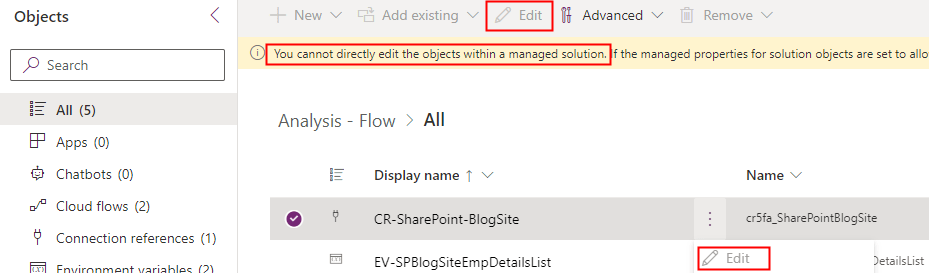
A connection reference is a component in a solution that holds information about a connector. It can be used by both a Canvas app and Power Automate flows. When importing a managed solution to an environment, the user is asked to either select an existing connection or create a new one. However, once a managed solution is imported, it cannot be edited as shown below
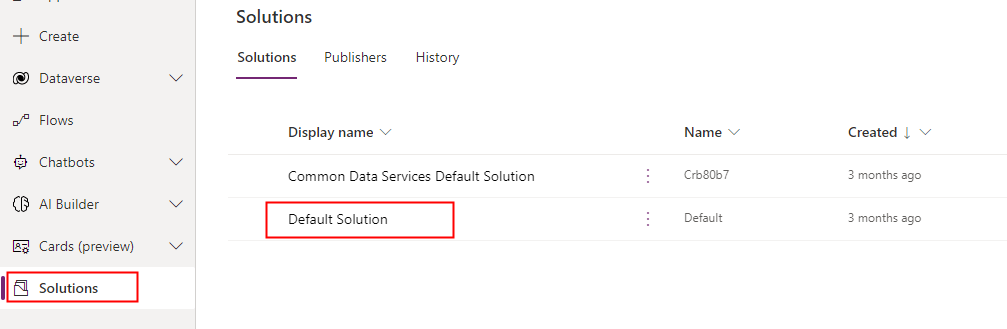
The solution to this is to use the Default Solution, which is a special solution that holds all the components within the environment.
Go to the Default Solution as shown below
To change a connection in a connection reference:
Go to Connection references
Select the connection reference you want to edit
Click “Edit” button.
Change the connection and then click Save
This will update the connection to a new user.
Do you like this article?
Subscribe to my blog with your email address using the widget on the right side or on the bottom of this page to have new articles sent directly to your inbox the moment I publish them.
In the last post, we have seen till the installation of the Teams App with the Bot on a Microsoft Team. Let us now continue to send a proactive message, be it an Adaptive card or a simple Text message on a Teams channel using Bot Framework REST API from a Power Automate Cloud Flow.
A proactive message is any message sent by a bot that isn’t in response to a request from a user. Ex: Welcome messages, Notifications, Scheduled messages, Broadcast message etc
Power Automate Cloud Flow:
For this blog post, I have used a Power Automate Instant cloud flow with manual trigger to send the message to a Teams Channel. To follow along the blog post, be ready with the following information
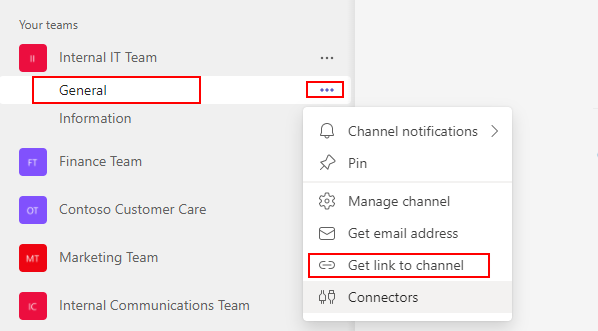
Team ID & Channel ID
This information is required to send the proactive message to a Microsoft Team Channel. To get this information, in Microsoft Teams Client identify the Team channel in scope > Click the ellipsis of the channel in scope > Get link to channel as shown below
After decoding the channel link, the url will be in the format as shown in the below image from which you can get the channel Id and Team group ID
If you are building a Teams broadcaster or communicator application using Power Apps, these information can be stored in Table or a SharePoint list. There are Graph API endpoints which can used to get the Channel Id’s etc.
The service URL is the base URI for all Bot framework API requests. In Teams the service URL will change based on user’s region [EMEA, America, APAC, India etc]. This example delivers messages only on the Team channel and not to the users directly so you can choose the service URL based on the Microsoft 365 Tenant Location. Find below some URL’s based on region
All the required information is now available to proceed with sending the channel message using REST API.
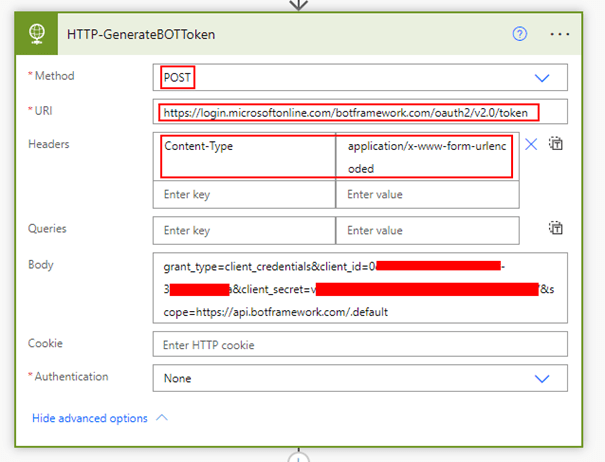
Generate Access Token – Bot Framework REST API:
There are SDK’s in Bot Framework for programming languages like .NET, JavaScript, Python etc to handle all conversations for you but an alternative to using the SDK is leveraging Bot Framework REST API. The first step in using the different REST API endpoints from Bot Framework is to generate an access token which is then added to the Authorization header of each API request in this format
Authorization: Bearer ACCESS_TOKEN
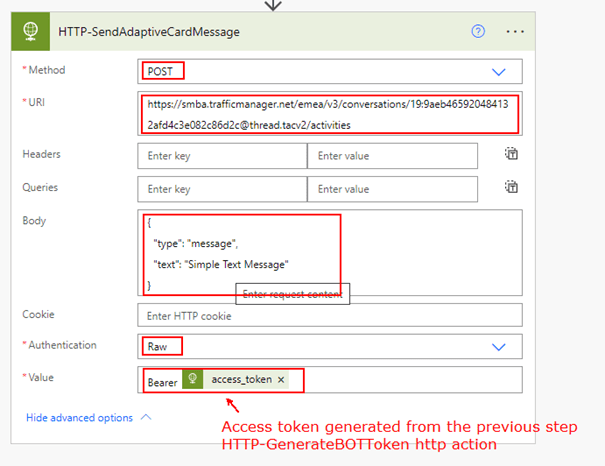
To request an access, make a HTTP request per the following details
Replace the botId and botSecret with the values stored from the previous steps. The Bot Id and the secret are from the custom Teams app created based on the previous post.
Add a HTTP Action in your Power Automate flow to add the above details for generating the token
The JWT access token is valid for 24 hours, if the token expires make another request.
Send Teams Channel Message:
The Teams Channel conversation post or proactive message on a channel can now be sent using the REST API to Create Conversation with the access token generated in above step.
Simple Text Message:
Find below the HTTP request detail to send a simple proactive message on a Teams Channel. The conversation Id is the Teams Channel Id
Replace teamsChannelId (conversationId) with the actual Team channel Id
Body:
{
  "type": "message",
  "text": "Simple Text Message"
}
Authorization Header: Bearer access_tokenvalue
The Authentication of the HTTP action should be set to Raw, the value should be in the format
Bearer access_token
You can use Parse JSON Action to extract the access token from the previous HTTP action HTTP-GenerateBOTToken or you can directly get the value using the following expression
body('HTTP-GenerateBOTToken')?['access_token']
The above HTTP request will create a HTTP response with the activity id which can be potentially used to send a reply etc.
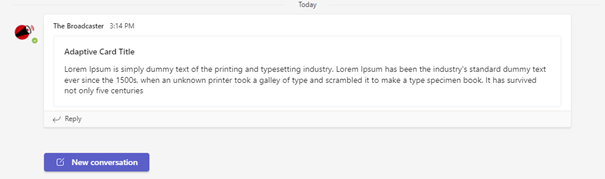
Adaptive Card Message:
Adaptive cards are platform-agnostic snippets of UI authored in JSON that different Microsoft apps and services like Teams, Outlook can use. It can be designed using the Adaptive Card designer portal. To send an Adaptive to a Teams Channel, everything else remains the same when comparted with above give HTTP request for the Simple Text message except the Body as below
{
  "type": "message",
  "attachments": [
    {
      "contentType": "application/vnd.microsoft.card.adaptive",
      "content": {
       "msTeams": {
          "width": "full"
        },
        Replace the ADAPTIVE CARD JSON PAYLOAD from the designer portal
      }
    }
  ]
}
You can get the complete body of request from this Link. This method can be used to send the message on any standard channel but not on Private Teams channel, Microsoft has not opened the possibility to send a channel message on private channel using a Bot. Find below adaptive card message posted on the Teams Channel from the Power Automate flow
Summary:
There are lot of possibilities with the Bot connector service REST API, what I have shown above is only an endpoint to send a message in a Teams Channel. Look at this documentation on the available conversation operations like Reply, Delete, Update conversation etc. Using this approach you can build a Company broadcaster app with the possibility of reaching out to multiple Teams without the user being the member or owner of the Team. If you are visiting my blog for the first time, please do look at my other blogposts.
Do you like this article?
Subscribe to my blog with your email address using the widget on the right side or on the bottom of this page to have new articles sent directly to your inbox the moment I publish them.
SharePoint connector in Power Automate is very rich with various actions that can make the developers or makers life simple when it comes to interacting with SharePoint data. There might be some actions like
Breaking permission to a list item
Creating a site
Adding user to a SharePoint group etc
which is not possible through the SharePoint standard connector or MS Graph API as of the time I am writing this article, SharePoint REST API to rescue. The SharePoint online REST API enables developers to remotely interact with SharePoint data. There is an action Send an HTTP request to SharePoint which could come handy in many scenarios, the point to note here is the action uses the context of user aka flow creator while executing the API. In this blogpost, let us see how to call a SharePoint REST API to create a Modern SharePoint communication site as an application in a Power Automate cloud flow using the HTTP connector with the help of a Self-Signed certificate. Find below the list of steps to enable calling the SharePoint REST API using certificate credentials
Creation of Self-Signed certificate
Application Registration in Azure AD Portal
Creation of Power Automate cloud flow with the HTTP Connector
Method 1: Without using Azure Key Vault
Method 2: Azure Key Vault to store Certificate
Pre-Requisites:
Access to HTTP Premium Connector in Power Automate
Register an application in Azure AD and obtain the client id & tenant id for the registered application. In this example I have added the Sites.Read.All Application permission with Admin Consent to create the SharePoint communication site, this permission is more than enough to create the site as an Application. Grant appropriate permission based on the requirements, for e.g to break permission on list items grant Sites.Manage.All. Find below screenshot for your reference for granting permissions
To add the above created self-signed certificate, click Certificates & secrets under the Manage blade. Click Upload certificate > Select the certificate file MSFlow.cer > Add
Creation of Power Automate cloud flow with the HTTP Connector:
Let us see below how to access the SharePoint REST API to create a SharePoint site with & without using the Azure Key Vault.
Method 1: Without using Azure Key Vault
Method 2: Azure Key Vault to store Certificate
Method 1: Without using Azure Key Vault
In the cloud flow, add a Compose action to store the PfxBase64 value copied during the creation of the certificate. Now add the HTTP action to create a Modern Communication site
Password: Certificate password given during the creation
Find below screenshot for your reference
Run the flow, it should be able to create the Site. Find below screenshot of the flow run
Method 2: Azure Key Vault to store Certificate
Azure Key Vault is a cloud service for storing and accessing secrets enabling your applications accessing it in a secure manner. Follow my blog article which I have written to call a Microsoft Graph API with Certificate using a Azure Key Vault to store the certificate
Custom Connector can be used to call a SharePoint REST api in the context of the user. If you are visiting my blog for the first time, please do look at my other blogposts.
Do you like this article?
Subscribe to my blog with your email address using the widget on the right side or on the bottom of this page to have new articles sent directly to your inbox the moment I publish them.
In Modern SharePoint lists you can display list item content in a more modern way using the Tiles view layout. If you have very big list with multiple columns along with picture columns you get a horizontal scroll bar on the list view, the Tiles view can solve this issue since the content will be displayed on the tile card where you can design the layout of the tile card to display the different list column values.
There are many blog posts & PnP Samples which will help you to create a Tiles view using JSON row formatting. If you are new to JSON row formatting, I recommend you to go through this link from Microsoft. Microsoft has recently brought in interface to format the list item row & do conditional formatting by creating rules based on column values
On this blog post, lets see how to create Tiles view as shown above for the Images stored as attachments in the list item. If you add an attachment to list item in SharePoint list, the attachments are stored in the following path
Power Automate Flow: To get the path of the attached file (Image file in this case), we will be creating an automated Flow which gets triggered on List item creation to get the path of the image & update it to the custom hyperlink list column (ProductPhotoHL).
JSON: To create a Tile view layout using list row view formatting.
Pre-Requisites:
Create a SP List by the name ProductInformation with the following columns
Title: Single line of text
ProductPhotoHL: Hyperlink (to the image)
ProductPhotoPic: Picture (to the image)
ProductPrice: Number
Features: Multiple lines of text
Couple of list items with Images as attachments after the Power automate flow is created
Only images as attachments
Not more than one image as an attachment
Power Automate to get the path of the Image attachment URL:
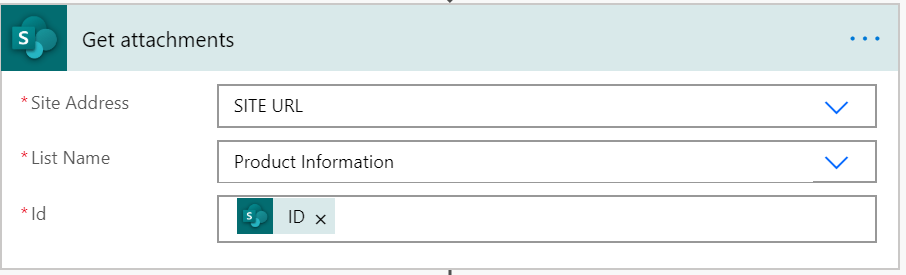
Create an automated flow with Trigger When an item is created and configure the trigger to the ProductInformation list. Add the Get Attachments action connected to the Product Information list & for Id parameter it should the List item Id (ID) selected using the dynamic content from the trigger When an item is created.
Now with the above action we have the attachment URL of the image, this must be updated to the list column ProductPhotoHL & ProductPhotoPic of the ProductInformation list in order to be displayed in the Tile view. To create the above shown Tile view ProductPhotoPic (Picture) is not required but I’ve used it show you that we can create a Thumnail of the image on the default list view using the Picture column ProductPhotoPic. By the time I am writing this post the Power Automate action Update item is not capable to update a column with Picture as a DataType but it can update a HyperLink column. Action Send an HTTP request to SharePoint to make HTTP requests to any SharePoint Rest endpoints, I’ve used this action to update the ProductPhotoPic (Picture) column as below
I’ve said this on the pre-requisite section that there should not be more than one attachment. In the Body of the HTTP request, the Url parameter for the ProductPhotoHL & ProductPhotoPic gets only the first attachment URL from the previous action “Get attachments” AbsoluteUri as dynamic content. To get the first attachment URL you can use any of the following formula from the expression
first(body(‘Get_attachments’))?[‘AbsoluteUri’]
body(‘Get_attachments’)?[0]?[‘AbsoluteUri’]
I’ve used the function first() to get the first item from the array. The flow is ready, add couple of items to the list by filling in information only for Title, ProductPrice, Features & a Image as an attachment. The flow gets triggered which will update the ProductPhotoHL & ProductPhotoPic with the image attachment url. You can download the flow template from the following GitHub repo link.
Create Tiles View layout using JSON:
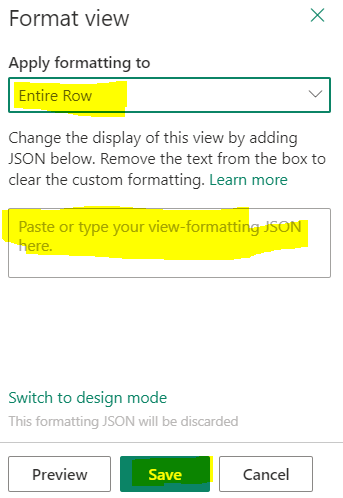
I’ve used the sample from PnP List view formatting samples to create items in tile layout for images. On the sample JSON I’ve updated the column ProductPhoto to ProductPhotoHL. The updated JSON is available here for download. Now copy the JSON & go to the List view & click on the down arrow (All Items)>Format current view>Advanced mode as shown below
The Apply formatting to should be set to Entire Row & paste the JSON to box as shown on the picture and then Save it.
Now you will have another layout by the name Tiles added to the existing layouts List & Compact List as shown below, select it
Now its time to see the need for the column ProductPhotoPic of datatype Picture, with the default layout you can see the thumbnail of the image added as an attachment
Summary: There are many samples available in PnP Github repo for List Row View & Column view formatting. In document & picture libraries the Tiles view layout are added by default, there is also a Column by the name Thumbnail in a Picture library. You can display a Thumbnail view of Images in PowerApps gallery for the Images stored in Document library, go through this link for more information. If you are storing images on a seperate document library & not as an attachment, the url of the image can be added on the HyperLink column. Hope you find this interesting & helpful.
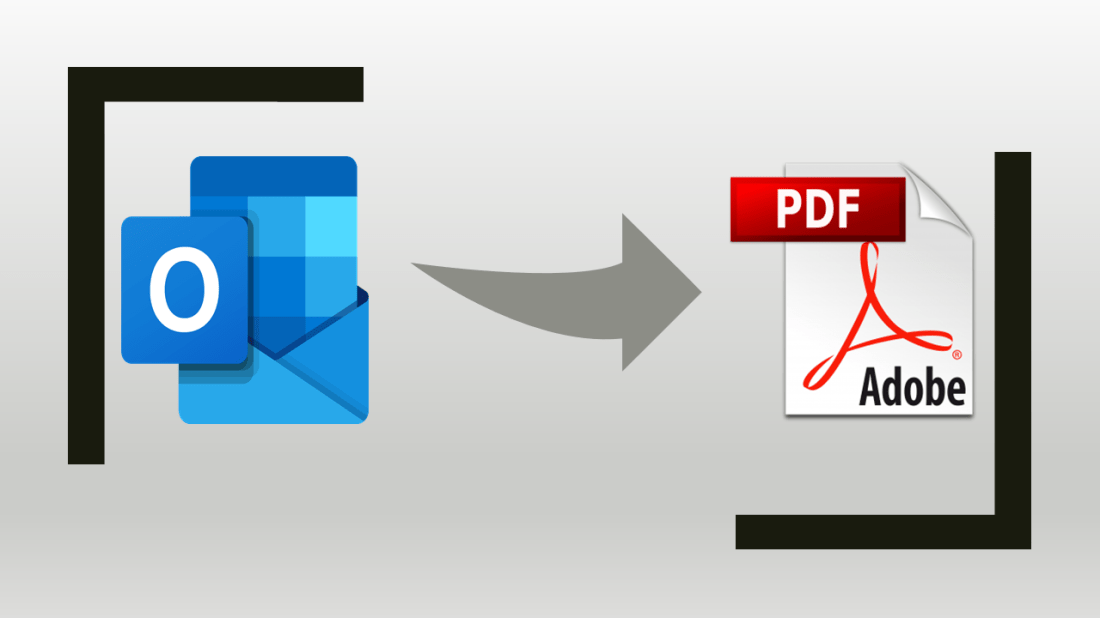
Recently I’ve came across a business case with need to automate the conversion of Outlook email messages with embedded images to PDF document. This could be done manually on Outlook client using Microsoft Print to PDF or browser Print if opened using Outlook on the Web. This process can be automated with the help of PowerAutomate trigger When a new email arrives and actions Export Email, Convert File, Create file but if an email has an embedded image or HTML content it will not work as of now. There are Third party connectors in Power Automate from Muhimbi, Plumsail which might have this functionality but I’ve not tested those yet. PowerAutomate action Export Email converts the email to .eml file.
An EML file is an email message containing the content of the message, along with the subject, sender, recipient(s), and date of the message in plain text format. Once you have the .eml file change the file extension from .eml to .txt where you can see the content. If there is any embedded image it will stored in the Base64 format. You can also change the .eml file extension to .mht and open it directly in Internet Explorer
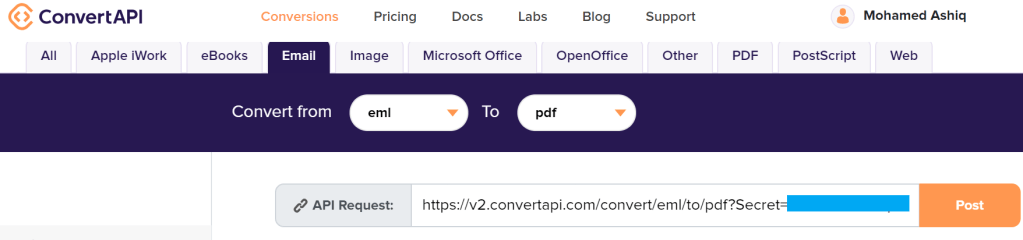
For this blogpost I’ve used third party API service from ConvertAPI to convert Email message to PDF, they have REST API endpoints to convert Word, Excel, PowerPoint, HTML, PDF and Image formats. There is also a Free Plan with ConvertAPI where you get 1500 seconds API execution time if you sign up.
You can also create your own API service hosted in Azure for conversion with the .NET libraries like iTextSharp, GroupDocs, PDFSharp etc. Let’s go ahead & create flow to
Convert Email to PDF – Without Embedded image
Convert Email to PDF – With Embedded image
The above two flows packages can be downloaded from Github repo.
Convert Email to PDF – Without Embedded image:
Power Automate connector OneDrive for Business has an action Convert file (preview) converts files to different formats such as PDF, HTML, JPG etc. This connector can be used to convert a simple email with out an embedded image.
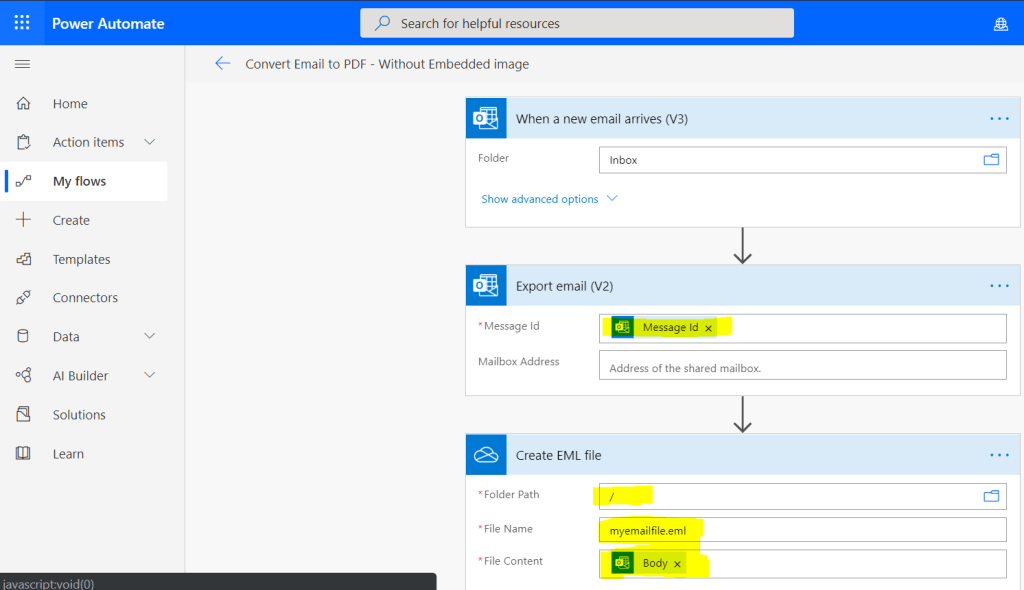
Step 1: Create a flow with Automated trigger When a new email arrives & configure the trigger parameters by clicking Show advanced options.
Step 2: Add the action Export email with Message Id from the output of the previous action. This action creates the .eml file
Step 3: Add the action Create file from the connector OneDrive for Business. Select the Folder path from your One drive, Enter the File Name for the .eml file & the File Content should be Body from the output of the action Export email (Previous). Find the screenshot below
Step 4: Add the action Convert file from the connector OneDrive for Business with Id from the output of the previous action Create File.
Step5: Add the action Create file from the connector OneDrive for Business. This step is for storing the PDF file back to the OneDrive. Select the Folder path from your One drive to store the PDF file, Enter the File Name for the PDF file & the File Content should be File content from the output of the action Convert file. Find screenshot below
Note: The storage location I’ve chosen is Onedrive, you can choose SharePoint, Azure blob etc. Based on the need you can choose to delete the .eml files after the file conversion is done.
Convert Email to PDF – With Embedded image:
As already said the previous flow will not convert an email with embedded image as expected. Be ready with the API endpoint from ConvertAPI to convert email to PDF. The endpoint will have the secret as a query string shown as below
Note: On this flow I will be using the .eml file generated from the previous flow.
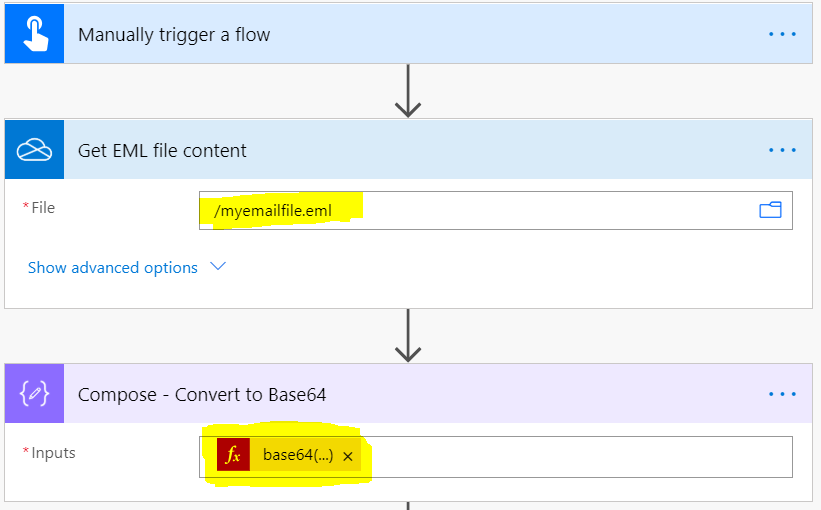
Step 1: Create a flow with Instant trigger Manually trigger a flow.
Step 2: Add the action Get file content from the connector OneDrive for Business. Select the .eml file which has the embedded image from the storage location i.e the file from OneDrive.
Step 3: Add the action Compose from the connector Data Operation. This step is to convert in to base64 representation a requirement for the convert API to work. On the Inputs file go to the expression editor and add the function base64(file content from the previous action get file) for converting .eml to base64.
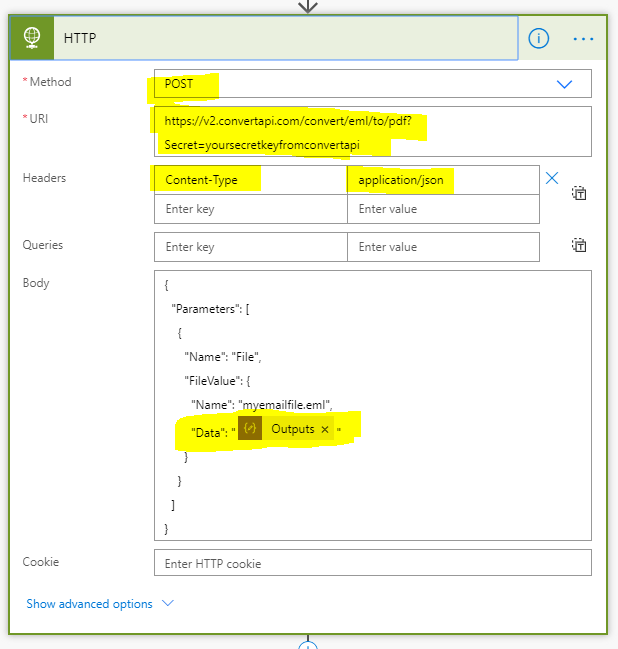
Step 4: Add the action HTTP (Premium) from the connector HTTP to make a POST request to the API convert API endpoint.
Body: You can generate this from the ConvertAPI site by uploading a .eml file on the site. Once this data is added to the HTTP action Body parameter change the Data parameter should be the Output of the previous action Compose – Convert to Base64
Step 5: Add the action Parse JSON from the connector Data Operation. This step is to parse the response of the HTTP POST action to the ConverAPI endpoint. You can generate the scheme by copying from the Flow run history for the HTTP action output. The schema will be look like
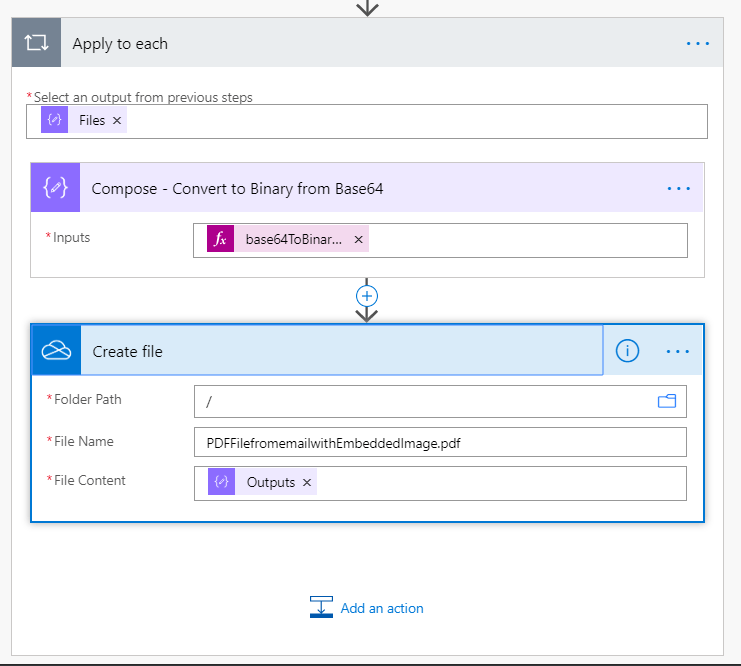
Step 6: Add the Compose action to convert the base64 data to binary to create the PDF from the HTTP request response. Select the filedata from the Output of the Parse JSON action which will automatically create a Apply to each since the Files is an array. Then add the following to the inputs of the of the compose action
Now add the Create file action from the connector OneDrive for Business as shown below. The parameter File content should be output of the Compose action. PFB the screenshot of the flow actions
Now its time to test the flow, run the flow & check your OneDrive for the PDF file. PFB the screenshot of the PDF file with embedded image
Summary: I am not vouching to use the ConvertAPI service for converting the email to PDF. Just a sample for a use case where you get some knowledge on different actions usage & some information on the .eml file which Microsoft has used for storing email content. If its going to be heavily used or if the data is secure, then I advise you to create a REST API endpoint of your own hosted in Azure for the conversion. Hope you find this post useful & informational. Let me know if there is any comments or feedback by posting a comment below.
In a modern SharePoint site you can create custom themes using PowerShell, REST API & CSOM. In this blogpost I will show you how to create themes using PowerAutomate. The following REST endpoints are available
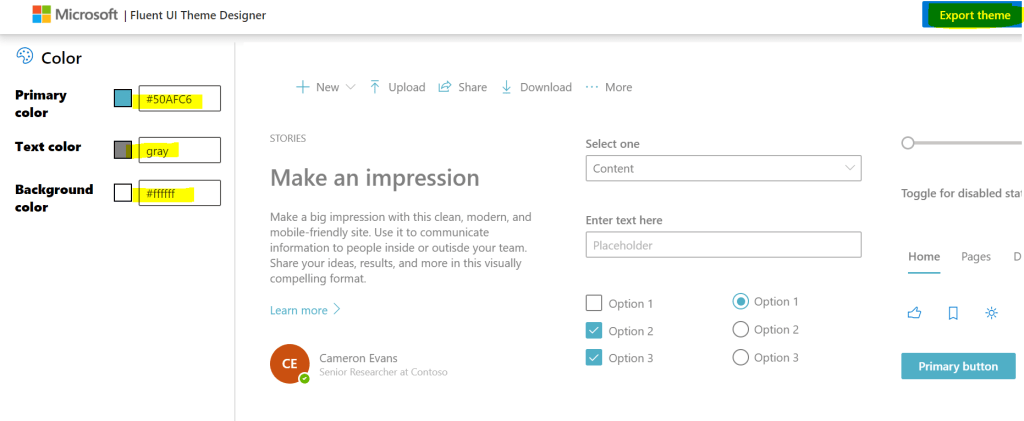
There is an online Theme Generator tool that you can use to define new custom themes. At the time of writing this post, the endpoints are open to everybody & not just to the SharePoint tenant admins which seems to be quite buggy. Laura Kokkarinen has written a very detailed blog post about this topic. I’ve got the inspiration to write about this topic from John Liu who has recently recorded a video about this. Find screenshot from the Theme generator tool:
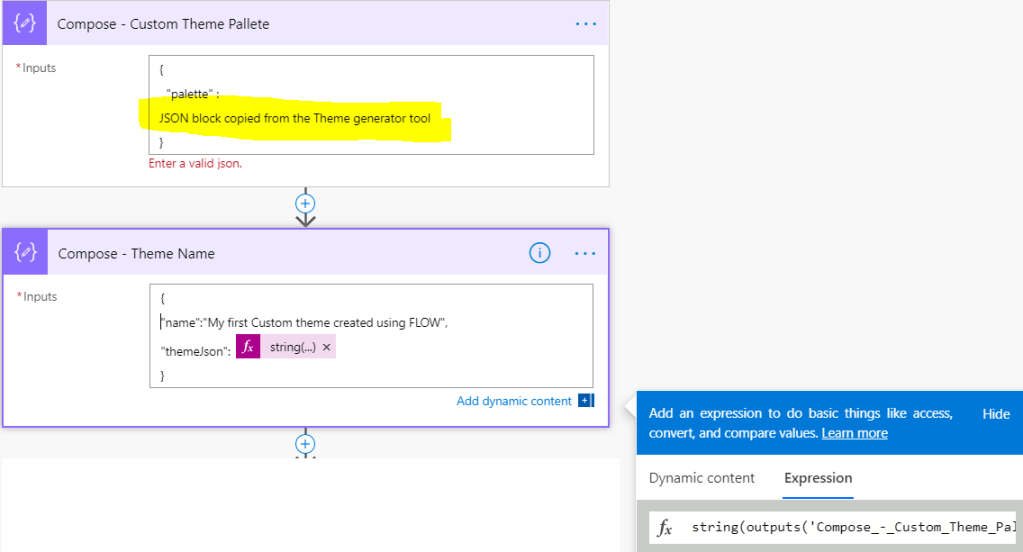
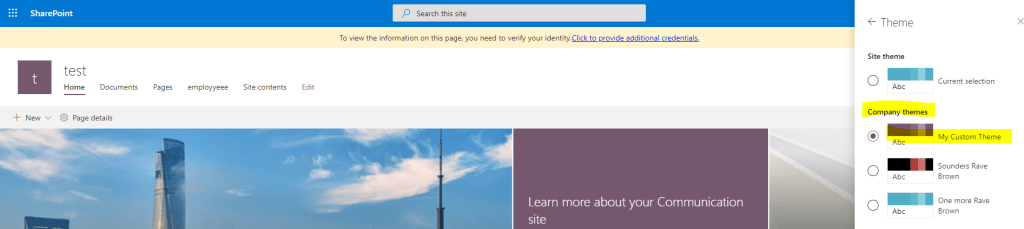
Once you have defined the theme from the tool, click on the Export theme button on the Right top corner of the tool to export the theme as a code block in JS, JSON & PowerShell. In this case, click JSON & Copy the generated block
Flow for Creating or adding the Theme to the tenant:
Let’s create an instant flow with trigger Manually trigger a flow to add a theme to the tenant. Add two Compose actions as shown below
The first compose action is the actual definition copied from the theme generator tool
{
  "palette" :
JSON block copied from the Theme generator tool
}
The second compose action has the name of the theme & its stringified JSON from the output of the previous compose action. To convert the JSON to string add a string expression on the dynamic content pane
{
"name":"My first Custom theme created using FLOW",
"themeJson": @{string(outputs('Compose_-_Custom_Theme_Pallete'))}
}
Now add the action Send an HTTP request to SharePoint with the following parameters
Most of us would have used PowerShell for SharePoint to manage SharePoint settings at the organization level and site collection level. SharePoint Online PowerShell commands are very efficient for batch operations for e.g creating multiple sites, list items etc. To use the SharePoint Online PowerShell commands
You must have the SharePoint Admin role or Global Administrator role in Office 365
Install the SharePoint Online Management Shell module
As you know you must be administrator to install a PowerShell module on your workstation which not everyone will have in corporate environments.
I often use a PowerShell script to enable App Catalog at a site collection level to test the PnP webparts & extensions before deploying at the tenant level app catalog based on requirement. If you are not an SPO admin then the dependency is with the SPO admin. In this blogpost I am going to show you how to automate this process by executing PowerShell script to enable App catlog in Azure using Power Automate.
Pre-requisite & permissions:
SPO Admin
Azure Subscription to create Automation account
Access to Premium connector (Azure Automation) in Power Automate
SharePoint List to collect details about the site which needs to have App catalog enabled
To complete this automation process, create the following two components
Automation account in Azure with a Run Book to execute PowerShell script for enabling App Catalog in SP site
Power automate flow to call the Run Book
Automation account in Azure with a Run Book to execute PowerShell script for enabling App Catalog in SP siteAutomation service in Azure is a cloud-based automation and configuration service that supports consistent management across your Azure and non-Azure environments. Go through the documentation from Microsoft to know about this powerfull service in Azure. Let’s use the service in Azure to create a simple Runbook with PowerShell code to enable App catalog in SPO site, you can do much more than this using this service. Refer to this link for the pricing details for the automation service in Azure.
Step 1: Go the Azure portal & create a resource Automation
Enter the name of the automation account, select the Subscription & resource group & click Create
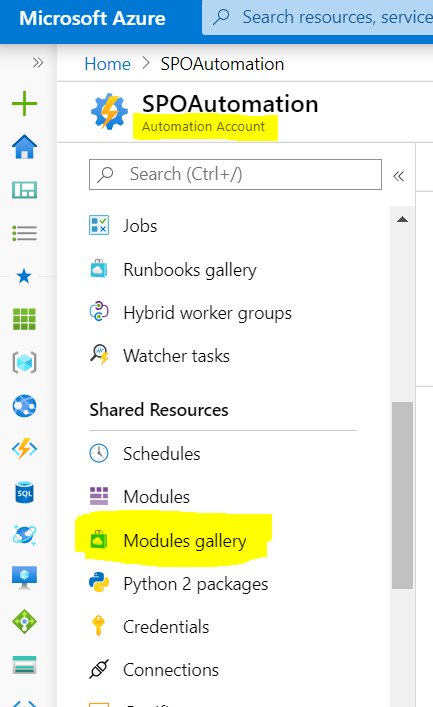
Step 2: After the resource is created, go to the resource & click Modules Gallery under the section Shared Resources as shown below to add the PS SPO module
Search with the keyword “SharePoint” & click “Microsoft.Onlie.SharePoint.PowerShell” and then click Import. This step will the add the SharePoint online PowerShell module for us to use the available PS SPO cmdlets in Runbook.
Now click modules & verify if the SPO PowerShell is added & available.
Step 3: The next step is to add the user credentials (Username & Password) of the SPO admin which is safe & secure by not hardcoding the password on the Runbook. You can also use certificates or AppID AppSecret in PnP online Powershell for creating connection to SPO.
Step 4: Now we are good to create the Runbook, to create it click Runbooks under the section Process Automation and then click Create a runbook. Enter the Name of the Runbook, select the Runbook type to PowerShell and click Create.
Now let’s add the code by editing the runbook to enable app catalog. The section Dynamic Parameters on the code will be passed from flow. To connect to SharePoint Online we are using the SPO admin credentials created in the previous step. Find the code below
# Dynamic Parameters
param(
  [parameter(Mandatory=$true)]
  [string]$SiteURL = "https://domain.sharepoint.com/sites/contosoportal",
  [parameter(Mandatory=$false)]
  [boolean]$enableAppCatalog = 1
)
# Credentials
$myCred = Get-AutomationPSCredential -Name "SPOAdminCred"
# Parameters
$AdminSiteURL = "https://domain-admin.sharepoint.com"
# Connect to SharePoint Online
Connect-SPOService -Url $AdminSiteURL -Credential $myCred
# Get the Site Collection
$Site = Get-SPOSite -Identity $SiteURL
# Enable App catalog
if($enableAppCatalog)
{Add-SPOSiteCollectionAppCatalog -Site $Site}
# Disable App catalog if false
else{Remove-SPOSiteCollectionAppCatalog -Site $Site}
# Get Site Collection Title
Write-Output $Site.Title
The runbook is now created, you can test the script by clicking on Test Pane & pass parameters (Site URL etc) to test it. Click Publish button as shown below to publish so that it can be called from Power Automate. It’s now time to create the flow
Power automate flow to call the Run Book
You can now create a flow with automated trigger from a SharePoint list to get the site url & Boolean value either to enable or disable the app catalog on the site. Here I will be using an Instant flow with trigger “Manually trigger a Flow”
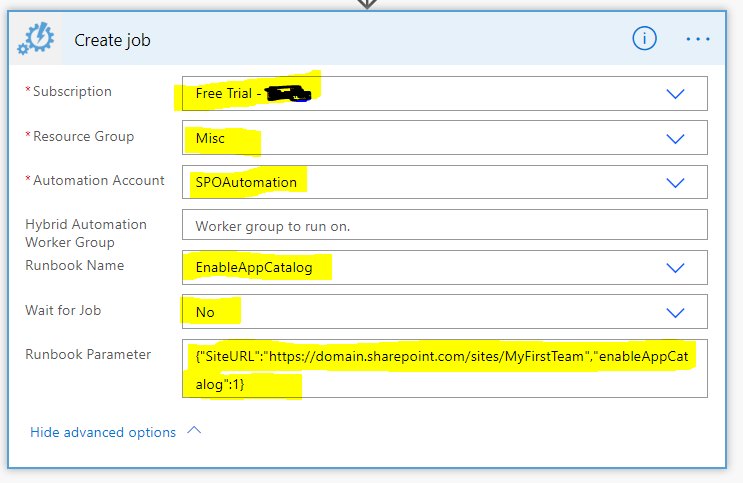
Once the flow is created, add the action “Create Job” under the connector “Azure Automation” which is a premium connector.
Select the Azure Subscription which has the Automation account resource with runbook>Select Resource Group>Select Automation Account>Select the Runbook name which has PS script to enable app catalog. If there is a need to wait until the automation job completes then select Yes on the field “Wait for Job”. For the dynamic parameter, write a JSON to pass the mandatory & optional parameters to the runbook script. On this example I will be passing the Site URL & Boolean value to either enable or disable app catalog using JSON as below
If using a SharePoint list, construct the above JSON dynamically with the URL
For the runbook parameters, you might also get an interface as shown below to pass the values (Site Url & enableAppcatalogbooleanvalue).
The flow is ready, run it to test now with parameters.
Summary: The use case I’ve chosen is a simple one but azure automation can be a more powerful service to perform various automation tasks. Find few below
Write Python script in the Runbook
Many samples are available within the Runbook gallery (Create AD user, Display All provisioned site collections etc) under the section Process automation.
With the PowerShell type Runbook all the PS modules (Azure AD for automating AD account creation, PNP SP Online etc) are readily available for us to import easily.
There is a feature by name “Hybrid Runbook Worker Feature” available within Azure Automation account for us to connect Onpremise resources in Azure (e.g SharePoint Onpremise, Onpremise AD etc).
Create a Webhook to call the runbook from an External application by making a POST call
Call a custom built dll by importing them in to the Modules section
Create graphical Runbook with GUI to add cmdlets & to configure the steps
Has there been a requirement or a need to change the owner/creator of the PowerApps or a Flow built by your organizational users? There could be various reasons for this request
App/flow creator would have left the organization
App/flow creator would have changed role within the organization
Handing over the app to the operations team…
By the time I am writing this post there are no Powershell command or actions available in Flow/PowerApp to change the original Owner of the flow but still you would be able to assign a Owner for the flow created by an user who has left the Organization from the Flow Admin center, I will cover the steps on this post. The good news is Microsoft has plans to release this feature as per this user voice request.
Prerequisite: Environment Admin or Power Platform Admin
Change the Owner of a Power App:
There are different ways to change the Owner of Power Apps using
# This call opens prompt to collect credentials (Azure Active Directory account and password) used by the commands
Add-PowerAppsAccount
Set-AdminPowerAppOwner -AppName '6aac46a2-a0f3-43f3-a2fb-51111785437c' -AppOwner '4cea7f11-c013-4bee-a6d1-ae3381a7f386' -EnvironmentName 'Default-2r6e8761-108d-417e-9bb4-e7c4e3ba2e23'
EnvironmentName is the environment of the PowerApp you would like to change the Owner. To get the environment name, the powershell command will help Get-PowerAppEnvironment
App Name is the App ID of the PowerApp. To get this information run the command Get-PowerApp ‘Name of the powerapp’
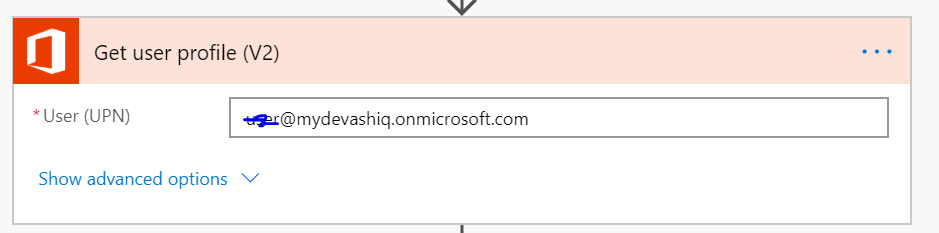
AppOwner is the Azure Active directory object id of the new Owner. It is the Unique id of the user in the tenant, you can get this information in multiple ways. To get it from flow, the following action would help. The outputs of this action should have the attribute Id which is the id of the user to be passed on the Powershell command.
The old owner will get viewer access to the app but you can get it changed if required. For other Powershell cmdlets for PowerApps & flow refer this article from Microsoft.
PowerShell Tip:
To get help on any Power shell cmdlet, type Get-Help cmdletname (e.g get-help Set-AdminPowerAppOwner). To get some examples type get-help Set-AdminPowerAppOwner -examples
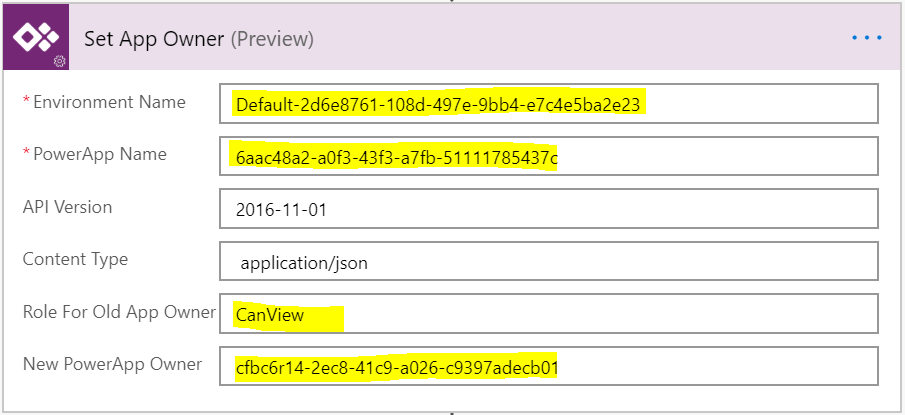
PowerApps for Admin Connector in Flow:
There is a preview action by the name “Set App Owner” under the connector PowerApps for admin which also helps you to change the owner of the PowerApp
PowerApps for Admin Connector in PowerApp:
The same connector used in the flow can also be used in PowerApp to change the owner for the powerapp. There is a Powerapps tool Connector Browser Tool from Microsoft to test the PowerApps for Admin connector which can be used to change the Owner of the app. The app is available as a package for download from this link, the link to the blogpost from Microsoft. You can select any actions, after entering values for the parameters click Submit.
You can test connector for Flow as well on this tool.
Assign a new Owner to a Power Automate Flow:
A new Owner can be assigned to an existing Power Automate flow by using the
Assign an Owner for a Flow created by an user who has left Organization by using PowerShell:
After installing the PowerShell module for PowerApps cmdlet for Administrators, enter the following command to get the Object ID of the user who created the flow
Establish a connection to use the Power cmdlets by entering the following command which opens a prompt to collect credentials (Azure Active Directory account and password of Power Platform Administrator or Global Admin)
Add-PowerAppsAccount
After copying the ObjectId of the user, enter the following PowerShell command Get-AdminFlow to get all the flows created by the user
Get-AdminFlow -CreatedBy userObjectId
The above command provides you the information of the Flow details. Copy the FlowName in GUID format and EnvironmentName. Now to assign a new Owner, enter the Set-AdminFlowOwnerRole command after changing the userObjectId, flowNameGUID and the environmentGUID
If you get a 200 OK then the new owner is assigned to the Flow. You can also remove an Owner by the following command, the only catch is you will not be able to remove the creator of the flow
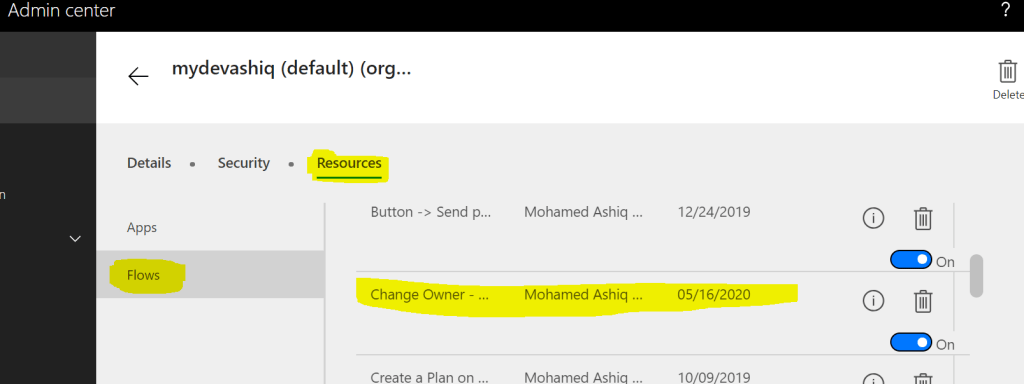
Assign an Owner for a Flow created by an user who has left Organization by using the Admin Center:
This can be done by connecting to the Flow Admin center, click the environment which has the flow
Click resources & then click Flows
Then look for the flow which needs the update, click the flow & click Manage sharing to add Owner
You can also export the flow as a package & then recreate it to have a new Owner. Follow this blogpost from Microsoft.
Summary: On this post, I’ve covered different ways to update the owner for PowerApps & Flow using Powershell & Admin connector in Flow & PowerApps. Hope you find this post useful & informational. Let me know if there is any comments or feedback below.
A decade back I was part of a team to automate the On & Offboarding process of employees for a customer using .NET framework, it had a module to provision user accounts in an on-premise environment. I still remember having used couple of dll’s for Active directory 2003 & exchange 2007 to create AD & Email account. It was not easy but nowadays with the Office 365 in place its so easy to create account & enable different Office 365 services (Exchange, SharePoint, Yammer etc) for a user in Azure Active directory. This example will be applicable for the Organization which does not have On-premise Active directory. Organizations having On-premise active directory, the user account’s will be synchronized from On-premise AD to Azure AD. On this post I am going show you how to
Create Azure AD account & assign license using Power Automate
Assign License using Graph Endpoint
Create Azure AD account & assign license using Power Automate:
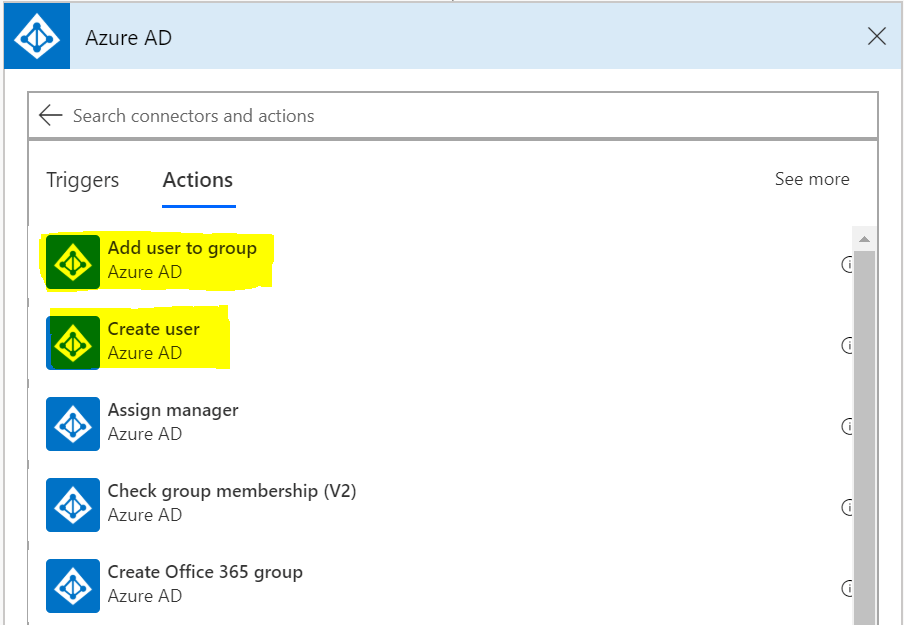
There is a Power Automate action Create user under the connector Azure AD which helps us to create account in Azure AD but there is no action as of now to assign individual license to a user but we can overcome this by adding the user to the AD security group which has a license assigned to it.
There is a flow action Add user to groupunder the same connector for adding the user to the security group, all the members of the group will get the license assigned on that group. The Azure AD connector does not return custom attributes of Azure AD. For e.g you can’t assign a value to a custom AD attribute with the Create user action, if you want to assign a custom attribute or an attribute which is not exposed in the Create User action then the account has to be created using PowerShell. There are ways to call a PowerShell script from Azure Automation Runbooks with the help of a flow action.
Other Azure AD actions apart from the above screenshot which could be of use are
Create group
Get group members
Get groups of a user
Get user
Remove Member from Group
Update user
There are templates available in Power automate template section which helps you create account based on the information from the SharePoint List, based on HTTP request etc
Prerequisite:
Permissions on Azure AD:
Group.ReadWrite.All
User.ReadWrite.All
Directory.ReadWrite.All
Security group with license assigned
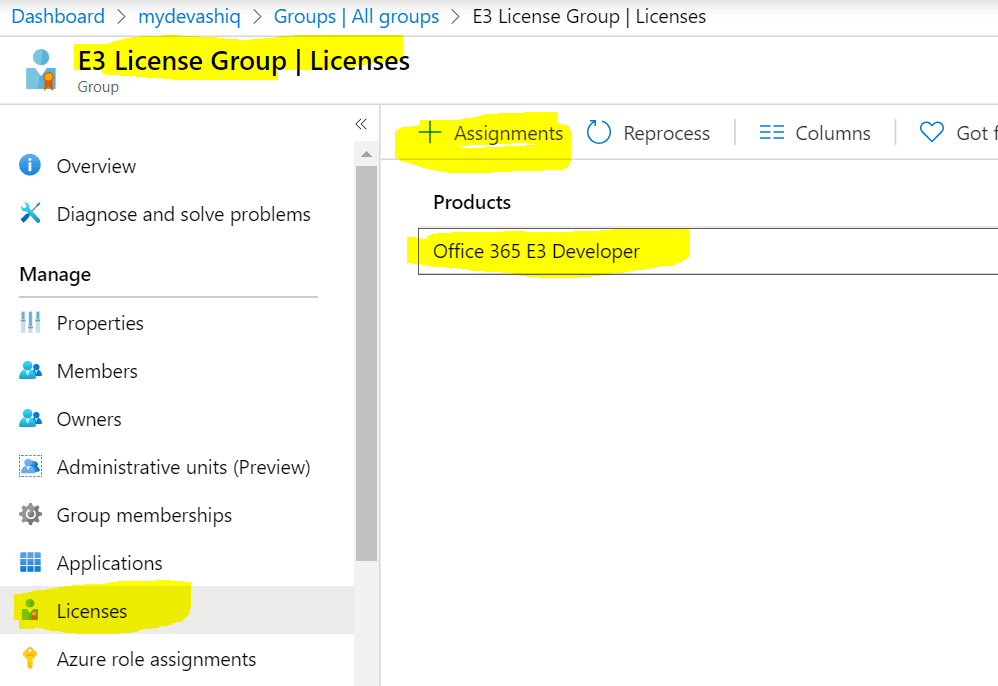
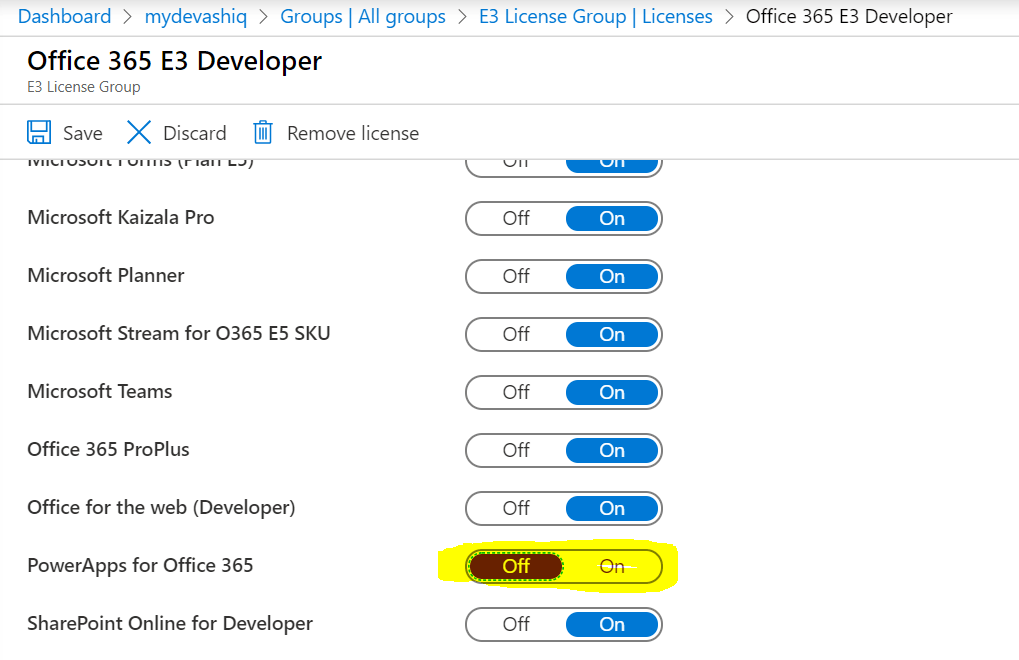
For assigning a license to Security group, go to Azure AD Admin center. Follow this documentation from Microsoft to assign license to a group.
You can also turn off certain services from the license to the group, for e.g Turning off the Power App service for the user
You can also use dynamic groups for assigning license to a user, if you have dynamic group based license assignment to a user then you could ignore the step on the flow to add user to the security group. Dynamic groups works based on rules to determine group membership, for e.g if a user has an AD attribute set for Department. In this case the AD user created with certain department will get automatically added to the group which will in turn assign a license to the user.
Let’s now create the flow, I have used an Instant flow with trigger Manually Trigger a flow. Add the action Create user from the connector Azure AD
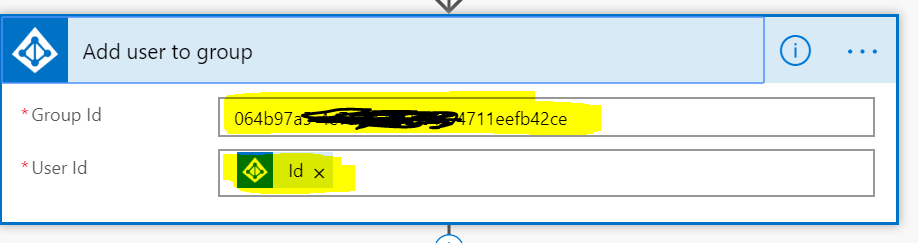
Now add the action Add user to group, the Group Id should be for the Security group which has a license assigned to it. The User Id field should be dynamic value Id from the previous action Create user.
To get the group Id, go to Azure AD
Run the flow. Once the flow runs successful the user account will be provisioned on Azure Ad with a license.
Assign License using Graph Endpoint:
There is a beta graph endpoint to assign license to a user. Find the Microsoft documentation for more information
All types of license (E5, E3, PowerApps, Power etc) has a Service Plan id also called as SKU id. Find the list of SKU id’s on this link if your tenant has procured the license for the service
The first SKU id is for Enterprise Mobility & Power BI (Free)
To remove the license for a user, use the collection removeLicenses. This graph endpoint to assign license can also be called from a Flow.
Summary: You can also use a HTTP request trigger in the Flow for integrating with other applications. On next post I will write about creating account in On-premise Active Directory. Hope you find this post useful & informational. Let me know if there is any comments or feedback below.
This is in continuation to my earlier post using Adaptive card for collecting information in Outlook also known as Outlook actionable message. On this post I am going to show you how to collect information from a user in Teams and storing the values back in a SharePoint list. The following Power Automate actions under Microsoft Teams connector are now available in preview mode which helps us to capture data back from a Teams adaptive card meaning you would be able to make POST calls back to the flow by click of a button (Action.Submit) on the Adaptive card
Post an adaptive card as the Flow bot to a Teams user, and wait for a response
Post an adaptive card as the Flow bot to a Teams channel, and wait for a response
Once an Adaptive card is posted in Teams using the above actions, the flow run will not continue until the recipient or someone in the channel (if sent to channel) responds to inputs that are required within the card till then the flow is put on wait for maximum period (Async calls) of 30 days as per the documentation. Post that period the flow will time out if no one responds to the card. There can be use case to collect responses from users in Teams & post it to Azure services like SQL etc, this avoids the users to have access to premium services or license since the card is sent using Power automate. The use case I’ve chosen for this post is to collect Name & Email address of a teams user by sending them an input form which stores the responses in a SharePoint list after the user responds. Find the resources I’ve used for this example
Let’s start by designing the card using the Adaptive card designer. Click on Open Sample, select Input Form as shown below
Then change the host app from the default Bot Framework Webchat to Microsoft Teams – Light (Optional Step). Remove the Phone number Text Block [Element] & the corresponding Text.Input [Inputs] field to keep it simple & I’ve also changed the Adaptive card image URL on the right column to the following URL since the image default image on the sample has got some issues rendering on teams. Find some information on image size & resolutions limits here.
Click Copy Card JSON from ribbon for this card to be used on the flow. We now have the adaptive cards JSON ready with us, let’s go ahead and the create the flow using Power Automate. Find the generated JSON below
{
    "$schema": "http://adaptivecards.io/schemas/adaptive-card.json",
    "type": "AdaptiveCard",
    "version": "1.0",
    "body": [
        {
            "type": "ColumnSet",
            "columns": [
                {
                    "type": "Column",
                    "width": 2,
                    "items": [
                        {
                            "type": "TextBlock",
                            "text": "Tell us about yourself",
                            "weight": "Bolder",
                            "size": "Medium"
                        },
                        {
                            "type": "TextBlock",
                            "text": "We just need a few more details to get you booked for the trip of a lifetime!",
                            "isSubtle": true,
                            "wrap": true
                        },
                        {
                            "type": "TextBlock",
                            "text": "Don't worry, we'll never share or sell your information.",
                            "isSubtle": true,
                            "wrap": true,
                            "size": "Small"
                        },
                        {
                            "type": "TextBlock",
                            "text": "Your name",
                            "wrap": true
                        },
                        {
                            "type": "Input.Text",
                            "id": "myName",
                            "placeholder": "Last, First"
                        },
                        {
                            "type": "TextBlock",
                            "text": "Your email",
                            "wrap": true
                        },
                        {
                            "type": "Input.Text",
                            "id": "myEmail",
                            "placeholder": "youremail@example.com",
                            "style": "Email"
                        }
                    ]
                },
                {
                    "type": "Column",
                    "width": 1,
                    "items": [
                        {
                            "type": "Image",
                            "url": "https://download-ssl.msgamestudios.com/content/mgs/ce/production/SolitaireWin10/dev/adapative_card_assets/v1/tile_spider.png",
                            "size": "auto"
                        }
                    ]
                }
            ]
        }
    ],
    "actions": [
        {
            "type": "Action.Submit",
            "title": "Submit"
        }
    ]
}
Flow Creation:
Create an Instant flow with trigger “Manually trigger a Flow”, this will post an Adaptive card to a Teams user with the Input form which collects response to a SharePoint list. Create a SharePoint list with two columns for us to store the Name and Email submitted from the adaptive card on Teams.
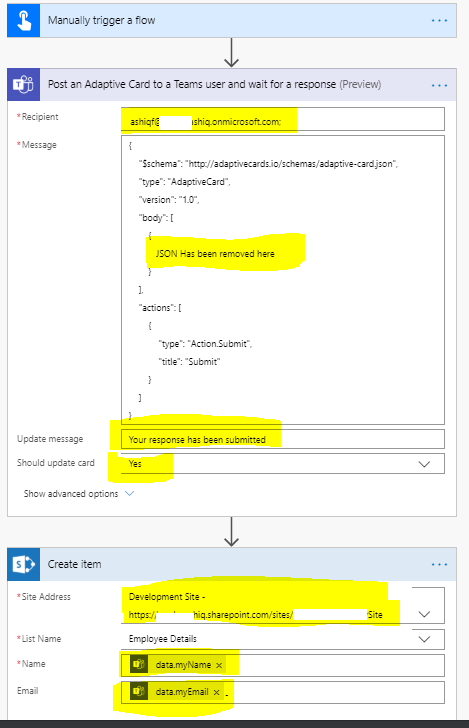
Add the flow action “Post an adaptive card as the Flow bot to a Teams user, and wait for a response”, on the action
Enter the email address of the user in the Recipient field
Paste the JSON copied from the card designer in the Message field
Enter information to be shown to the user on the field Update message after the Submit button is clicked
Field Should update card to be set as Yes
Now add the action “Create item” to store the form response in the SharePoint list created above with the request body information mapped to Name (myName) & Email (myEmail) using the dynamic content. The dynamic content has also information about the user (Email, Display Name, Response time etc) responded in Teams
The flow is ready, Run the flow to test it. The recipient would have received the card in Teams as below
After the user keys in the Name & Email address on Teams and clicking Submit button will complete the flow till then the flow will be in wait state for a period of 30 days maximum. The data will be submitted to the SharePoint list and the card will be updated with the update message as below
There is an Adaptive card designer in Power Automate which is an experimental feature currently with which you would able to design/update Adaptive card in the Power Automate action. To enable it, click the cog wheel on your flow environment and click “View All Power Automate settings”. On the popup toggle the Experimental Features to On and click Save button.
Go back to the flow in Edit mode, the Teams action will now have an Adaptive card designer as shown below
Senior Program Manager for Power Automate Audrie Gordon has a great video on Adaptive cards for Power Automate which has lot of information.
If you run in to an error while submitting the form or triggering the flow, look at the Troubleshooting tips for Adaptive cards. There are few known issues documented here with regards to using this action on Power Automate.
Summary: You now have created an input form for collecting information from a user in teams. To know the future road map for Adaptive cards, click here to know. There are couple of amazing templates available in the Flow environment, just search for Adaptive card in templates where you get template for different use cases. Hope you have enjoyed reading this post and find it useful. If you have any comments or feedback, please provide it on the comments section below.


