Automate the assignment of Capacity Add-ons in Power Platform Environment using Power Automate Flow

In Power Platform, capacity add-ons such as AI Builder Credits, Per-App plan, Power Pages Capacity, Power Automate Per Flow, Power Automate Process, Copilot Studio messages are allocated at an environment level and are not tied to individual users, unlike the Power Apps/Power Automate Premium plan. These add-ons are assigned to an environment through the Power Platform Admin Center. However, there may be cases where the allocation of add-ons needs to be automated as part of the license assignment process, leveraging IT service management tools such as ServiceNow, BMC Remedy or any custom tools.

This blog post will explore how to automate the capacity assignment using the Power Platform API, which is currently in preview at the time of writing.

Pre-Requisites:

  • Power Platform Administrator
  • Access to create Entra ID App registration
  • Power Automate Premium – License

Authentication of Power Platform API:

To access the resources available via Power Platform API, the API must be authenticated with a token generated using an Entra ID application. This token is sent as a header along with each API request. Client credentials authentication flow is used with the Service Principal.

Active Directory App registration:

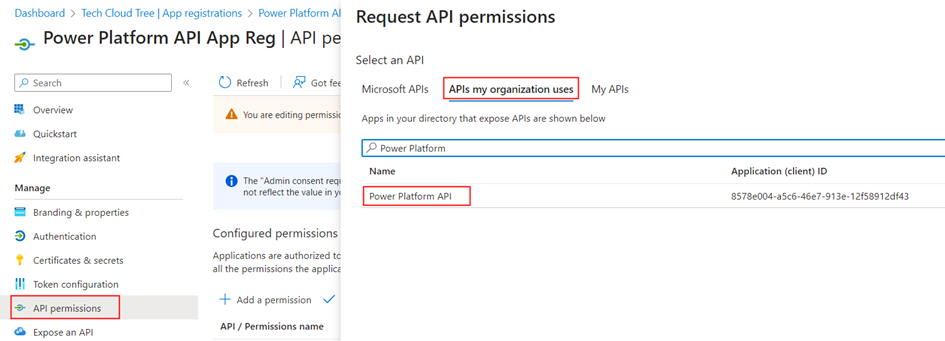
To generate a bearer token, the first step is to register an Active Directory app with the Power Platform API permission to call the API endpoints responsible for assigning capacity to an environment. Once the registration is complete, add the permission Licensing.Allocations.ReadWrite as detailed in the documentation, to assign Capacity Add-ons as shown below
Select the permission as shown below
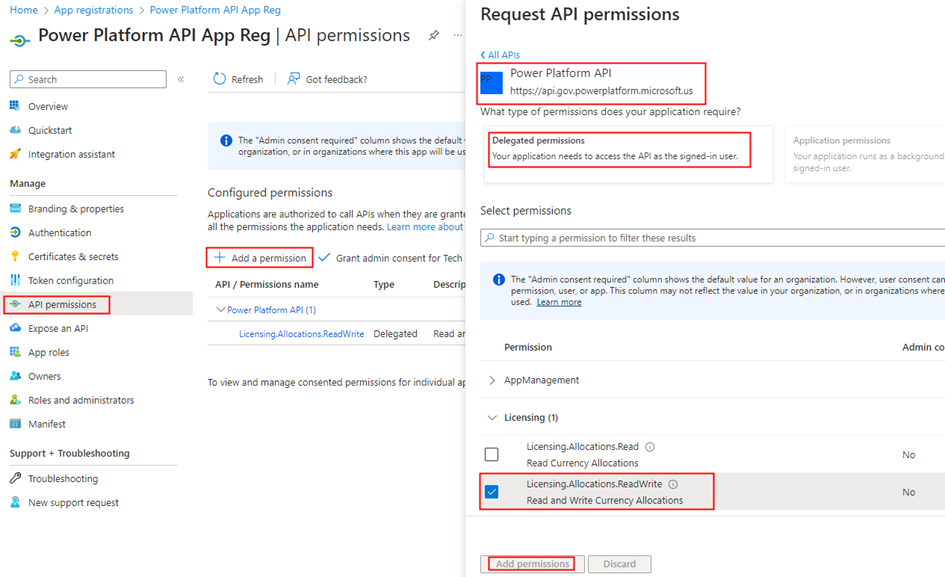
Admin consent is not required.
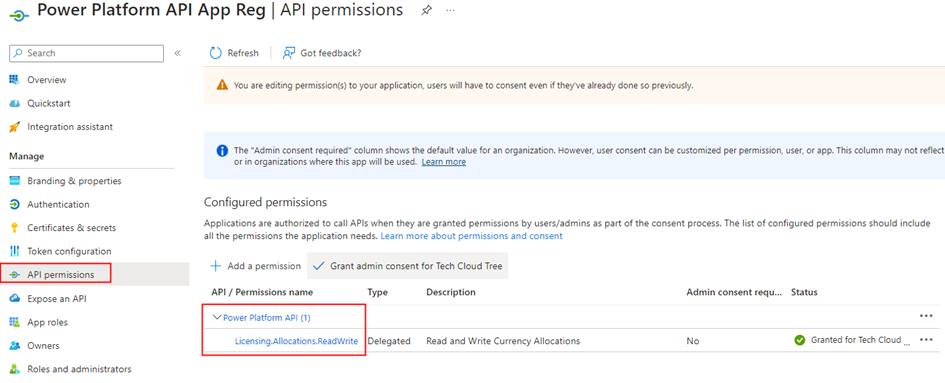
Make sure to note the Client ID/Application ID, Client Secret, and Tenant ID associated with the registered application, as these details will be essential for the Power Automate flow.

Registering the Entra ID app as an Admin management Application:

Access for the registered Entra application needs to be granted by a user with the Power Platform Administrator role to be utilized as a Service Principal for calling the capacity allocation API. Use the following PowerShell command to grant the necessary permissions for the App Reg/service principal to invoke the Capacity Addon allocation API.

Add-PowerAppsAccount

New-PowerAppManagementApp -ApplicationId ClientId-EntraIDAppRegistrationClientId

Replace the EntraIDAppRegistrationClientId with the registered Entra ID App reg.

Note: The Service Principal flow doesn’t use application permissions and is instead treated as a Power Platform Administrator for all API calls that they make.

Power Automate Flow:

For testing purposes, I’ve created an Instant Flow. However, select a trigger type that aligns with your specific needs. Add a HTTP connector to generate an access token for calling the API. Find the HTTP request details as below

Request Type: POST

URI: https://login.microsoftonline.com/tenantId/oauth2/v2.0/token

Headers:

Content-Typeapplication/x-www-form-urlencoded
Acceptapplication/json

Body:

grant_type=client_credentials&client_id=clientID&client_secret=secretfromEntraIDAppReg&scope=https://api.powerplatform.com/.default

Make sure to replace the tenantId, ClientID & secretfromEntraIDAppReg in the HTTP request.

Add a compose action with the following expression to extract the access token from the above HTTP request

body('nameOfTheHTTPConnectorAction').access_token
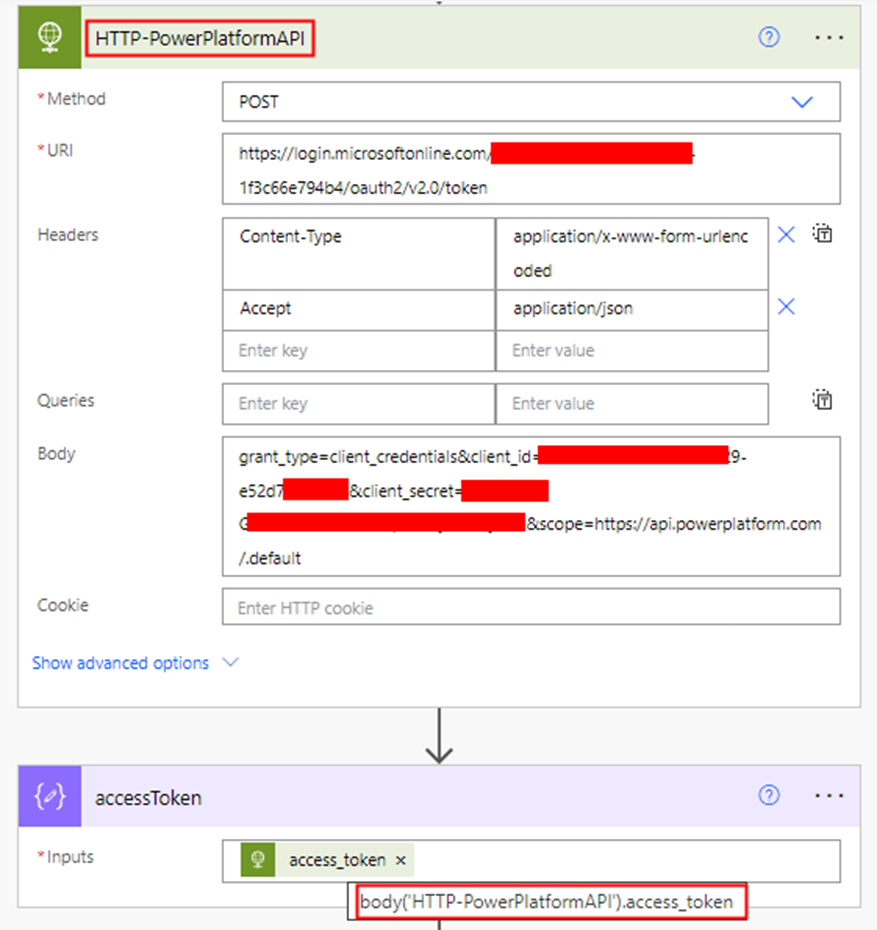
Add another HTTP action to assign the capacity using Currency Allocation by Environment API. Find below the HTTP request details:

Request Type: PATCH

URI: https://api.powerplatform.com/licensing/environments/environmentID/allocations?api-version=2022-03-01-preview

Headers:

AuthorizationBearer Outputs(’AccessTokenComposeAction’)

Body:

{

"currencyAllocations": [
{
"currencyType": "AI",
"allocated": 150
}
],
"environmentId": " environmentID"
}

The provided http request body pertains to AI Builder credit allocation. For other capacity types like Per App plan, Copilot Studio, and Power Pages follow the currency type information outlined in the following documentation:

https://learn.microsoft.com/en-us/rest/api/power-platform/licensing/currency-allocation/patch-currency-allocation-by-environment

Make sure to replace the environmentID in both the URI and the Body accordingly.
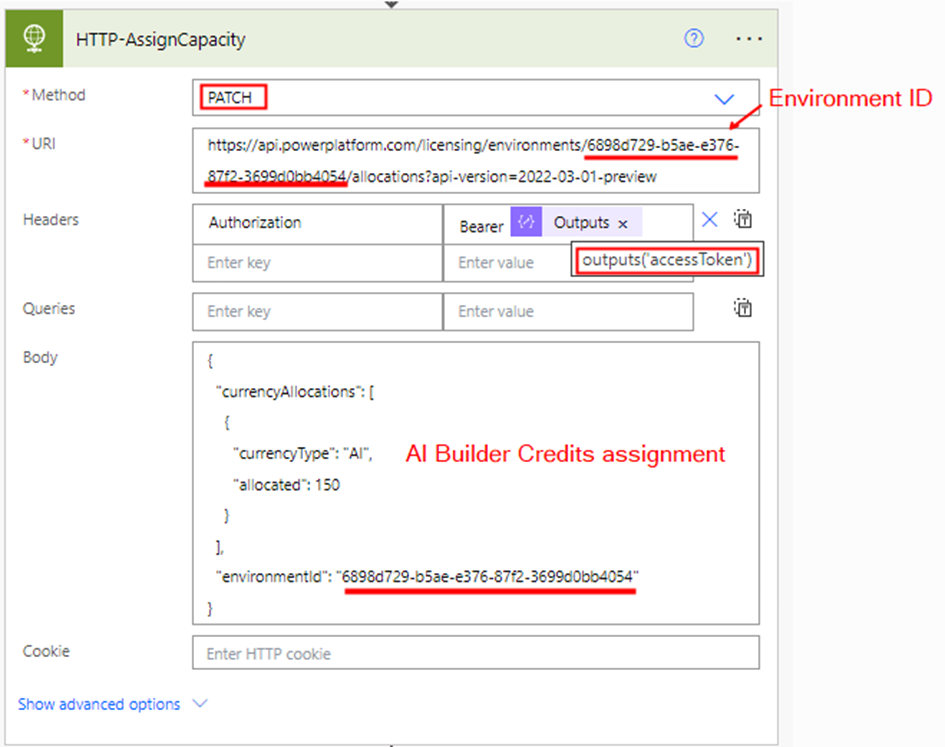
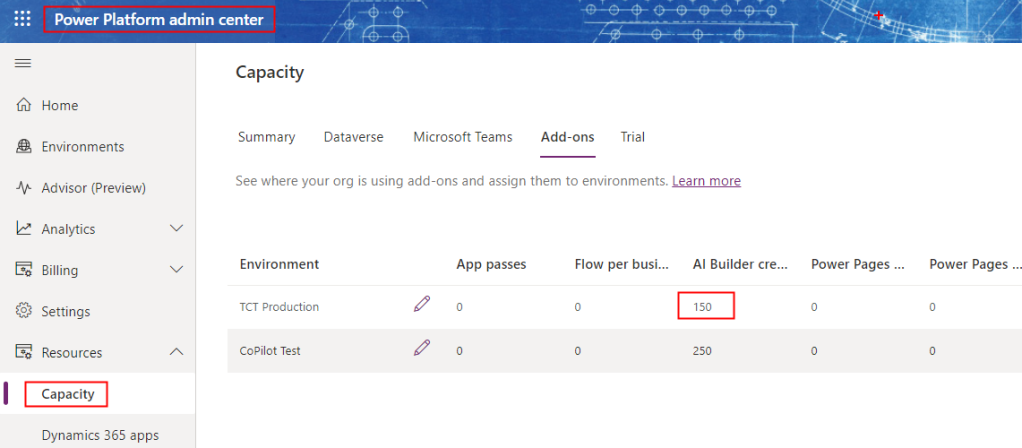
Test the flow, the environment will have AI Builder 150 credits allocated.
To get existing capacity assignments on an environment, make a GET request to the following endpoint

https://api.powerplatform.com/licensing/environments/environmentID/allocations?api-version=2022-03-01-preview

Summary:

This capability opens doors to enhanced license assignment processes for Power Platform, offering an approach for managing and optimizing Power Platform addons through automation. Hope you have found this informational & thanks for reading. If you are visiting my blog for the first time, please do look at my other blogposts.

Do you like this article?

Subscribe to my blog with your email address using the widget on the right side or on the bottom of this page to have new articles sent directly to your inbox the moment I publish them.

Streamlining Integration: Using Azure Managed identities in Power Apps and Power Automate to access Microsoft Graph API – Part 3

In both Part 1  and Part 2 of the blog series, I’ve covered the utilization of Managed Identities in Power Apps and Power Automate for secure access to Microsoft Graph API. This included a deep dive into setting up and configuring the Azure API Management service with the Microsoft Graph permissions for the managed identity. In Part 2, I’ve explored the process of exporting the API as a connector in Power Platform, securing it with API key authentication.

The Part 3 aims to enhance the security of the connector by implementing Entra ID OAuth authentication.

Entra ID Apps:

To enhance the security of the custom connector published from Azure API Management for Microsoft Graph APIs using Entra ID OAuth authentication instead of Subscription key, it is essential to create two Entra ID applications. One application should represent the API from API Management, while the other should represent the client application to be utilized in the Entra ID OAuth authentication for the custom connector.

Registering an Application in Microsoft Entra ID for API Representation:

In the Entra ID portal, navigate to App registrations and click + New registration. Enter a name, such as APIM PP Resource, and proceed by clicking the Register button, leaving all settings as default. This app represents the APIs added in the Azure API management instance.

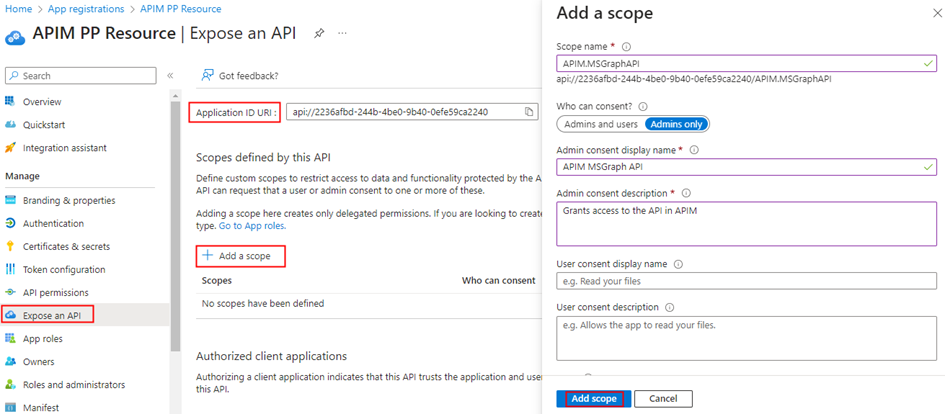
  • Under the Manage section in the side menu, select Expose an API. Set the Application ID URI with the default value and remember to copy this value for future use.
  • Click on the Add a scope button to access the Add a scope panel:
    1. Enter a new Scope name as APIM.MSGraphAPI
    2. Set Admin consent display name to APIM MSGraph API
    3. Provide Admin consent description as “Grants access to the API in APIM.”
    4. Ensure the Enabled scope state is selected.
    5. Complete the process by selecting the Add scope button to create the scope.

Registering an Application in Microsoft Entra ID for Client Representation:

Create another Entra ID app to be used in the custom connector for securing with Entra ID OAuth Authentication. In the Entra ID portal, navigate to App registrations and click + New registration. Enter a name, such as APIM PP Client, and proceed by clicking the Register button, leaving all settings as default.

  1. Retrieve the Client ID, Tenant Id from the Overview section of the Entra ID app and generate a secret through the Certificates & secrets under the Manage blade. Once the secret is successfully created, copy its value for use in configuring the custom connector OAuth Authentication.
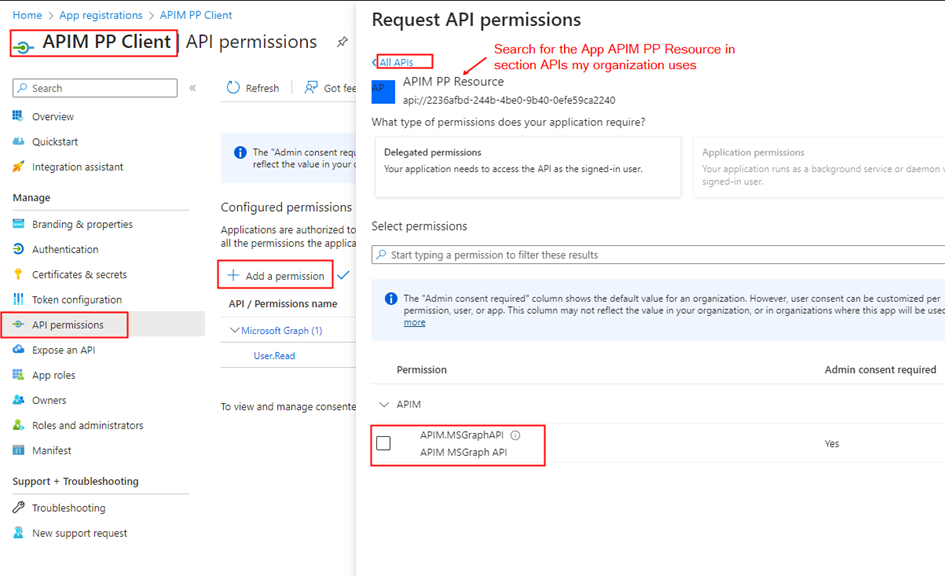
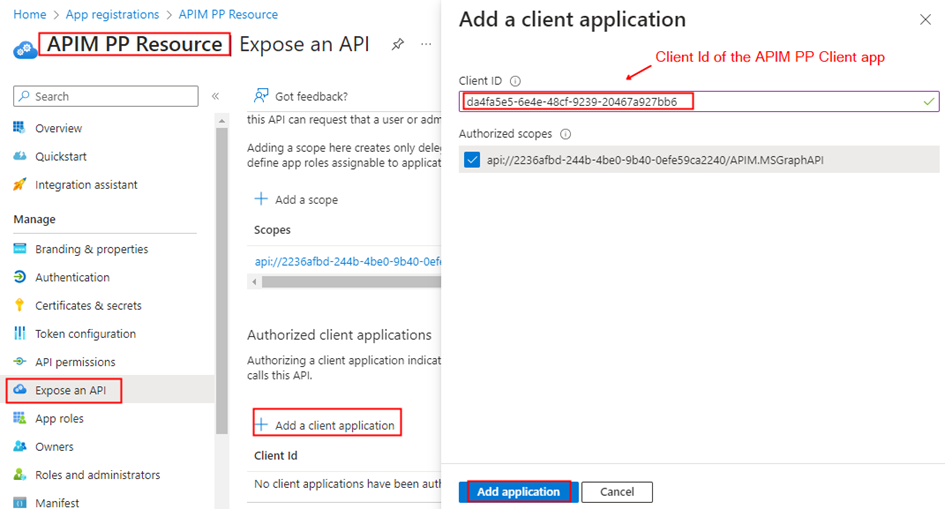
  2. Go to the Entra ID app APIM PP Resource created earlier. In the Manage section, click on Expose an API and then Add a client application by selecting + Add a client application in the popout panel. Enter the Client ID of the APIM PP Client app registered now. Select the authorized scope created in the previous section, then proceed by clicking Add Application. This ensures the application APIM PP Resource trusts the client application APIM PP Client and users should not be asked to consent when the client calls the APIs published API Management instance.

Note: If you prefer users/admins to provide consent for the permission while creating a connection for the custom connector, add the APIM.MSGraphAPI Scope to the APIM PP Client app, as shown below. In this scenario, the step mentioned in bullet no 2 becomes unnecessary.

Configuring Custom Connector Authentication to Entra ID OAuth:

Following the export of the API from the Azure API Management as a custom connector in Power Platform in Part 2 of this blog series, proceed to the Power Apps or Power Automate maker portal to edit the connector.

  1. Access the custom connectors, locate the exported connector in the Power Platform Environment where the connector was exported from API Management
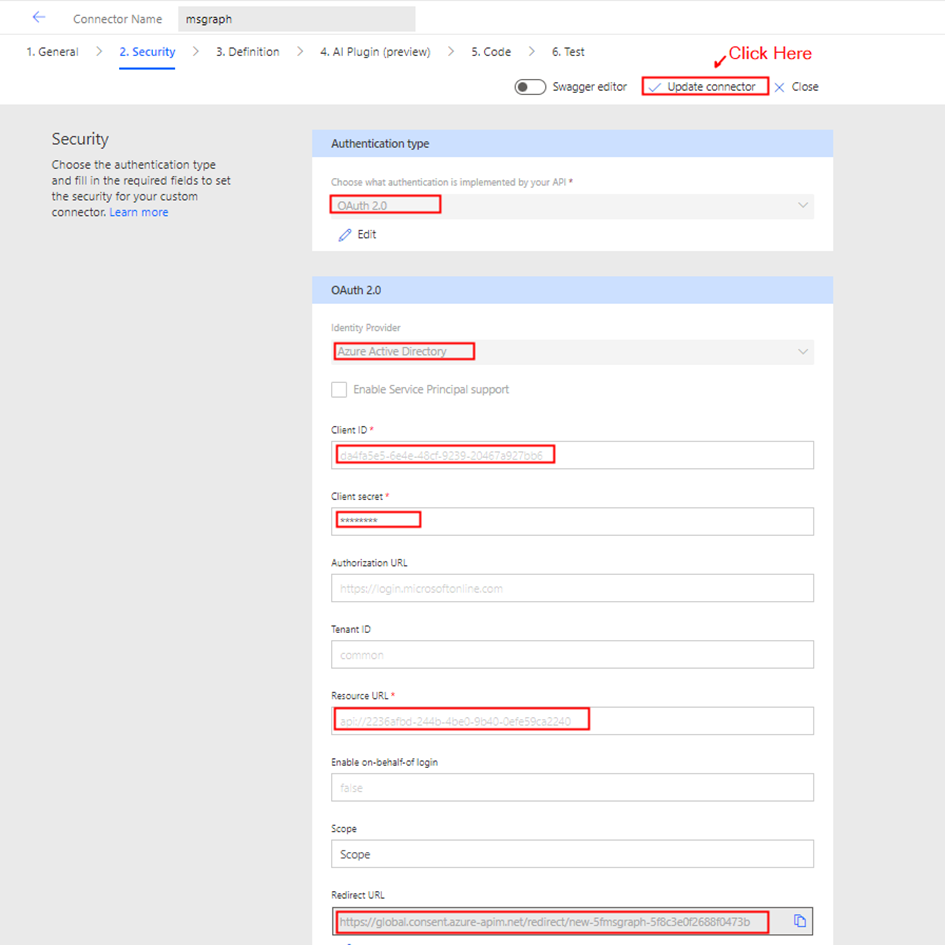
  2. Within the Authentication type settings, originally set to API Key, click Edit, and modify it to OAuth 2.0.
  3. Choose the Identity provider as Azure Active Directory. Enter the Client ID and Client secret obtained from the APIM PP Client app copied earlier. Set the resource URL to the Application ID URI generated from the APIM PP Resource app.
  4. Click Update connector to generate a Redirect URL on the same screen—ensure to copy this URL.
  1. Navigate to the APIM PP Client app in the Entra ID portal and add a Web Redirect URI, paste the copied Redirect URL.

Azure API Management: Configure JWT validation policy to Authorize requests from Custom connector:

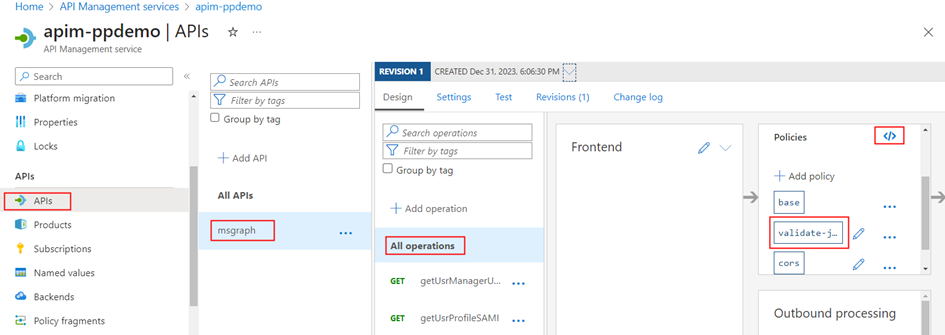
The JWT validation policy pre-authorizes requests from the Power Platform Custom connector as it adds the layer of security to ensure that incoming access tokens are valid and meet specific criteria before the APIM starts processing requests to the added MS Graph API endpoints. The policy checks the value of the audience claim in an access token obtained from Microsoft Entra ID with in the custom connector. The audience claim typically specifies the intended recipient of the token, ensuring that the token is meant for the intended API.

By configuring the following JWT validation policy in the <inbound> policy section below the node <base />, you enforce the validation of the access token, and if the token is invalid, an error message is returned.  Don’t forget to replace the TenantId and the required claims value to the client id of the app APIM PP Resource.

<validate-jwt header-name="Authorization" failed-validation-httpcode="401" failed-validation-error-message="Unauthorized. Access token is missing or invalid.">

<openid-config url="https://login.microsoftonline.com/replaceherewithTenantId/v2.0/.well-known/openid-configuration" />
<issuers> <issuer>https://sts.windows.net/replaceherewithTenantId/</issuer>
</issuers>
<required-claims>
<claim name="aud">
<value>api://replaceherewiththeClientIDoftheApp-APIM PP Resource</value>
</claim>
</required-claims>
</validate-jwt>

Note:  If you attempt to establish the connection from the Test Tab and subsequently execute the action, you will encounter the following error “Access denied due to missing subscription key. Make sure to include subscription key when making requests to an API.

Creating a Product:

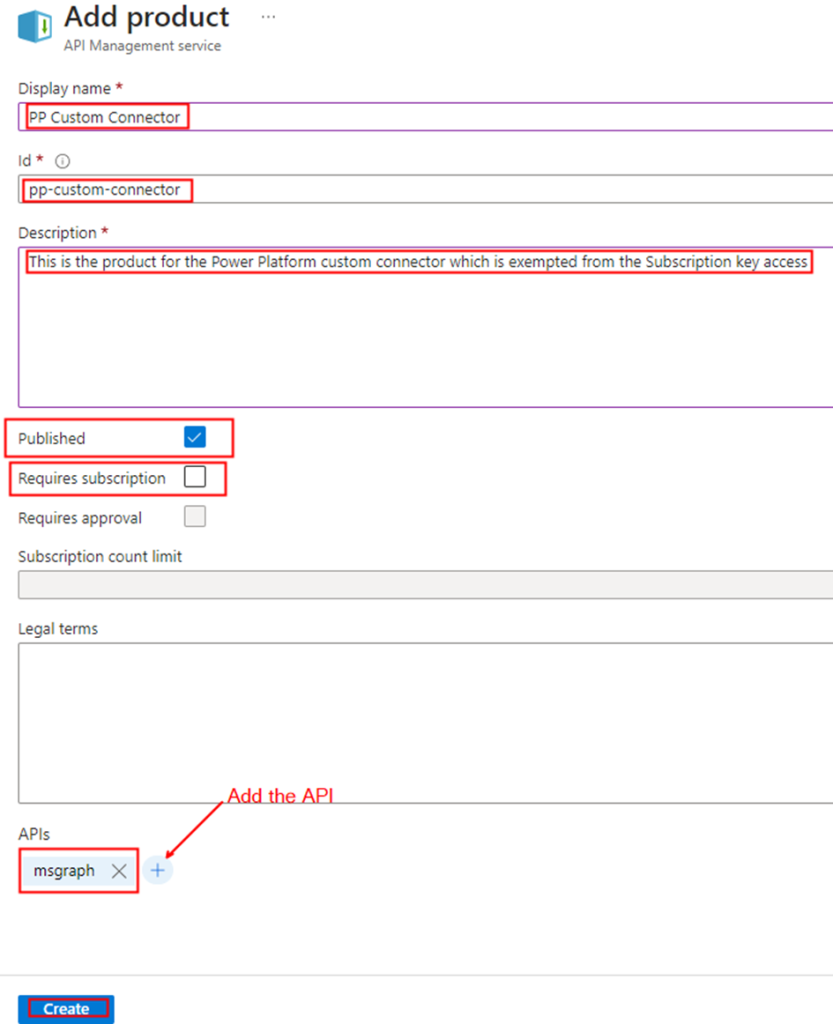
To enable the custom connector to generate tokens for API access from API Management, it’s necessary to associate the APIs with a Product that doesn’t require a subscription key. Follow these steps:

  • In the left navigation pane, go to Products and click on + Add.
  • Provide the Product Name, Description, uncheck the box Require subscription option, select the relevant API, and proceed to create the Product.

Testing the Custom connector:

Navigate to the Power Platform Maker portal and access the custom connector interface. Edit the connector to initiate the creation of a connection within the Test tab. Click on + New connection and click Create. Notably, you’ll observe that it doesn’t prompt for the API Subscription key, as discussed in the Part 2 of the article.

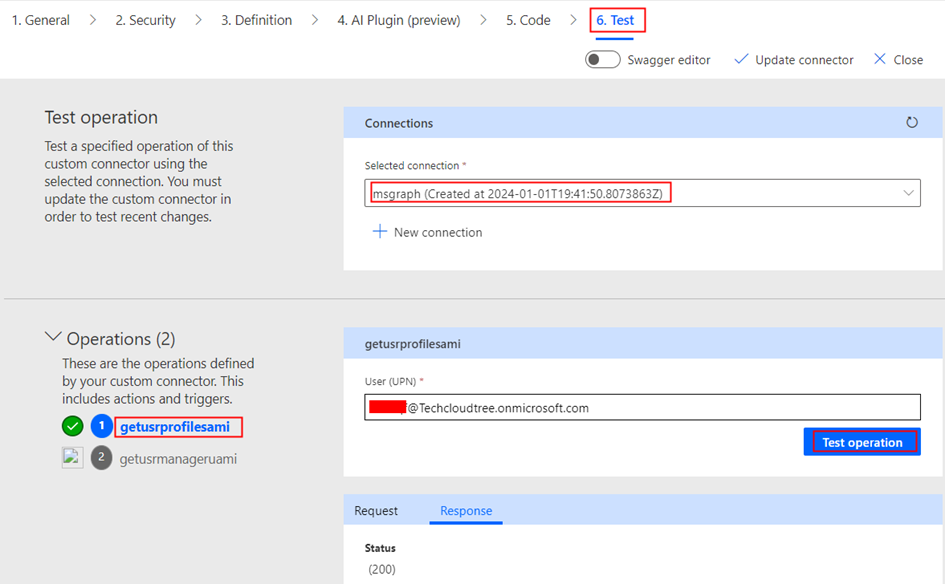
Once the connection is created, return to the edit mode of the custom connector to initiate testing of the actions. Navigate to the Test tab, where you can select the specific connection and choose the operation you wish to test. Test the operation and validate the results of the custom connector action.

Summary:

This concludes the blog series, where we delved into the secure access of Microsoft Graph APIs in Power Platform with the help of Azure API management, employing both Subscription keys and Entra ID OAuth authentication. Demonstrated the usage of managed identities in Power Platform, the methods explored here, particularly for securing Microsoft Graph API with application permissions, are adaptable for various services. Addressing the significant security risk of Broken Access Control, I have highlighted the importance of correctly implementing authentication mechanisms to prevent potential exploitation by attackers.

For those with existing Entra ID app registrations seeking to enhance security with API Management, the credential manager feature offers a solution. Utilizing the Grant Type Authorization code for Delegated Permission and Client Credentials for Application Permission ensures a comprehensive approach to safeguarding your applications and APIs. Hope you have found this informational & thanks for reading. If you are visiting my blog for the first time, please do look at my other blogposts.

Do you like this article?

Subscribe to my blog with your email address using the widget on the right side or on the bottom of this page to have new articles sent directly to your inbox the moment I publish them.
Streamlining Integration: Using Azure Managed identities in Power Apps and Power Automate to access Microsoft Graph API – Part 2

In Part 1 of the blog series on using Managed identities in Power Apps and Power Automate to access Microsoft Graph API securely, I have delved into the setup and configuration of the Azure API management service with the necessary Microsoft Graph permissions for the managed identity. Building upon that foundation, Part 2 aims to take it further your integration journey in making the API’s available as a connector in Power Apps and Power Automate secured with API key Authentication.

Azure API Management Instance: Managing API Subscription Keys

APIs published through the Azure API Management instance are by default secured by Subscription keys. These keys play a crucial role in establishing connections in Power Apps or Power Automate after exporting APIs as custom connectors.

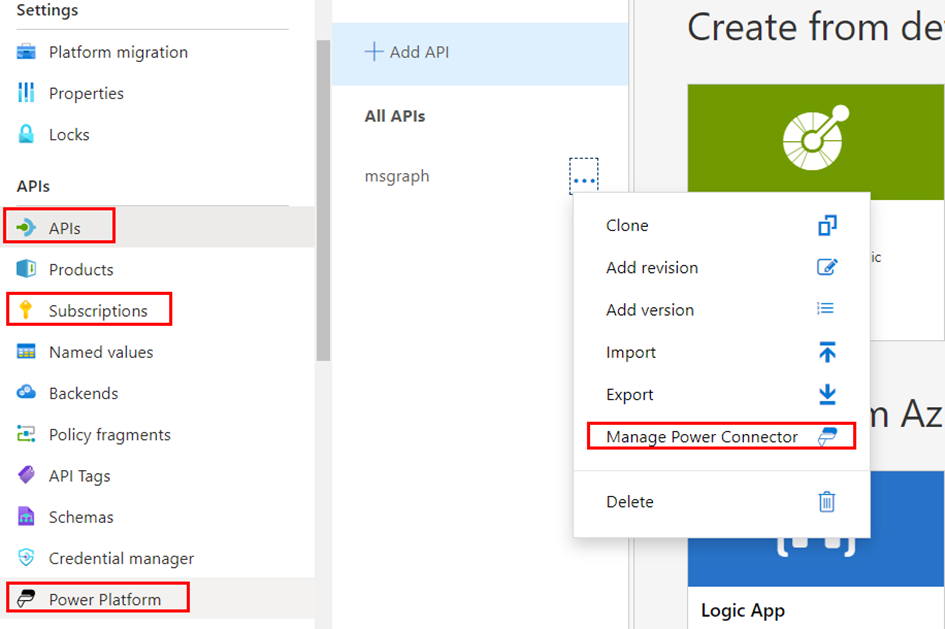
To manage these keys, navigate to the left navigation menu under the “Subscriptions” blade in the Azure portal within your API Management (APIM) instance. Here, you have the option to generate a new key or utilize an existing one. Copy the key from the portal to create the connection in the later section.

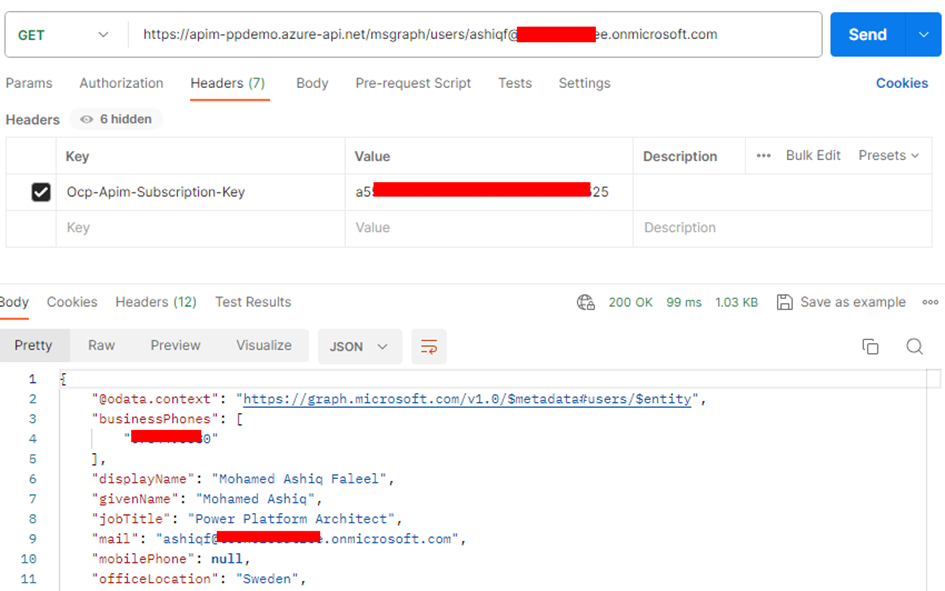
You can test the API by using the Subscription key from Postman as shown below:            

Exporting API as a Connector in Power Platform:

To harness the capabilities of the APIs within your API Management instance secured with the Managed identities, exporting them as connectors in Power Platform is a major step in order to be used in Power Apps and Power Automate. Follow these simple steps for a seamless integration:

In the left navigation menu, navigate to Power Platform under the APIs blade.

  • Click on Create a connector to initiate the connector creation process.
  • Choose the specific API (e.g., msgraph) that you wish to export as a connector.
  • Select the Power Platform environment where you have Maker/Admin role access.
  • Under API Display Name, enter a name for the connector. This will be the identifier for your connector within Power Platform.
  • Click on the “Create” button to complete the process.

Once the connector is created, navigate to your Power Apps or Power Automate portal. You’ll see the API listed under Custom Connectors on the left navigation bar in Environment where the connector has been created from the API Management instance.

  • Click on the Edit icon to initiate the analysis and testing of connector actions.
  • Explore the Definition tab to view the view the API operations within the APIM instance now listed as Actions.
  • Verify the Authentication type of the connector by navigating to the Security tab, where the setting is configured to API key for streamlined validation.
  • Begin by creating a connection in the Test tab. Click on + New connection to start testing.
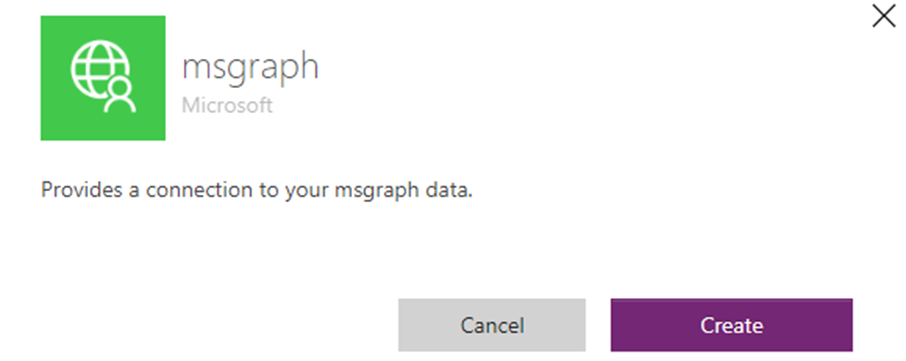
  • Enter the Subscription key, which you previously copied from the Azure portal for the API Management (APIM) instance. This key establishes the secure link between your connector and the APIM services. If there is no error, the connection will be created.

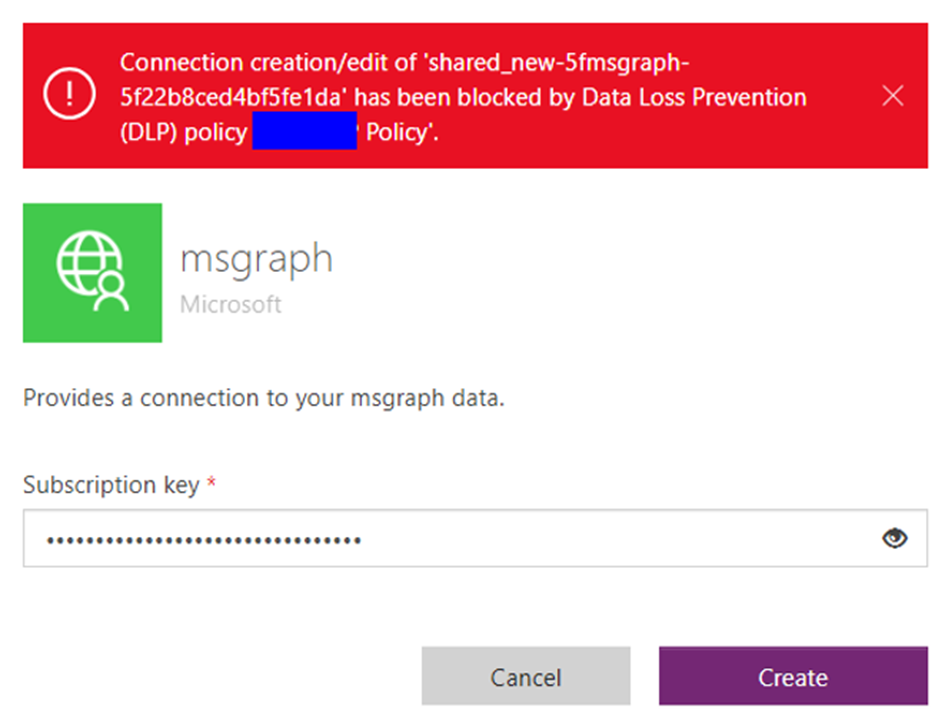
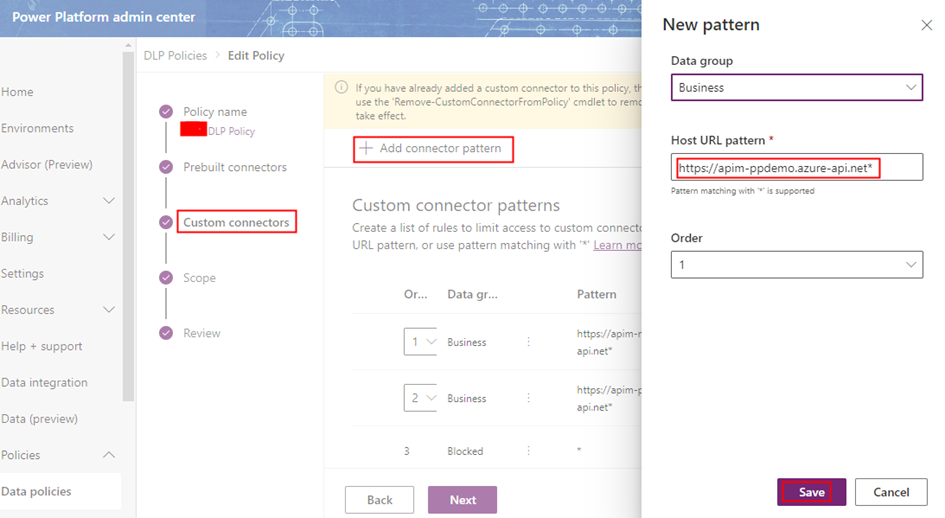
In the event of encountering below error message indicating that connection creation has been blocked by Data Loss Prevention (DLP) policy

Add the Gateway URL copied from the API management instance under the Overview section on the portal as a connector pattern allowed in the Business/Non Business category of the DLP policy.

Note: Please be aware that in the API Management instance, within the APIs Policies section, if you haven’t included the wildcard (*) as I did for CORS, and have instead specified particular URLs like https://make.powerapps.com, an additional policy in the Custom connector is required to be added under the Definitions tab. Specifically, you need to add a policy to set the request Origin header.

Testing the Custom Connector:

Once the connection is created, return to the edit mode of the custom connector to initiate testing of the actions. Navigate to the Test tab, where you can select the specific connection and choose the operation you wish to test. Test the operation and validate the results of the custom connector action.

Summary:

This completes the Part 2 of the blog series where we have explored the process of accessing Microsoft Graph APIs securely within the API management with Subscription key authentication using managed identities (System and User) as a connector in Power Platform. In our next article, we will delve into the enhancing security further by implementing OAuth authentication within the custom connector for API management APIs. Stay tuned. Hope you have found this informational & thanks for reading. If you are visiting my blog for the first time, please do look at my other blogposts.

Do you like this article?

Subscribe to my blog with your email address using the widget on the right side or on the bottom of this page to have new articles sent directly to your inbox the moment I publish them.