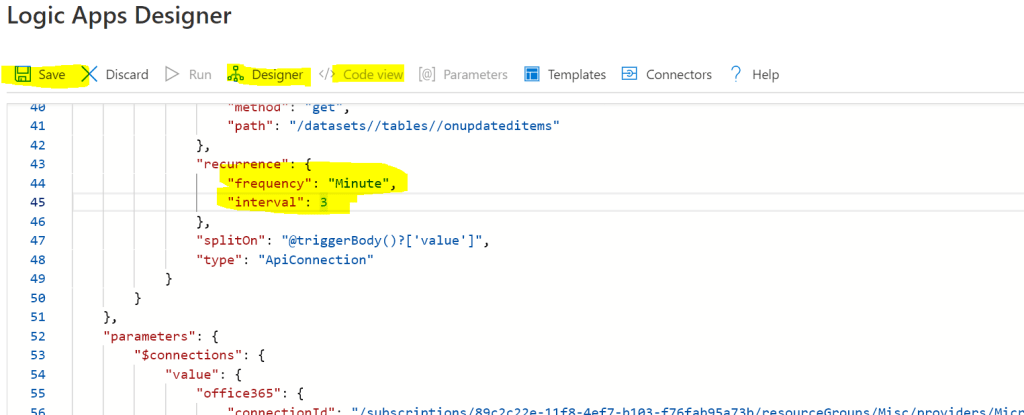
Have you ever noticed on your Automated flow with trigger for e.g Item created or modified on a SharePoint list will not run immediately as & when there was an item either created or modified in the list? The reason is all the automated triggers has a recurrent frequency schedule which is set to 3 mins, it means it looks for the changes in the SharePoint list every 3 mins. To check this, go to Peek Code on the trigger to check the interval frequency
For the When an Item is created trigger
This setting cannot be changed in Power Automate but with Azure Logic Apps you can adjust this setting. For more details on the pricing, refer to this link
If there is further delay in the trigger to get fired, check your flow plan since it has a dependency. As per information gathered from the Flow community forum
The maximum flow frequency for User based or App based plans is 1 minute, however if you are using Free plan it will be 15 minutes. And if it is Flow for Office 365 (Plan from your Enterprise license E3, E5 etc) and Flow for Dynamics 365 it will be 5 minutes.
From the FAQ page in the Microsoft site for Flow, it says
Your plan determines how often your flows run. For example, your flows may run every 15 minutes if you’re on the free plan. If a flow is triggered less than 15 minutes after its last run, it’s queued until 15 minutes have elapsed.
The same trigger with Logic apps which has options to update the recurrent frequency interval
If you are new to Logic Apps, follow this article from Microsoft to get started. The other advantage with Logic apps is there is a code view to update & Save which is not the case with Power Automate. In Power Automate, you can only view the code & not update
Hope this information was useful in some way. If you have any comments, let me know on the comments section.
This post is in continuation to my previous post Automate the provision of Azure AD Account & License assignment – Part 1 for creating account in Azure active directory using Power Automate. On this post I will highlight the feature available in Azure Automation account which can be leveraged to create an On-premise AD account. Refer to this post for the usage of Azure automation account to interact with SharePoint online in Microsoft 365 using Power Automate.
Azure Automation is so easy to setup for automating tasks that interacts with
Azure (Azure AD, SQL etc)
M365 services (SharePoint etc).
Automation runbooks in Azure might not have access to resources in other clouds or in your on-premises environment because they run on the Azure cloud platform. To access local resources like On-premise Active Directory which lives behind the firewall, there is a feature within Azure Automation called as Hybrid runbook worker. Azure Automation Hybrid Workers extends Azure Automation into your private networks and allows running runbooks that interacts with resources such as on-premises Active Directory, SharePoint etc.
Hybrid Runbook Worker feature to run runbooks directly on the
Computer in On-premise network
Any secured network like a virtual machine in Azure behind the firewall
Cloud services like AWS etc
that’s hosting the role and against resources in the environment to manage local resources. Refer to this documentation about Hybrid runbook worker for more information.
The following image from Microsoft documentation illustrates this functionality:
Pre-requisite:
Azure Subscription to create
Automation Account
Log Analytics Workspace
Server (Windows or Linux based)
Internet access
Port: Only TCP 443 required for outbound internet access
I’ve found a really interesting video on Youtube from Travis Robert regarding this topic to set this up on Windows workstation.
Once the Hybrid runbook worker is setup, you can write PowerShell script to create account in On premise Active directory. Find the link to the script to add a user to Active directory in Onpremise. The parameters for the AD account (attributes like name, location, jobtitle, manager etc) to the runbook can be passed from a SharePoint List in Office 365 which could then be triggered using a Flow.
Summary: I was not able to give you a complete walkthrough but I hope had given some pointers to connect on-premise AD. Forgive my ignorance if I have made some mistakes since I don’t have much experience with IT infrastructure. Hope you find this post useful & informational. Let me know if there is any comments or feedback below.
Most of us would have used PowerShell for SharePoint to manage SharePoint settings at the organization level and site collection level. SharePoint Online PowerShell commands are very efficient for batch operations for e.g creating multiple sites, list items etc. To use the SharePoint Online PowerShell commands
You must have the SharePoint Admin role or Global Administrator role in Office 365
Install the SharePoint Online Management Shell module
As you know you must be administrator to install a PowerShell module on your workstation which not everyone will have in corporate environments.
I often use a PowerShell script to enable App Catalog at a site collection level to test the PnP webparts & extensions before deploying at the tenant level app catalog based on requirement. If you are not an SPO admin then the dependency is with the SPO admin. In this blogpost I am going to show you how to automate this process by executing PowerShell script to enable App catlog in Azure using Power Automate.
Pre-requisite & permissions:
SPO Admin
Azure Subscription to create Automation account
Access to Premium connector (Azure Automation) in Power Automate
SharePoint List to collect details about the site which needs to have App catalog enabled
To complete this automation process, create the following two components
Automation account in Azure with a Run Book to execute PowerShell script for enabling App Catalog in SP site
Power automate flow to call the Run Book
Automation account in Azure with a Run Book to execute PowerShell script for enabling App Catalog in SP siteAutomation service in Azure is a cloud-based automation and configuration service that supports consistent management across your Azure and non-Azure environments. Go through the documentation from Microsoft to know about this powerfull service in Azure. Let’s use the service in Azure to create a simple Runbook with PowerShell code to enable App catalog in SPO site, you can do much more than this using this service. Refer to this link for the pricing details for the automation service in Azure.
Step 1: Go the Azure portal & create a resource Automation
Enter the name of the automation account, select the Subscription & resource group & click Create
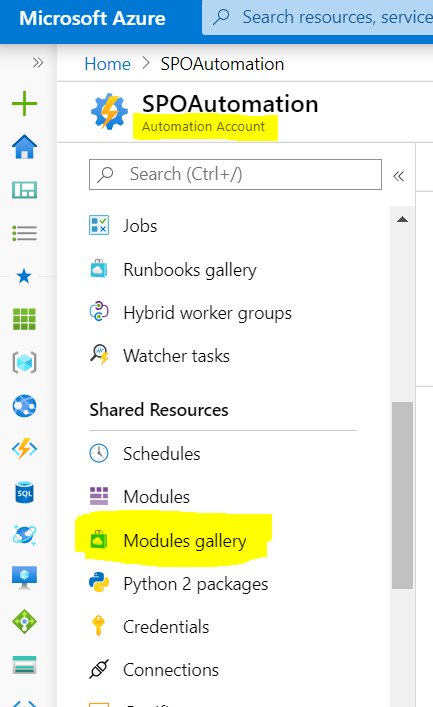
Step 2: After the resource is created, go to the resource & click Modules Gallery under the section Shared Resources as shown below to add the PS SPO module
Search with the keyword “SharePoint” & click “Microsoft.Onlie.SharePoint.PowerShell” and then click Import. This step will the add the SharePoint online PowerShell module for us to use the available PS SPO cmdlets in Runbook.
Now click modules & verify if the SPO PowerShell is added & available.
Step 3: The next step is to add the user credentials (Username & Password) of the SPO admin which is safe & secure by not hardcoding the password on the Runbook. You can also use certificates or AppID AppSecret in PnP online Powershell for creating connection to SPO.
Step 4: Now we are good to create the Runbook, to create it click Runbooks under the section Process Automation and then click Create a runbook. Enter the Name of the Runbook, select the Runbook type to PowerShell and click Create.
Now let’s add the code by editing the runbook to enable app catalog. The section Dynamic Parameters on the code will be passed from flow. To connect to SharePoint Online we are using the SPO admin credentials created in the previous step. Find the code below
# Dynamic Parameters
param(
  [parameter(Mandatory=$true)]
  [string]$SiteURL = "https://domain.sharepoint.com/sites/contosoportal",
  [parameter(Mandatory=$false)]
  [boolean]$enableAppCatalog = 1
)
# Credentials
$myCred = Get-AutomationPSCredential -Name "SPOAdminCred"
# Parameters
$AdminSiteURL = "https://domain-admin.sharepoint.com"
# Connect to SharePoint Online
Connect-SPOService -Url $AdminSiteURL -Credential $myCred
# Get the Site Collection
$Site = Get-SPOSite -Identity $SiteURL
# Enable App catalog
if($enableAppCatalog)
{Add-SPOSiteCollectionAppCatalog -Site $Site}
# Disable App catalog if false
else{Remove-SPOSiteCollectionAppCatalog -Site $Site}
# Get Site Collection Title
Write-Output $Site.Title
The runbook is now created, you can test the script by clicking on Test Pane & pass parameters (Site URL etc) to test it. Click Publish button as shown below to publish so that it can be called from Power Automate. It’s now time to create the flow
Power automate flow to call the Run Book
You can now create a flow with automated trigger from a SharePoint list to get the site url & Boolean value either to enable or disable the app catalog on the site. Here I will be using an Instant flow with trigger “Manually trigger a Flow”
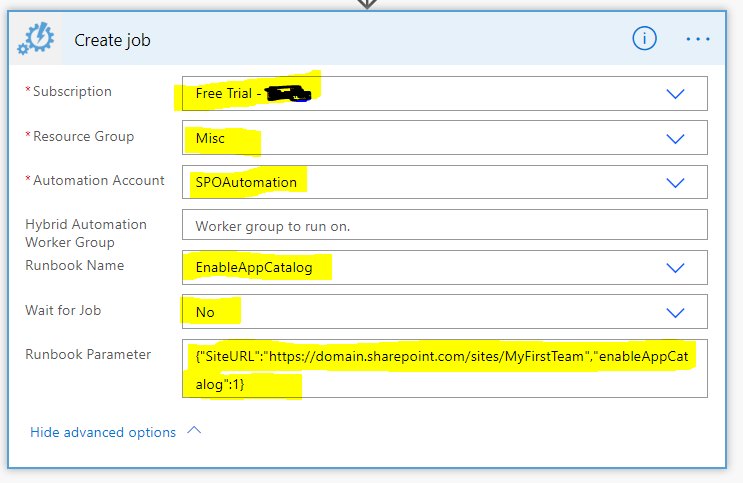
Once the flow is created, add the action “Create Job” under the connector “Azure Automation” which is a premium connector.
Select the Azure Subscription which has the Automation account resource with runbook>Select Resource Group>Select Automation Account>Select the Runbook name which has PS script to enable app catalog. If there is a need to wait until the automation job completes then select Yes on the field “Wait for Job”. For the dynamic parameter, write a JSON to pass the mandatory & optional parameters to the runbook script. On this example I will be passing the Site URL & Boolean value to either enable or disable app catalog using JSON as below
If using a SharePoint list, construct the above JSON dynamically with the URL
For the runbook parameters, you might also get an interface as shown below to pass the values (Site Url & enableAppcatalogbooleanvalue).
The flow is ready, run it to test now with parameters.
Summary: The use case I’ve chosen is a simple one but azure automation can be a more powerful service to perform various automation tasks. Find few below
Write Python script in the Runbook
Many samples are available within the Runbook gallery (Create AD user, Display All provisioned site collections etc) under the section Process automation.
With the PowerShell type Runbook all the PS modules (Azure AD for automating AD account creation, PNP SP Online etc) are readily available for us to import easily.
There is a feature by name “Hybrid Runbook Worker Feature” available within Azure Automation account for us to connect Onpremise resources in Azure (e.g SharePoint Onpremise, Onpremise AD etc).
Create a Webhook to call the runbook from an External application by making a POST call
Call a custom built dll by importing them in to the Modules section
Create graphical Runbook with GUI to add cmdlets & to configure the steps
In bigger active directory implementation, there will also be information stored on the Extension attributes, to get the information you will have to pass the name of the attribute “OnPremisesExtensionattributes” as a query string in the format as
The User profile service Rest API endpoint in SharePoint http://siteurl/_api/SP.UserProfiles.PeopleManager/GetMyProperties does not provide all the active directory information. For e.g Location, OnPremisesextensionAttributes etc information is not available. SharePoint UPS synchronizes the AD data of all users in schedule basis. So the other option is to use the Graph Endpoint if you need those information for your application customization.
Has there been a requirement or a need to change the owner/creator of the PowerApps or a Flow built by your organizational users? There could be various reasons for this request
App/flow creator would have left the organization
App/flow creator would have changed role within the organization
Handing over the app to the operations team…
By the time I am writing this post there are no Powershell command or actions available in Flow/PowerApp to change the original Owner of the flow but still you would be able to assign a Owner for the flow created by an user who has left the Organization from the Flow Admin center, I will cover the steps on this post. The good news is Microsoft has plans to release this feature as per this user voice request.
Prerequisite: Environment Admin or Power Platform Admin
Change the Owner of a Power App:
There are different ways to change the Owner of Power Apps using
# This call opens prompt to collect credentials (Azure Active Directory account and password) used by the commands
Add-PowerAppsAccount
Set-AdminPowerAppOwner -AppName '6aac46a2-a0f3-43f3-a2fb-51111785437c' -AppOwner '4cea7f11-c013-4bee-a6d1-ae3381a7f386' -EnvironmentName 'Default-2r6e8761-108d-417e-9bb4-e7c4e3ba2e23'
EnvironmentName is the environment of the PowerApp you would like to change the Owner. To get the environment name, the powershell command will help Get-PowerAppEnvironment
App Name is the App ID of the PowerApp. To get this information run the command Get-PowerApp ‘Name of the powerapp’
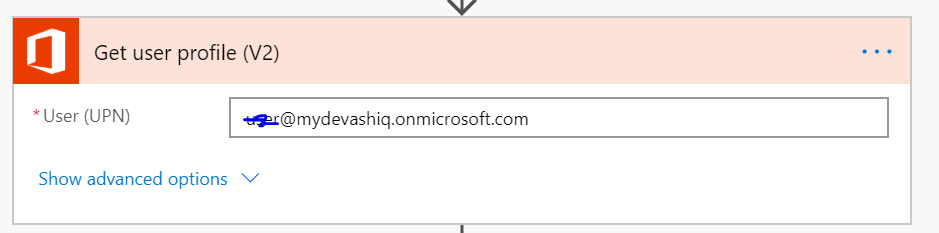
AppOwner is the Azure Active directory object id of the new Owner. It is the Unique id of the user in the tenant, you can get this information in multiple ways. To get it from flow, the following action would help. The outputs of this action should have the attribute Id which is the id of the user to be passed on the Powershell command.
The old owner will get viewer access to the app but you can get it changed if required. For other Powershell cmdlets for PowerApps & flow refer this article from Microsoft.
PowerShell Tip:
To get help on any Power shell cmdlet, type Get-Help cmdletname (e.g get-help Set-AdminPowerAppOwner). To get some examples type get-help Set-AdminPowerAppOwner -examples
PowerApps for Admin Connector in Flow:
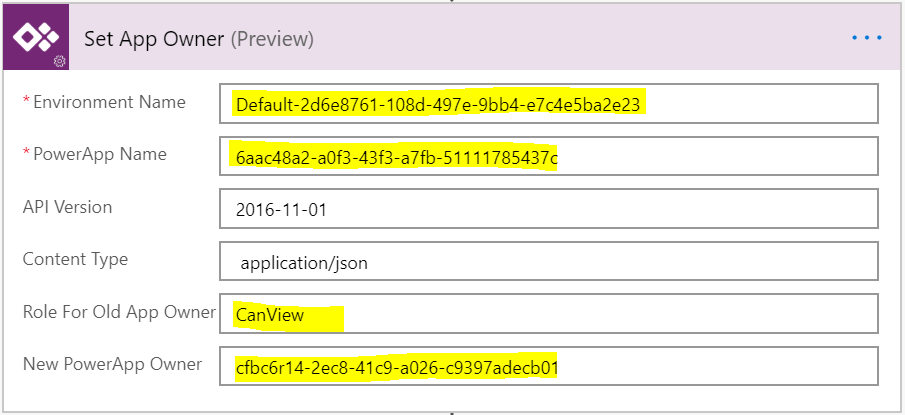
There is a preview action by the name “Set App Owner” under the connector PowerApps for admin which also helps you to change the owner of the PowerApp
PowerApps for Admin Connector in PowerApp:
The same connector used in the flow can also be used in PowerApp to change the owner for the powerapp. There is a Powerapps tool Connector Browser Tool from Microsoft to test the PowerApps for Admin connector which can be used to change the Owner of the app. The app is available as a package for download from this link, the link to the blogpost from Microsoft. You can select any actions, after entering values for the parameters click Submit.
You can test connector for Flow as well on this tool.
Assign a new Owner to a Power Automate Flow:
A new Owner can be assigned to an existing Power Automate flow by using the
Assign an Owner for a Flow created by an user who has left Organization by using PowerShell:
After installing the PowerShell module for PowerApps cmdlet for Administrators, enter the following command to get the Object ID of the user who created the flow
Establish a connection to use the Power cmdlets by entering the following command which opens a prompt to collect credentials (Azure Active Directory account and password of Power Platform Administrator or Global Admin)
Add-PowerAppsAccount
After copying the ObjectId of the user, enter the following PowerShell command Get-AdminFlow to get all the flows created by the user
Get-AdminFlow -CreatedBy userObjectId
The above command provides you the information of the Flow details. Copy the FlowName in GUID format and EnvironmentName. Now to assign a new Owner, enter the Set-AdminFlowOwnerRole command after changing the userObjectId, flowNameGUID and the environmentGUID
If you get a 200 OK then the new owner is assigned to the Flow. You can also remove an Owner by the following command, the only catch is you will not be able to remove the creator of the flow
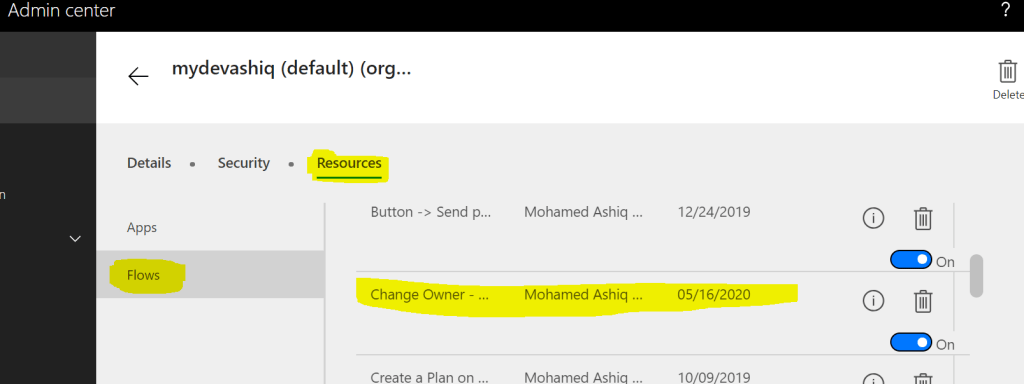
Assign an Owner for a Flow created by an user who has left Organization by using the Admin Center:
This can be done by connecting to the Flow Admin center, click the environment which has the flow
Click resources & then click Flows
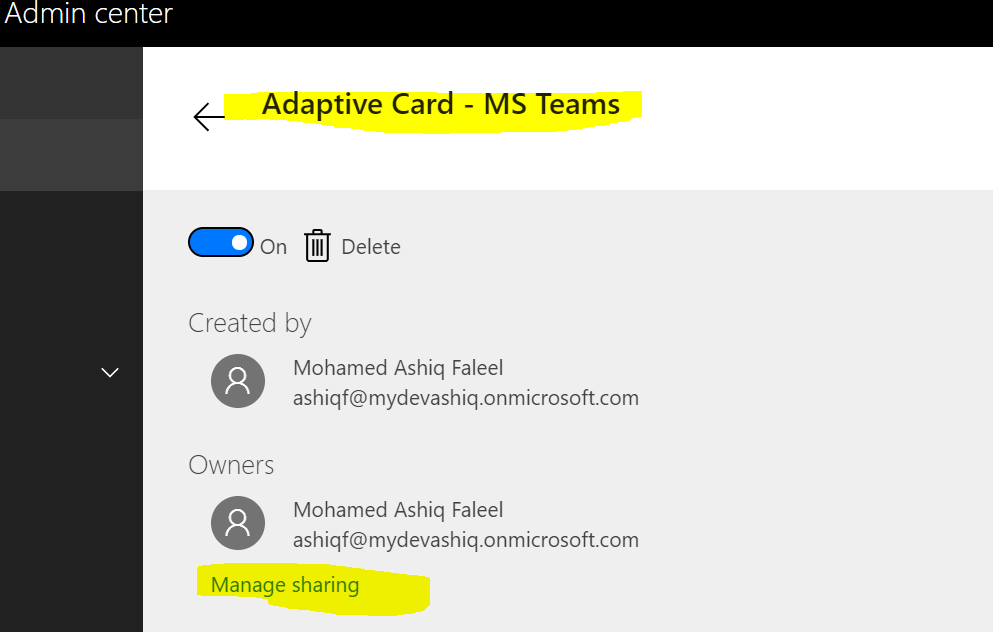
Then look for the flow which needs the update, click the flow & click Manage sharing to add Owner
You can also export the flow as a package & then recreate it to have a new Owner. Follow this blogpost from Microsoft.
Summary: On this post, I’ve covered different ways to update the owner for PowerApps & Flow using Powershell & Admin connector in Flow & PowerApps. Hope you find this post useful & informational. Let me know if there is any comments or feedback below.
A decade back I was part of a team to automate the On & Offboarding process of employees for a customer using .NET framework, it had a module to provision user accounts in an on-premise environment. I still remember having used couple of dll’s for Active directory 2003 & exchange 2007 to create AD & Email account. It was not easy but nowadays with the Office 365 in place its so easy to create account & enable different Office 365 services (Exchange, SharePoint, Yammer etc) for a user in Azure Active directory. This example will be applicable for the Organization which does not have On-premise Active directory. Organizations having On-premise active directory, the user account’s will be synchronized from On-premise AD to Azure AD. On this post I am going show you how to
Create Azure AD account & assign license using Power Automate
Assign License using Graph Endpoint
Create Azure AD account & assign license using Power Automate:
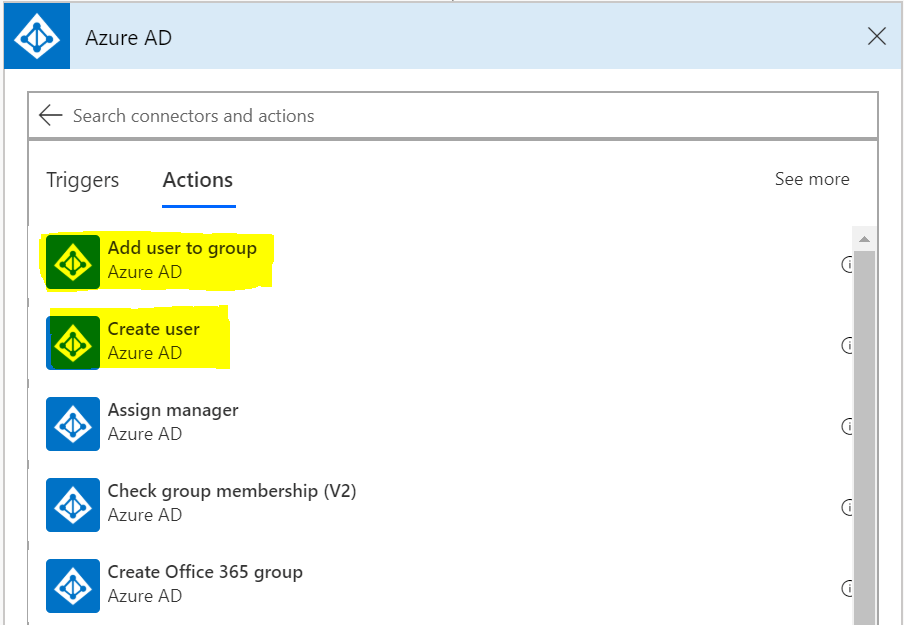
There is a Power Automate action Create user under the connector Azure AD which helps us to create account in Azure AD but there is no action as of now to assign individual license to a user but we can overcome this by adding the user to the AD security group which has a license assigned to it.
There is a flow action Add user to groupunder the same connector for adding the user to the security group, all the members of the group will get the license assigned on that group. The Azure AD connector does not return custom attributes of Azure AD. For e.g you can’t assign a value to a custom AD attribute with the Create user action, if you want to assign a custom attribute or an attribute which is not exposed in the Create User action then the account has to be created using PowerShell. There are ways to call a PowerShell script from Azure Automation Runbooks with the help of a flow action.
Other Azure AD actions apart from the above screenshot which could be of use are
Create group
Get group members
Get groups of a user
Get user
Remove Member from Group
Update user
There are templates available in Power automate template section which helps you create account based on the information from the SharePoint List, based on HTTP request etc
Prerequisite:
Permissions on Azure AD:
Group.ReadWrite.All
User.ReadWrite.All
Directory.ReadWrite.All
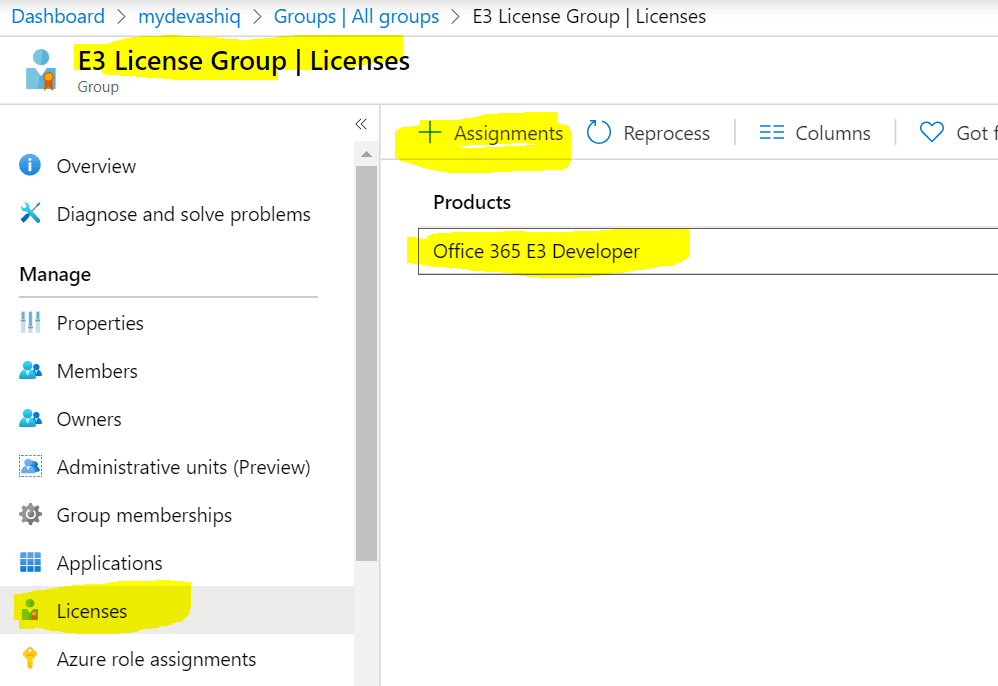
Security group with license assigned
For assigning a license to Security group, go to Azure AD Admin center. Follow this documentation from Microsoft to assign license to a group.
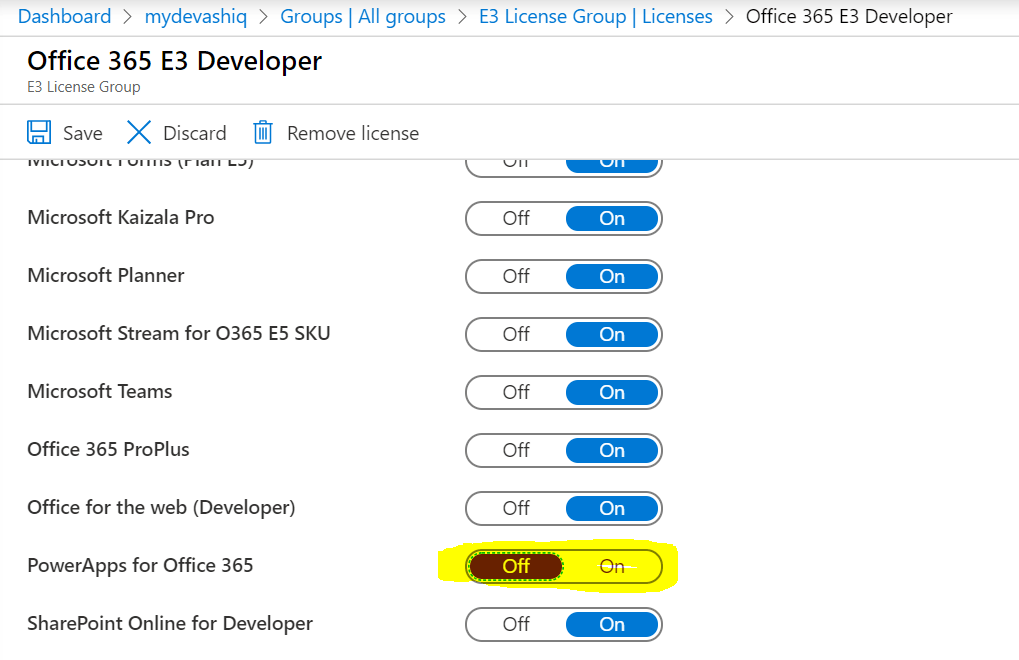
You can also turn off certain services from the license to the group, for e.g Turning off the Power App service for the user
You can also use dynamic groups for assigning license to a user, if you have dynamic group based license assignment to a user then you could ignore the step on the flow to add user to the security group. Dynamic groups works based on rules to determine group membership, for e.g if a user has an AD attribute set for Department. In this case the AD user created with certain department will get automatically added to the group which will in turn assign a license to the user.
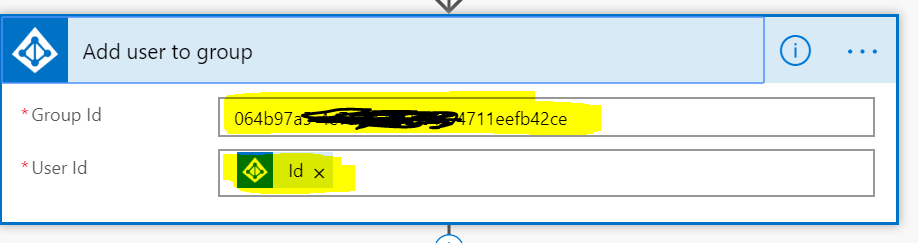
Let’s now create the flow, I have used an Instant flow with trigger Manually Trigger a flow. Add the action Create user from the connector Azure AD
Now add the action Add user to group, the Group Id should be for the Security group which has a license assigned to it. The User Id field should be dynamic value Id from the previous action Create user.
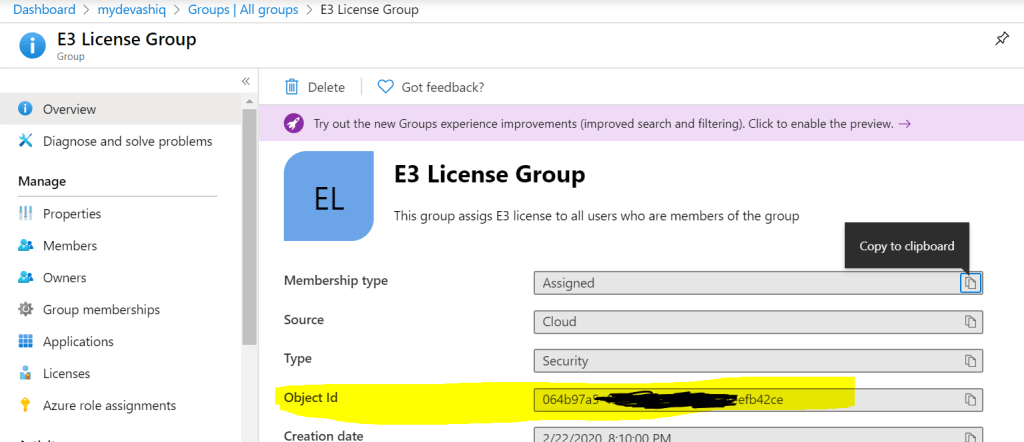
To get the group Id, go to Azure AD
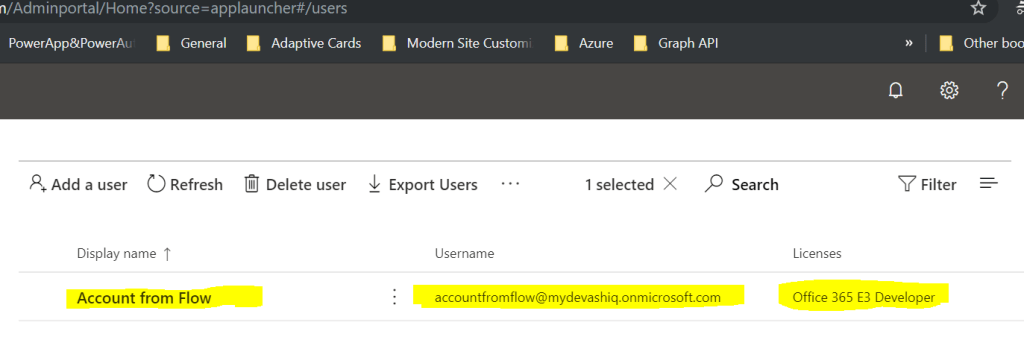
Run the flow. Once the flow runs successful the user account will be provisioned on Azure Ad with a license.
Assign License using Graph Endpoint:
There is a beta graph endpoint to assign license to a user. Find the Microsoft documentation for more information
All types of license (E5, E3, PowerApps, Power etc) has a Service Plan id also called as SKU id. Find the list of SKU id’s on this link if your tenant has procured the license for the service
The first SKU id is for Enterprise Mobility & Power BI (Free)
To remove the license for a user, use the collection removeLicenses. This graph endpoint to assign license can also be called from a Flow.
Summary: You can also use a HTTP request trigger in the Flow for integrating with other applications. On next post I will write about creating account in On-premise Active Directory. Hope you find this post useful & informational. Let me know if there is any comments or feedback below.