Convert Outlook Email with embedded images to PDF using PowerAutomate

Recently I’ve came across a business case with need to automate the conversion of Outlook email messages with embedded images to PDF document. This could be done manually on Outlook client using Microsoft Print to PDF or browser Print if opened using Outlook on the Web. This process can be automated with the help of PowerAutomate trigger When a new email arrives and actions Export Email, Convert File, Create file but if an email has an embedded image or HTML content it will not work as of now. There are Third party connectors in Power Automate from Muhimbi, Plumsail which might have this functionality but I’ve not tested those yet. PowerAutomate action Export Email converts the email to .eml file.

An EML file is an email message containing the content of the message, along with the subject, sender, recipient(s), and date of the message in plain text format. Once you have the .eml file change the file extension from .eml to .txt where you can see the content. If there is any embedded image it will stored in the Base64 format. You can also change the .eml file extension to .mht and open it directly in Internet Explorer

For this blogpost I’ve used third party API service from ConvertAPI to convert Email message to PDF, they have REST API endpoints to convert Word, Excel, PowerPoint, HTML, PDF and Image formats. There is also a Free Plan with ConvertAPI where you get 1500 seconds API execution time if you sign up.

You can also create your own API service hosted in Azure for conversion with the .NET libraries like iTextSharp, GroupDocs, PDFSharp etc. Let’s go ahead & create flow to

  1. Convert Email to PDF – Without Embedded image
  2. Convert Email to PDF – With Embedded image

The above two flows packages can be downloaded from Github repo.

Convert Email to PDF – Without Embedded image:

Power Automate connector OneDrive for Business has an action Convert file (preview) converts files to different formats such as PDF, HTML, JPG etc. This connector can be used to convert a simple email with out an embedded image.

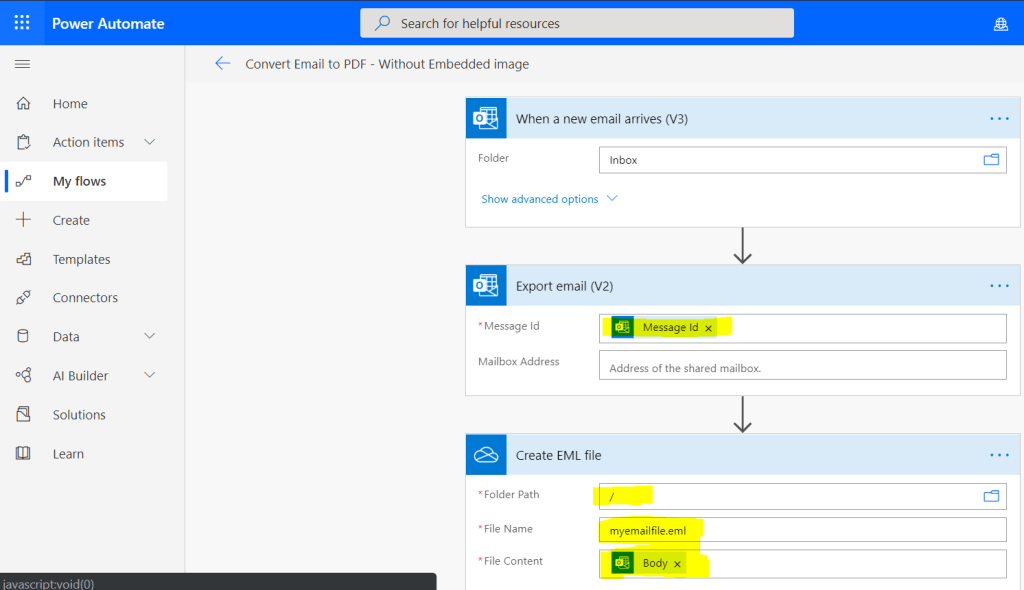
Step 1: Create a flow with Automated trigger When a new email arrives & configure the trigger parameters by clicking Show advanced options.

Step 2: Add the action Export email with Message Id from the output of the previous action. This action creates the .eml file

Step 3: Add the action Create file from the connector OneDrive for Business. Select the Folder path from your One drive, Enter the File Name for the .eml file & the File Content should be Body from the output of the action Export email (Previous). Find the screenshot below

Step 4: Add the action Convert file from the connector OneDrive for Business with Id from the output of the previous action Create File.

Step 5: Add the action Create file from the connector OneDrive for Business. This step is for storing the PDF file back to the OneDrive. Select the Folder path from your One drive to store the PDF file, Enter the File Name for the PDF file & the File Content should be File content from the output of the action Convert file. Find screenshot below

Note: The storage location I’ve chosen is Onedrive, you can choose SharePoint, Azure blob etc. Based on the need you can choose to delete the .eml files after the file conversion is done.

Convert Email to PDF – With Embedded image:

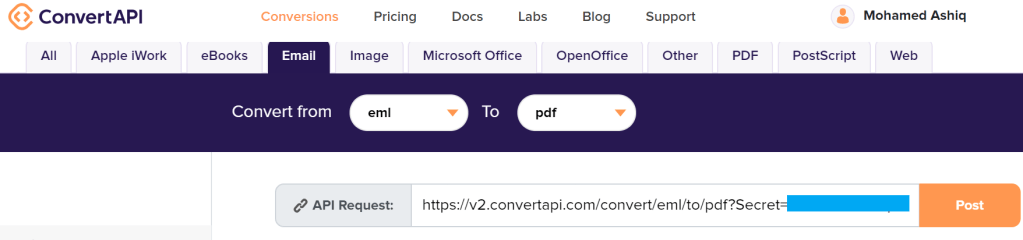
As already said the previous flow will not convert an email with embedded image as expected. Be ready with the API endpoint from ConvertAPI to convert email to PDF. The endpoint will have the secret as a query string shown as below

https://v2.convertapi.com/convert/eml/to/pdf?Secret=yoursecretkeyfromconvertapi

Note: On this flow I will be using the .eml file generated from the previous flow.

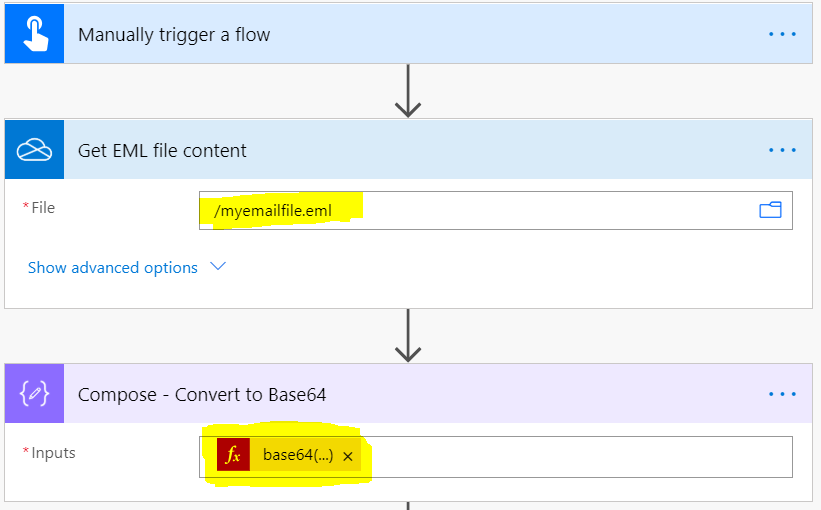
Step 1: Create a flow with Instant trigger Manually trigger a flow.

Step 2: Add the action Get file content from the connector OneDrive for Business. Select the .eml file which has the embedded image from the storage location i.e the file from OneDrive.

Step 3: Add the action Compose from the connector Data Operation. This step is to convert in to base64 representation a requirement for the convert API to work. On the Inputs file go to the expression editor and add the function base64(file content from the previous action get file) for converting .eml to base64.

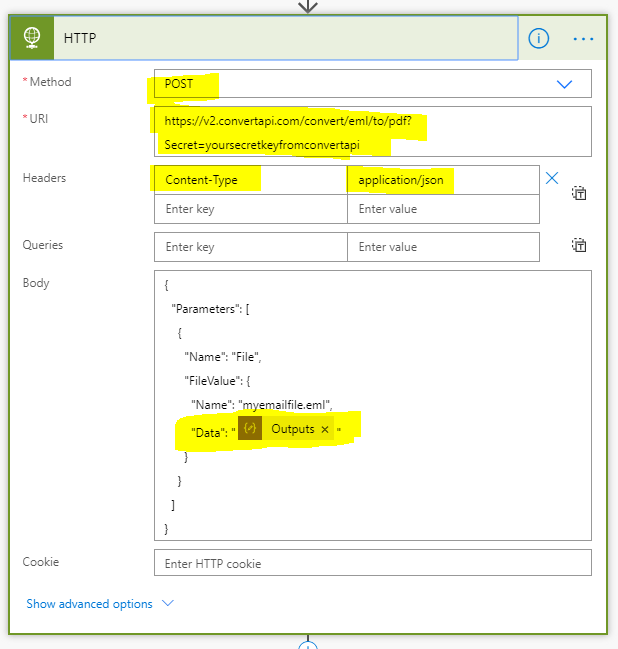
Step 4: Add the action HTTP (Premium) from the connector HTTP to make a POST request to the API convert API endpoint.

Method: POST

URI: https://v2.convertapi.com/convert/eml/to/pdf?Secret=yoursecretkeyfromconvertapi

Headers:

Key: Content-Type

Value: application/json

Body: You can generate this from the ConvertAPI site by uploading a .eml file on the site. Once this data is added to the HTTP action Body parameter change the Data parameter should be the Output of the previous action Compose – Convert to Base64

{
  "Parameters": [
    {
      "Name": "File",
      "FileValue": {
        "Name": "myemailfile.eml",
        "Data": "@{outputs('Compose_-_Convert_to_Base64')}"
      }
    }
  ]
}

Step 5: Add the action Parse JSON from the connector Data Operation. This step is to parse the response of the HTTP POST action to the ConverAPI endpoint. You can generate the scheme by copying from the Flow run history for the HTTP action output. The schema will be look like

{
    "type": "object",
    "properties": {
        "ConversionCost": {
            "type": "integer"
        },
        "Files": {
            "type": "array",
            "items": {
                "type": "object",
                "properties": {
                    "FileName": {
                        "type": "string"
                    },
                    "FileExt": {
                        "type": "string"
                    },
                    "FileSize": {
                        "type": "integer"
                    },
                    "FileData": {
                        "type": "string"
                    }
                },
                "required": [
                    "FileName",
                    "FileExt",
                    "FileSize",
                    "FileData"
                ]
            }
        }
    }
}

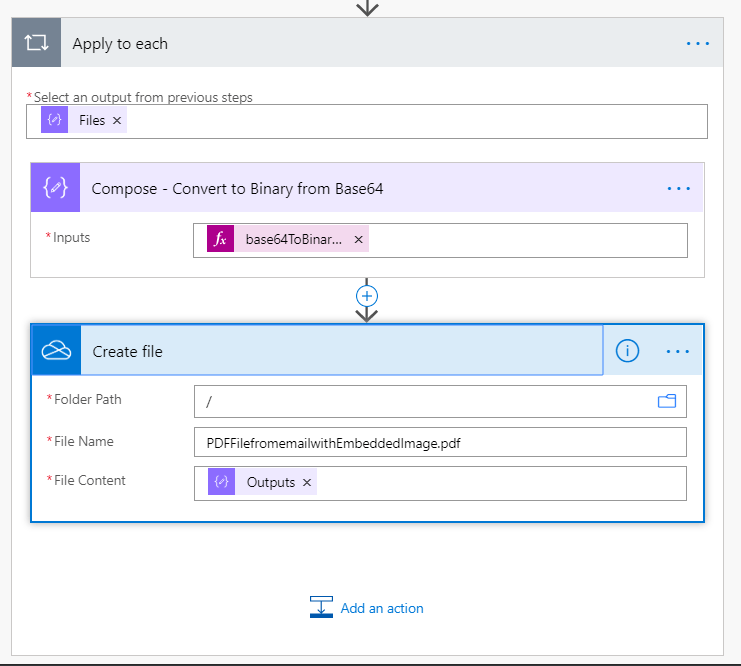
Step 6: Add the Compose action to convert the base64 data to binary to create the PDF from the HTTP request response. Select the filedata from the Output of the Parse JSON action which will automatically create a Apply to each since the Files is an array. Then add the following to the inputs of the of the compose action

base64toBinary(items(‘Apply_to_each’)?[‘FileData’]).

Now add the Create file action from the connector OneDrive for Business as shown below. The parameter File content should be output of the Compose action. PFB the screenshot of the flow actions

Now its time to test the flow, run the flow & check your OneDrive for the PDF file. PFB the screenshot of the PDF file with embedded image

Summary: I am not vouching to use the ConvertAPI service for converting the email to PDF. Just a sample for a use case where you get some knowledge on different actions usage & some information on the .eml file which Microsoft has used for storing email content. If its going to be heavily used or if the data is secure, then I advise you to create a REST API endpoint of your own hosted in Azure for the conversion. Hope you find this post useful & informational. Let me know if there is any comments or feedback by posting a comment below.

Batch SharePoint requests [GET, POST, PATCH, DELETE] in PowerAutomate and MS Graph

Batching helps you in optimizing the performance of your application by combining multiple requests into a single request. SharePoint Online & MS Graph APIs supports the OData batch query option. Batch requests MUST be submitted as a single HTTP POST request to the batch endpoint of a service as below for

The request body of the above POST request must be made up of an ordered series of query operations [GET] and/or ChangeSets [POST or PATCH or DELETE]. You can have different combination of change sets.

In this blog post, I am going to show you how to batch multiple SharePoint requests for Creating, Reading, Updating & Deleting List items in

  1. PowerAutomate
  2. MS Graph

Pre-Requisites:

Have the following items ready to follow along this post

  1. SharePoint Site
    1. Site Id [GUID of the Site]
    2. Create a SharePoint List by the Name EmployeeInformation with the schema
      1. Title [Default]
      2. Location [Custom: Single Line of Text]
    3. List Id [GUID of the above list]
  2. Graph Explorer to test the Graph batching

Batch SharePoint requests in PowerAutomate:

If there is a requirement for multiple requests to be performed in SharePoint from your flow, the batch request with SharePoint Online REST API helps in reducing the execution time of your flow by combining many operations into a single request to SharePoint. Create an Instant Flow with trigger “Manually trigger a Flow” and the action Send an HTTP request to SharePoint to send the batch requests.

Lets now prepare the parameters to be passed for the Send an HTTP request to SharePoint action:

Site Address: https://mydevashiq.sharepoint.com/sites/test77

Method: POST

Headers:

  • Key: accept Value: application/json;odata=verbose
  • Key: content-type Value: multipart/mixed; boundary=batch_cd329ee8-ca72-4acf-b3bf-6699986af544

The boundary specification with batch_guid used on the content type header can be any random guid. In the request body the batch_guid will be used. To understand more about the OData batch operation, go through this documentation.

Body:

The request body given below is for reading all the items [GET], creating a list item, deleting an existing item & updating an existing item on the EmployeeInformation List using REST API endpoints. A ChangeSet (random guid) is used to group one or more of the insert/update/delete operations and MUST NOT contain query operations [GET]. For the query operation there must be separate batch as per the example below

--batch_cd329ee8-ca72-4acf-b3bf-6699986af544
Content-Type: application/http
Content-Transfer-Encoding: binary

GET https://domain.sharepoint.com/sites/sitename/_api/web/lists/GetByTitle('EmployeeInformation')/items?$select=Title,Location HTTP/1.1
Accept: application/json;odata=nometadata

--batch_cd329ee8-ca72-4acf-b3bf-6699986af544
Content-Type: multipart/mixed; boundary="changeset_64c72699-6e7c-49c4-8d9b-6b16be92f7fc"
Content-Transfer-Encoding: binary

--changeset_64c72699-6e7c-49c4-8d9b-6b16be92f7fc
Content-Type: application/http
Content-Transfer-Encoding: binary

POST https://domain.sharepoint.com/sites/sitename/_api/web/lists/GetByTitle('EmployeeInformation')/items HTTP/1.1
Content-Type: application/json;odata=verbose

{
    "__metadata": {
      "type": "SP.Data.EmployeeInformationListItem"
    },
    "Title": "Mohamed Shaahid Faleel",
    "Location": "England"
}

--changeset_64c72699-6e7c-49c4-8d9b-6b16be92f7fc
Content-Type: application/http
Content-Transfer-Encoding: binary

DELETE https://domain.sharepoint.com/sites/sitename/_api/web/lists/GetByTitle('EmployeeInformation')/items(37) HTTP/1.1
If-Match: *

--changeset_64c72699-6e7c-49c4-8d9b-6b16be92f7fc
Content-Type: application/http
Content-Transfer-Encoding: binary

PATCH https://domain.sharepoint.com/sites/sitename/_api/web/lists/GetByTitle('EmployeeInformation')/items(30) HTTP/1.1
Content-Type: application/json;odata=nometadata
If-Match: *

{
    "Title": "Mohamed Faleel",
    "Location": "USA
}

--changeset_64c72699-6e7c-49c4-8d9b-6b16be92f7fc--

--batch_cd329ee8-ca72-4acf-b3bf-6699986af544--

Once the above action is executed the response can be parsed to get the required information if you’ve used a GET request as per this documentation from Microsoft. PFB the screenshot of the action

The request body can be generated dynamically based on the requirement.

Batch SharePoint requests in MS Graph:

As we have done batching using the SharePoint REST APIs, in a similar manner you can combine multiple requests in one HTTP call using JSON batching for MS Graph. Here I will use the MS Graph explorer to test the batch request. Find the request parameters

Endpoint URL: https://graph.microsoft.com/v1.0/$batch

Method: POST

Body:

I’ve used the Site Id and List Id for the EmployeeInformation list to construct the SP endpoint URL’s as per the documentation for Creating, Reading, Updating & Deleting SP list items.

{
    "requests": [
      {
        "id": "1",
        "method": "POST",
        "url": "/sites/{77b3a8c8-549f-4848-b82c-8bb6f4864918}/lists/{2f923934-d474-4473-8fc0-3486bd0c15c5}/items",
         "body": {
          "fields":{"Title":"Test from Graph","Location":"Oslo"}
        },
        "headers": {
          "Content-Type": "application/json"
        }
      },
      {
        "id": "2",
        "method": "GET",
        "url": "/sites/{77b3a8c8-549f-4848-b82c-8bb6f4864918}/lists/{2f923934-d474-4473-8fc0-3486bd0c15c5}/items"
      },
      {
        "id": "3",
        "url": "/sites/{77b3a8c8-549f-4848-b82c-8bb6f4864918}/lists/{2f923934-d474-4473-8fc0-3486bd0c15c5}/items/44",
        "method": "PATCH",
        "body": {
            "fields":{"Title":"Mohamed Ashiq Faleel","Location":"Stockholm"}
        },
        "headers": {
          "Content-Type": "application/json"
        }
      },
      {
        "id": "4",
        "url": "/sites/{77b3a8c8-549f-4848-b82c-8bb6f4864918}/lists/{2f923934-d474-4473-8fc0-3486bd0c15c5}/items/50",
        "method": "DELETE"
      }
    ]
  }

On a same way you can batch different APIs endpoint from MS Graph. JSON batching also allows you to sequence the requests. Find below the screenshot from Graph explorer

Graph explorer also generates code snippets for the different programming languages

JavaScript Code snippet

Summary: On this post we have seen how to batch SharePoint requests using PowerAutomate & MS Graph. Microsoft has used request batching on many first party features. Hope you have found this informational & helpful in some way. Let me know any feedback or comments on the comment section below

Create/Delete a SharePoint custom theme using PowerAutomate

In a modern SharePoint site you can create custom themes using PowerShell, REST API & CSOM. In this blogpost I will show you how to create themes using PowerAutomate. The following REST endpoints are available

There is an online Theme Generator tool that you can use to define new custom themes. At the time of writing this post, the endpoints are open to everybody & not just to the SharePoint tenant admins which seems to be quite buggy. Laura Kokkarinen has written a very detailed blog post about this topic. I’ve got the inspiration to write about this topic from John Liu who has recently recorded a video about this. Find screenshot from the Theme generator tool:

Once you have defined the theme from the tool, click on the Export theme button on the Right top corner of the tool to export the theme as a code block in JS, JSON & PowerShell. In this case, click JSON & Copy the generated block

{
  "themePrimary": "#50AFC6",
  "themeLighterAlt": "#f7fcfd",
  "themeLighter": "#def1f6",
  "themeLight": "#c3e6ee",
  "themeTertiary": "#8ecddd",
  "themeSecondary": "#61b8ce",
  "themeDarkAlt": "#489eb3",
  "themeDark": "#3c8597",
  "themeDarker": "#2d626f",
  "neutralLighterAlt": "#faf9f8",
  "neutralLighter": "#f3f2f1",
  "neutralLight": "#edebe9",
  "neutralQuaternaryAlt": "#e1dfdd",
  "neutralQuaternary": "#d0d0d0",
  "neutralTertiaryAlt": "#c8c6c4",
  "neutralTertiary": "#d9d9d9",
  "neutralSecondary": "#b3b3b3",
  "neutralPrimaryAlt": "#8f8f8f",
  "neutralPrimary": "gray",
  "neutralDark": "#616161",
  "black": "#474747",
  "white": "#ffffff"
}

Flow for Creating or adding the Theme to the tenant:

Let’s create an instant flow with trigger Manually trigger a flow to add a theme to the tenant. Add two Compose actions as shown below

The first compose action is the actual definition copied from the theme generator tool

{
  "palette" : 
JSON block copied from the Theme generator tool
}

The second compose action has the name of the theme & its stringified JSON from the output of the previous compose action. To convert the JSON to string add a string expression on the dynamic content pane

{
"name":"My first Custom theme created using FLOW", 
"themeJson": @{string(outputs('Compose_-_Custom_Theme_Pallete'))}
}

Now add the action Send an HTTP request to SharePoint with the following parameters

Site Address: https://domain.sharepoint.com/sites/sitename

Method: POST

URI: /_api/thememanager/AddTenantTheme

Headers:

Key: Accept

Value: application/json;odata.metadata=minimal

Body: Output of the Second compose action (Compose – Theme Name)

Now you are ready to test the flow. Once its successful you can apply the custom theme to the site

Click cog wheel on the site to select the theme by selecting the Change the look link

For deleting the theme, add the action Send a HTTP request to SharePoint with the following parameters

Site Address: https://domain.sharepoint.com/sites/sitename

Method: POST

URI: /_api/thememanager/DeleteTenantTheme

Headers:

Key: Accept

Value: application/json;odata.metadata=minimal

Body: { “name”:”the name of your custom theme” }

Summary: Hope you find this post useful & informational. Let me know if there is any comments or feedback below.

Multiple ways to access your On-premise data in Microsoft 365 and Azure

If your organization is using a hybrid cloud environment, this post will shed some light to integrate on-premise resources with Microsoft 365 & Azure services. Hybrid integration platforms allows enterprises to better integrate services and applications in hybrid environments (on-premise and cloud). In this blog post, I will write about the different services & tools available with in Microsoft Cloud which allows you to connect or expose your On-premises data or application in Office 365. There are still many enterprise organizations on Hybrid mode due to various factors. It can be a challenging task to integrate your on-premises network but with right tools & services in Office 365 & Azure it can be easier. Find below the high-level overview & some references on how to

  1. Access your on-premise data in Power Platform & Azure Apps (Logic Apps, Analysis Services & Azure Data factory)
  2. Programmatically access your on-premise resources in your Azure Function app
  3. Access on-premise resources in Azure automation account
  4. Expose your on-premise Application or an existing WEB API in Office 365 cloud

Access on-premise data in Power Platform & Azure Apps (Logic Apps, Analysis Services & Azure Data factory):

The on-premises data gateway allows you to connect to your on-premises data (data that isn’t in the cloud) with several Microsoft cloud services like Power BI, Power Apps, Power Automate, Azure Analysis Services, and Azure Logic Apps. A single gateway can be used to connect multiple on premise applications with different Office 365 applications at the same time.

At the time of writing, with a gateway you can connect to the following on-premises data over these connections:

  • SharePoint
  • SQL Server
  • Oracle
  • Informix
  • Filesystem
  • DB2

To install a gateway, follow the steps outlined in MS documentation Install an on-premises data gateway. Install the gateway in standard mode because the on-premises data gateway (personal mode) is available only for Power BI.

Once the data gateway is installed & configured its ready to be used in the Power platform applications.

  1. PowerApps
  2. PowerAutomate
  3. PowerBI

The other catch the gateway is not available for the users with Power Automate/Apps use rights within Office 365 licenses as per the Licensing overview documentation for the Power Platform. Data gateways can be managed from the Power Platform Admin center.

Shane Young has recorded some excellent videos on this topic for PowerApps & PowerBI.

To use in

  1. Azure Logic Apps
  2. Azure Analysis service
  3. Azure Data Factory

create a Data Gateway resource in Azure.

High Availability data gateway setup:

You can use data gateway clusters (multiple gateway installations) using the standard mode of installation to setup a high availability environment, to avoid single points of failure and to load balance traffic across gateways in the group.

No need to worry about the security of the date since all the data which travels through the gateway is encrypted.

Data gateway architecture:

Find below the architecture diagram from Microsoft on how the gateway works

I recommend you to go through On-premises data gateway FAQ.

Integration Service Environment:

As per the definition from Microsoft an integration service environment is a fully isolated and dedicated environment for all enterprise-scale integration needs. When you create a new integration service environment, it’s injected into your Azure Virtual Network allowing you to deploy Logic Apps as a service in your VNET. The private instance uses dedicated resources such as storage and runs separately from the public global Logic Apps service. Once this logic apps instance is deployed on to your Azure VNET, you can access your On-premise data resources in the private instance of your Logic Apps using

  • HTTP action
  • ISE-labeled connector for that system
  • Custom connector

For the pricing of ISE, refer this link.

Programmatically access your on-premise resources in your Azure Function app

As you all know Azure Functions helps in building functions in the cloud using serverless architecture with the consumption-based plan. This model lets the developer focus on the functionality rather than on infrastructure provisioning and maintenance. Okay let’s not more talk about what a Function app can do but let us see on how to connect to your on-premise resources (SQL, Biztalk etc) within your function.

During the creation of a Function app in Azure, you can choose the hosting plan type to be

  • Consumption (Serverless)
  • Premium
  • App Service plan

Consumption based plan is not supported for the on-premise integration so while creating the app the hosting plan has to either premium or app service based plan & the Operating system has to to be Windows. On-premise resources can be accessed using

  1. Hybrid Connections
  2. VNet Integration

Hybrid Connections:

Hybrid Connections can be used to access application resources in private networks which can be on-premise. Once the Function app resource is created in Azure, go to Networking section of the App service to setup & configure. Go through the documentation from Microsoft for the detailed instructions to set this up.

How it works:

The Azure Hybrid Connection represents a connection between Azure App Service and TCP endpoint (host and port) of an on-premise system. On the diagram below Azure Service Bus Relay receives two encrypted outbound connections. One from the side of Azure App Service (Web App in our case) and another from the Hybrid Connection Manager (HCM). HCM is a program that must be installed on your on-premise system. It takes care of the integrations between the on-premise service (SQL in this case) with Azure Service Bus Relay.

Once the setup is done, you can create a connection string in Appsettings.json file or from Azure function app interface of your function app. After this you can access the data in your function app code.

I’ve found a couple of interesting blogs about this setup.

VNet Integration:

In the Networking features of the App service, you can add an existing VNET. An Azure Virtual Network (VNet) is a representation of your own network (private) in the cloud. It is a logical isolation of the Azure cloud dedicated to your subscription.

In Azure Vnet you can connect an on-premise network to a Microsoft VNet, this has been documented from Microsoft here. Once there is integration between your Azure Vnet & on-premise network and the VNet is setup on your function app you are set to access on-premise resources in your function app.

Access on-premise resources in Azure automation account:

Azure Automation is a service in Azure that allows you to automate your Azure management tasks and to orchestrate actions across external systems from right within Azure. Hybrid runbook worker feature allows you to access on-premise resources easily. The following diagram from Microsoft explains on how this feature works

I’ve written a blogpost recently about this feature for automating on-premise active directory.

Expose your on-premise Application or an existing WEB API in Office 365 cloud:

Azure Active Directory’s Application Proxy provides secure remote access to on-premises web applications (SharePoint, intranet website etc). Besides secure remote access, you have the option of configuring single sign-on. It allows the users to access on-premise applications the same way they access M365 applications like SharePoint Online, PowerApp, Outlook etc. To use Azure AD Application Proxy, you must have an Azure AD Premium P1 or P2 license.

How it works:

The following diagram from Microsoft documentation shows how Azure AD and Application Proxy works

Find below documentations on how to

  1. Add an on-premises application for remote access through Application Proxy in Azure Active Directory
  2. Secure access to on-premises APIs with Azure AD Application Proxy
  3. Use Azure AD Application Proxy to publish on-premises apps for remote users
  4. Deploy Azure AD Application Proxy for secure access to internal applications in an Azure AD Domain Services managed domain

Once the connector service is installed from your Azure AD application proxy, you can add an on-premise app as shown below

The above step will register an application with App registrations.

Summary: I’ve given some overview about the different services & tools to connect & integrate on-premise resources with Microsoft cloud. Hope you like this post & find it useful. Let me know any feedback or comments on the comment section below

Copy & Apply Site Template to a SharePoint site using Power Automate

If you have a requirement to copy a site template (Site Pages including images & webpart, site column, site content type, navigation etc) from an existing SharePoint site & apply it to a recently created SharePoint site, this blog post would be helpful.

Pre-requisites:

  • SharePoint site collection administrator
    • SharePoint site with a custom list associated to a Flow
  • Access to Premium connector (Azure Automation) in Power Automate
  • Azure subscription to create Azure Automation Runbook
Technical Diagram

SharePoint Patterns and Practices (PnP) community has developed a library of PowerShell commands (PnP PowerShell) that allows you to perform complex provisioning and artefact management actions towards SharePoint. On this example I will be using PnPProvisioningTemplate cmdlet’s to copy the pages including the assets & webparts to another site but you can do much more than this. Find the PnP cmdlets I will using

To generate a .pnp package (Site Template) from the source site

Get-PnPSiteTemplate -out template.pnp -Handlers PageContents -IncludeAllClientSidePages -PersistBrandingFiles

The parameter -PersistBrandingFiles saves all the asset files including the image files from the Site Assets library that makes up the composed look of page. Parameter -Handlers <Handlers> processes only the information passed to it. On the above example it processes only the Pages & its associated contents & not lists etc The PnP cmdlet Get-PnPSiteTemplate creates a package with extension .pnp which can be converted to a ZIP package by changing the extension to .ZIP from .pnp. Look at the Get-PnPSiteTemplate documentation for the various parameters it supports.

PnP package. Explore the Files folder

Once the package .pnp file is ready, the package can be applied to another site using the command Invoke-PnPSiteTemplate

To Apply the Template to a destination site (Apply template to site):

Invoke-PnPSiteTemplate .\template.pnp

If you want to test these commands in PowerShell console on your local computer, install the PnP module

Keep in mind before executing the PnPSiteTemplate commands, the site context must be created for both source & target site by creating a connection as shown below

Connect-PnPOnline -url "sourcesiteurl"
Get-PnPSiteTemplate -out template.pnp -Handlers PageContents -IncludeAllClientSidePages -PersistBrandingFiles
Connect-PnPOnline -url "targetsiteurl"
Invoke-PnPSiteTemplate .\template.pnp

For interactive login, use command

Connect-PnPOnline -url “sourcesiteurl” -UseWebLogin

or

Connect-PnPOnline -url “sourcesiteurl” -Interactive

Setup SharePoint List:

Till now you would have got some ideas about the PnP commands we will be using on the Azure Automation runbook, let’s now create the SharePoint list to collect the Source (Template to be copied from) & target URL (Template to be applied) for the SharePoint site. Find the list Schema for the List to be named as Site Template

Azure Automation Runbook:

The list is ready, let us now create the Azure automation runbook. I’ve written a post Execute SharePoint Online PowerShell scripts using Power Automate, it will help you with steps (Step 1 – Create automation account, Step 2 – Import SharePointPnPPowerShell Online PowerShell Module & Step 3 – Add user credentials) to create the automation account & runbook to execute the PnP PowerShell command for copying & applying the site template.

Step 4: Now we are good to create the Runbook, to create it click Runbooks under the section Process Automation and then click Create a runbook. Enter the Name of the Runbook ApplySiteTemplate, select the Runbook type to PowerShell and click Create.

Create Runbook in Azure Automation Account

Now let’s add the code by editing the runbook. The section Dynamic Parameters on the code will be passed from the flow. To connect to SharePoint Online site, we are using the SPO admin credentials created in Step 3. Find the code below

# Dynamic Parameters, will be passed from Flow
param(
  [parameter(Mandatory=$true)]
  [string]$SiteTemplateURL = "https://mydevashiq.sharepoint.com/sites/contosoportal",
  [parameter(Mandatory=$true)]
  [string]$ApplyTemplatetoURL = "https://mydevashiq.sharepoint.com/sites/contosositeportal"
)
# Credentials
$myCred = Get-AutomationPSCredential -Name "SPOAdminCred" 
# Connect to source site for creating the package or site template
Connect-PnPOnline -url $SiteTemplateURL -Credentials  $myCred
Get-PnPSiteTemplate -out template.pnp -Handlers PageContents -IncludeAllClientSidePages -PersistBrandingFiles
# Connect to destination site for applying the package or site template
Connect-PnPOnline -url $ApplyTemplatetoURL -Credentials  $myCred 
Invoke-PnPSiteTemplate .\template.pnp

The runbook is now created, you can test the script by clicking on Test Pane & pass parameters (Site URL etc) to test it. Click Publish button as shown below to publish so that it can be called from Power Automate.

You can also create the template (PnP Package) for a site & store it on a SP library. The PnP command to get the file

Connect-PnPOnline -url "siteurlwhichhasthePnPpackagefile" -Credentials  $myCred
Get-PnPFile -Url "/sites/sitenamewithPnPPackagefile/Shared Documents/template.pnp" -Filename "template.pnp" -AsFile

You can use a certificate instead of Username and Password to get a APP only access token to call PnP commandlet, for more details check the documentation for Connect-PnPOnline. It’s now time to create the flow to call the Runbook.

Power automate flow to call the Run Book:

You can now create a flow with automated trigger “When an item is created” from the SharePoint list created earlier to pass the Site Template URL & Apply to Site Template URL. Once the flow is created, add the action “Create Job” under the connector “Azure Automation” which is a premium connector.

Select the Azure Subscription which has the Automation account resource with runbook>Select Resource Group>Select Automation Account>Select the Runbook name which has the PS script. If there is a need to wait until the automation job completes then select Yes on the field “Wait for Job”. Enter the URL for SiteTemplateURL & ApplyTemplatetoURL

The flow is ready, run it to test now with parameters. I’ve used this sample to test a site (Template) which has

  • Customized home page with couple of standard webpart & images
  • 2 more pages with images & other standard webparts

has copied to another site. If there is a custom webpart on the source site which is added to a page, make sure to deploy it on the destination site.

Summary: Take a look at the SharePoint starter kit PnP package to explore more about the usage of different features in PnP provisioning. This example can also be extended with Site design & Site script which has the capability to call a flow. Hope you have enjoyed reading this post and find it useful. If you have any comments or feedback, please provide it on the comments section below.