In a SharePoint modern page, you as an author would be able to turn on or turn off comments while creating a page. Everyone with minimum Read access on a SharePoint site would be able to Post, Like, reply to a comment at a single level, @mention a person while commenting in a SharePoint page.
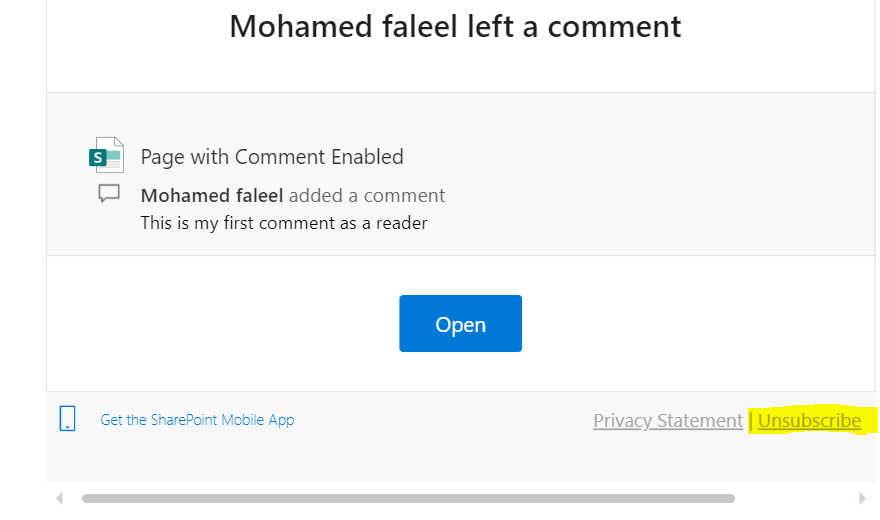
When someone comments on a page or news post, SharePoint notifies the author or the person mentioned in the header of the page via an email. The SharePoint mobile app also alerts the author whenever a comment is made. If there are multiple comments, it will be batched so that the authors receive a single email when several comments have been made within a short period of time. Additionally, author gets email notices when users reply to comments or leave a “like”. Author or a user can unsubscribe from notifications by clicking the “Unsubscribe” link in the footer of the email.
UnSubscribe
User with contribute access on a site would be able to delete any comments posted on the page which is quite an issue & not yet addressed by Microsoft. User with Read access to the site would be able to delete only the comments they have posted. Do you know where the comments are stored when ever you make a comment, they are stored in a separate data store with references to the Site Pages library guid & the item id of the page. The comments & likes are accessible via Rest API of the site. Find the different endpoints available for executing below actions
Getting comments & likes of a page item
Posting a comment on a page
Deleting a existing comment
There are couple of nice blog posts covering this topic with the API details. Find the links below:
On this blog post I am going to show you how to access the comments details of a SharePoint page using Power Automate.
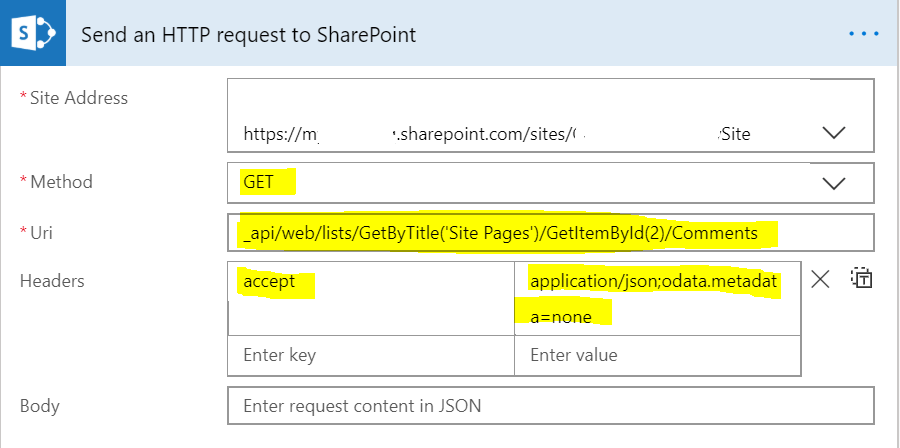
Let’s create an automated flow with trigger “Manually Trigger a Flow”, add an action “Send an Http request to SharePoint” since the API to retrieve the comments is an SharePoint rest API.
The API for getting the comments of a SharePoint page is
The odata.metadata=none option reduces the size of the payload significantly, and for many scenarios this is all that you need when working with list items
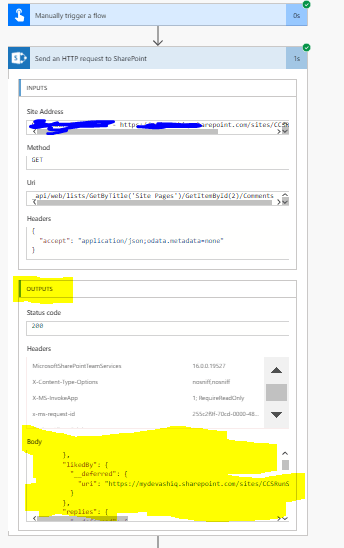
Run the flow, the output of this action would have all the data related to the comments posted by users on the page in a JSON format. To get the required information we will have to parse the JSON with the help of the Parse JSON action. Add the Parse to JSON action as below with content to the Body from Outputs of the action “Send an Http request to SharePoint”
Click on the button “Generate from sample” which loads a popup “Insert a Sample JSON payload” paste the run data of the flow for generating the schema automatically. To get the run data, go to the run history and click the run and go to outputs of the action “Send an Http request to SharePoint” copy everything inside the Body
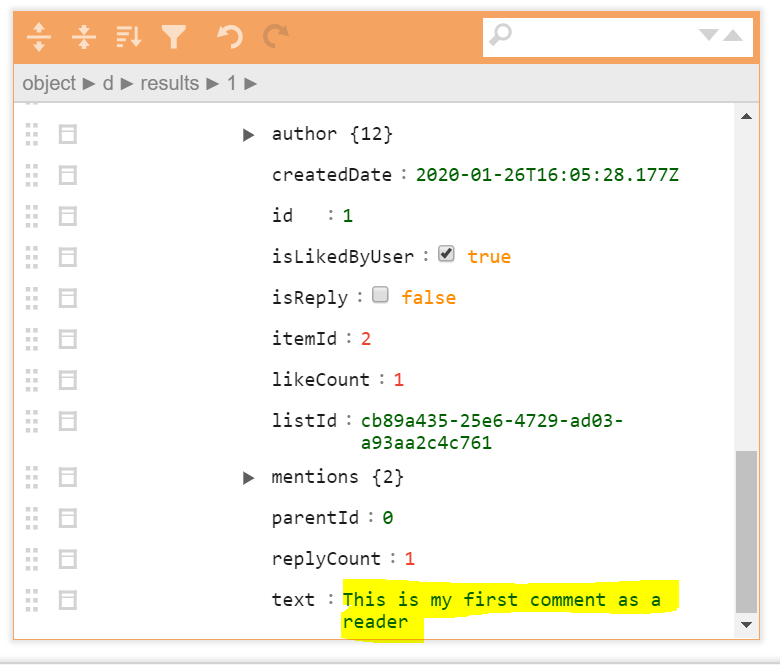
Find the information of the body in the JSON online viewer to decide what information you need & what is available on JSON output
Add the compose action to see all the information available from the Output of the parse action, I’ve added only text which has the comment text & email has the email address of the user posted the comment
Summary: There are different Rest API endpoints available for comments & likes in Modern SharePoint page, you can select the any of them based on the requirement. The api’s can also be used on SPFx solutions for customizing Comments feature. Hope you find this post useful. Let me know if there is any comments or feedback by posting a comment below.
Adaptive Cards a new way for developers to display & exchange content in a common and consistent way across different applications. It can be hosted on
Bot Framework Webchat
Cortona Skills
Outlook Actionable Messages
Windows Timeline
Microsoft Teams
Windows Notifications
SDKs (.NET, JavaScript, Android, React, iOS etc) are available for authoring & rendering cards inside your own apps. Microsoft has got a very great documentation on this. The schema explorer has got information about all the list of available Card elements, containers & actions sets to use. Adaptive card templating features which is now available in preview mode to help create, reuse & share the cards you develop & enable you to separate the data from the layout in an Adaptive card. There is also a plugin available called as Adaptive Card Viewer in Visual studio code for visualizing the card & a Team app called as App Studio.
Develop a card using the Adaptive Card Designer from the scratch or you can start with some available samples. Card Authors describe their content as a simple JSON object with the help of the designer which could then be rendered natively inside a Host Application as shown above, automatically adapting to the look and feel of the Host.
On this blog post, I am going to show you how to create an Outlook actionable message using a sample (Input Form) available in Adaptive card designer, this collects information (Name, Email) from the user & storing it in a SharePoint list using two flows. On submission of the form, a simple response message will be shown using a response Adaptive card. For the outlook version requirements for actionable message, click on this link. Find the flows to be created below
Instant flow with the manual trigger for sending the adaptive card in an email
Instant Flow using trigger When a Request is received for sending information to SharePoint list
Actionable messages can be via Email which I am focusing on this blog post or using connectors. Check here the supported scenarios via an Email.
Steps Involved to create actionable message via an Email:
Creating the Adaptive card for the host application (Outlook)
Creating the Flows
Let’s start with creating the card using the Adaptive Card designer
Adaptive Card Creation:
There is going to be two adaptive cards
First one is the initial form to be sent on email using the sample Input form
Second one is a response card which will be shown after the input form is submitted
First Adaptive Card:
Go the designer & click on Open Sample, select Input Form as shown below
Adaptive Card Designer
Then change the host app from the default Bot Framework Webchat to Outlook Actionable Messages. Remove the Phone number Text Block [Element] & the corresponding Text.Input [Inputs] field to keep it simple. Remove the Submit action set, add the action set of type Action.Http for us call the flow with method POST for us to interact with SharePoint
Update the following attributes of the just added element action set
Rename the Title of the element to Submit from Action.Http
Add the Id submit
Change the Style to Positive from Default
Select the Method to POST
Url to be set to our second FLOW (When a Http request is received) HTTP POST url later once we have it ready with us
Click the Add New header, enter “Authorization” to Name and leave the Value blank. If this is not done, you will receive an HTTP 401 unauthorized message while clicking the button on the email. The HTTP request is received flow does not have any authentication its anonymous so be careful with the URL and have some steps to validate on the flow so check if its triggered from valid source
Add one more header, enter “Content-type” to Name and Value should be “application/json”. This is required to make the POST request from the email
The first card is ready, lets us go ahead and create the second one which is the response card. This will be shown once the response is submitted
Second Adaptive Card:
This is going to be a very simple card, lets start from the scratch. Go to the designer and select New Card
Add a Container
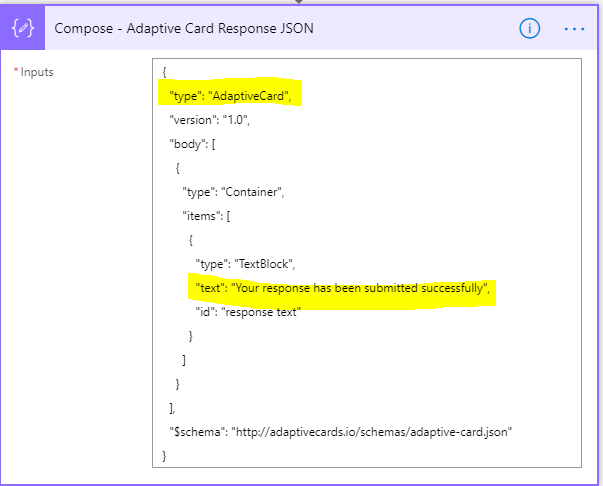
Add a TextBlock with text “Your Response has been submitted successfully” on the container
Click Copy Card JSON from ribbon for this card to be used on the flow. We now have the adaptive cards ready with us, let’s go ahead and the create the flows using Power Automate. Find the generated JSON below
Instant Flow using trigger When a Request is received:
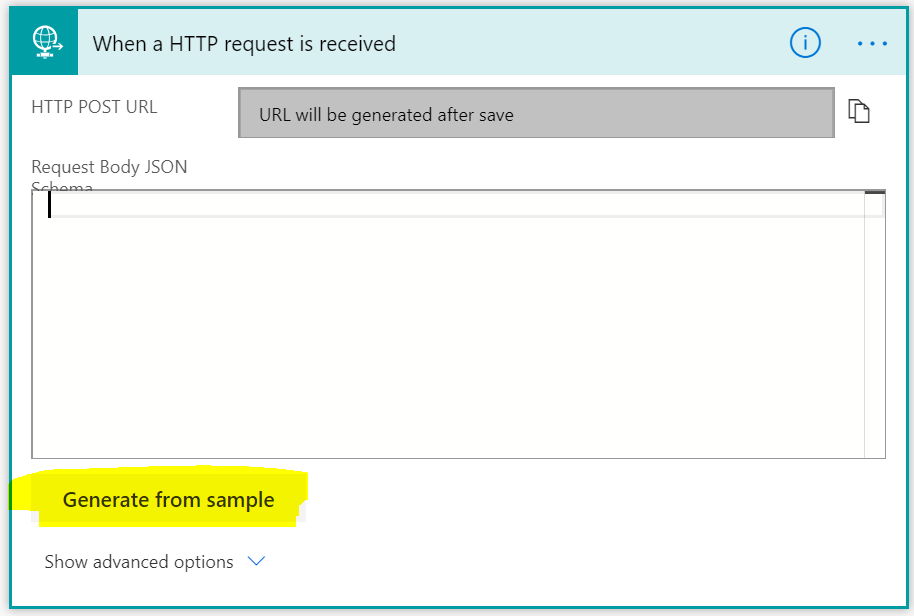
This flow is an Instant flow with trigger “When a HTTP request is received”, this is going to be called from email for submitting the Input form to a SharePoint list. Create a SharePoint list with two columns for us to store the Name and Email submitted from the adaptive card on email.Create the flow with the trigger as said above. The POST url will be generated after the flow is saved with an action. Click Generate from sample on the trigger and copy and paste below information which would automatically generate the schema for you. If you have more advanced JSON schema with, try using this tool.
{
	"inputName": "",
	"inputEmail": ""
}
Click Advanced options to select the method POST. Add the action create item to store the user form response to SharePoint list created above with the request body information mapped to Title (Name – inputName) & Email (inputEmail) using the dynamic content
Add the Compose action, paste the JSON of the second adaptive card to the Inputs.
Compose action
Add the Response action, a premium one with the header key CARD-UPDATE-IN-BODY and the value as true. The body parameter should be the outputs of the compose action JSON
Response Action – Premium Action
Save the flow, the POST url will now be generated copy it and go to the first adaptive card and paste it on the url attribute for the Submit action set. After this copy the JSON from ribbon, we are now ready for creating the next flow
Instant flow with the manual trigger for sending the Adaptive Card
This flow is an instant flow with trigger Manually Trigger a flow for sending the adaptive card an outlook actionable message in an Email. You can have a different type of trigger based on the requirement. Add the compose & send an email (v2) action, paste the JSON for the first adaptive card to the inputs field of compose action. Make sure JSON also has the POST Url of the first flow on the Action set. On the compose action, also include the script tags as given below
<script type=”application/adaptivecard+json”>
— JSON of First Adaptive Card—
</script>
<script type="application/adaptivecard+json">
{
    "$schema": "http://adaptivecards.io/schemas/adaptive-card.json",
    "type": "AdaptiveCard",
     "version": "1.0",
    "body": [
        {
            "type": "ColumnSet",
            "columns": [
                {
                    "type": "Column",
                    "width": 2,
                    "items": [
                        {
                            "type": "TextBlock",
                            "text": "Tell us about yourself",
                            "weight": "Bolder",
                            "size": "Medium"
                        },
                        {
                            "type": "TextBlock",
                            "text": "We just need a few more details to get you booked for the trip of a lifetime!",
                            "isSubtle": true,
                            "wrap": true
                        },
                        {
                            "type": "TextBlock",
                            "text": "Don't worry, we'll never share or sell your information.",
                            "isSubtle": true,
                            "wrap": true,
                            "size": "Small"
                        },
                        {
                            "type": "TextBlock",
                            "text": "Your name",
                            "wrap": true
                        },
                        {
                            "type": "Input.Text",
                            "id": "myName",
                            "placeholder": "Last, First"
                        },
                        {
                            "type": "TextBlock",
                            "text": "Your email",
                            "wrap": true
                        },
                        {
                            "type": "Input.Text",
                            "id": "myEmail",
                            "placeholder": "youremail@example.com",
                            "style": "Email"
                        }
                    ]
                },
                {
                    "type": "Column",
                    "width": 1,
                    "items": [
                        {
                            "type": "Image",
                            "url": "https://upload.wikimedia.org/wikipedia/commons/b/b2/Diver_Silhouette%2C_Great_Barrier_Reef.jpg",
                            "size": "auto"
                        }
                    ]
                }
            ]
        }
    ],
    "actions": [
        {
            "type": "Action.Http",
            "title": "Submit",
            "url": "HTTP POST FLOW URL",
            "id": "submit",
            "style": "positive",
            "method": "POST",
            "body": "{\"inputName\":\"{{myName.value}}\",\"inputEmail\":\"{{myEmail.value}}\"}",
            "headers": [
                {
                    "name": "Authorization",
                    "value": ""
                },
                {
                    "name": "Content-type",
                    "value": "application/json"
                }
            ]
        }
    ]
}
</script>
Instant Flow for sending the actionable message
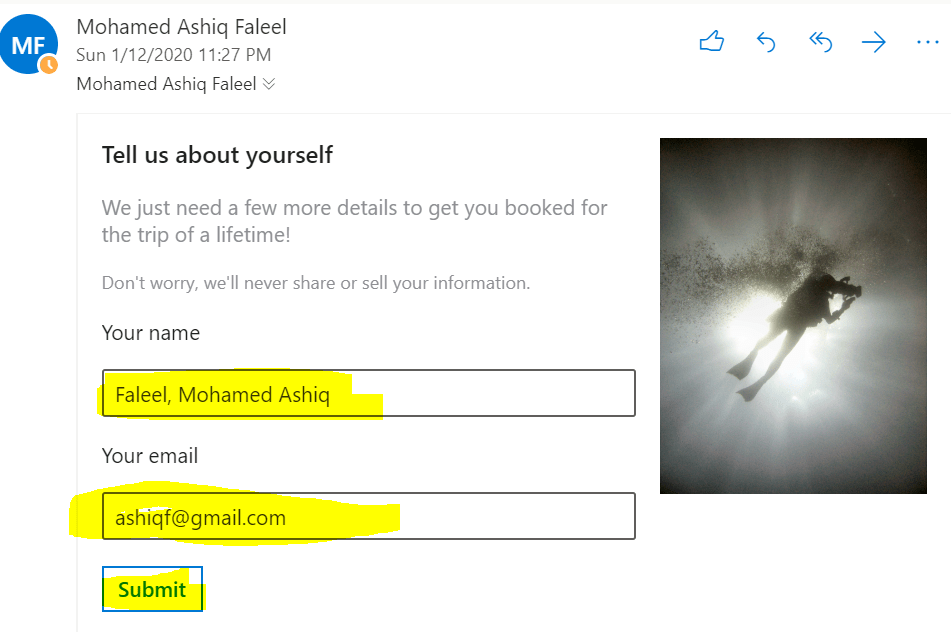
On the Send an email (V2) action, click the html view and select the outputs of the compose JSON which has the first adaptive card JSON. The flow is ready, click the Test link on the right corner of your flow to trigger it. The email will be received to the sender as below
Email – Input for collection information (Name & Email)
Once the information is Submitted, you would see the response as below
Email response after the form is submitted
If you would like to test with the tenant or global users, then register your adaptive card actionable message on the Actionable Email Developer Dashboard to enable this service. Enter the Flow URL (HTTP Request response), scope & sender email address. For more information on the developer dashboard refer here. Regarding security of the actionable message, refer here.
New Provider Registration
Once your provider is approved. Add the Provider Id (originator) field to the originator attribute in your JSON of the adaptive cards next to the type key, as follows:
“originator”: “ProviderId”,
Summary: You now have an actionable message adaptive card on outlook for collecting information from users on email. It provides you more functionality than the available Out of the box actions Approvals or Emails with options. To know the future road map, click here to know. Hope you have enjoyed reading this post and find it useful. If you have any comments or feedback, please provide it on the comments section below.
On this blog post, I am going to cover different options to post a Teams conversation in a Teams channel using API call.
Using a Flow with HTTP Request trigger & Flow action
Create an Incoming Webhook in Teams
Graph Endpoint to create a Teams conversation
I do now see more requirements from customer to integrate Teams with different applications. These options for posting a message in a Teams channel could be to used on an External application or from a SharePoint Site using SPFx.
Create a Flow with HTTP Request trigger
Create an Instant flow with Trigger “When a HTTP request is received” a premium trigger which gets triggered to a HTTP request. This is a responsive trigger as it responds to an HTTP Request. The structure of the requests/responses that Microsoft Flow uses is a RESTful API web service known as REST. The API or HTTP post URL will be generated only after the flow is saved with at least one action.
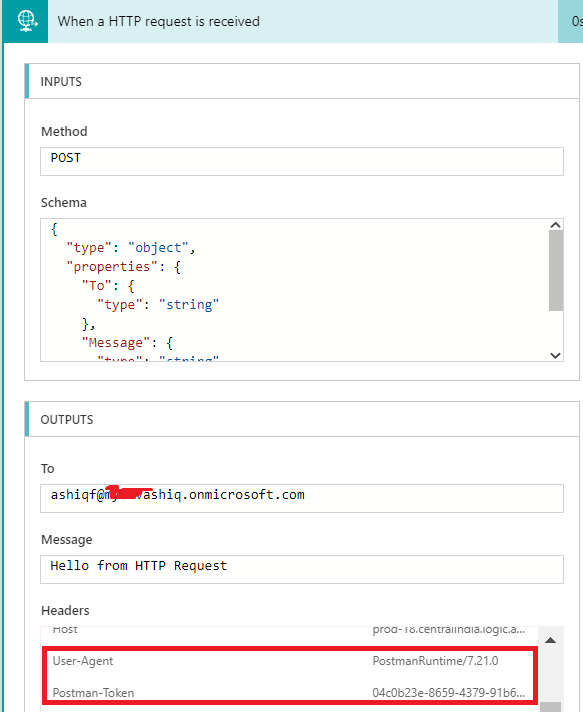
Let’s say I would like to post a Teams conversation with @mention to a specific user and some message. In this case I will have to pass the information either in Parameters or on the body of the call. On this example we will be passing the information on the request Body
{
    "To":"ashiqf@####.onmicrosoft.com",
    "Message": "Hello from HTTP Request"
}
Copy the above sample and paste it on the popup you get after clicking on Generate Schema. The tool will automatically generate the JSON schema for you. Also jsonschema.net could be used to generate the schema
Find the generated schema below for the information email address & message which would be passed on the request body while making the POST call
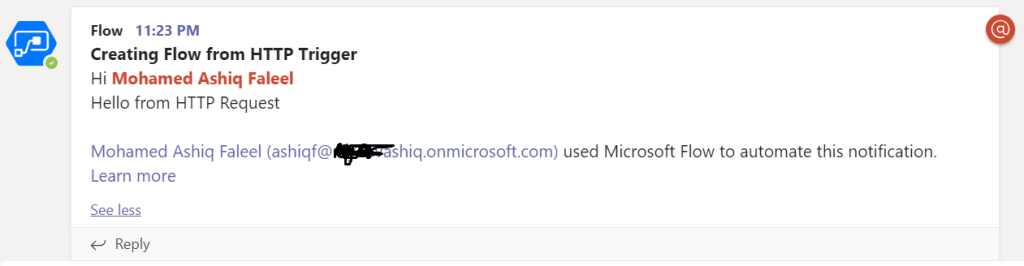
Add the action “Post a message as the Flow bot to a channel”, this will create a Teams conversation on a specific channel in a Team. On the below screenshot, look at the way I am doing @mention to a user, leaving a New line & making a text appear Bold
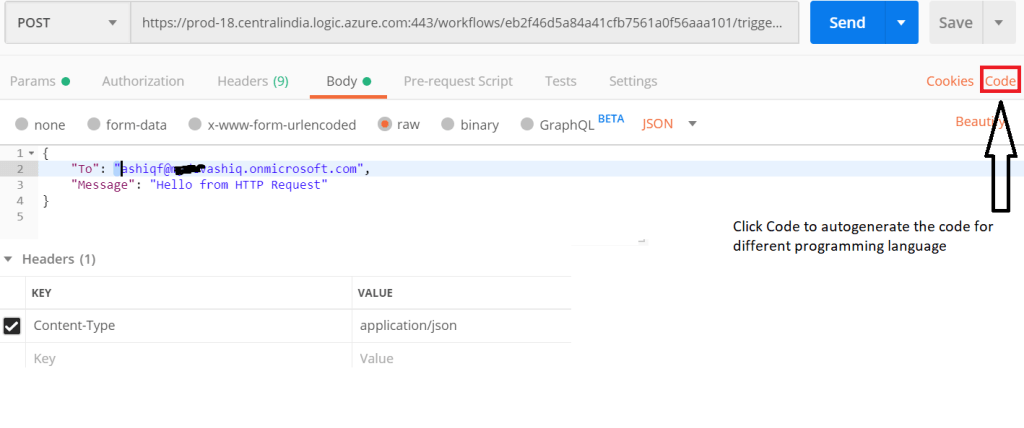
After you save the flow, the HTTP Post URL will be generated for us to use in an external application or where ever we want. The API is not secured its anonymous. Lets now use Postman client to trigger. Don’t forget to set the headers for content-type to application/json, Information on the body & method to POST else the trigger will fail
After the Post button is clicked on Postman client which would then trigger the flow. The message on Teams channel will appear as shown below
In Postman client, there is an option to generate the code to call the API for different programming languages
As already said, the HTTP post URL is anonymous. If you would like to secure the flow actions, you could do it after the flow is triggered with some validations. If you look at the output from the Flow run for the Trigger, there is information on the field “User-Agent”, with this information you would able to add some validations
Create an Incoming Webhook in Teams for a Specific channel
Incoming webhooks could be used to create Teams Conversations on a specific channel on a team. It’s special type of Connector in Teams that provides a simple way for an external app to share content in team channels
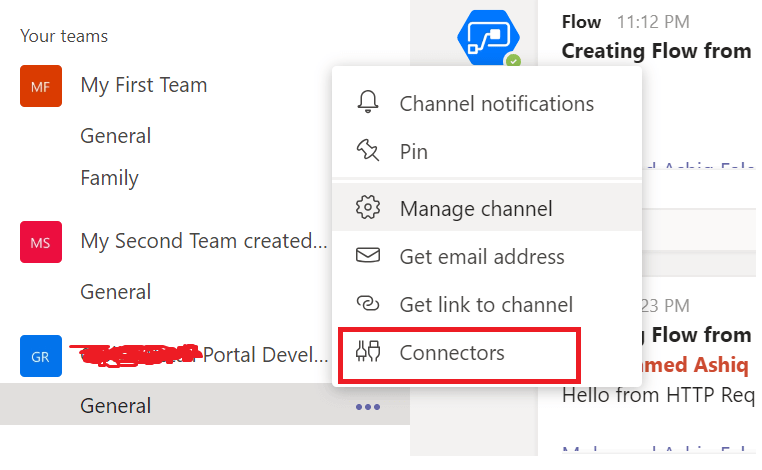
To create a Webhook, go to the Teams channel where you would like to have the conversation posted. Click connectors
Create Webhook
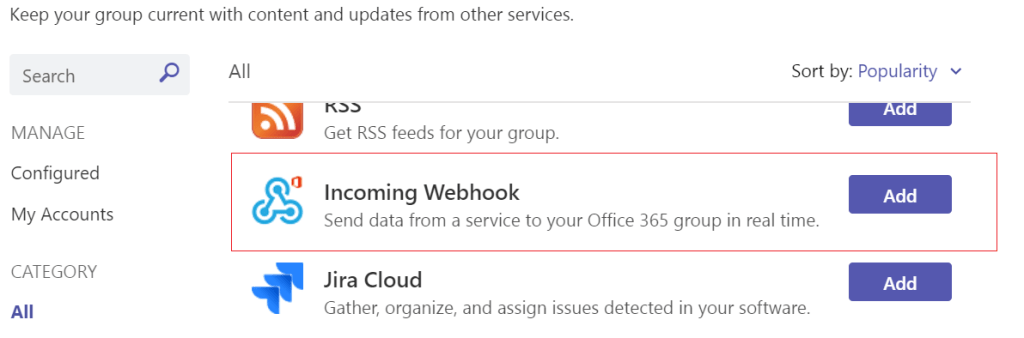
Look for Incoming Webhook from the list of connectors then click Add
Provide a Name for the webhook and click Create. Now the URL will be generated, click Done
The generated URL will be on this format, get this copied
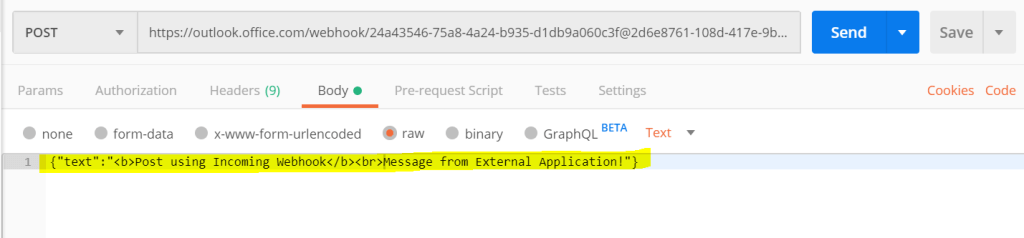
I will now use post man to create a conversation in Teams, it has to be Post request with the information passed on the Body. The header information is not required for this POST call
{"text":"<b>Post using Incoming Webhook</b><br>Message from External Application!"}
There is also endpoint (REST) available in MS-Graph to post/create a Teams conversation. The time I am writing this post, its a Beta endpoint and its not recommended for production use
POST /teams/{id}/channels/{id}/messages
The ID of the Teams and the Channel ID must be passed along with the bearer Token to create a team’s conversation. To get the bearer token create a Azure AD app with API permissions for Graph to create a message. The permission could be either Delegated or Application permissions based on the requirement. There are lot of articles which covers the steps to create an App in Azure so am not going to cover those in this post.
I’ve described different ways to create team’s conversation using API calls. Hope you find this post informative & useful. If you have any comments or questions, let me know on the comment section.
Its fairly easy to create an event using Power automate in Office 365 Outlook using the action Create Event but there is no action to get the attendees details on who has Accepted, tentatively accepted, Declined & No response if you are trying to automate.
MS Graph comes to the rescue to get the attendees details, there is an endpoint available to fetch the attendee’s details of an outlook event.
Let’s assume you are creating Outlook Event using flow action Create Event which has a connection using a different account (For e.g a service account with mailbox enabled). After the event is created the Event ID (Unique ID of an Event) is stored on a SharePoint Custom list or SQL etc to get the attendees information.
Before you start, you need to make sure you have the following:
Access to an Office 365 tenant with administrative access to Azure AD
Access to create flows in Microsoft Flow
Step 1 – Create an Application in Azure AD with API permissions to Calendar
You will need to register an application within Azure AD.
Navigate to Azure Active Directory from https://portal.azure.com and select App registrations. Select New registration. I am not going to list the steps required to create an Application in Azure AD, there are lot of blog posts & Microsoft articles which covers the steps. For this requirement, Redirect URI is not required to filled on the Azure app.
To get authorized to call Microsoft Graph in Power Automate/MS Flow, we’ll need the following information:
Tenant ID
Client ID
Client secret
API Permission to Read Calendar
Token Endpoint
Once the application is created, go to the API Permissions. To configure application permissions for the AD app to get the event information, API permission to the Calendar is required. Find the steps below to grant read permission to the calendar
Click on the API Permissions menu item in the navigation panel.
Click on the Add a Permission button.
Click Microsoft Graph under the tab Microsoft APIs.
Click on the Application Permissions button.
Expand the Calendars section.
Select the Calendars.Read option. This step gives access to the app for reading all the calendars in the mailboxes across the tenant.
This explorer will not work for delegated permissions since it uses your permissions to access the API endpoint but you can use Postman to test the graph endpoint with the Oauth authentication.
Find the documentation for the different endpoints available for Calendar in the link
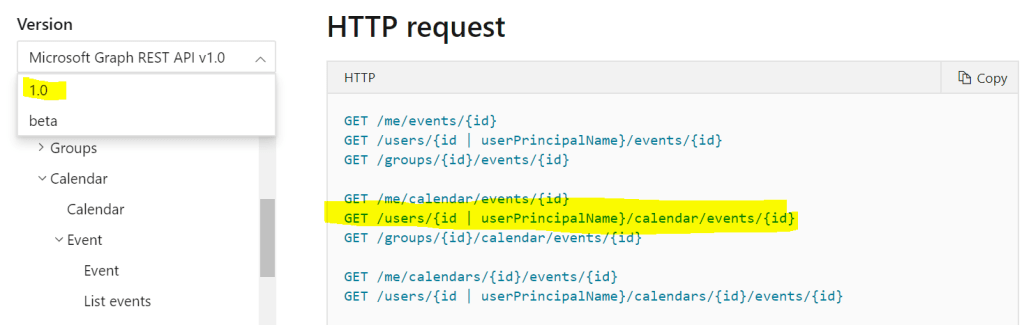
For this requirement we are interested in the following HTTP request/endpoint to the get details of a different user using the version 1.0
GET /users/{id | userPrincipalName}/calendar/events/{id}
Step 2 – Create a Flow
With the Azure AD application created, you have to create a flow using it. You could even create a Azure logic Apps. Find the steps below to create a scheduled flow
First, go to https://flow.microsoft.com and go to My flows. Select New > Create Scheduled-from blank to create a new flowThis flow will be running on scheduled basis to get the attendees details.
Flow Trigger
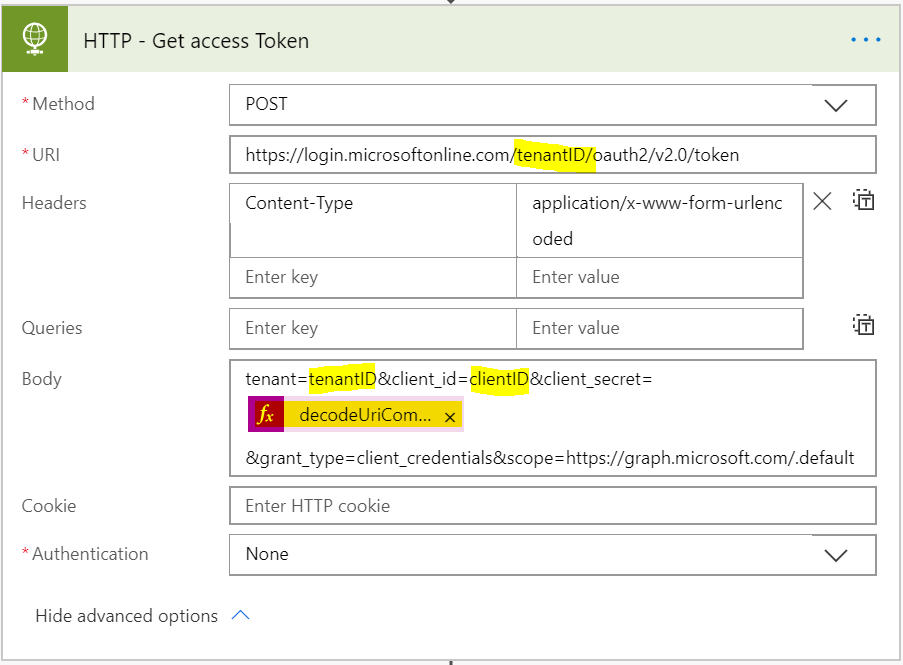
Call the token endpoint of the tenant’s Azure AD which will provide us an access token for Microsoft Graph in return for the information contained in the request body. Use the Flow action HTTP which is premium action to make a HTTP post request for getting a token.
Before we construct the HTTP request, we need encode the client secret to avoid having URL unsafe characters:
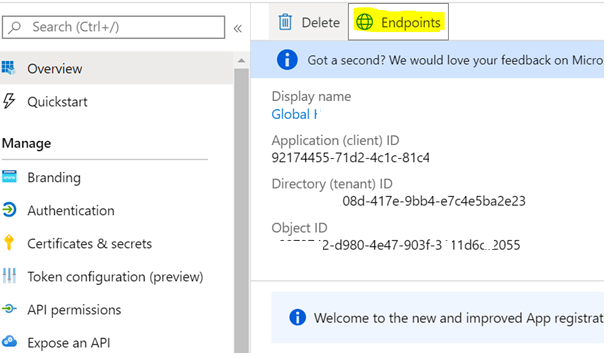
The token endpoint URL can be obtained from the AD App by clicking on the Endpoint link as shown below
Active Directory App – OverviewHTTP Action
When the above HTTP request is made, we get authenticated, and in the response, we’ll receive the access token for calling Microsoft Graph. Before we can use the access token, we need to parse the JSON in the response body to make the token available to us in the dynamic content panel
The next step is to the parse the JSON response of the HTTP – Get Access token action and get the token type and access token to make a call to the Graph endpoint. To do this Add the action Parse JSON
The Content has to be the Body of the action HTTP – Get Access token and to build the schema.
Run the flow, copy the outputs [Body] of the action HTTP – Get Access token
Click the button Generate from Sample, paste the Body and click Done. These steps will generate the schema automatically
Parse JSON Action
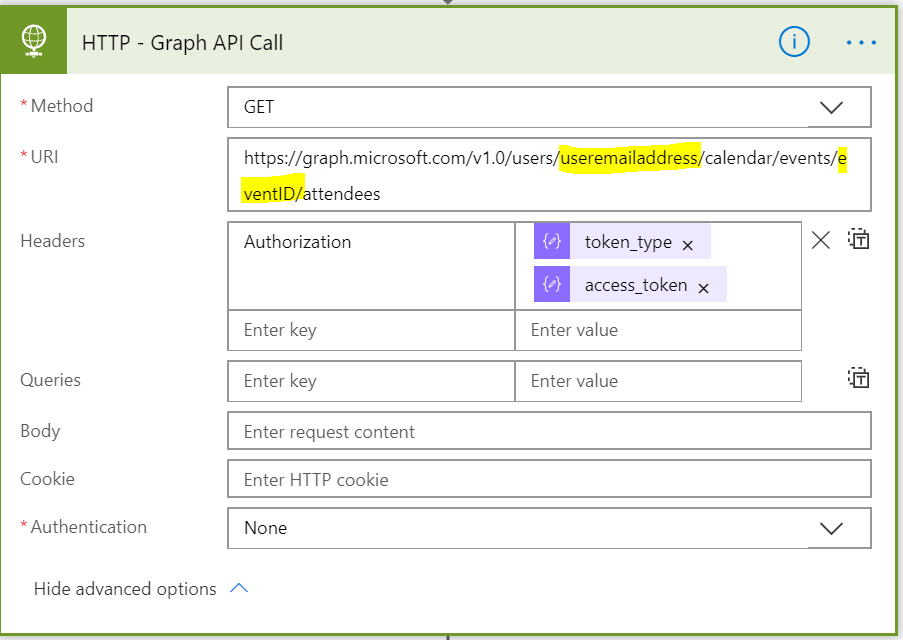
The next step is to call the Graph endpoint using the HTTP action with the token type & access token on the Headers obtained from the above method
Event ID should be the ID of the event you would like to get the attendees information and Headers information is constructed from the Parse JSON – Access token.
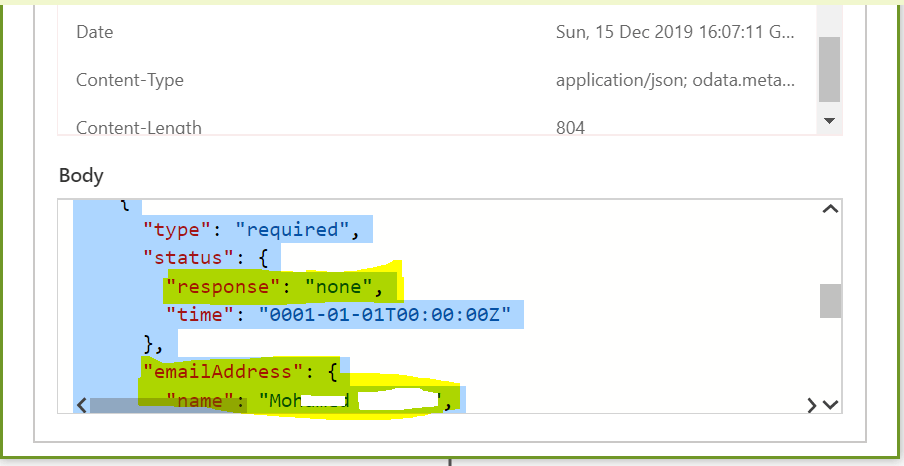
Run the Flow, you will now have the attendee’s information in the JSON format as shown below. The JSON will have information about the users details and the responses. JSON Parse action could be used to parse the JSON and get the information as per the requirement
Hopefully you enjoyed reading this article and find it useful.