
In the last post, we have seen till the installation of the Teams App with the Bot on a Microsoft Team. Let us now continue to send a proactive message, be it an Adaptive card or a simple Text message on a Teams channel using Bot Framework REST API from a Power Automate Cloud Flow.
A proactive message is any message sent by a bot that isn’t in response to a request from a user. Ex: Welcome messages, Notifications, Scheduled messages, Broadcast message etc
Power Automate Cloud Flow:
For this blog post, I have used a Power Automate Instant cloud flow with manual trigger to send the message to a Teams Channel. To follow along the blog post, be ready with the following information
- Team ID & Channel ID
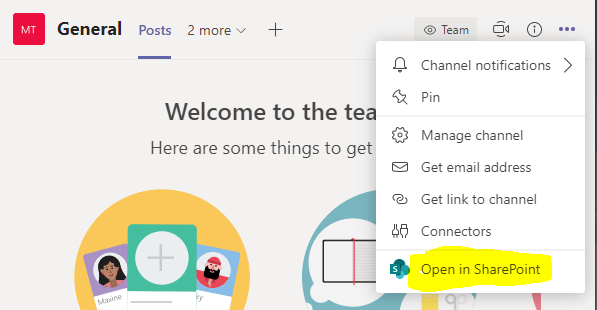
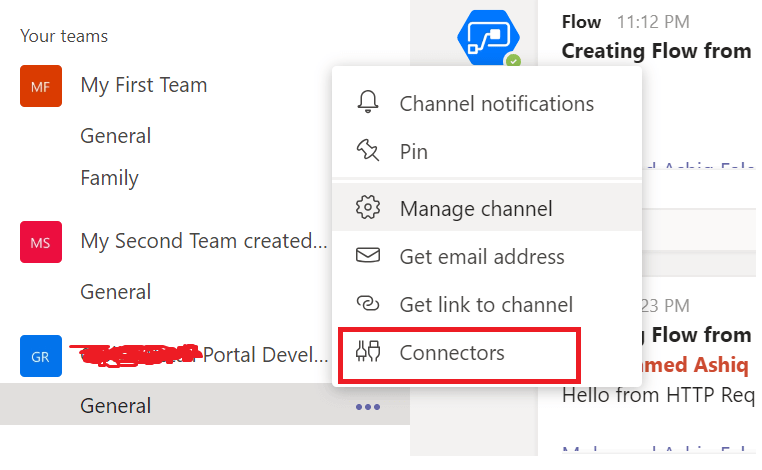
This information is required to send the proactive message to a Microsoft Team Channel. To get this information, in Microsoft Teams Client identify the Team channel in scope > Click the ellipsis of the channel in scope > Get link to channel as shown below
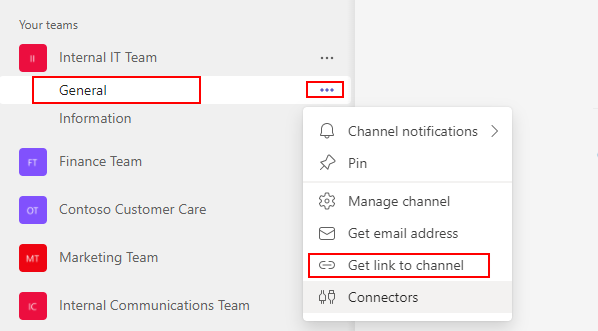
After decoding the channel link, the url will be in the format as shown in the below image from which you can get the channel Id and Team group ID

If you are building a Teams broadcaster or communicator application using Power Apps, these information can be stored in Table or a SharePoint list. There are Graph API endpoints which can used to get the Channel Id’s etc.
- Bot ID [Part 1 – Step 6]
- Bot Secret [Part 1 – Step 7]
- Teams Service URL
The service URL is the base URI for all Bot framework API requests. In Teams the service URL will change based on user’s region [EMEA, America, APAC, India etc]. This example delivers messages only on the Team channel and not to the users directly so you can choose the service URL based on the Microsoft 365 Tenant Location. Find below some URL’s based on region
| Region | Service URL |
| EMEA | https://smba.trafficmanager.net/emea/ |
| America | https://smba.trafficmanager.net/amer/ |
| India | https://smba.trafficmanager.net/in/ |
| APAC | https://smba.trafficmanager.net/APAC/ |
All the required information is now available to proceed with sending the channel message using REST API.
Generate Access Token – Bot Framework REST API:
There are SDK’s in Bot Framework for programming languages like .NET, JavaScript, Python etc to handle all conversations for you but an alternative to using the SDK is leveraging Bot Framework REST API. The first step in using the different REST API endpoints from Bot Framework is to generate an access token which is then added to the Authorization header of each API request in this format
Authorization: Bearer ACCESS_TOKEN
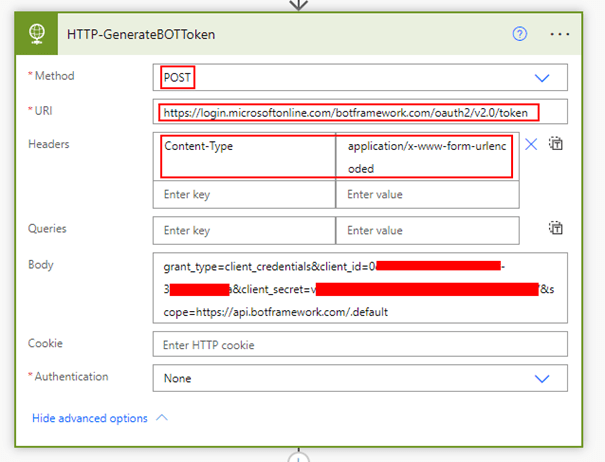
To request an access, make a HTTP request per the following details
Method: POST
Request URL:
https://login.microsoftonline.com/botframework.com/oauth2/v2.0/tokenContent-Type: application/x-www-form-urlencoded
Body:
grant_type=client_credentials&client_id=botId&client_secret=botSecret&scope=https://api.botframework.com/.defaultReplace the botId and botSecret with the values stored from the previous steps. The Bot Id and the secret are from the custom Teams app created based on the previous post.
Add a HTTP Action in your Power Automate flow to add the above details for generating the token
The JWT access token is valid for 24 hours, if the token expires make another request.
Send Teams Channel Message:
The Teams Channel conversation post or proactive message on a channel can now be sent using the REST API to Create Conversation with the access token generated in above step.
Simple Text Message:
Find below the HTTP request detail to send a simple proactive message on a Teams Channel. The conversation Id is the Teams Channel Id
Type: POST
Request URL:
https://smba.trafficmanager.net/emea/v3/conversations/teamsChannelId/activitiesReplace teamsChannelId (conversationId) with the actual Team channel Id
Body:
{
  "type": "message",
  "text": "Simple Text Message"
}
Authorization Header: Bearer access_tokenvalue
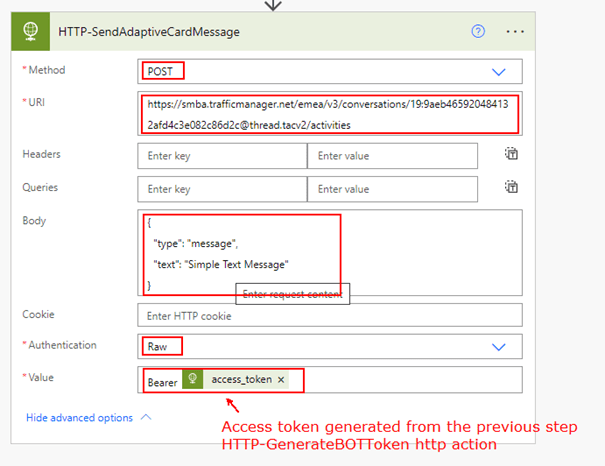
The Authentication of the HTTP action should be set to Raw, the value should be in the format
Bearer access_token
You can use Parse JSON Action to extract the access token from the previous HTTP action HTTP-GenerateBOTToken or you can directly get the value using the following expression
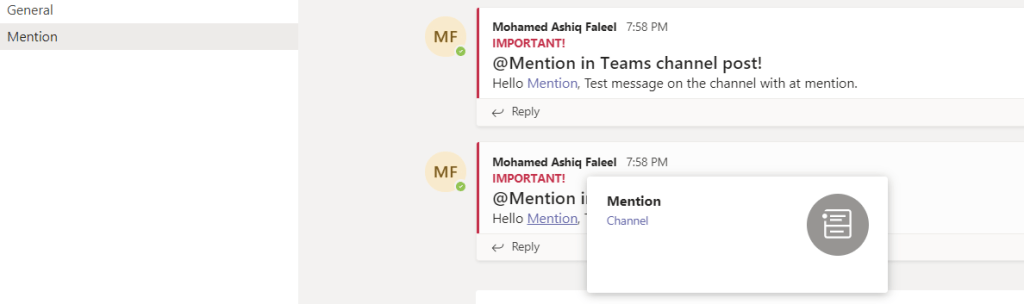
body('HTTP-GenerateBOTToken')?['access_token']The above HTTP request will create a HTTP response with the activity id which can be potentially used to send a reply etc.
Adaptive Card Message:
Adaptive cards are platform-agnostic snippets of UI authored in JSON that different Microsoft apps and services like Teams, Outlook can use. It can be designed using the Adaptive Card designer portal. To send an Adaptive to a Teams Channel, everything else remains the same when comparted with above give HTTP request for the Simple Text message except the Body as below
{
"type": "message",
"attachments": [
{
"contentType": "application/vnd.microsoft.card.adaptive",
"content": {
"msTeams": {
"width": "full"
},
Replace the ADAPTIVE CARD JSON PAYLOAD from the designer portal
}
}
]
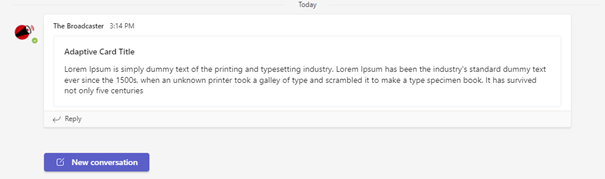
}You can get the complete body of request from this Link. This method can be used to send the message on any standard channel but not on Private Teams channel, Microsoft has not opened the possibility to send a channel message on private channel using a Bot. Find below adaptive card message posted on the Teams Channel from the Power Automate flow
Summary:
There are lot of possibilities with the Bot connector service REST API, what I have shown above is only an endpoint to send a message in a Teams Channel. Look at this documentation on the available conversation operations like Reply, Delete, Update conversation etc. Using this approach you can build a Company broadcaster app with the possibility of reaching out to multiple Teams without the user being the member or owner of the Team. If you are visiting my blog for the first time, please do look at my other blogposts.
Do you like this article?
Subscribe to my blog with your email address using the widget on the right side or on the bottom of this page to have new articles sent directly to your inbox the moment I publish them.


