In today’s data-driven world, businesses rely on integration between their data sources and analysis platforms to derive insights and make informed decisions. One such powerful combination is leveraging Snowflake, a leading cloud-based data warehousing platform, alongside Microsoft Power Platform. In this blog series, we’ll delve into the options of integrating Snowflake data sources into Power Platform, exploring both custom and out-of-the-box connector options. In Part 1, our focus will be on setting up and configuring Snowflake, followed by creating a custom connector that leverages Snowflake’s SQL REST API. This connector facilitates the connection between Snowflake and the Power Platform services such Power Apps and Power Automate.

Pre-requisites:
- Snowflake account with Account Admin access: Snowflake offers a 30-day trial, granting full access to explore its capabilities. You can select either Azure/AWS/GCP
- Entra ID access (Global Admin or Privileged Administrator Role) to create App registration and grant Admin consent: Ensure you have Entra ID access to enable the creation of App registrations and to grant Admin consent for necessary permissions.
- Power Platform Administrator Role: To make adjustments to allow custom connector endpoints for Snowflake identifier URL, especially in cases where endpoints are blocked by the tenant scoped DLP policy.
- Maker or System Administrator access in a Power Platform Environment: Access privileges should include Maker or System Administrator rights within your Power Platform environment to register custom connector.
- Power Apps premium license: A Power Apps premium license is required to use a custom connectors in a Power Apps or a Cloud flow.
This blog post is divided into the following sections:
- Creation of Entra ID Apps.
- Setup Snowflake Environment.
- Creation of a custom connector & DLP Policy Update.
Creation of Entra ID Apps:
There are two app registrations required to facilitate the API access through Microsoft Entra ID, where one would represent the Snowflake OAuth resource and the other would represent the OAuth client application which would be in this case the custom connector
Section 1 – Registering an Application in Microsoft Entra ID for Snowflake OAuth resource:
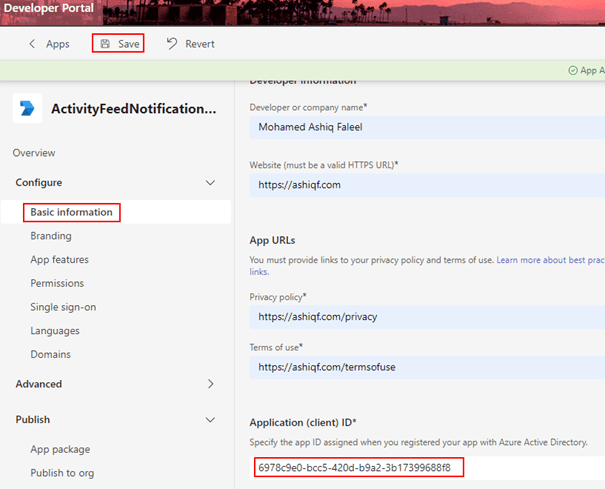
In the Entra ID portal, navigate to App registrations and click + New registration. Enter a name, such as Snowflake OAuth resource, and proceed by clicking the Register button, leaving all settings as default.
Under the Manage section in the side menu, select Expose an API. Set the Application ID URI with the default value and remember to copy this value for future use. This will be known as external_oauth_audience_list in the section Setup and configuration in Snowflake
Click on the Add a scope button to access the panel. The Snowflake Role Public is added as an OAuth scope for OAuth flows where the Snowflake OAuth client acts on behalf of a user from the custom connector. If there is a custom Snowflake role, it should be added as a scope instead of ‘Public’:
- Enter a new Scope name as session:scope:PUBLIC
- Set Admin consent display name to Account Admin
- Provide Admin consent description as “Can Administer the Snowflake account”
- Ensure the Enabled scope state is selected.
Complete the process by selecting the Add scope button to create the scope.

Section 2 – Registering an Application in Microsoft Entra ID for Snowflake OAuth client:
In the Entra ID portal, navigate to App registrations and click + New registration. Enter a name, such as Snowflake OAuth client, and proceed by clicking the Register button, leaving all settings as default.
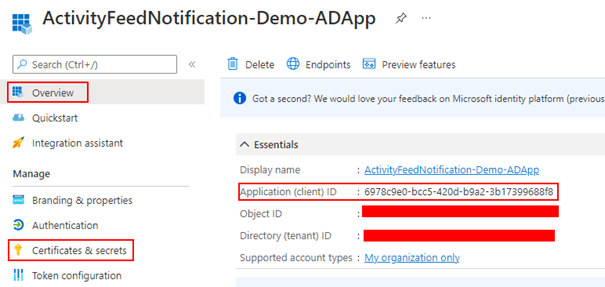
Retrieve the Client ID, Tenant Id from the Overview section of the Entra ID app and generate a secret through the Certificates & secrets under the Manage blade. Once the secret is successfully created, copy its value for use in configuring the custom connector OAuth Authentication.
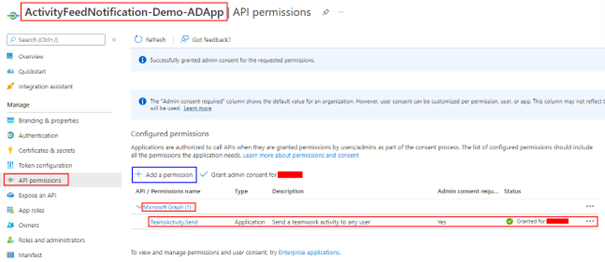
In the API permissions section under the Manage blade, click + Add a permission and search for Snowflake OAuth resource, the application created previously.

Select the Delegated permission session:scope:PUBLIC defined in the previous section as shown below, and grant Admin consent.

Everything is configured in Entra ID. Now, let’s move on to Snowflake to set up the necessary components for this integration to function.
Reference: https://docs.snowflake.com/en/user-guide/oauth-azure
Setup Snowflake Environment:
Let’s head in to the Snowflake instance as an Account Admin. Here, you’ll create a
- Create Database with sample data & grant roles
- Set up security integration
- Create a user in Snowflake synchronized with the Entra ID user
Log in to the Snowflake instance to copy the Identifier URL as shown below. This URL will be used in the custom connector to access the Snowflake REST API.

Snowflake Identifier URL: https://texxxx.eu-north-1.aws.snowflakecomputing.com
Create Database with sample data & grant role:
Create a SQL Worksheet as shown below and execute the following script to set up the Snowflake environment by creating a warehouse, database, and table named ‘rockers_table’. Sample data is inserted into the table, and permissions are granted to the ‘public’ role for accessing and updating the table:

-- Switch to the 'accountadmin' role
use role accountadmin;
-- Create the HOL_WH warehouse with size 'X-SMALL'
CREATE OR REPLACE WAREHOUSE HOL_WH WITH WAREHOUSE_SIZE='X-SMALL';
-- Create the HOL_DB database
CREATE OR REPLACE DATABASE HOL_DB;
-- Grant usage on the warehouse HOL_WH to the role 'public'
GRANT USAGE ON WAREHOUSE hol_wh TO ROLE public;
-- Grant usage on the database HOL_DB to the role 'public'
grant usage on database hol_db to role public;
-- Grant usage on the schema HOL_DB.PUBLIC to the role 'public'
grant usage on schema hol_db.public to role public;
use role accountadmin;
-- Switch to the HOL_DB database
use database HOL_DB;
use warehouse HOL_WH;
-- Create the 'rockers_table' table
CREATE TABLE rockers_table (
  id INT,
  name VARCHAR(50),
  age INT
);
-- Insert data into the 'rockers_table' table
INSERT INTO rockers_table (id, name, age)
VALUES (1, 'Jimi Hendrix', 27),
       (2, 'Janis Joplin', 27),
       (3, 'Elvis Presley', 42),
       (4, 'Freddie Mercury', 45),
       (5, 'Whitney Houston', 48),
       (6, 'Michael Jackson', 50),
       (10, 'John Lennon', 40);
-- Grant select and update permissions on the 'rockers_table' table to the role 'public'
grant select, update on table hol_db.public.rockers_table to role public;
Set up security integration:
Let’s proceed to create the Security integration, which is a Snowflake object that establishes an interface between Snowflake and Entra ID. This integration is a prerequisite for enabling Entra OAuth authentication in the custom connector. Execute the following script:
create security integration connector
       type = external_oauth
       enabled = true
       external_oauth_type = azure
       external_oauth_issuer = 'https://sts.windows.net/tenantId/'
       external_oauth_jws_keys_url = 'https://login.microsoftonline.com/tenantId /discovery/v2.0/keys'
       external_oauth_audience_list = ('applicationIDURI')
       external_oauth_token_user_mapping_claim = 'upn'
       external_oauth_snowflake_user_mapping_attribute = 'login_name'
       external_oauth_any_role_mode = 'ENABLE';
Replace the tenantid in ‘external_oauth_issuer’ and ‘external_oauth_jws_keys_url’, and the Application ID URI in ‘external_oauth_audience_list’. These values should be copied from sections 1 and 2 of the Entra ID app creation process written above.
Reference:
https://quickstarts.snowflake.com/guide/power_apps_snowflake/#0
Create a user in Snowflake synchronized with the Entra ID user:
We’ll create a user in Snowflake that mirrors the Entra ID user upn as created in the security integration. In the User & Roles section under Admin, click + User. The login name should be the UPN (User Principal Name) from Entra ID/AD. Once the required details are entered, proceed to click on Create User.

Creation of a custom connector & DLP Policy Update:
The custom connector serves as a wrapper around the Snowflake REST API, facilitating communication between Power Apps or Power Automate and the API. To create this connector, navigate to Custom connectors in the Power Apps/Power Automate maker portal, then click on + New custom connector and select Create from blank. Enter the connector name, and on the subsequent screen, enter the Snowflake Identifier URL in the Host field and some description about the connector.

Now click Security on the right bottom corner or from the Tab to enter the Entra ID application information copied from the App registration Snowflake OAuth Client for the OAuth 2.0 authentication type. Under the section OAuth 2.0
- Change the Identity provider to Azure Active Directory
- Enter the Client id & Client secret copied from the Section 2 of the Entra ID app registration Snowflake OAuth Client
- Enter the Resource URL as api://applicationIDURI copied from the Section 1 of the Entra ID app registration Snowflake OAuth Resource
- Enter the Scope as session:scope:PUBLIC based on the permissions you have added. Leave a space between each permission if there are multiple permissions

After the above information is filled in, click Create connector which will autogenerate the Redirect URL https://global.consent.azure-apim.net/redirect/cc-2dsnowflake-xxxxxx-5f92d3264404092da9. Now go to the Entra ID App registration Snowflake OAuth Client created in Section 2 of the Entra ID apps and add the above Redirect Web URI.

The connector is now prepared to add actions based on the Snowflake REST API endpoints. Snowflake’s REST API offers functionalities such as submitting SQL statements, checking execution statuses, cancelling executions, and fetching query results concurrently. This blog post will primarily concentrate on integrating with the API to submit SQL statements. For more guidelines, it’s recommended to look at the Snowflake REST API documentation for best practices.
Let’s proceed to add an action for submitting a SQL statement. Navigate to Definitions and select + New action. Once you’ve filled in the Summary, Description, and Operation ID (e.g., GETSFData), click on + Import from sample under the Request section, and input the following details:
Verb: POST
URL: https://snowflakeidentifierURL/api/v2/statements
Replace the Snowflake Identifier URL
Headers:
Content-Type application/json
Accept application/json
Body:
{
"statement": "select name, age from rockers_table;",
"timeout": 60,
"database": "HOL_DB",
"schema": "PUBLIC",
"warehouse": "HOL_WH",
"role": "PUBLIC"
}
Click Import & Update connector then proceed to click the Test tab and create a New connection. In the event of encountering DLP error message indicating that connection creation has been blocked by Data Loss Prevention (DLP) policy. Add the Snowflake Identifier URL as a connector pattern allowed in the Business/Non Business category of the DLP policy.

VOILA, everything is set up. You can now test the action to execute a SQL statement to retrieve data from the rockers_table as shown below:

The request body for updating an existing item is
{
"statement": "UPDATE rockers_table SET Name = 'Mohamed Ashiq' WHERE ID = '1';",
"timeout": 60,
"database": "HOL_DB",
"schema": "PUBLIC",
"warehouse": "HOL_WH",
"role": "PUBLIC"
}
Summary:
In the next part of the blog series, we’ll explore how to manipulate the response from the connector action. This involves adding C# code in the custom connector to facilitate the display in Power Apps gallery control without using a Power Automate flow. Hope you have found this informational & thanks for reading. If you are visiting my blog for the first time, please do look at my other blogposts.
Do you like this article?
Subscribe to my blog with your email address using the widget on the right side or on the bottom of this page to have new articles sent directly to your inbox the moment I publish them.