With the rise of AI agents and extensibility through MCP (Model Context Protocol), exposing your APIs and tools to agents like Copilot Studio is becoming increasingly common. But the catch – without proper authentication, you’re opening the doors to your enterprise data.
In this post, we’ll walk through how to secure an MCP Server using Microsoft Entra ID and consume it from Copilot Studio using delegated permissions.
We’ll be using this sample repo as a reference implementation: MCP-Server-Entra-Id-Auth
Introduction
MCP servers allow AI agents to invoke tools and APIs in a standardized way. When integrated with platforms like Microsoft Copilot Studio, they unlock powerful automation scenarios.
However, MCP servers are essentially OAuth 2.0 resource servers, and every MCP client (like Copilot Studio) acts as an OAuth client.
Why Securing Your MCP Server is Important
Without proper authentication:
- Anyone with access to the endpoint could invoke your tools
- Sensitive operations such as internal APIs may be exposed
- No identity context → no auditing or governance
Modern MCP implementations rely on OAuth-based authentication, ensuring:
- Identity-aware requests
- Scoped access tokens
- Secure communication between client and server
In enterprise scenarios, Entra IDbecomes the natural choice.
Prerequisites
Before we begin, make sure you have:
- Access to a Microsoft Entra ID tenant
- Access to Microsoft Copilot Studio
- Basic understanding of:
- OAuth 2.0 / Delegated permissions
- App registrations
- MCP server up and running (use the repo above)
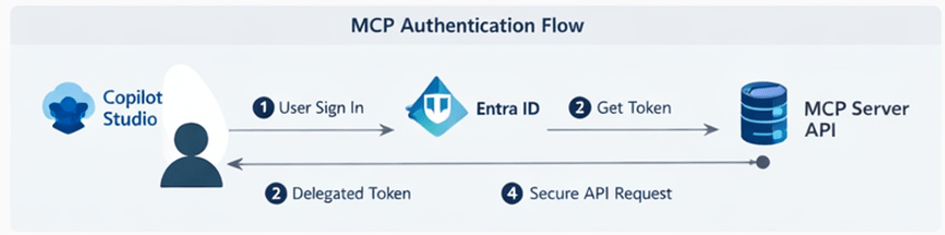
Architecture Overview
We will configure:
- MCP Server → Protected resource (API)
- Copilot Studio → Client application
- Entra ID → Identity provider
Flow:
- User signs in via Copilot Studio
- Copilot gets delegated token
- Token is sent to MCP Server
- MCP Server validates and processes request
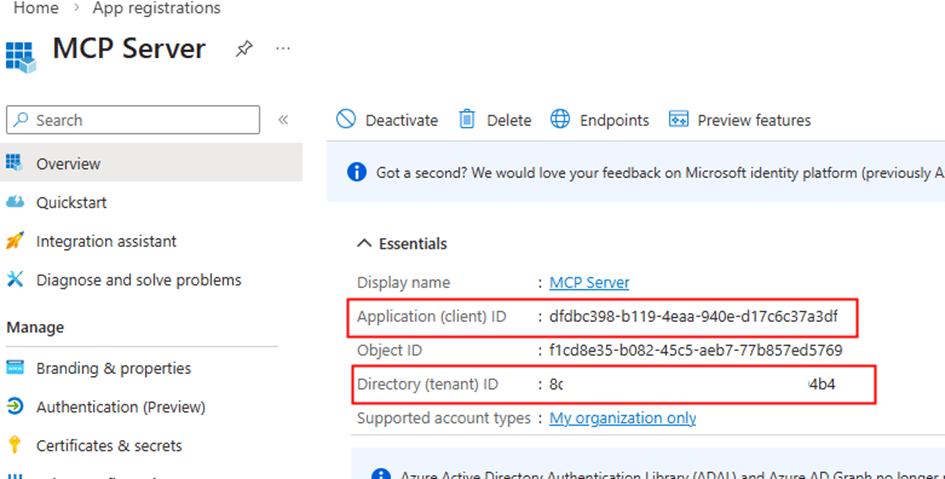
Step 1: Create App Registration for MCP Server (Resource API)
Go to Entra ID → App registrations → New registration
Configure:
- Name: MCP-Server-App
- Supported account types: Single Tenant
After creation:
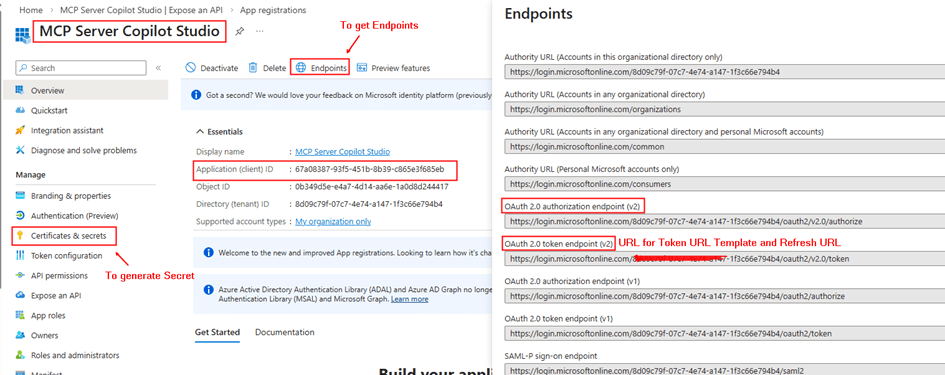
- Copy the Client Id, Tenant Id from the Overview section.
Expose an API
- Go to Expose an API
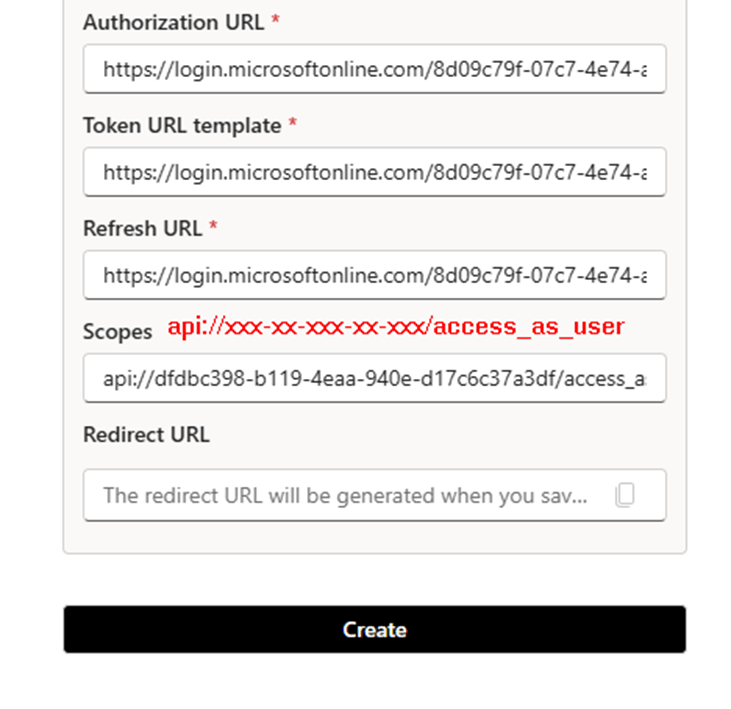
- Set Application ID URI (e.g., api://xxx-xxxx)
- Add a scope:
- Name: access_as_user
- Who can consent: Admins + users
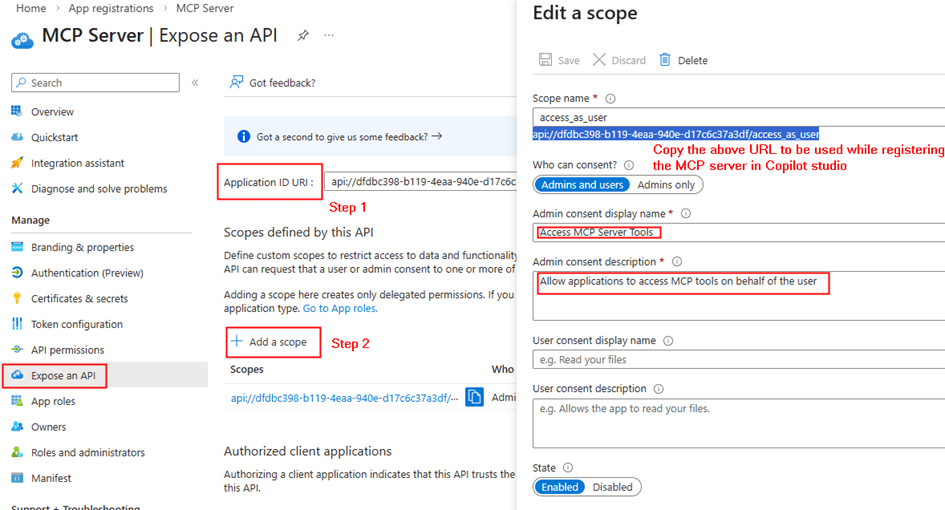
Configure Permissions
- Add required Microsoft Graph delegated permissions (if needed) or remove it.
This app represents your secured MCP Server
Step 2: Configure MCP Server with Entra ID
In your MCP server, appsettings.json (from repo):
Configure:
- Tenant ID
- Client ID (MCP Server app)
- Scopes
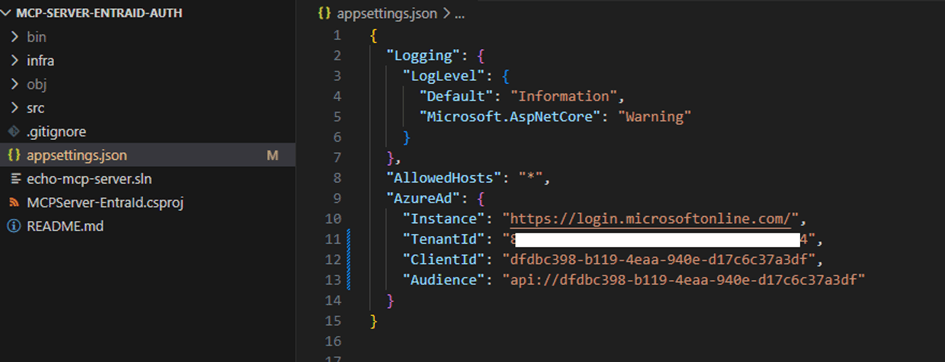
This allows the server to:
- Validate incoming tokens
- Optionally call APIs like Microsoft Graph
Many MCP implementations use OAuth flows such as on-behalf-of (OBO)/delegates permissions to call APIs using the user’s identity.
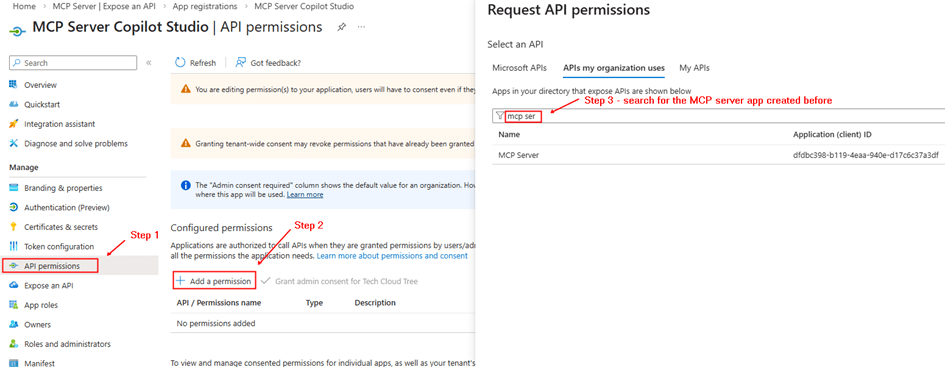
Step 3: Create App Registration for Copilot Studio (Client)
Create another app:
- Name: Copilot-MCP-Client
- Supported Account Types: Single tenant only
Configure:
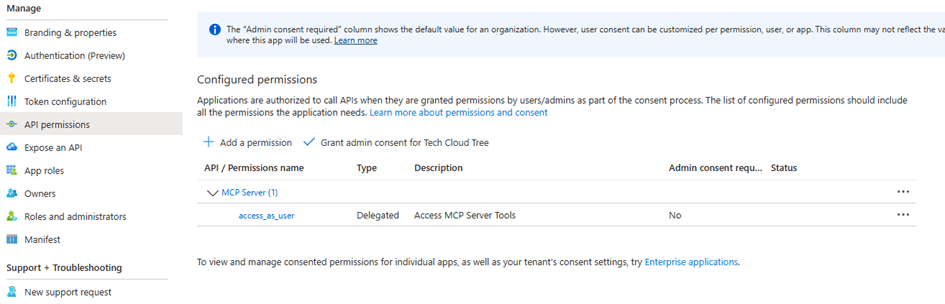
API Permissions
Add permission:
- My APIs → MCP-Server-App
- Select: access_as_user (delegated)
Copy the Client Id, secret and the OAuth endpoints for adding the MCP server in Copilot studio interface.
Grant Admin Consent
This step is not Mandatory, if not provided an admin consent the user will asked for a consent with the permissions for the app while creating the connection to the MCP Server.
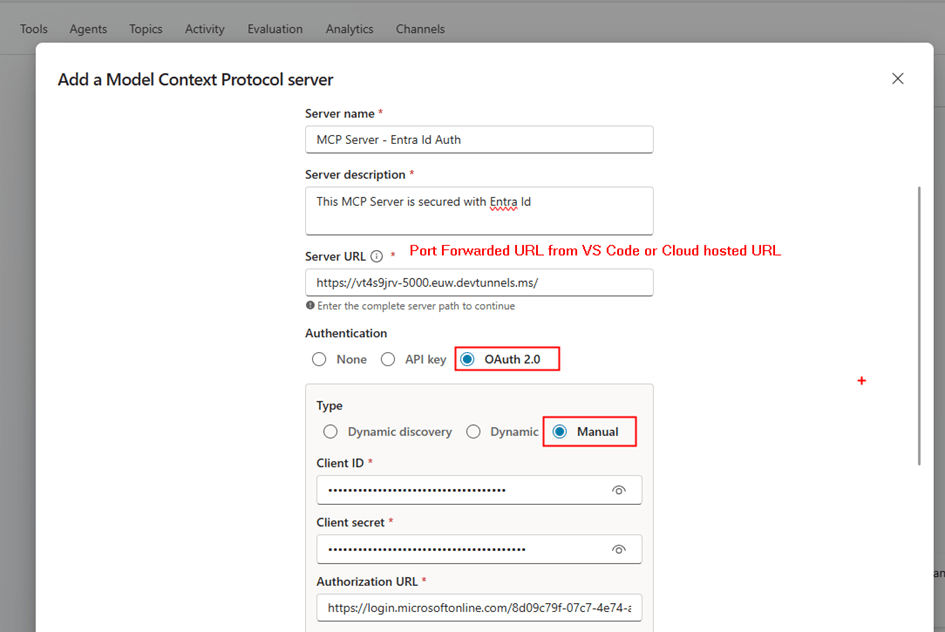
Step 4: Add MCP Server in Copilot Studio
Now comes the interesting part.
In Copilot Studio:
- Go to Tools
- Click + Add a tool > Model Context Protocol
- Provide the details from the Copilot Studio Client app registration and MCP endpoint (e.g., /mcp or /)
Copilot Studio will:
- Create a custom connector behind the scenes
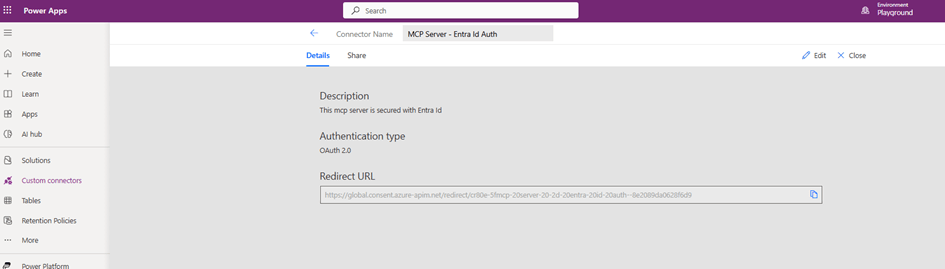
On the next screen, you will get the link to the redirect url
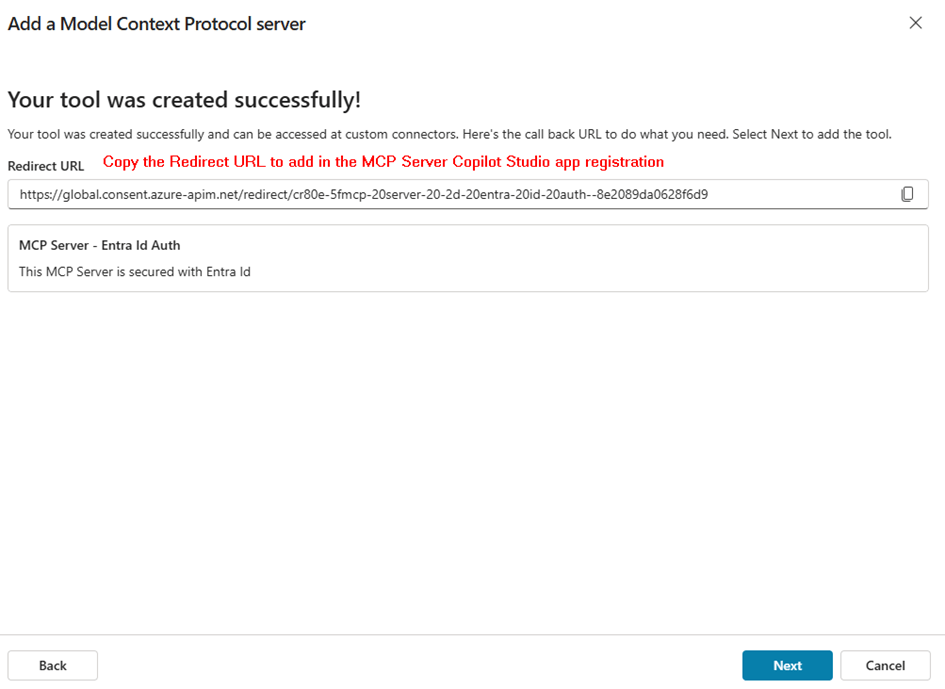
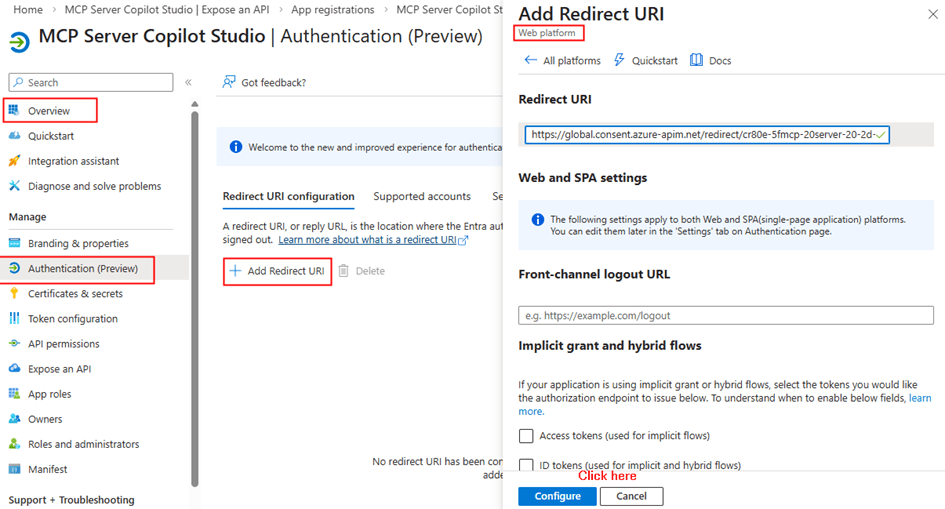
Now go to the Copilot studio client app registration Authentication section under Manage blade
- Add Redirect URI (important for Copilot Studio custom connector)
- Example:
https://global.consent.azure-apim.net/redirect/xxxx
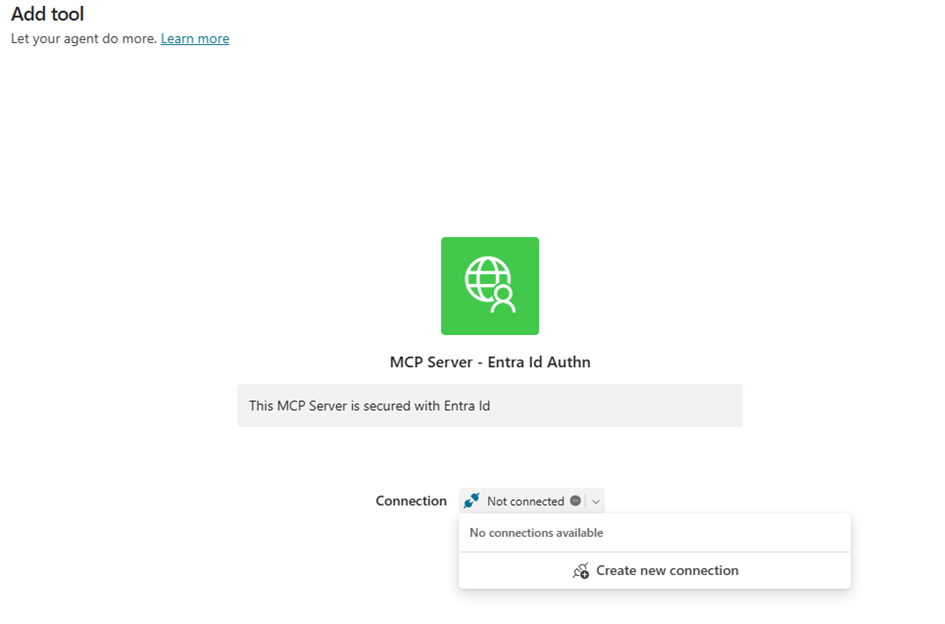
Step 5: Create the Connection
Once the MCP server is added:
- Create new connection
- Copilot Studio prompts for authentication
- Sign in using Entra ID
- Consent to permissions
This creates a connection instance tied to the user
Now every MCP call:
- Uses delegated access
- Runs under the signed-in user context
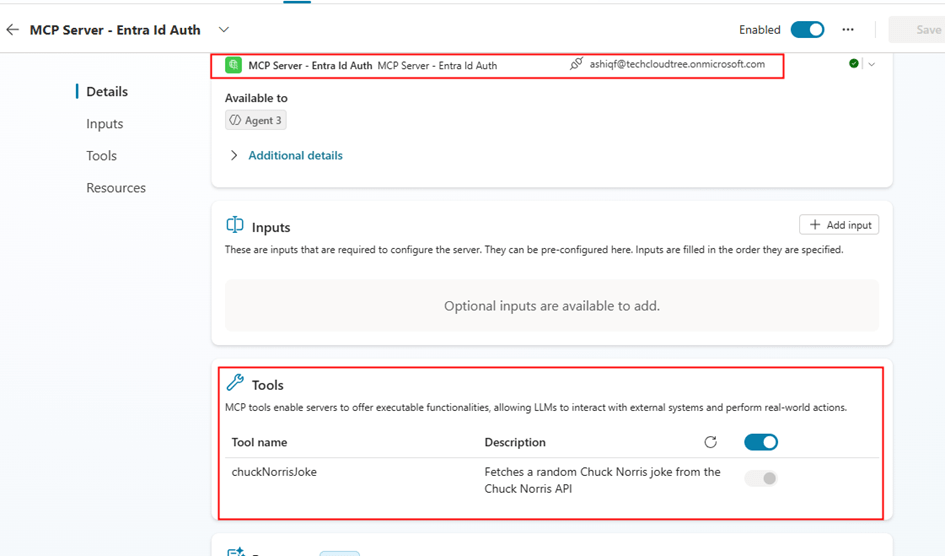
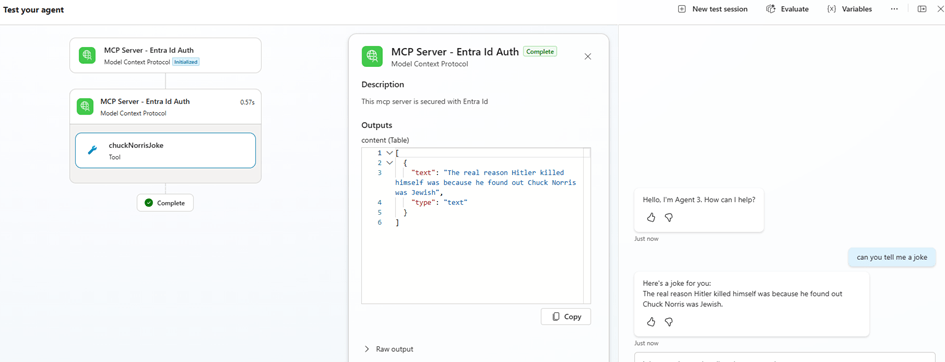
Step 6: Test in Copilot Agent
- Add MCP tool to your agent
- Invoke a tool (e.g., get users, groups, etc.) with a prompt
- Verify:
- Authentication prompt
- Successful execution
- User-context data
Delegated Permissions – Why It Matters
This setup uses delegated permissions, meaning:
- The MCP server acts on behalf of the user
- Access is limited to what the user is allowed to do
- No over-permissioning (unlike app-only access)
This is critical for:
- Enterprise governance
- Least privilege access
- Auditability
Summary:
In this post, we covered:
- Why MCP servers must be secured
- How OAuth + Entra ID fits into MCP architecture
- Creating two app registrations:
- MCP Server (resource)
- Copilot Studio (client)
- Adding MCP server in Copilot Studio
- Automatic custom connector creation
- Using delegated permissions for secure access
Final Thoughts
As MCP adoption grows, security is not optional – it’s a design requirement.
By integrating Microsoft Entra ID with your MCP server:
- You get enterprise-grade authentication
- Seamless integration with Copilot Studio
- Identity-aware AI agents
And most importantly, you stay in control of your data.