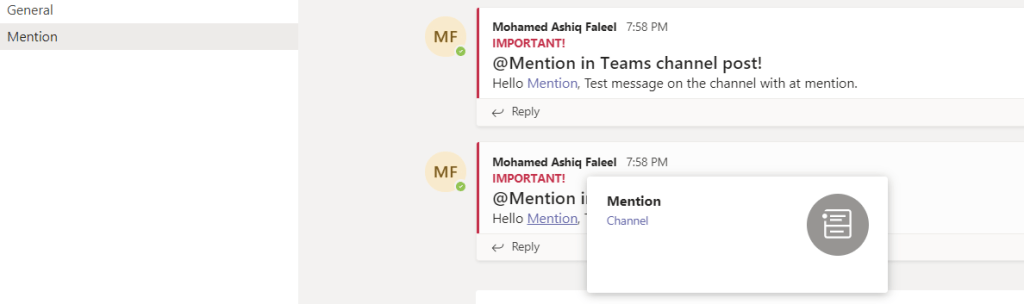
There are ways to @mention a user while posting a conversation in Teams channel using flow action but as far as I know its not possible as of now to @mention a Teams channel using Flow actions. In this post, I will show you how to @mention a channel & user using a POST call to a MS Graph beta endpoint. To construct the endpoint URL you will need to know the TeamID & ChannelID, to get the information go to Teams > click the three dots > click Get link to channel > Copy the URL
Now decode the copied url, I’ve used Meyerweb Decoder. Your url will look something like below
Summary: The endpoint which has been used in this post are beta endpoints. Graph API can be easily called using Power Automate, if you need some example on using a Graph API refer this post. Hope you find this post useful & informational. Let me know if there is any comments or feedback below.
This is in continuation to my earlier post using Adaptive card for collecting information in Outlook also known as Outlook actionable message. On this post I am going to show you how to collect information from a user in Teams and storing the values back in a SharePoint list. The following Power Automate actions under Microsoft Teams connector are now available in preview mode which helps us to capture data back from a Teams adaptive card meaning you would be able to make POST calls back to the flow by click of a button (Action.Submit) on the Adaptive card
Post an adaptive card as the Flow bot to a Teams user, and wait for a response
Post an adaptive card as the Flow bot to a Teams channel, and wait for a response
Once an Adaptive card is posted in Teams using the above actions, the flow run will not continue until the recipient or someone in the channel (if sent to channel) responds to inputs that are required within the card till then the flow is put on wait for maximum period (Async calls) of 30 days as per the documentation. Post that period the flow will time out if no one responds to the card. There can be use case to collect responses from users in Teams & post it to Azure services like SQL etc, this avoids the users to have access to premium services or license since the card is sent using Power automate. The use case I’ve chosen for this post is to collect Name & Email address of a teams user by sending them an input form which stores the responses in a SharePoint list after the user responds. Find the resources I’ve used for this example
Let’s start by designing the card using the Adaptive card designer. Click on Open Sample, select Input Form as shown below
Then change the host app from the default Bot Framework Webchat to Microsoft Teams – Light (Optional Step). Remove the Phone number Text Block [Element] & the corresponding Text.Input [Inputs] field to keep it simple & I’ve also changed the Adaptive card image URL on the right column to the following URL since the image default image on the sample has got some issues rendering on teams. Find some information on image size & resolutions limits here.
Click Copy Card JSON from ribbon for this card to be used on the flow. We now have the adaptive cards JSON ready with us, let’s go ahead and the create the flow using Power Automate. Find the generated JSON below
{
    "$schema": "http://adaptivecards.io/schemas/adaptive-card.json",
    "type": "AdaptiveCard",
    "version": "1.0",
    "body": [
        {
            "type": "ColumnSet",
            "columns": [
                {
                    "type": "Column",
                    "width": 2,
                    "items": [
                        {
                            "type": "TextBlock",
                            "text": "Tell us about yourself",
                            "weight": "Bolder",
                            "size": "Medium"
                        },
                        {
                            "type": "TextBlock",
                            "text": "We just need a few more details to get you booked for the trip of a lifetime!",
                            "isSubtle": true,
                            "wrap": true
                        },
                        {
                            "type": "TextBlock",
                            "text": "Don't worry, we'll never share or sell your information.",
                            "isSubtle": true,
                            "wrap": true,
                            "size": "Small"
                        },
                        {
                            "type": "TextBlock",
                            "text": "Your name",
                            "wrap": true
                        },
                        {
                            "type": "Input.Text",
                            "id": "myName",
                            "placeholder": "Last, First"
                        },
                        {
                            "type": "TextBlock",
                            "text": "Your email",
                            "wrap": true
                        },
                        {
                            "type": "Input.Text",
                            "id": "myEmail",
                            "placeholder": "youremail@example.com",
                            "style": "Email"
                        }
                    ]
                },
                {
                    "type": "Column",
                    "width": 1,
                    "items": [
                        {
                            "type": "Image",
                            "url": "https://download-ssl.msgamestudios.com/content/mgs/ce/production/SolitaireWin10/dev/adapative_card_assets/v1/tile_spider.png",
                            "size": "auto"
                        }
                    ]
                }
            ]
        }
    ],
    "actions": [
        {
            "type": "Action.Submit",
            "title": "Submit"
        }
    ]
}
Flow Creation:
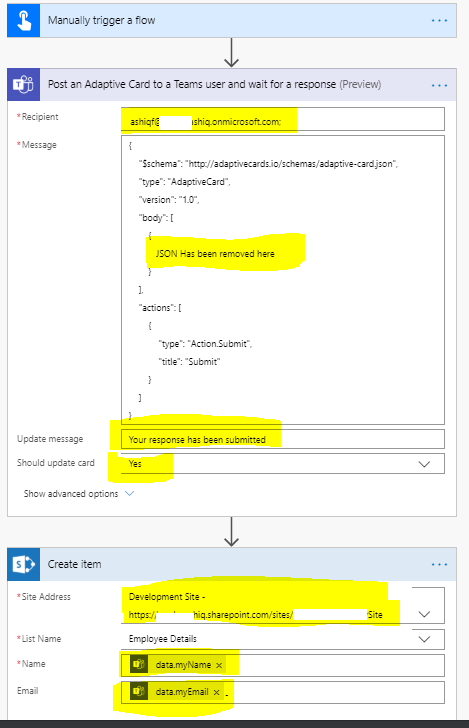
Create an Instant flow with trigger “Manually trigger a Flow”, this will post an Adaptive card to a Teams user with the Input form which collects response to a SharePoint list. Create a SharePoint list with two columns for us to store the Name and Email submitted from the adaptive card on Teams.
Add the flow action “Post an adaptive card as the Flow bot to a Teams user, and wait for a response”, on the action
Enter the email address of the user in the Recipient field
Paste the JSON copied from the card designer in the Message field
Enter information to be shown to the user on the field Update message after the Submit button is clicked
Field Should update card to be set as Yes
Now add the action “Create item” to store the form response in the SharePoint list created above with the request body information mapped to Name (myName) & Email (myEmail) using the dynamic content. The dynamic content has also information about the user (Email, Display Name, Response time etc) responded in Teams
The flow is ready, Run the flow to test it. The recipient would have received the card in Teams as below
After the user keys in the Name & Email address on Teams and clicking Submit button will complete the flow till then the flow will be in wait state for a period of 30 days maximum. The data will be submitted to the SharePoint list and the card will be updated with the update message as below
There is an Adaptive card designer in Power Automate which is an experimental feature currently with which you would able to design/update Adaptive card in the Power Automate action. To enable it, click the cog wheel on your flow environment and click “View All Power Automate settings”. On the popup toggle the Experimental Features to On and click Save button.
Go back to the flow in Edit mode, the Teams action will now have an Adaptive card designer as shown below
Senior Program Manager for Power Automate Audrie Gordon has a great video on Adaptive cards for Power Automate which has lot of information.
If you run in to an error while submitting the form or triggering the flow, look at the Troubleshooting tips for Adaptive cards. There are few known issues documented here with regards to using this action on Power Automate.
Summary: You now have created an input form for collecting information from a user in teams. To know the future road map for Adaptive cards, click here to know. There are couple of amazing templates available in the Flow environment, just search for Adaptive card in templates where you get template for different use cases. Hope you have enjoyed reading this post and find it useful. If you have any comments or feedback, please provide it on the comments section below.


