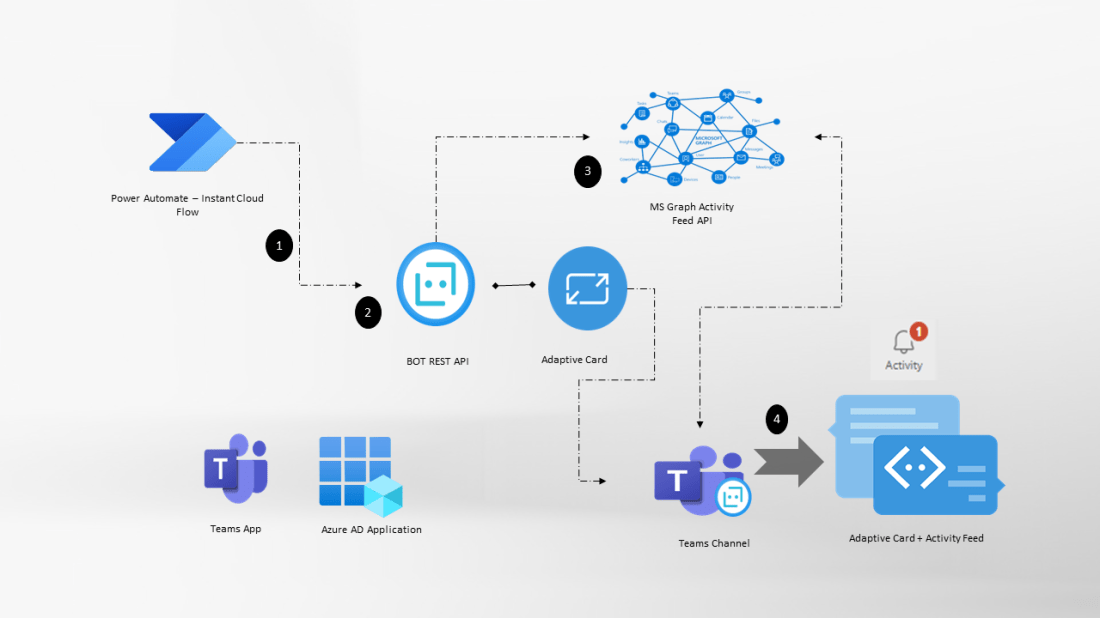
Activity feed notifications appears in the Teams activity feed panel with link to various locations thus enabling developers to build actionable content. These notifications are sent as push notifications in the Teams client. In this blogpost, let us see how to send Teams activity feed notification using
Custom Teams App with a Bot
Power Automate standard action: Post a feed notification
Pre-Requisites:
Access to HTTP Premium Connector in Power Automate
Microsoft graph has API endpoints to send activity feed notifications to Teams users. The pre-requisite to use the activity feed graph endpoint is to have a custom Teams app scoped to a Team, or in a chat or user.
Step 1: Custom Teams App scoped to Team:
For this blogpost, I have used a custom Teams app scoped to a Team. Refer to the following blogpost to create a custom Team app scoped to a Team with a Bot capable of sending an Adaptive card message on a channel
Do not install the Teams App yet before completing the other steps given below. After the Teams bot is created, a custom Azure Active directory Application must be registered.
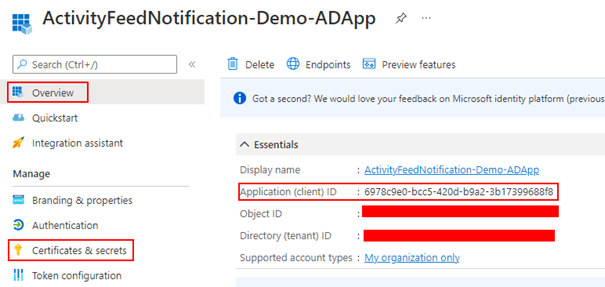
Step 2: Azure AD Application – Microsoft Graph Activity Feed permission:
Register an Azure AD application to add the Microsoft Graph permission to be send activity feed. Copy the Application (client) ID and Tenant Id of the registered app from the Overview section and create a secret from the Certificates & secrets under Manage blade per the screenshot shown below. Once the secret is created, copy the value to be used in the Power Automate cloud flow
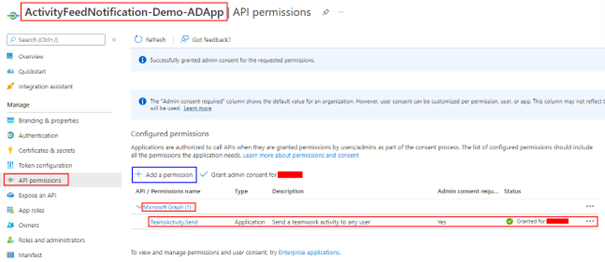
Add the application permission TeamsActivity.Send with an admin consent.
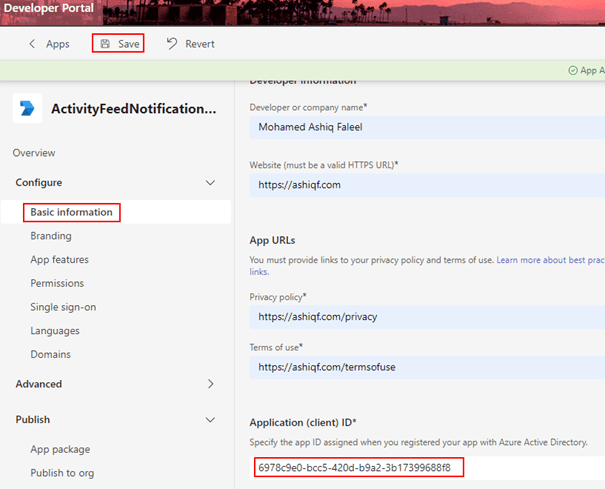
Step 3: Link the AD app to the Teams App
The AD application with permission to send activity feed is created, the next step is to link the Teams app created in Step 1 with the AD app. In the Teams Developer portal, enter the Application (client) ID in the apps Basic Information under the Overview section as shown in the below screen shot
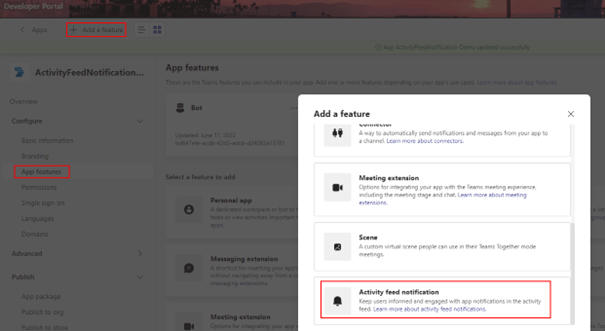
Don’t forget to Save the App in the Developer portal after the Application ID is entered. Now go to the App Features and then click Activity Feed notification as shown below
Click + Add an activity and enter the following information per the screenshot below
Type: informationBroadcasted
Description: Information Broadcasted Activity
Title: Notification from {actor} broadcasted by {broadcastedBy}
Click Save. The Teams app is now ready to be installed, follow the instructions here to install the bot in a Team for testing the Activity Feed notifications.
Power Automate Cloud Flow to send Adatpive card message and Activity Feed:
The Teams app is ready and now let’s create an Instant cloud flow with manual trigger to send an Adaptive card message to a Teams channel (General or any standard channel) and then Deep link to the adaptive card post in the Teams Channel to the activity feed notification. I have used a Premium HTTP connector action to send the adaptive card using Bot Framework REST API. Go through the following post to send the Adaptive card
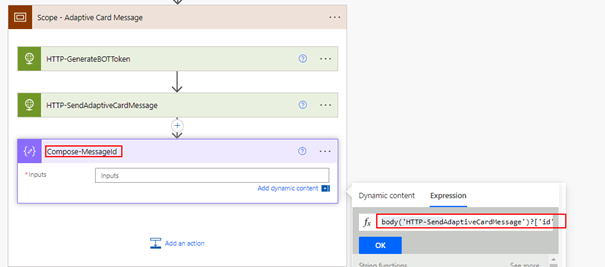
In the flow after the action HTTP-SendAdaptiveCardMessage, add a compose action with the following expression to get the Message ID of the Adaptive card channel message
body('HTTP-SendAdaptiveCardMessage')?['id']
Add two compose action to store the TeamIdorGroupId and TeamChannelID as shown below
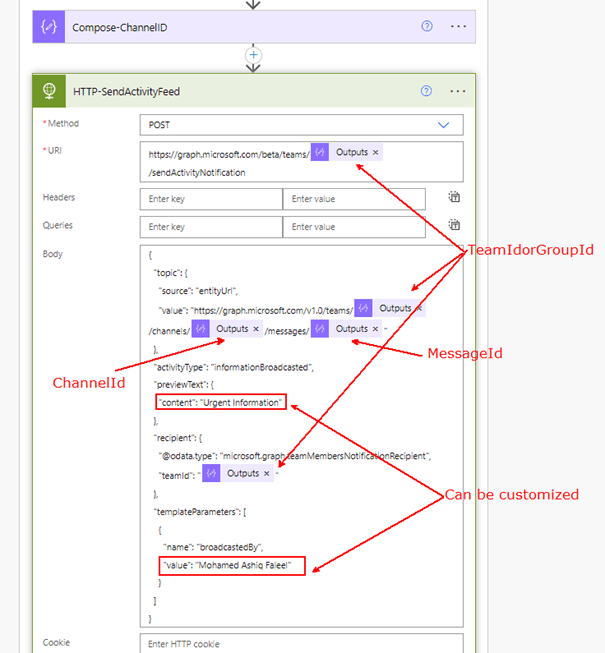
Add a HTTP action (Premium) to send the activity feed to all Team members (Beta) using the Graph Activity Feed API. Find the details below for the HTTP request
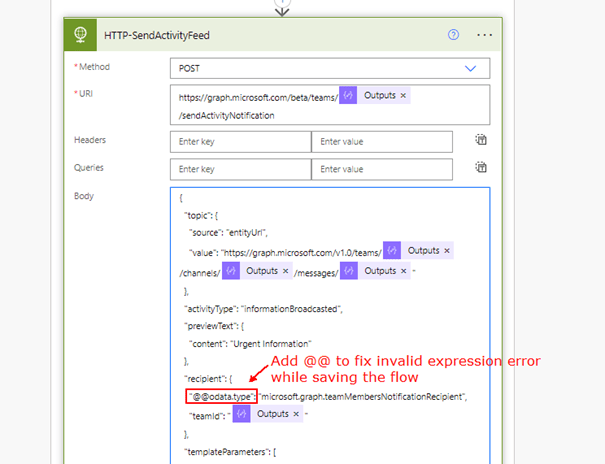
If you are having issues (Invalid Expression) while saving the flow, add additional @ keyword in the recipient as shown below
Click Show advanced options in the HTTP action to enter the Authentication details. Enter the Client (Application) ID, Secret and Tenant Id from Step 2
Time to test the Power Automate flow. Find below the Activity Feed message for a Teams user
Note:
The Teams app can also be enabled with Resource Specific Consent, to do so in the Teams Developer portal click Permissions on the Left bar. In the section Team Permissions select TeamsActivity.Send.Group under Application. If you have done this, Step 2 is not required. I will cover this in a different blog post.
Power Automate standard action: Post a feed notification:
There is a standard Teams action Post a feed notification which creates an activity feed with/without Deep link to a chat or Teams Channel using the Power Automate Teams Bot. Find below the action
Summary:
Isn’t this powerful to have engaging and actionable content for the users in Teams. There can be many use cases which could be applied for this setup e.g: Notify user and deep link to a Power App added in Teams channel etc. Hope you have found this informational & thanks for reading. If you are visiting my blog for the first time, please do look at my other blogposts.
Do you like this article?
Subscribe to my blog with your email address using the widget on the right side or on the bottom of this page to have new articles sent directly to your inbox the moment I publish them.
In the last post, we have seen till the installation of the Teams App with the Bot on a Microsoft Team. Let us now continue to send a proactive message, be it an Adaptive card or a simple Text message on a Teams channel using Bot Framework REST API from a Power Automate Cloud Flow.
A proactive message is any message sent by a bot that isn’t in response to a request from a user. Ex: Welcome messages, Notifications, Scheduled messages, Broadcast message etc
Power Automate Cloud Flow:
For this blog post, I have used a Power Automate Instant cloud flow with manual trigger to send the message to a Teams Channel. To follow along the blog post, be ready with the following information
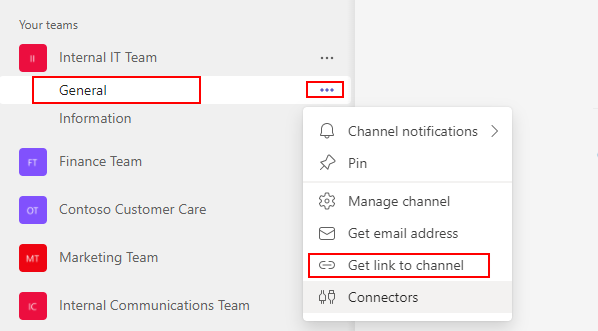
Team ID & Channel ID
This information is required to send the proactive message to a Microsoft Team Channel. To get this information, in Microsoft Teams Client identify the Team channel in scope > Click the ellipsis of the channel in scope > Get link to channel as shown below
After decoding the channel link, the url will be in the format as shown in the below image from which you can get the channel Id and Team group ID
If you are building a Teams broadcaster or communicator application using Power Apps, these information can be stored in Table or a SharePoint list. There are Graph API endpoints which can used to get the Channel Id’s etc.
The service URL is the base URI for all Bot framework API requests. In Teams the service URL will change based on user’s region [EMEA, America, APAC, India etc]. This example delivers messages only on the Team channel and not to the users directly so you can choose the service URL based on the Microsoft 365 Tenant Location. Find below some URL’s based on region
All the required information is now available to proceed with sending the channel message using REST API.
Generate Access Token – Bot Framework REST API:
There are SDK’s in Bot Framework for programming languages like .NET, JavaScript, Python etc to handle all conversations for you but an alternative to using the SDK is leveraging Bot Framework REST API. The first step in using the different REST API endpoints from Bot Framework is to generate an access token which is then added to the Authorization header of each API request in this format
Authorization: Bearer ACCESS_TOKEN
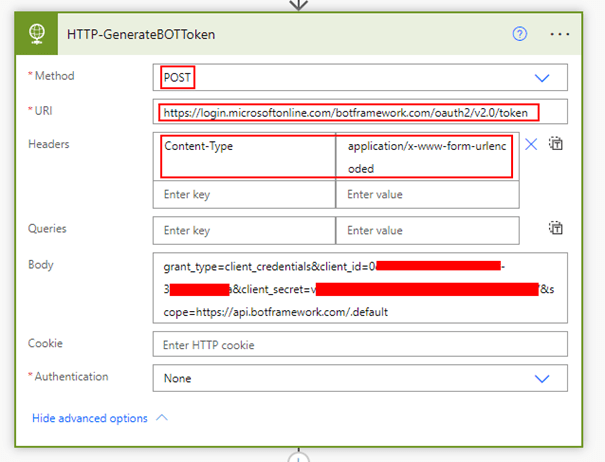
To request an access, make a HTTP request per the following details
Replace the botId and botSecret with the values stored from the previous steps. The Bot Id and the secret are from the custom Teams app created based on the previous post.
Add a HTTP Action in your Power Automate flow to add the above details for generating the token
The JWT access token is valid for 24 hours, if the token expires make another request.
Send Teams Channel Message:
The Teams Channel conversation post or proactive message on a channel can now be sent using the REST API to Create Conversation with the access token generated in above step.
Simple Text Message:
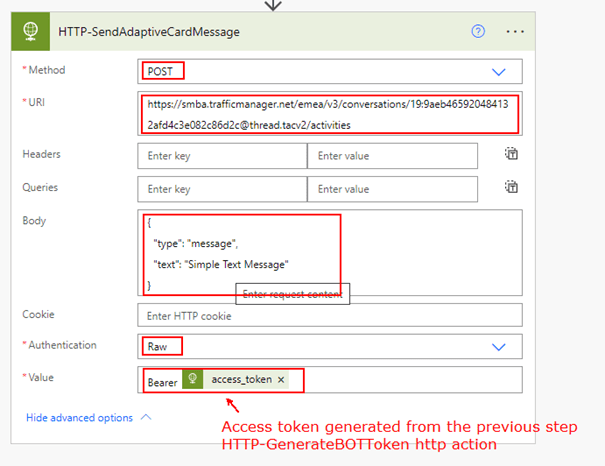
Find below the HTTP request detail to send a simple proactive message on a Teams Channel. The conversation Id is the Teams Channel Id
Replace teamsChannelId (conversationId) with the actual Team channel Id
Body:
{
  "type": "message",
  "text": "Simple Text Message"
}
Authorization Header: Bearer access_tokenvalue
The Authentication of the HTTP action should be set to Raw, the value should be in the format
Bearer access_token
You can use Parse JSON Action to extract the access token from the previous HTTP action HTTP-GenerateBOTToken or you can directly get the value using the following expression
body('HTTP-GenerateBOTToken')?['access_token']
The above HTTP request will create a HTTP response with the activity id which can be potentially used to send a reply etc.
Adaptive Card Message:
Adaptive cards are platform-agnostic snippets of UI authored in JSON that different Microsoft apps and services like Teams, Outlook can use. It can be designed using the Adaptive Card designer portal. To send an Adaptive to a Teams Channel, everything else remains the same when comparted with above give HTTP request for the Simple Text message except the Body as below
{
  "type": "message",
  "attachments": [
    {
      "contentType": "application/vnd.microsoft.card.adaptive",
      "content": {
       "msTeams": {
          "width": "full"
        },
        Replace the ADAPTIVE CARD JSON PAYLOAD from the designer portal
      }
    }
  ]
}
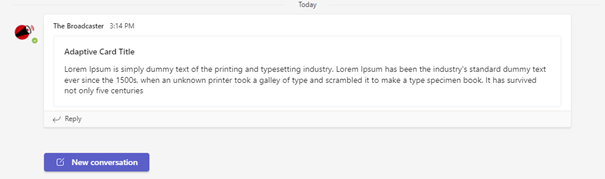
You can get the complete body of request from this Link. This method can be used to send the message on any standard channel but not on Private Teams channel, Microsoft has not opened the possibility to send a channel message on private channel using a Bot. Find below adaptive card message posted on the Teams Channel from the Power Automate flow
Summary:
There are lot of possibilities with the Bot connector service REST API, what I have shown above is only an endpoint to send a message in a Teams Channel. Look at this documentation on the available conversation operations like Reply, Delete, Update conversation etc. Using this approach you can build a Company broadcaster app with the possibility of reaching out to multiple Teams without the user being the member or owner of the Team. If you are visiting my blog for the first time, please do look at my other blogposts.
Do you like this article?
Subscribe to my blog with your email address using the widget on the right side or on the bottom of this page to have new articles sent directly to your inbox the moment I publish them.
Microsoft Teams connector in Power Automate has actions which can send a simple text message or Adaptive card as a flow bot in a Teams channel. Messages or cards are posted as the user who’s signed into the connector in the flow or by using the flow bot.
Messages can be posted on a Teams channel only if the signed in user or account of the connector is a member or an Owner of the Microsoft Team. Recently I had a requirement from my customer to post or broadcast messages on numerous Teams channels (> 1000). It is impossible per the limits for Microsoft Teams to have a dedicated service account as a member of all teams in scope. There is no graph API with application permission which can send a message in a channel. In this blog post, let us see how I have overcome the limitation of posting a message or card in multiple teams with the help of
Custom Teams App with a Bot
Installation of Teams App in Teams
Bot connector REST API to post a Message or Adaptive Card aka proactive message
Custom Teams App with a Bot:
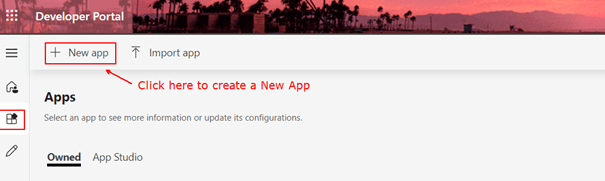
The teams in scope to receive the channel post or Adaptive card message should have a custom Teams app installed. The Teams app should have a Bot as its app features enabling the Microsoft team to receive the message. In this section, let us see how to create a Teams App with a Bot using the Developer Portal for Teams. Step 1: Login to the Teams Developer portal using your Microsoft 365 login ID and then Click + New app as shown below
Step 2: In the following screen for the Basic information of the app, enter the following mandatory information like Short name, App ID (Auto Generated), Short description, Long description, Developer or company name, Website (Valid HTTPS URL), Privacy policy url, Terms of use url. Once all of the above information is entered, click Save at the top left corner as shown below.
To apply a custom logo or an app icon for the Teams app, click Branding on the left navigation bar in the Teams developer portal as shown above.
Application (client) ID – Teams Activity Feed:
You can leave the Application (client) ID as blank. This section will be filled for custom Teams Activity Feed use case.
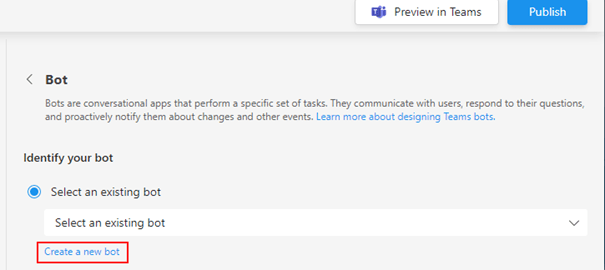
Step 3: On the left navigation, click App features > Bot
Step 4: Click Create a new bot which will take you to the Bot management portal. If you already have a bot where you are an Owner, it will be listed in the dropdown as shown below.
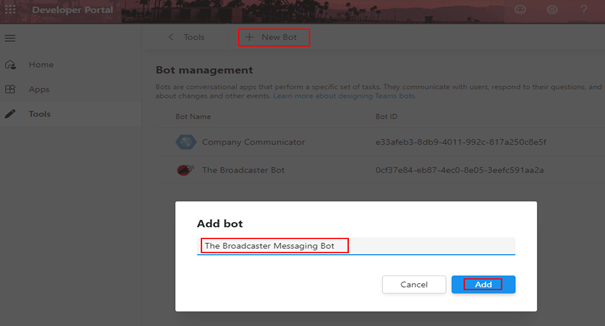
Step 5: In the Bot management, click + New Bot > Enter the name of the bot > Add
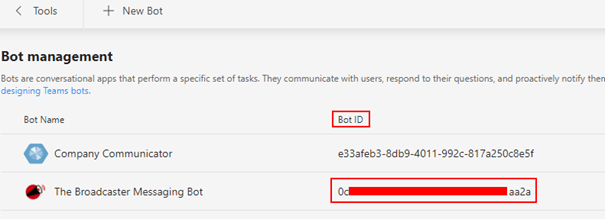
Step 6: Once the bot is added. In the Bot management portal url from the Developer Portal, copy the Bot ID and keep it handy to be used in the Power Automate cloud flow.
Step 7: Now click the registered bot in the above screen to Add a secret as shown below. As soon as the secret is generated, copy the value and keep it handy to be used in Power Automate cloud flow.
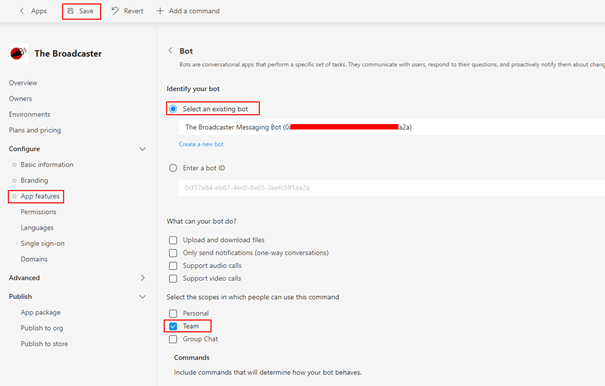
Step 8: Go back to the created Teams app in the Developer Portal, in App features > Select the created bot > Set the scope to Team > Save
Installation of Teams App in Teams:
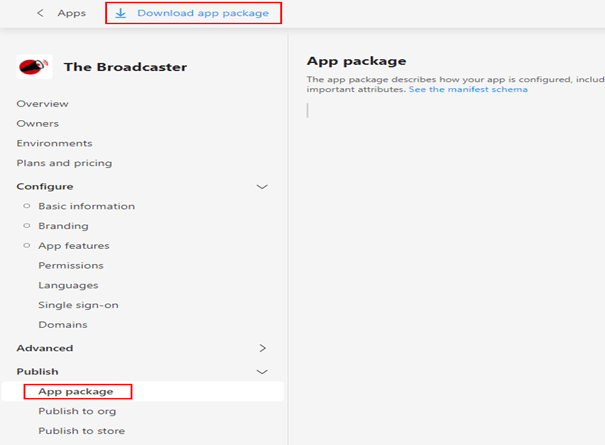
The Teams app is now configured with required features to send Teams channel conversation post. Download the App manifest package from the Developer Portal as shown below
Upload app in Microsoft Teams [Side Loading]:
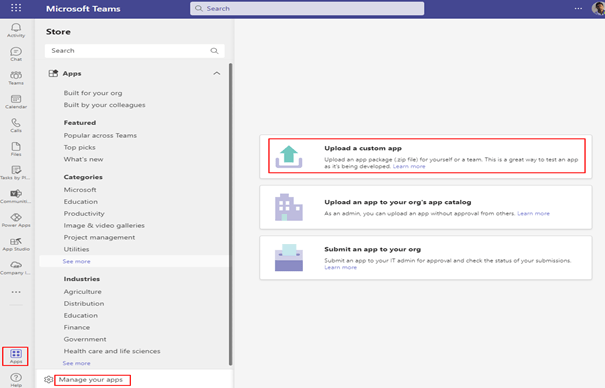
Go through this Microsoft Documentation link to sideload the Teams App to your Teams client as a developer before publishing the package to the Teams Organization App catalog.
Go to the Teams Desktop Client > Apps > Manage your apps > Upload a custom app > Select the App manifest Zip package from above step > Add to a team > Select the Team to install the app > Setup a bot.
Find below the screenshot for your reference from Teams Desktop client
To validate the installation of the app, go to the Installed Team > Manage Team > Apps > You can find the installed app as shown below
Upload app in Microsoft Teams [Organization App Catalog]:
After the app is tested, the app can be deployed at scale once the app is available in the Teams Organization App catalog through Graph API. The pre-requisite to call the Graph API enpoint to install the app is the
Teams ID (Group ID)
Teams APP ID from the App catalog
Summary:
In the next post I will cover how to use Bot Framework REST API in Power Automate Cloud Flow to send the Adaptive card message in a Teams Channel. If you are visiting my blog for the first time, please do look at my other blogposts.
Do you like this article?
Subscribe to my blog with your email address using the widget on the right side or on the bottom of this page to have new articles sent directly to your inbox the moment I publish them.
SharePoint and Microsoft teams services in Microsoft 365 makes it easier to share content or collaborate with external users who is outside your organization. A guest or external user is someone who do not have a school or work account with your organization, they can be your partner, vendor, customer etc. In this article let us see how to build a self-registration experience for external users with the help of Microsoft Forms & Power Automate to onboard them to a
SharePoint online site
Microsoft Team
Microsoft Form to collect details from External User:
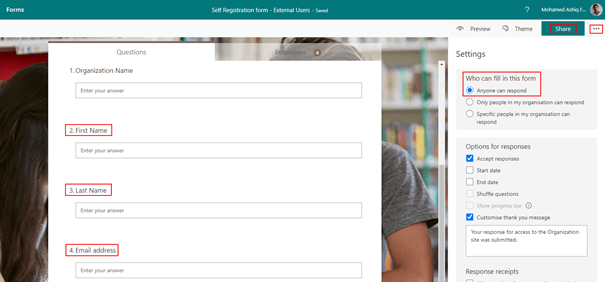
To start building this experience, create a Microsoft form with the setting Anyone can respond and with fields (Name, Email address etc) to collect information from the external user to send invitation.
Azure Active Directory Application registration:
The next step after creating the form is to register an application in Azure AD with Microsoft graph API permission to send invitation to external user. After the app is registered obtain the client id, client secret & tenant id to be used in the Power Automate flow further down this article to generate the JSON webtoken to access Microsoft Graph API for sending invitation. Find below screenshot with the permission User.Invite.All added to the app. Keep in mind the permission requires Admin consent.
There is also delegated permission available for User.Invite.All.
Onboard External users to a SharePoint online site:
Once the Microsoft form is ready, we can start building the Power Automate flow which can send the email invitation to the external user and for granting access to the SharePoint site. The external sharing features of SharePoint Online enables users in your organization share content with people outside the organization. There is no limit to the number of guests you can invite to SharePoint sites as per this SharePoint online limits documentation. Find below steps to create the Power Automate flow with a custom approval on a Microsoft Team
Power Automate Flow:
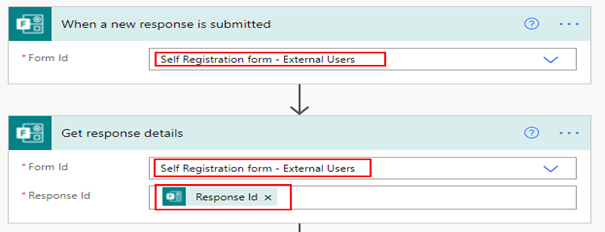
Create an Automated flow with the trigger When a new response is submitted with the above form name selected on the dropdown and then add the action Get response details with the Response Id selected from the dynamic content for the trigger to get the form details submitted in the Microsoft form by the external user. Find screenshot below
Adaptive card for Teams Approval:
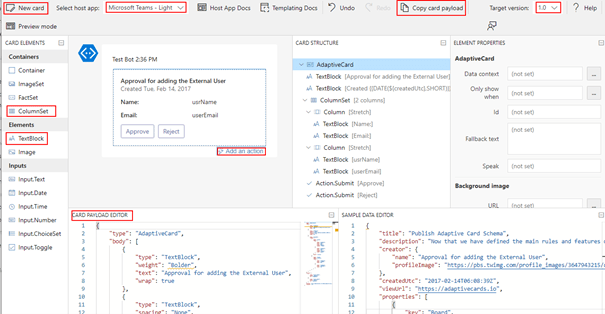
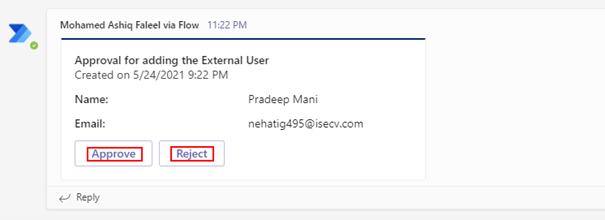
For the Approval in Microsoft Teams, I have used a custom card created from the Adaptive card designer with elements ColumnSet, TextBlock to display information submitted in the form & action button Approve and Reject to take further action by a Microsoft teams user to proceed with Invitation for the Guest account creation. Find screenshot below from the adaptive card designer
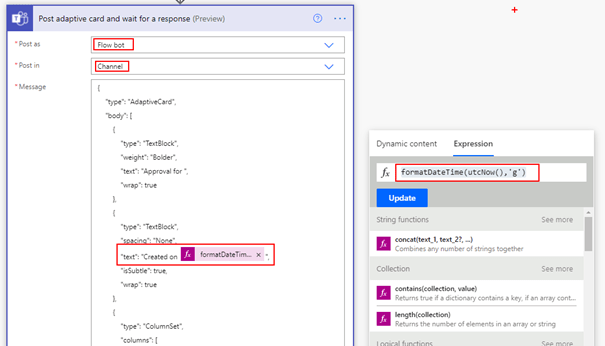
After the card is designed, copy the card payload from the designer and go to the flow and then add the action Post adaptive card and wait for a response and make appropriate selection on the available fields as shown below
Post as: Flow bot
Post in: Channel
Message: Payload copied from designer. Replace the fields for usrName & userEmail selected from the dynamic content from the outputs of the action Get response details. The created on textBlock element has the flow expression formatDateTime(utcNow(),’g’) to display the current datetime information on the card.
Update Message: Custom message which appear after an action taken in Microsoft Teams
Team: Select the Team where you would like to post the card
Channel: Select the channel from the Microsoft Team where you would like to have the approval adaptive card posted
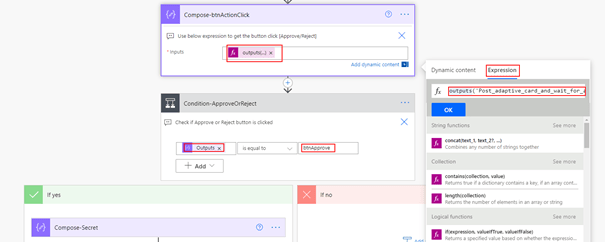
The above adaptive card is used to get approval from the Organization teams user based on the information submitted by the external user in the Microsoft form to proceed with the next steps for sending the guest account invite. Now we will have to identify if the user has clicked the button Approve or Reject. This information can be easily obtained from the Outputs of the action.
Note: Adaptive card can also be sent using a Microsoft Graph API with the card payload in Attachments field
Adaptive card for Teams – Dynamic content Missing:
As of the time I am writing this article there is an issue in getting the output as dynamic content for the Post adaptive card and wait for a response action if there is dynamic content added on the JSON Payload (Name, Email from Forms). The fix is to run the flow till the post adaptive card action and take an action on Microsoft teams by clicking either Approve or Reject and then go to the Flow run from the history as shown below
From the above screenshot, we can see if the user has clicked the Approve or Reject button from the field submitActionId. To get this value in Flow, use the expression
To get the submitActionId, enter the expression outputs(‘Post_adaptive_card_and_wait_for_a_response’).body.submitActionId in the compose action, then add a condition control to decide action based on users approval
I have observed this issue occurs in other team’s adaptive card actions as well, the above fix should work. Now we can implement the logic to send the Guest Invitation using Microsoft Graph API. To send the invite, we will use the Azure AD application registered above.
Generate JSON Web token to Access Graph API:
Be ready with the ClientId, Client Secret and Tenant Id collected from the AD app registration you have done initially. The only authentication flow to generate a access token for application permissions is Client credentials.
To generate a token
Store the Client Secret on a String variable or a compose action
Make a HTTP request using the HTTP connector with the following details. Make sure to replace the string for tenantId, azureAdAppclientId and azureAdAppclientSecret
Add a HTTP connector action to the flow for making a POST request per the following information
For the client secret make sure to URL encode using the expression encodeUriComponent(variables(‘clientSecret’)) else the request may fail due to the presence of special characters.
In the above screen, I have added a compose action to store the SharePoint site address to be used for granting the external user access to. To extract the token from the above request, add the parse JSON action with Content from the HTTP request body and the following schema
Include the access token when calling the Microsoft Graph API in the Headers section or raw as shown in the next section.
Send Invitation using Microsoft Graph API:
Before sending the invitation, validate if the user already exists in your organization AD tenant by using the email address of the external user with the help of the action Search for users as shown below
If there is null response for the action Search for users, then the user does not exist. This can be calculated using the expression length and by passing the value as a parameter, if it is equals zero then the external user does not exist. If the user already exists, we can directly proceed to granting the external user access to SharePoint.
Graph API to check if a guest user already exists:
{
  "invitedUserDisplayName": "External User Name",
  "invitedUserEmailAddress": "External User Email Address",
  "sendInvitationMessage": true,
  "inviteRedirectUrl": "SharePoint site URL or any URL",
  "invitedUserMessageInfo": {
    "messageLanguage": "en-US",
    "customizedMessageBody": "Welcome to the M365PAL SharePoint site! Click the link below and sign in."
  }
}
In HTTP request body, use the dynamic content of the form to populate the fields invitedUserDisplayName & Emailaddress. The invite redirectUri is the output of the compose action which has the SharePoint site url. I have added a delay of one minute before granting access to SharePoint site for the external user, this step is to make sure there is an entry in Azure AD for the external user/guest account.
Grant Access to SharePoint site for the external user:
As soon as the guest account invite is sent from the above Microsoft graph API request HTTP action, it is time to grant access to the SharePoint site for the external user. There is a SharePoint REST API endpoint to add a user to a SharePoint group (Owners, Member, Visitors), find below the request details
For the external user, the email address used to send the invite works.
Go back to the flow and add the action Send an HTTP request to SharePoint to call the above REST api. Find below the screenshot of the action
The above action uses delegated permission, the user of the connection should have access to the SharePoint site. As of now, there is no Graph API for adding the user to a SharePoint group but you can register an app in Active directory and add permission for SharePoint to call the above REST API. Refer to the documentation Granting access via Azure AD App-Only for calling the REST API using the registered AD app.
Testing the flow:
The whole flow can now be tested by submitting the form which sends the adaptive card on Teams first as shown below
After the card is approved, the invite is sent to the external user. After the external user accepts the invite, the user should be automatically redirected to the SharePoint site with the appropriate access. The access to the SharePoint site for the external user can be validated by the checking the membership of the SharePoint group in the site even before the user accepts the invitation. The site members can also be validated by accessing the URL for All users list:
This approach of granting access to SharePoint site for external user can be applied to internal users by turning off the access requests.
Limit External Sharing by domain:
The external sharing on SharePoint can be restricted based on domain of the external user. To enable the setting login into the SharePoint admin center > Policies > Sharing > Enable the checkbox Limit external sharing by domain > Add domain
Onboard External users to a Microsoft Team:
To onboard the external user to a Microsoft Team, the only change to the above flow is, instead of adding the user to the SharePoint group the user must be added as a Member to the Microsoft 365 group connected to the Microsoft Teams. The graph API to add a member to a Microsoft Team is
The expression to get the user object Id of the external user as per the below screenshot is
outputs(‘HTTP-SendGuestInvitation’).body.invitedUser.Id The expression can be used in a compose action to get the Object Id of the external user which can be used in the Graph API request to add the member to a Team. HTTP-SendGuestInvitation is the name of the HTTP Action.
Permission for the Azure AD App to add a member to a Microsoft Team:
The application permission Group.ReadWrite.All has to be added on the Azure AD app, if you are going to be using the same JSON webtoken generated above. There is delegated permission as well for adding members.
Summary: With this, the Power Automate flow should send the invitation as shown below to the external user.
If it is for a Microsoft Team, the external user should be licensed for teams service to open it on their teams client. The same flow can be also configured for Microsoft 365 group. If you are visiting my blog for the first time, please do look at my other blogposts.
There are many organizations maintaining multiple domains on a single Microsoft 365 or Azure AD tenant, in those cases there might be a need to create dynamic Microsoft 365 groups, security groups & distributions list based on the user’s domain to manage the group’s membership. On this blogpost, let us see how to
Create Dynamic Microsoft 365 group based on the user’s domain for Teams & Yammer
Create a Dynamic distribution list based on user’s domain in Exchange online
To begin with let us see some basics of a Dynamic group. The membership of a dynamic group will automatically update as people join, leave, or move within the organization whenever the user’s Azure Active Directory attributes are changed. In simple terms, rules determines the group membership. The users will be added or removed automatically as and when the user attributes change or users join and leave the tenant which reduces the administrative effort of adding and removing users from a group. Dynamic group can be created based on variety of attributes including role, location, department etc.
Create Dynamic Microsoft 365 group based on the user’s domain for Teams & Yammer
Microsoft Teams and Yammer (Microsoft 365 Connected) supports dynamic membership. It enables the membership of Team or Yammer to be defined by one or more rules that check for certain attributes in Azure AD. Microsoft Teams & Yammer creates a Microsoft 365 group in Azure AD. For this post, the membership rule will be simple one which is based on the user’s domain and country. You can also have a complex rule involving multiple Azure AD attributes like Title, Geography, Department etc. Before we proceed further, there are some pre-requisite & facts to be considered before creating a dynamic group.
User Administrator or Global administrator role in Azure AD
Users you foresee to be part of a dynamic group membership rule should have an Azure AD premium License P1 or P2
Microsoft 365 E3, E5, Front line workers MF3 & MF1 has Azure AD premium 1 service which should suffice.
An Azure AD organization can have maximum of 5000 dynamic groups.
Any number of Azure AD resources can be members of a single group.
Dynamic Membership based on Domain for Teams:
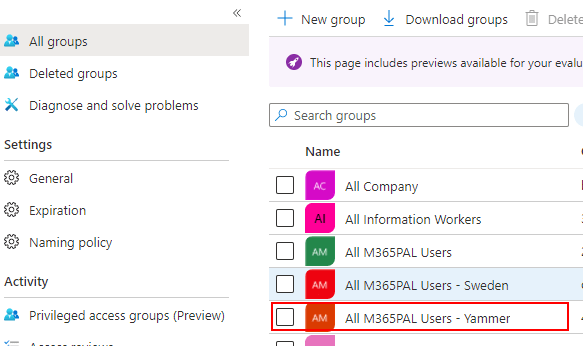
To create a Dynamic membership MS team, create a Microsoft 365 group first with Dynamic membership in Azure Active directory. You can create a dynamic group from PowerShell but here I will be using Azure Ad GUI to create the dynamic Microsoft 365 group with rule to add users based on their domain and country. I have added a domain m365pal.me to my Azure AD tenant which I will be using here for this example.
Sign in to Azure AD Admin center with administrator role in the Azure AD organization
Click Groups and then click + New Group
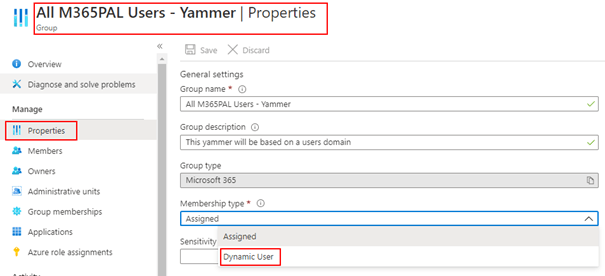
Select the Group type as Microsoft 365. Dynamic membership will also work with Security group but for team it should be Microsoft 365 group.
Enter the Group Name & Group email address
Select the Membership type as Dynamic User
Select the Owner and then
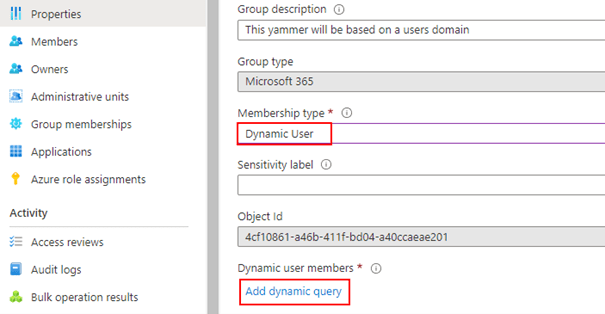
Under Dynamic user members section, click Add dynamic query
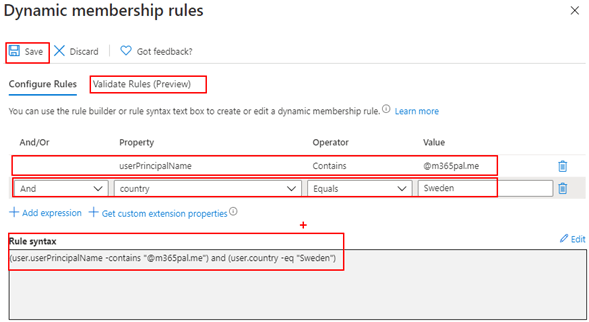
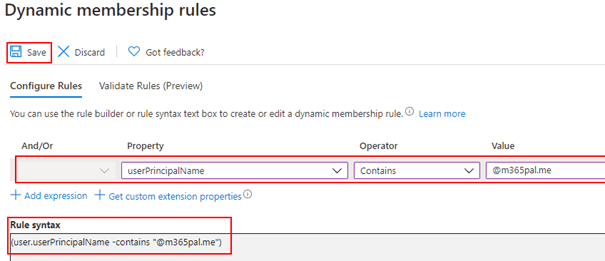
In Dynamic membership rules panel, add rule to define membership based on users domain & country
First rule for Domain: under Property column select userPrinicipalName, Operator should be Contains and the Value should be the domain name in format “@yourdomain.com”. This rule will add all users with the UPN user@yourdomain.com. Now click + Add expression to add the second rule
Second rule for country: under Property column select country, Operator should be Equals and the value should be the country name.
You can also validate the rules by clicking the link Validate Rules and then by adding users to check if the user satisfies the rule
Click Save. This is how it should look like
Click Create.
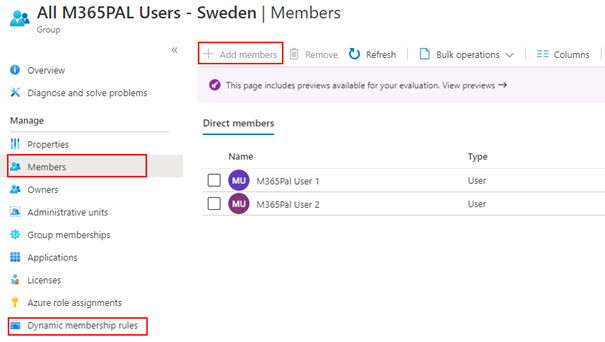
After waiting for couple of minutes, check the group membership. Please find below screenshot for the group which has two members satisfying the condition. You can also notice the + Add members link is disabled since the group is dynamic membership and not assigned. To modify the rules, click the link Dynamic membership rules link.
Now we are ready to create the MS Teams, go to https://teams.microsoft.com/ and then click Join or create a team at the left bottom corner and then Click Create a team
Click From a group or team and then click Microsoft 365 group
Now select the group you have created in Azure AD and then click Create.
The team is now created, you can find the team on the list. Check the membership of the team which will have the two users satisfying the rules and the owner of the group. One more thing to notice here is the message which says The membership settings prevents you from adding or removing members.
Voila! Dynamic Microsoft team is now created & setup.
If you have an existing team to be converted to a Dynamic team, find the Microsoft 365 group in Azure AD for the Team you wish to convert and then update the membership status from Assigned to Dynamic user with membership rules
Dynamic Membership based on Domain for Yammer:
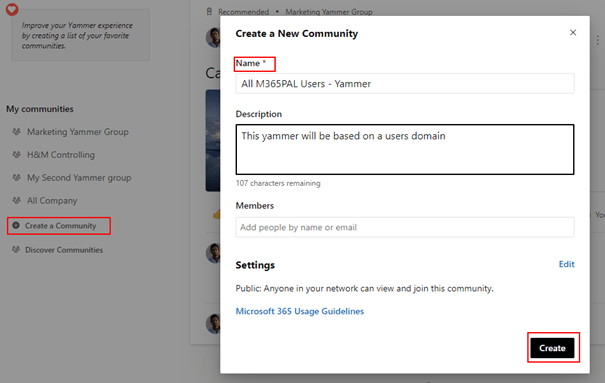
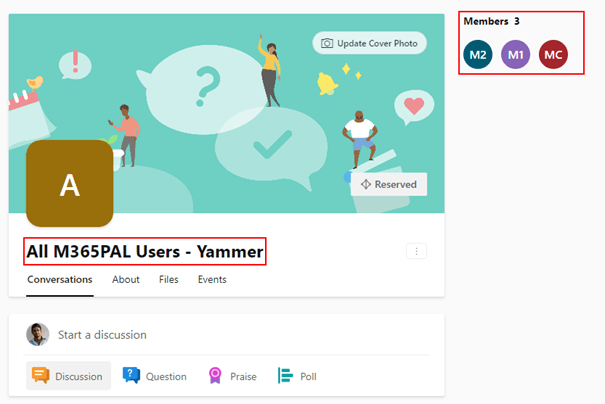
Yammer (Microsoft 365 Connected) also supports dynamic membership. Find the steps below to create a dynamic yammer group based on the user’s domain. Find the steps below
Click Create a Community and then Enter the name of the Community
Click the button Create
Now sign in to Azure AD Admin center to the update the membership settings of the Microsoft 365 group connected to the Yammer community. Find the yammer group and then click
Click Properties under the Manage blade and then change the membership type from Assigned to Dynamic user
After updating the membership type to Dynamic user. You will now have option to enter the dynamic query. Click dynamic query
In Dynamic membership rules panel, add rule to define membership based on users domain
Rule for Domain: under Property column select userPrinicipalName, Operator should be Contains and the Value should be the domain name in format “@yourdomain.com”. This rule will add all users with the UPN user@yourdomain.com. Now click + Add expression to add rules based on need
Click Save
Click Save. Wait for couple of minutes for the membership to be updated.
Now check the Yammer group in Yammer.com for the membership status. Please find below screenshot for your reference which will not have the + icon on the highlighted members section for adding users since this is now a dynamic yammer group
Also, Microsoft 365 group/Security group can be used for different use cases. See some sample use cases below
You can use to target SharePoint page/news to specific audience with the help of Microsoft 365 group or Security group. Will it not be more powerful if you use dynamic groups within a SharePoint to target content certain group of audience!
Assign Microsoft Licenses to users based on Dynamic Group.
Grant access to an App (PowerApps etc) using the dynamic group targeting certain departments, geographies etc
Create a Dynamic distribution list based on user’s domain in Exchange online:
Dynamic distribution groups are mail-enabled Active Directory group to distribute email messages to all its members within a Microsoft Exchange organization. Unlike regular distribution lists that contain a defined set of members, the membership list for dynamic distribution groups is calculated each time a message is sent to the group, based on the filters and conditions that you define in the group. You can create a Dynamic Distribution list from Exchange Admin center as shown below but the options to write advanced filter conditions or rules are limited so PowerShell is preferred.
Dynamic Distribution list from PowerShell:
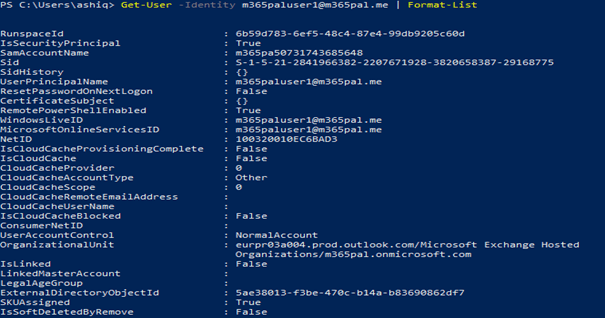
Make sure the Exchange online PowerShell module is installed. There are some limitations to create a recipient filter (Rules) that worked based on user’s domain with the operator like or contains but there is a workaround. The filter works based on the exchange property WindowsEmailAddress which is always the primary SMTP address, you can also consider using the property WindowsLiveID. Follow the steps below to create a Dynamic Distribution list based on user’s domain
Load the module by the running the command Import-Module ExchangeOnlineManagement
After authentication, enter the following command to create the Dynamic DL based on User’s domain. I have added the RecipientTypeDetails in the RecipientFilter to apply the filter rule only to user mailboxes which excludes the SharedMailboxes
Summary: On this post we have seen how to create dynamic groups based on user’s domain. Do some planning to start using the dynamic groups which will help reduce lot of administrative overhead. Hope you have found this informational & helpful. Let me know any feedback or comments on the comment section below
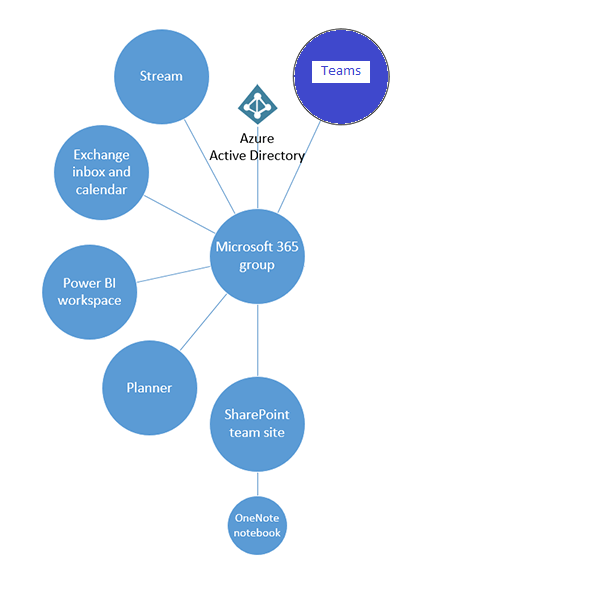
When you create a Microsoft Team, a Microsoft 365 group is created to manage the team membership like Owners, members, guests. I would rather say the Microsoft 365 group is a backbone of a Team. Through the group you also get an email address for the MS team. Find the other Microsoft 365 services which gets created per this documentation whenever there is a Team provisioned
On this blogpost let us see how to enable a team which can also act as an email distribution list so that you can send an email to all the team members, by default this option is disabled. You will have to be an Owner of the team to set this up. There are couple of ways to do this
Graph Explorer
Outlook
Exchange Online Powershell
Exchange Online Administrator
Graph Explorer:
Graph explorer is a utility that will let you make requests and get responses against the different graph endpoints as a signed in user (Delegated User). To enable the email distribution functionality, we will have to get the group id of the team for setting a value to True for the property autoSubscribeNewMembers. To get the Group Id information go to the Team and click the Get link to team as shown below
Copy the content from the popup which should be in the below format
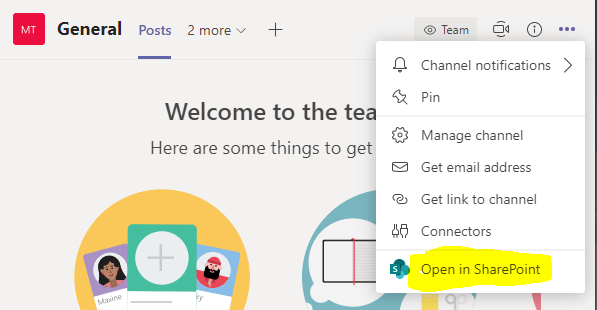
The Microsoft 365 group inbox for a Team is not available in Outlook but it can be accessed through the SharePoint site associated to the group. Open the SharePoint site from any of the Teams channel as shown below
On the Group Settings popup, enable the Subscription as shown below and then Save it. By default this setting is disabled for the Microsoft 365 group.
Exchange Online PowerShell:
The same setting can also be enabled from Exchange online PowerShell if you have Exchange online Administrator access on the tenant. Make sure the Exchange online PowerShell module is installed. Follow the steps below to turn on AutoSubscribeNewMembers which distributes emails to all users
Load the module by the running the command Import-Module ExchangeOnlineManagement
To disable the setting: Set-UnifiedGroup -Identity ” Team Display Name ” -AutoSubscribeNewMembers:$false
Refer to the documentation from Microsoft for more Exchange online commands related to the Microsoft 365 group.
Exchange Online Administrator
Login into the Exchange Online Admin center and click on Groups from the dashboard section. Execute the below steps
Find the group associated to the team (Team Display Name) from the list and then select
Click on Edit (Pencil Icon) from the ribbon
On the General tab, Enable the property Subscribe new members and then Save
Summary: The same setting can also be applied to a Team created through a Microsoft 365 group. Hope you have found this informational. There were already lot of blogs talking about groups
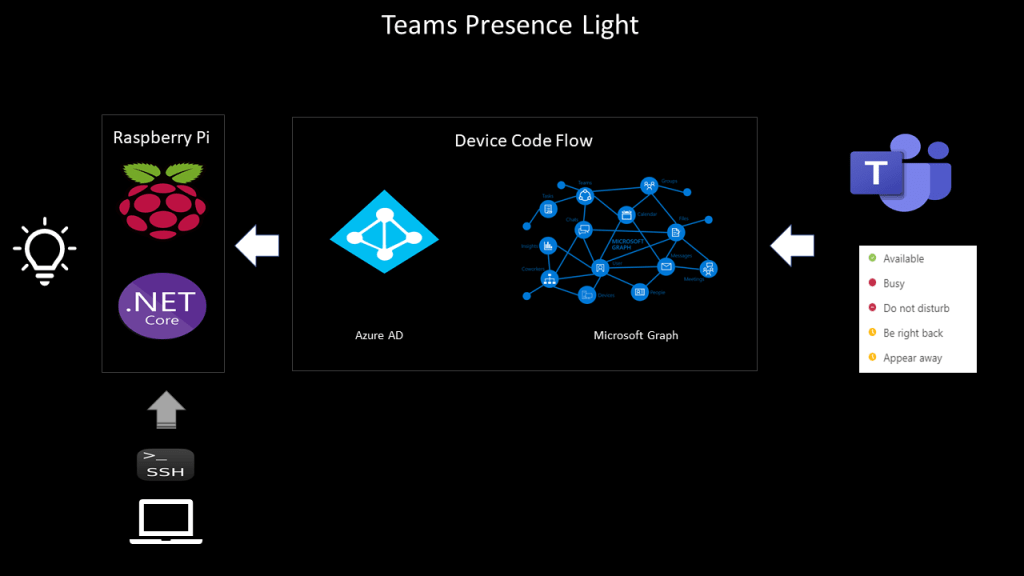
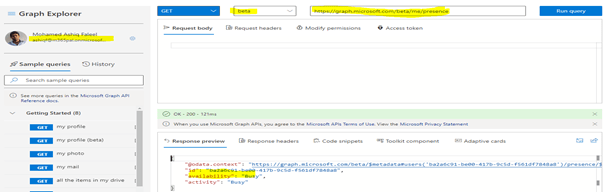
Almost every one of us is working from home these days due to the Corono situation we are in as of the time I am writing this article. I wrote a recent blog post about controlling devices from PowerApps with the help of a Raspberry PI and thought of extending the project by creating a Teams presence light with the help of a Raspberry Pi & couple of LED’s with different colours. This was possible due to the availability of the presence API endpoint in MS Graph, this helps us get the user’s current team presence (Available, Busy, Be right back, Do not disturb etc) for a logged in user. As of the time I am writing this article application permissions are not supported.
Device Code Flow:
The supported permission type is Delegated to get the presence information in MS graph, the user must sign in to get the users Teams presence. So how can a user signin/authenticate on a device like Raspberry Pi if we are only using a Terminal window to develop & run the application which I will doing it here, Device code flow to the rescue which is an authentication flow to get the data from MS graph for handling delegated permissions with remote signin/authentication using an auto generated device code. This flow lets the user use another device (for instance the windows client with the VS Code) to sign-in interactively. By using the device code flow, the application obtains tokens through a two-step process especially designed for these devices like Raspberry Pi. Examples of such applications are applications running on iOT, or Command-Line tools (CLI).
Refer this blog post for the steps & instructions to develop applications remotely on a Raspberry Pi using VS code.
Application Design:
There will be a .NET core console application polling the MS Graph presence endpoint every 5 seconds and based on the status, the corresponding coloured lights will be turned on. Find below the high-level design of the application
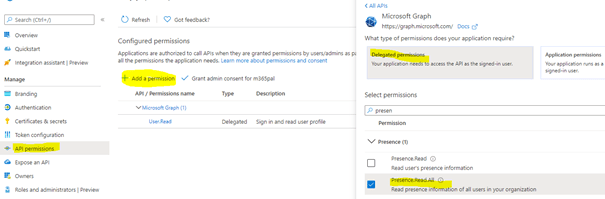
Active Directory application registration:
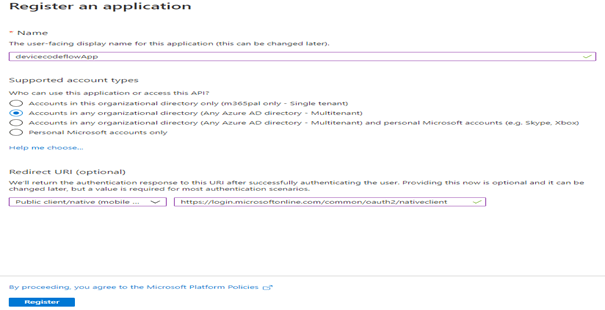
Start with registering an Application in Active directory with the following settings
Supported Account Types: Accounts in any organizational directory
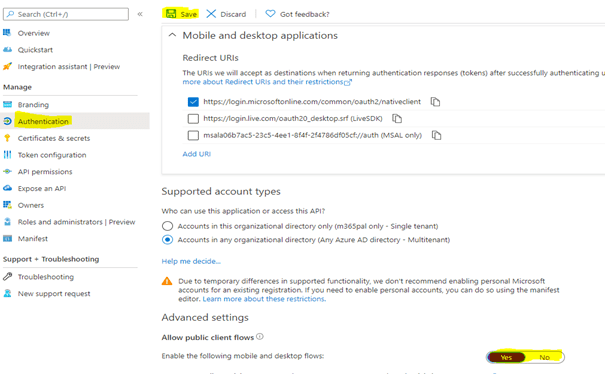
Enable Allow public client flows a required setting for the device code flow to work as shown below
Add the permission Presence.Read.All if you going to create a presence light for some other user other than the signed in user and Presence.Read if its going to be only for the signed in user. Once the permission is added, grant admin consent.
In this example, GPIO pins 12 and 13 are used with Green and Red LED’s but you can also use a RGB LED matrix supported for Raspberry Pi which are readily available in the market. Use the Client Id and the tenant id of the application in the app.
Provide the GPIO pins the root permissions through the command on the terminal window /usr/bin/gpio export 12 out and /usr/bin/gpio export 13 out.
Run the application by using dotnet run
Method AcquireByDeviceCodeAsync(IPublicClientApplication pca) generates the device code
As soon as the application is run from the command line, the code is generated as shown below
Code pca.AcquireTokenSilent(Scopes, accounts.FirstOrDefault()).ExecuteAsync(); generates the token which will used along with the graph GET request for getting the teams presence status of the user
The Token will be valid only for 3599 seconds which is close to 1 hour. Generate one more token using the same line of code after an hour which I have not handled in the sample code.
Polling will happen every 5 seconds using the .NET Timer_timer.Change(TimeSpan.FromSeconds(0), TimeSpan.FromSeconds(5));
Based on the teams presence, the corresponding lights will be turned on using the below code
switch (presenceStatus)
{
                        case "Available":
                            Console.WriteLine($"{DateTime.Now} : User is Available");
                            controller.Write(pinGreen, PinValue.High);
                            controller.Write(pinRed, PinValue.Low);
                            break;
                        case "Busy":
                            Console.WriteLine($"{DateTime.Now} : User is Busy");
                            controller.Write(pinGreen, PinValue.Low);
                            controller.Write(pinRed, PinValue.High);
                            break;
}
Code for this application can be found in this GitHub repo link.
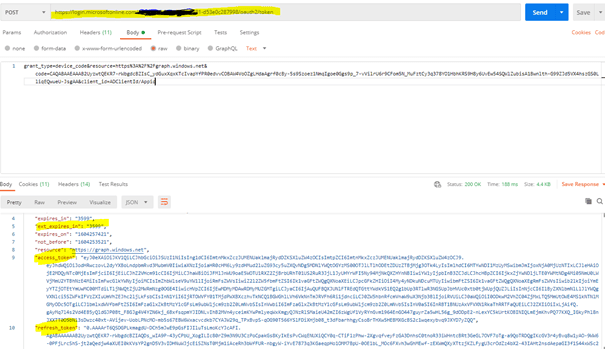
Request Body: grant_type=device_code&resource=https%3A%2F%2Fgraph.windows.net&code=CAQABAAEAAAB2UyzwtQEKR7-rWbgdcBZIsC_ydGuxXqxKTcIvapYfPR0edvvCOBAW4VoOZgLHdaAgrf0cBy-5s9Szoez1NmqIgoe0Ggs9p_7-vVilrU6r9CFom5N_M(Information from the Previous response)&client_id= ADClientId/Appid
Will generate the token in the response
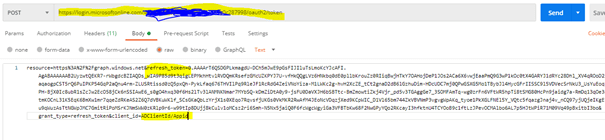
Refresh Token:
This token is used to generate access token after the initial one expires by making another request with information like this in the request body
All of these are handled for us by the Microsoft Authentication library for .NET.
Summary: I’ve used MSAL for .NET library but there are also libraries for MSAL for Python and for other languages as well based on your comfort with the programming language. Hope you have found this informational & interesting. Let me know any feedback or comments on the comment section below
This post is in response to a comment in one of the most viewed article from my blogsite to post an Adaptive card to an user in Teams using PowerAutomate. Assume we have a use case for using Adaptive card for collecting response from n number of users based on the data from an Excel, SQL database etc. The response must be unique for users so there has to be separate instance of Adaptive card flow to each user since the flow has to wait till it gets response from the user.
To handle this scenario, we are going to create two flows
Flow 1 – Send Adaptive card to collect response: This flow creates an adaptive card to collect response from each user
Flow 2 – Microsoft Teams User Details: The main flow which has the user details
For this example, I will be storing the user details on an Array variable but you can dynamically generate user details or based on the data from various datasources like Excel, Database etc. Let us go ahead and create the flows
Flow 1 – Send Adaptive card to collect response
This flow will be called from flow 2 to create the Adaptive card for the team user to collect response.
Step 1: Create an Instant flow with trigger type “When a HTTP request is received” and select the method type to Post by clicking Show advanced options. Now click Use sample payload to generate schema under the section Request Body JSON Schema and the enter the following data for the team user email address and click Done to generate the schema
{
“Email”:”user@domain.onmicrosoft.com”
}
The email address of the Teams user will be passed from Flow 2 on the request body.
Step 2: Add the action Post an Adaptive card to a Teams user and wait for a response. The only change is for the field Recipient which should be Email (request body json schema) from the dynamic content of the trigger When a HTTP request is received.
Step 4: Saving the flow automatically generates the HTTP POST URL, the URL will be used in the Flow 2. The complete flow should be looking like the below
We are now good to create the second flow from where the Adaptive card collect response flow will be triggered from.
Flow 2 – Microsoft Teams User Details:
This flow is the primary flow which triggers the Flow 1 for the posting the adaptive card to multiple team users.
Step 1: Create an Instant flow with the trigger type “Manually trigger a flow” and add a Array variable to store the user email address for sending the Adaptive card to collect response from multiple users.
Step 2: Add the Parse JSON action to parse the email address from the array variable and then click Generate from sample
Paste the array data as given below and click Done to automatically generate the schema for us. Then for the Content parameter in the action, select Teams Users (array variable) from the dynamic content.
Step 3: Add a compose action and the select the email attribute from the Parse JSON output to automatically generate a Apply to each loop as below
Step 4: Add the HTTP action to make a Post request to the HTTP url created from the first flow to post an Adaptive Card to the teams user. Find the parameters below
Method: Post
URI: HTTP Request flow URL (when a HTTP request is received) copied from the Flow 1
“Email”: Output of JSON Parse action (Email)-to be replaced
}
Authentication: None
This should now create Adaptive card to collect responses from multiple users irrespective of the users response to the Adaptive card.
Summary: On this post we have seen how to send adaptive card to multiple teams users using Power automate. There should be a question? Why cannot we use a Child flow concept to call the Adaptive card from the parent flow using the action Run a Child Flow available in Power platform solutions. Since we are using a For Each loop in Flow 2 Step 3 it will go to the next loop only if the first user responds to the adaptive card since there will be an action Respond to a PowerApp or flow at the end of a child flow (must have in child flow). We will have to keep in mind about the action (HTTP) and triggers (When a HTTP request is received) used in this flow are Premium. Let me know any feedback or comments on the comment section below
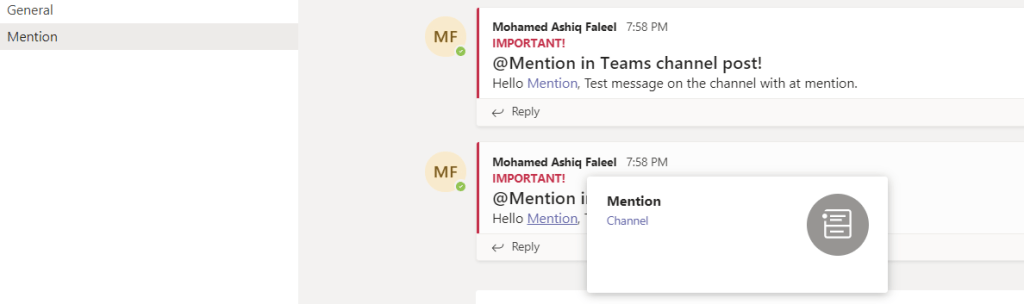
There are ways to @mention a user while posting a conversation in Teams channel using flow action but as far as I know its not possible as of now to @mention a Teams channel using Flow actions. In this post, I will show you how to @mention a channel & user using a POST call to a MS Graph beta endpoint. To construct the endpoint URL you will need to know the TeamID & ChannelID, to get the information go to Teams > click the three dots > click Get link to channel > Copy the URL
Now decode the copied url, I’ve used Meyerweb Decoder. Your url will look something like below
Summary: The endpoint which has been used in this post are beta endpoints. Graph API can be easily called using Power Automate, if you need some example on using a Graph API refer this post. Hope you find this post useful & informational. Let me know if there is any comments or feedback below.
This is in continuation to my earlier post using Adaptive card for collecting information in Outlook also known as Outlook actionable message. On this post I am going to show you how to collect information from a user in Teams and storing the values back in a SharePoint list. The following Power Automate actions under Microsoft Teams connector are now available in preview mode which helps us to capture data back from a Teams adaptive card meaning you would be able to make POST calls back to the flow by click of a button (Action.Submit) on the Adaptive card
Post an adaptive card as the Flow bot to a Teams user, and wait for a response
Post an adaptive card as the Flow bot to a Teams channel, and wait for a response
Once an Adaptive card is posted in Teams using the above actions, the flow run will not continue until the recipient or someone in the channel (if sent to channel) responds to inputs that are required within the card till then the flow is put on wait for maximum period (Async calls) of 30 days as per the documentation. Post that period the flow will time out if no one responds to the card. There can be use case to collect responses from users in Teams & post it to Azure services like SQL etc, this avoids the users to have access to premium services or license since the card is sent using Power automate. The use case I’ve chosen for this post is to collect Name & Email address of a teams user by sending them an input form which stores the responses in a SharePoint list after the user responds. Find the resources I’ve used for this example
Let’s start by designing the card using the Adaptive card designer. Click on Open Sample, select Input Form as shown below
Then change the host app from the default Bot Framework Webchat to Microsoft Teams – Light (Optional Step). Remove the Phone number Text Block [Element] & the corresponding Text.Input [Inputs] field to keep it simple & I’ve also changed the Adaptive card image URL on the right column to the following URL since the image default image on the sample has got some issues rendering on teams. Find some information on image size & resolutions limits here.
Click Copy Card JSON from ribbon for this card to be used on the flow. We now have the adaptive cards JSON ready with us, let’s go ahead and the create the flow using Power Automate. Find the generated JSON below
{
    "$schema": "http://adaptivecards.io/schemas/adaptive-card.json",
    "type": "AdaptiveCard",
    "version": "1.0",
    "body": [
        {
            "type": "ColumnSet",
            "columns": [
                {
                    "type": "Column",
                    "width": 2,
                    "items": [
                        {
                            "type": "TextBlock",
                            "text": "Tell us about yourself",
                            "weight": "Bolder",
                            "size": "Medium"
                        },
                        {
                            "type": "TextBlock",
                            "text": "We just need a few more details to get you booked for the trip of a lifetime!",
                            "isSubtle": true,
                            "wrap": true
                        },
                        {
                            "type": "TextBlock",
                            "text": "Don't worry, we'll never share or sell your information.",
                            "isSubtle": true,
                            "wrap": true,
                            "size": "Small"
                        },
                        {
                            "type": "TextBlock",
                            "text": "Your name",
                            "wrap": true
                        },
                        {
                            "type": "Input.Text",
                            "id": "myName",
                            "placeholder": "Last, First"
                        },
                        {
                            "type": "TextBlock",
                            "text": "Your email",
                            "wrap": true
                        },
                        {
                            "type": "Input.Text",
                            "id": "myEmail",
                            "placeholder": "youremail@example.com",
                            "style": "Email"
                        }
                    ]
                },
                {
                    "type": "Column",
                    "width": 1,
                    "items": [
                        {
                            "type": "Image",
                            "url": "https://download-ssl.msgamestudios.com/content/mgs/ce/production/SolitaireWin10/dev/adapative_card_assets/v1/tile_spider.png",
                            "size": "auto"
                        }
                    ]
                }
            ]
        }
    ],
    "actions": [
        {
            "type": "Action.Submit",
            "title": "Submit"
        }
    ]
}
Flow Creation:
Create an Instant flow with trigger “Manually trigger a Flow”, this will post an Adaptive card to a Teams user with the Input form which collects response to a SharePoint list. Create a SharePoint list with two columns for us to store the Name and Email submitted from the adaptive card on Teams.
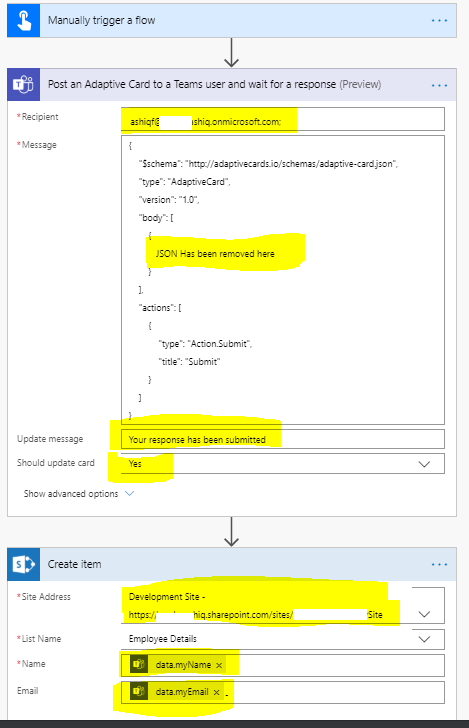
Add the flow action “Post an adaptive card as the Flow bot to a Teams user, and wait for a response”, on the action
Enter the email address of the user in the Recipient field
Paste the JSON copied from the card designer in the Message field
Enter information to be shown to the user on the field Update message after the Submit button is clicked
Field Should update card to be set as Yes
Now add the action “Create item” to store the form response in the SharePoint list created above with the request body information mapped to Name (myName) & Email (myEmail) using the dynamic content. The dynamic content has also information about the user (Email, Display Name, Response time etc) responded in Teams
The flow is ready, Run the flow to test it. The recipient would have received the card in Teams as below
After the user keys in the Name & Email address on Teams and clicking Submit button will complete the flow till then the flow will be in wait state for a period of 30 days maximum. The data will be submitted to the SharePoint list and the card will be updated with the update message as below
There is an Adaptive card designer in Power Automate which is an experimental feature currently with which you would able to design/update Adaptive card in the Power Automate action. To enable it, click the cog wheel on your flow environment and click “View All Power Automate settings”. On the popup toggle the Experimental Features to On and click Save button.
Go back to the flow in Edit mode, the Teams action will now have an Adaptive card designer as shown below
Senior Program Manager for Power Automate Audrie Gordon has a great video on Adaptive cards for Power Automate which has lot of information.
If you run in to an error while submitting the form or triggering the flow, look at the Troubleshooting tips for Adaptive cards. There are few known issues documented here with regards to using this action on Power Automate.
Summary: You now have created an input form for collecting information from a user in teams. To know the future road map for Adaptive cards, click here to know. There are couple of amazing templates available in the Flow environment, just search for Adaptive card in templates where you get template for different use cases. Hope you have enjoyed reading this post and find it useful. If you have any comments or feedback, please provide it on the comments section below.


