
The Power Automate action Send an HTTP request to SharePoint could come handy in many scenarios to execute SharePoint REST API queries but you will not able to use this action directly in Power Apps. In this blogpost, let us see how to call the SharePoint REST API in a custom connector which can be used either in Power Automate or Power Apps. There are many REST API endpoints available within SharePoint but the following use cases are not satisfied with a SharePoint standard connector in Power Platform
- Creating a site
- Adding user to a SharePoint group
Pre-Requisites:
- A standalone Power Apps or Power Automate plan license is required to access custom connectors
- Access to register Azure AD Application in Azure AD Portal
Azure Active Directory Application:
To execute a SharePoint REST API in Power Apps or Power Automate there must be an Azure AD app registered with appropriate SharePoint permission intended for the operations through a custom connector. For this example I have registered an AD application with the delegated permissions AllSites.Read.

Obtain the Client ID from the Overview section and create a secret from the Certificates & secrets under Manage blade. Once the secret is created, copy the value to be used in the custom connector. Add a Web Redirect URI https://global.consent.azure-apim.net/redirect as shown below

The Redirect URI is common and will be created while creating the custom connector.
Creation of Custom Connector:
Custom connector can be created from Power Apps maker portal or Power Automate portal. Custom connector created from any of the above-mentioned interfaces can be used in a Power App or Power Automate cloud flow. Let us see how to create a SharePoint communication site with the below permission using a custom connector. In the Power Automate portal, expand Data on the left panel > Custom connectors > + New custom connector > Create from blank

In Host field, enter tenantname.sharepoint.com and some description about the connector.
Along this article wherever you find the keyword tenantname, replace it with the name of the organizations Microsoft 365 tenant.
Now click Security on the right bottom corner to enter the Azure AD application information for the OAuth 2.0 authentication type. Under the section OAuth 2.0
- Change the Identity provider to Azure Active Directory
- Enter the Client id & Client secret of the Azure AD application
- Leave the Login URL as https://login.windows.net & Tenant ID as common
- Enter the Resource URL as https://tenantname.sharepoint.com
Enter the Scope as AllSites.Read based on the permissions you have added on the Azure AD app. If you have multiple permission, leave a space between each permission
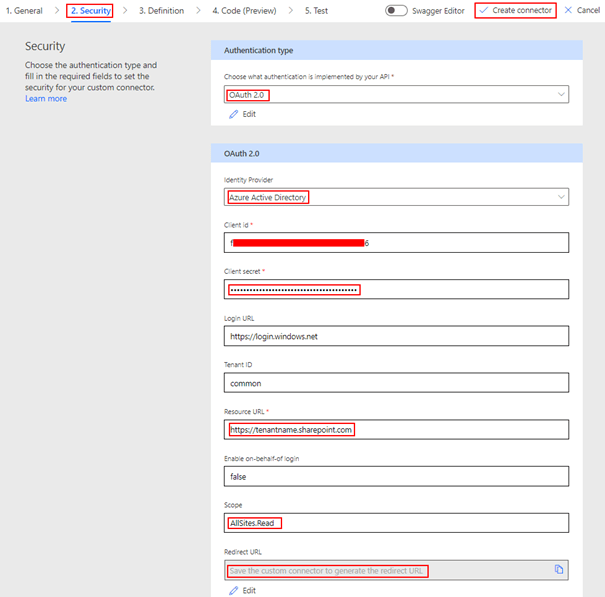
After the above information is filled in, click Create connector which will autogenerate the Redirect URL https://global.consent.azure-apim.net/redirect. This is the URL we have added as a Redirect Web URI in the Azure AD application. The connector is now ready for the actions based on SharePoint API endpoint to
Create SharePoint Communication site:
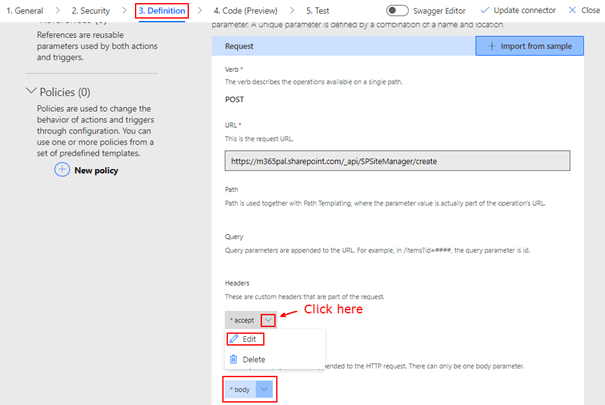
Details about the REST API to create a communication site can be found here. Find below the HTTP request details
Mode: POST
Request URI: https://tenantname.sharepoint.com/_api/SPSiteManager/create
Headers: application/json
Body:
{
  "request": {
    "Title": "Communication Site 1",
    "Url":"https://tenantname.sharepoint.com/sites/test-commsite2",
    "Lcid": 1033,
    "Description":"Description",
    "WebTemplate":"SITEPAGEPUBLISHING#0",
    "SiteDesignId":"96c933ac-3698-44c7-9f4a-5fd17d71af9e",
    "Owner":"owner@tenantname.com",
    "WebTemplateExtensionId":"00000000-0000-0000-0000-000000000000"
  }
}
Replace tenantname and Owner in the body
After the custom connector is created in the above step, now click the Definition tab of the Custom Connector > click + New action which will create the following screen to enter information about the action
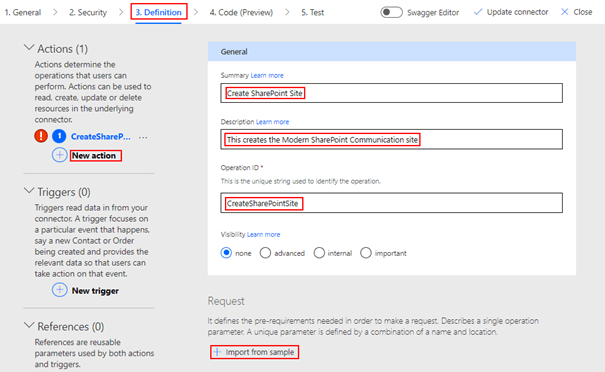
After the Summary, Description and Operation ID is entered click + Import from sample under the Request section, enter the REST API details on the following screen per the information given above to create a site

Click Import and then make changes to the Headers and Body section as shown below
Make the parameter required and add the default values as shown below

After the above changes are done, click Update connector. The custom connector action to create a new communication site is ready to be tested. Click the Test tab and enter the body information for various parameters or enter the JSON directly by toggling the Raw Body property to On

In the response, you get the Site Object id of the newly created site.
Summary:
Many of the SharePoint REST API’s are available in Microsoft Graph’s ecosystem but there are still a few which is not but this method can solve that problem. If you are interested to know on calling a SharePoint REST API as an daemon application in Power Automate, go through this blogpost. Hope you have found this informational & thanks for reading. If you are visiting my blog for the first time, please do look at my other blogposts.
Do you like this article?
Subscribe to my blog with your email address using the widget on the right side or on the bottom of this page to have new articles sent directly to your inbox the moment I publish them.
