OpenAI has released a new neural network called Whisper, which is an open-source model that can convert speech to text with impressive accuracy. This model is specifically designed to transcribe spoken language into text with high precision and speed, making it an ideal tool for a variety of applications, such as virtual assistants and video captioning. Whisper relies on advanced machine learning algorithms to analyze audio signals from multiple languages and convert them into written text. OpenAI has recently made API endpoints available to the public since March 1, 2023, allowing developers to easily integrate this powerful technology into their own applications.
The Speech to Text Open API can
- Transcribe audio into whatever language the audio is in.
- Translate and transcribe the audio into English.
As of the date I am writing this post, this model is not available in Azure. In this blog post, I will cover how to use the Microphone control and File Upload control to convert speech to text using the OpenAI Whisper API in a Power Automate flow.
Download Link to the Sample App: https://github.com/ashiqf/powerplatform/blob/main/OpenAI-SpeechtoText.msapp. Replace the API Key in the Power Automate flow HTTP Action Authorization Header.
OpenAPI Speech to Text API:
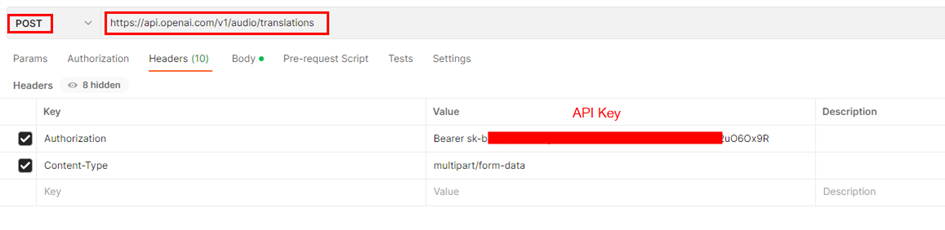
The speech to text API provides two endpoints, transcriptions and translations. At present, the maximum file size allowed for uploads is 25 MB and the supported audio formats are mp3, mp4, mpeg, mpga, m4a, wav, and webm. In this blog post, I utilized the Translation API to demonstrate its capability to convert English audio into text, it can understand other languages as well
POST https://api.openai.com/v1/audio/translations
If you have not yet created an API key, please sign up/login for OpenAI and obtain it from there.
Body:

Integration with Power Apps:
I have used a Power Automate flow with the Power Apps trigger to invoke the Speech to Text API via the HTTP connector in Power Automate. Alternatively, you can achieve the same outcome by constructing a Custom Connector. This sample app can be downloaded from this github link.
Microphone Control:
The audio control captures audio input through the device’s microphone and will be sent to the Power Automate flow for conversion into text using the Whisper API. The audio format of the recording depends on the type of device being used
- 3gp format for Android.
- AAC format for iOS.
- Webm format for web browsers.
I’ve tested this control from the app accessed through the web browser. If you encounter an unsupported audio format for OpenAI, you can use utilities such as FFMpeg. Additionally, a .Net version of the control is available for download which can be used in Azure Function. John Liu (MVP) has written a sample Azure function that handles the conversion of audio formats using the aforementioned utility.
Step 1: To add a microphone control to the canvas, insert the Microphone control from the command bar. To preview the recorded audio from the Microphone control, add an Audio control
Step 2: Add a button to convert and to trigger the Power Automate flow. Find below the Power FX code
//Generates a JSON Text with the binary of the Audio file or Recorded audio
Set(varJson,JSON(Microphone1.Audio,JSONFormat.IncludeBinaryData));
Set(strB64Audio, Last(Split(varJson, ",")).Value);
Set(strB64AudioContent, Left(strB64Audio, Len(strB64Audio) - 1));
//Extract Audio Format
Set(varAudioFileType,Mid(varJson,Find(":",varJson)+1,Find(";",varJson)-Find(":",varJson)-1));
//Call the Power Automate Flow
Set(audioText,'SpeechtoText-OpenAIWhisper'.Run(strB64AudioContent,varAudioFileType).audiotext);
The Power FX code performs the following task
- Stores the audio captured by a Microphone control in a variable as JSON data, including binary data.
- Extracts the base64-encoded audio content from the JSON data using the string manipulation functions Split, Left, Mid.
- Determines the audio file type by parsing a string variable.
- Uses the extracted audio content and file type to call the Power Automate flow ‘SpeechtoText-OpenAIWhisper’ to obtain the corresponding text transcription which comes in later section of this post.
- Assigns the resulting text transcription to a variable named ‘audioText’, this is assigned to a Text Label to display the converted text from the OpenAI Whisper API.
Step 3: Add a Label control to display the converted Text set to the variable audioText
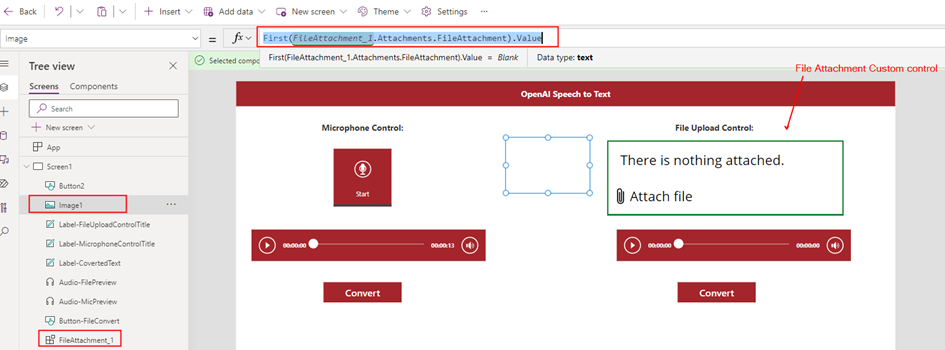
File Upload Control
As of the day I am writing this post there is no file control that can handle all types of files in Power Apps, I have created a custom component utilizing the Attachment control to create a file attachment control. For further details, please refer to blogpost Uploading Files Made Easy: A Guide to Using the Attachment Control in Power Apps to add the control to the app.
Step 1: Add the file attachment control to the app from the component library. Set the input property for Maximum Attachments to 1 from the component.
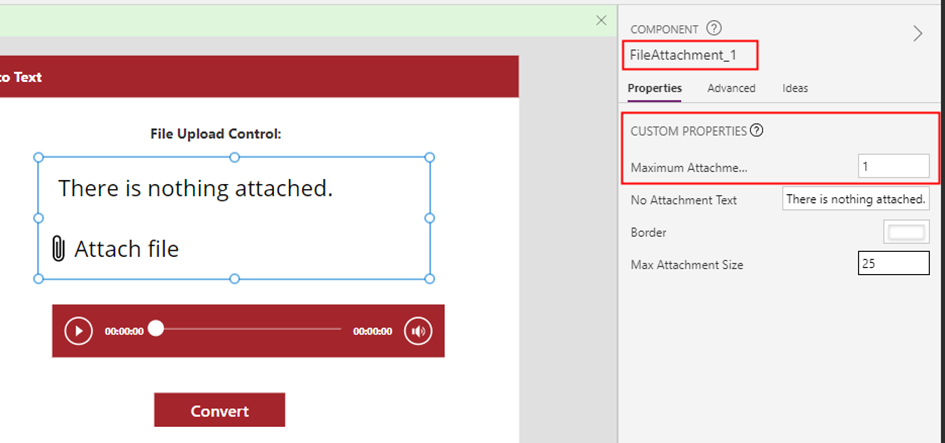
Step 2: To extract the binary content of an audio file, add an Image control to the app. The Image control is capable of working with any type of file to extract its content.
Step 3: Add a Button control to convert the Audio from the uploaded file. Find the PowerFX below
//Generates a JSON Text with the binary of the Audio file using the Image control
Set(varFileContent,JSON(Image1.Image,JSONFormat.IncludeBinaryData));
//Extract Base64 content
Set(varExtractedFileContent,Last(Split(varFileContent,",")).Value);
//Remove the last character " from the string
Set(varExtractedFileContent,Left(varExtractedFileContent,Len(varExtractedFileContent)-1));
//Extract Audio Format
Set(varAudioFileType,Mid(varFileContent,Find(":",varFileContent)+1,Find(";",varFileContent)-Find(":",varFileContent)-1));
//Call the Power Automate Flow
Set(audioText,'SpeechtoText-OpenAIWhisper'.Run(varExtractedFileContent,varAudioFileType).audiotext);
Step 4: Add a Label control to display the converted Text set to the variable audioText
Power Automate Flow
Now, let’s create a Power Automate flow with the Trigger type Power Apps to invoke the OpenAI Whisper API and convert speech to text. Step 1: Add two compose action (input parameters) to receive the audio format and content from either the recorded audio captured by the Microphone control or the uploaded audio file from the file attachment control in the Power Apps

{
  "$content-type": @{outputs('Compose-AudioFormat')},
  "$content": @{triggerBody()['Compose-FileContent_Inputs']}
}
Step 2: Add a HTTP connector to make a request to the Whisper API endpoint. Refer to the blog post How to use form-data and form-urlencoded content type in Power Automate or Logic Apps HTTP action for handling multipart/form-data in the HTTP action
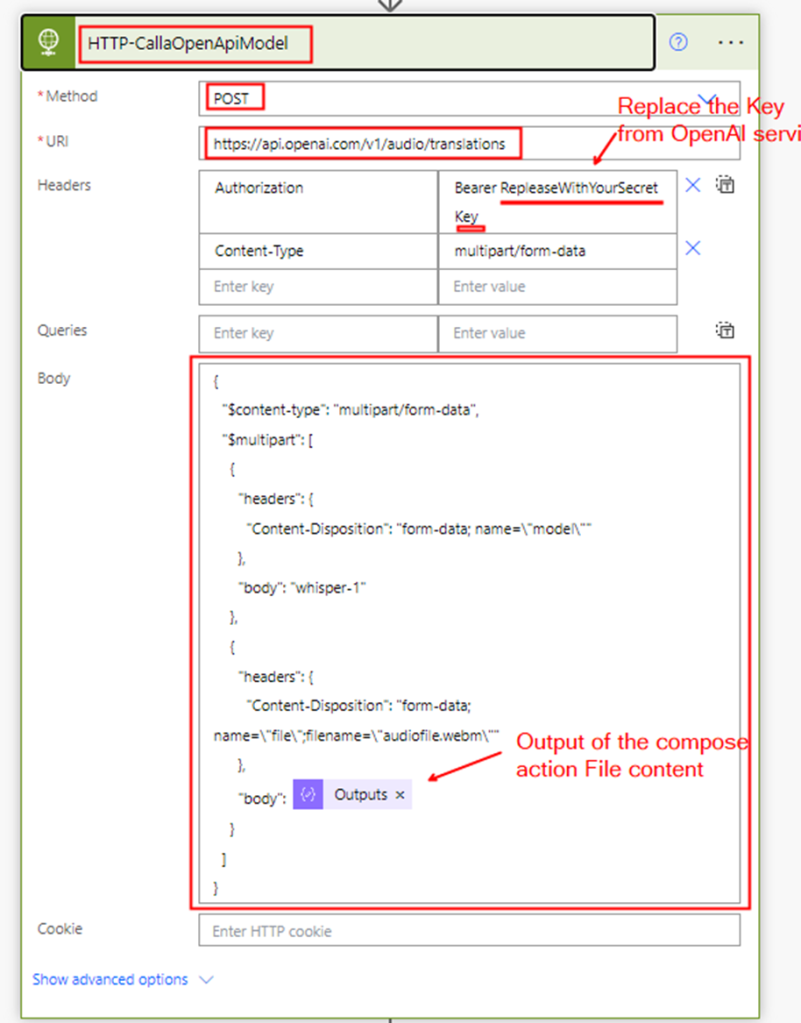
Request Body:
{
  "$content-type": "multipart/form-data",
  "$multipart": [
    {
      "headers": {
        "Content-Disposition": "form-data; name=\"model\""
      },
      "body": "whisper-1"
    },
    {
      "headers": {
        "Content-Disposition": "form-data; name=\"file\";filename=\"audiofile.webm\""
      },
      "body": @{outputs('Compose-FileContent')}
    }
  ]
}
Step 3: Add the Respond to a PowerApp or a flow action to pass the converted text back to the app. To get the converted text, use the following expression
body('HTTP-CallaOpenApiModel')['Text']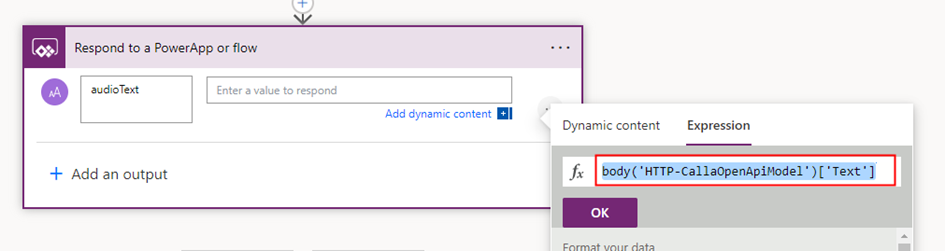
The expression was constructed based on the response of the Whisper API call. In the event that the response property changes in the future, please ensure to update the expression accordingly.
Summary:
In this post, I’ve outlined a step-by-step guide on how to develop a basic app with Speech to Text functionality using Power Apps and a Power Automate flow leveraging the OpenAI’s Whisper API. The possibilities for using this technology are endless, from creating virtual assistants to generating audio captions and translations. Furthermore, the Whisper API can also be used to transcribe video files, adding even more versatility to its capabilities. It’s worth noting that while Azure offers its own Speech to Text service, it currently does not rely on the OpenAI Whisper Model. However, it’s possible that the two services will eventually integrate in the future. Hope you have found this informational & thanks for reading. If you are visiting my blog for the first time, please do look at my other blogposts.
Do you like this article?
Subscribe to my blog with your email address using the widget on the right side or on the bottom of this page to have new articles sent directly to your inbox the moment I publish them.