In my previous post, we explored how to secure an MCP Server using Microsoft Entra ID delegated permissions, where the user’s identity is passed through to the API.
Secure Your MCP Server with Entra ID Authentication for Copilot Studio
But what if your scenario does not require user context?
What if you want:
- A centralized connection
- No per-user sign-in prompts
- A backend service-to-service integration
In this post, we’ll walk through how to secure an MCP Server using application permissions (service principal authentication) and integrate it with Copilot Studio.
Introduction
MCP Servers exposed to Copilot Studio can be secured using different OAuth patterns:
- Delegated permissions → user context
- Application permissions → app-only context
This post focuses on the application permission model, where:
- Copilot Studio uses a service principal (client credentials flow)
- MCP Server validates app tokens instead of user tokens
- No user interaction is required at runtime
Why Use Application Permissions?
Delegated access is great when you need user context. But in many enterprise scenarios:
- Background operations don’t need user identity
- Shared tools should behave consistently
- Managing per-user connections becomes overhead
With application permissions:
- Authentication is centralized
- No per-user connection creation
- Better suited for automation and shared agents
Prerequisites
Before starting:
- Access to Microsoft Entra ID
- Access to Copilot Studio and Power Platform
- MCP Server implementation (you can reuse the same repo)
- Permissions to create app registrations and custom connectors
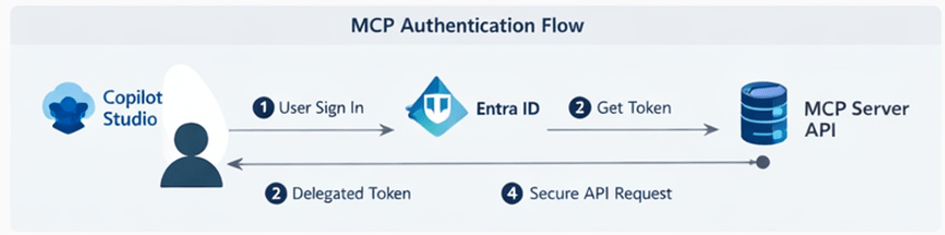
Architecture Overview
In this setup:
- MCP Server → Protected API (App roles enabled)
- Copilot Client → Service principal (client credentials flow)
- Entra ID → Issues app-only tokens
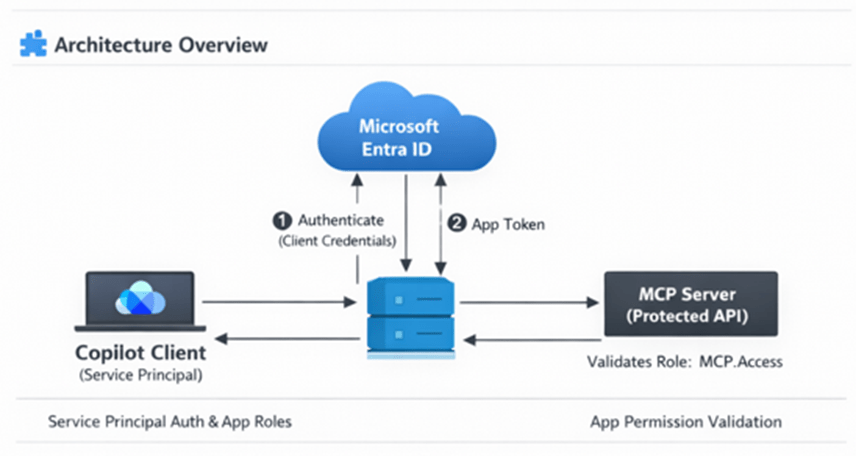
Flow:
- Copilot (via connector) authenticates using service principal
- Entra ID issues app-only token
- Token is sent to MCP Server
- MCP Server validates role-based access
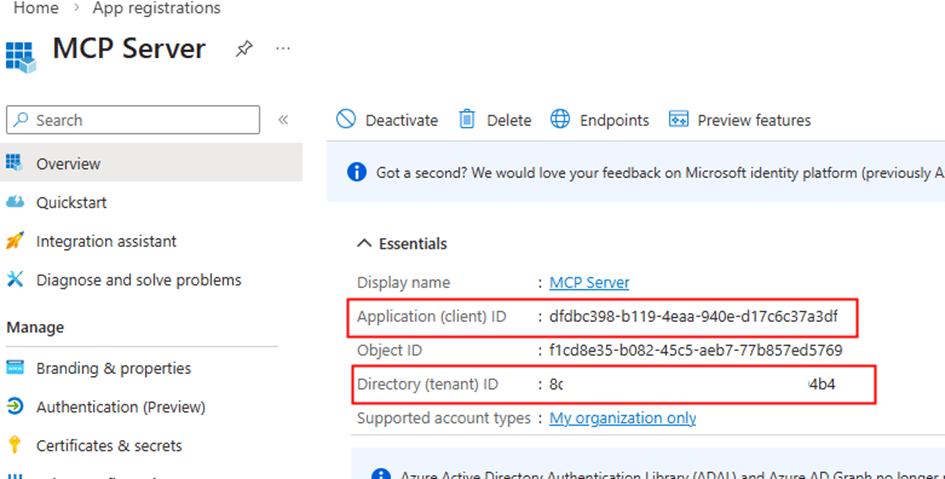
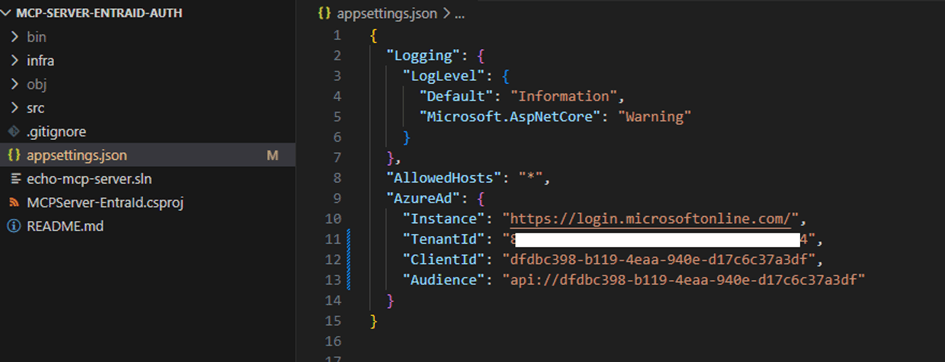
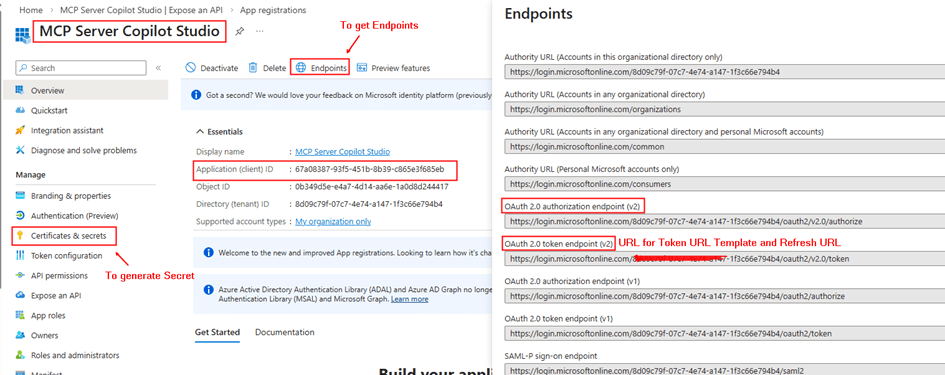
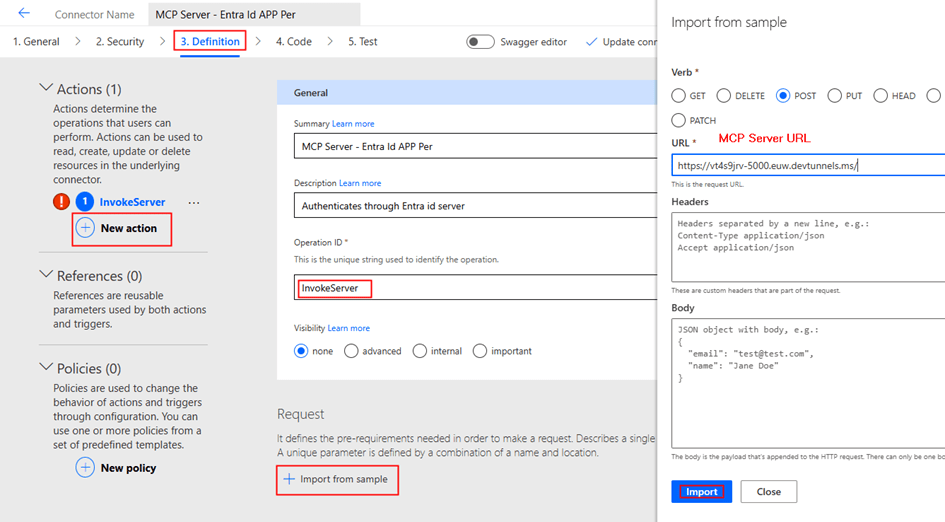
Step 1: Update MCP Server App Registration (Resource API)
Go to your existing MCP Server app registration created from the instructions in my other post.
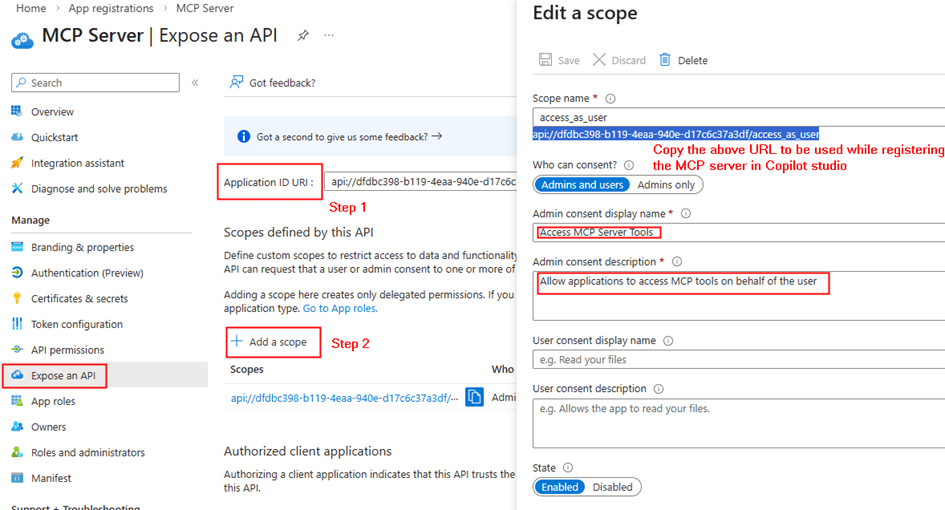
Create App Roles
Navigate to App roles → Add new role:
- Display name: Access MCP Server API
- Allowed member types: Applications
- Value: api.server.access
- Description: Allows access to MCP Server as an application
This is the key difference from delegated setup.
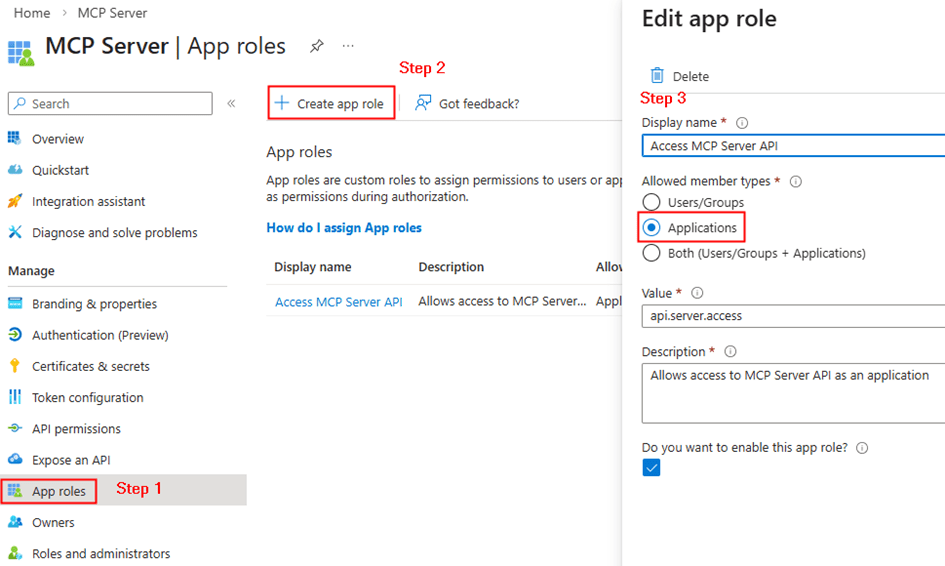
Instead of scopes, we have defined app roles for applications. Copy the resource url from the api permissions. E.g: api//xxxxx-xxxx-xxxx-xxx
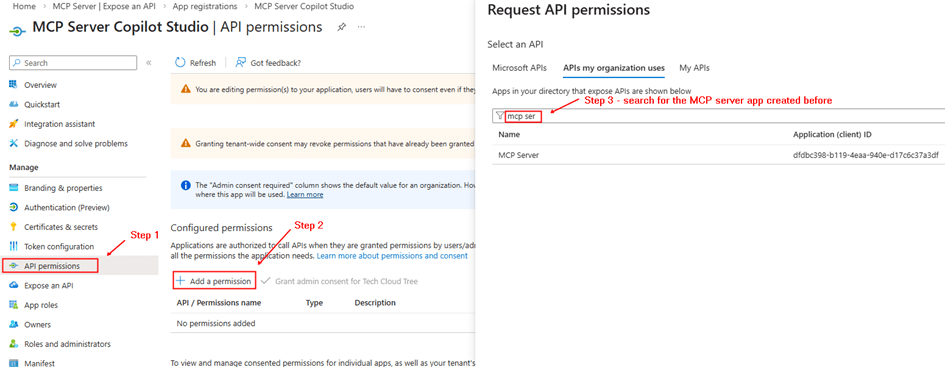
Step 2: Configure Copilot Client App (Service Principal)
Go to your second app registration (Copilot client).
Add Application Permission
- API permissions → Add permission
- My APIs → Select MCP Server app
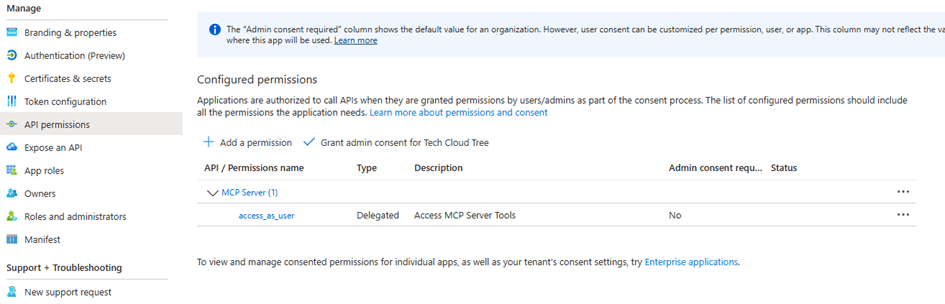
- Choose Application permission → api.server.access
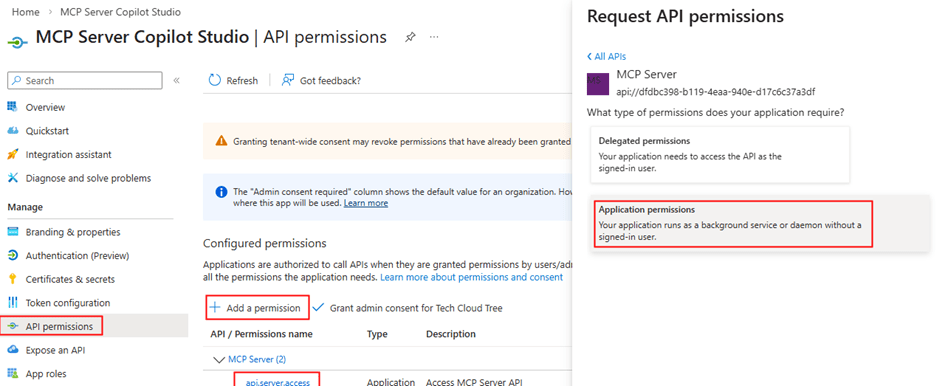
Grant Admin Consent
This allows the client app to call MCP Server without a user
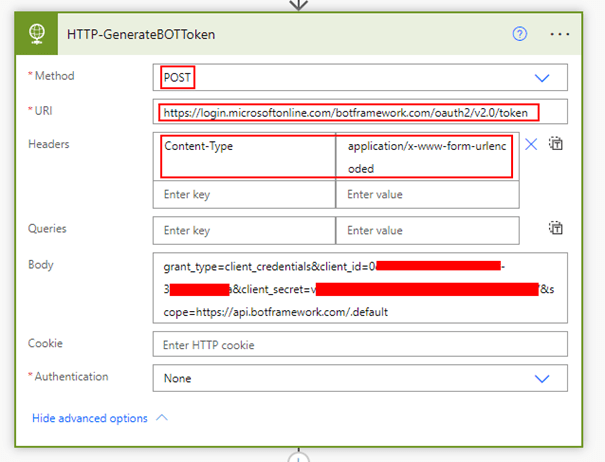
Copy the client id, client secret for entering in the security tab while creating the custom connector.
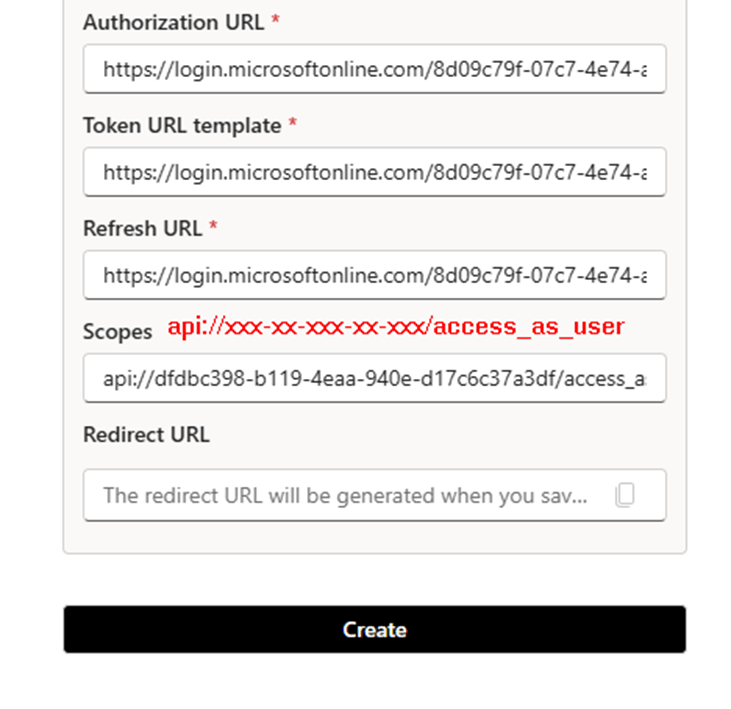
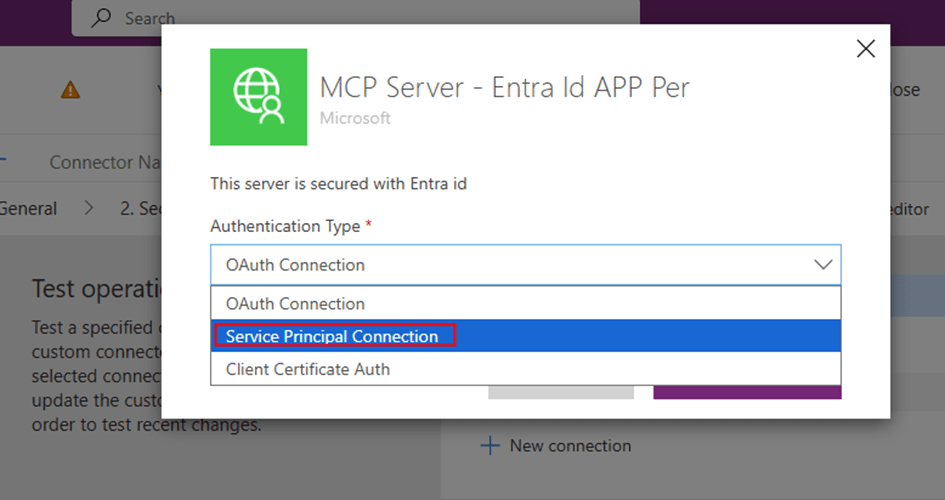
Step 3: Create Custom Connector in Power Platform
Unlike the delegated setup, this time we do not add MCP Server directly from Copilot Studio.
Instead:
- Go to make.powerapps.com
- Create a Custom Connector
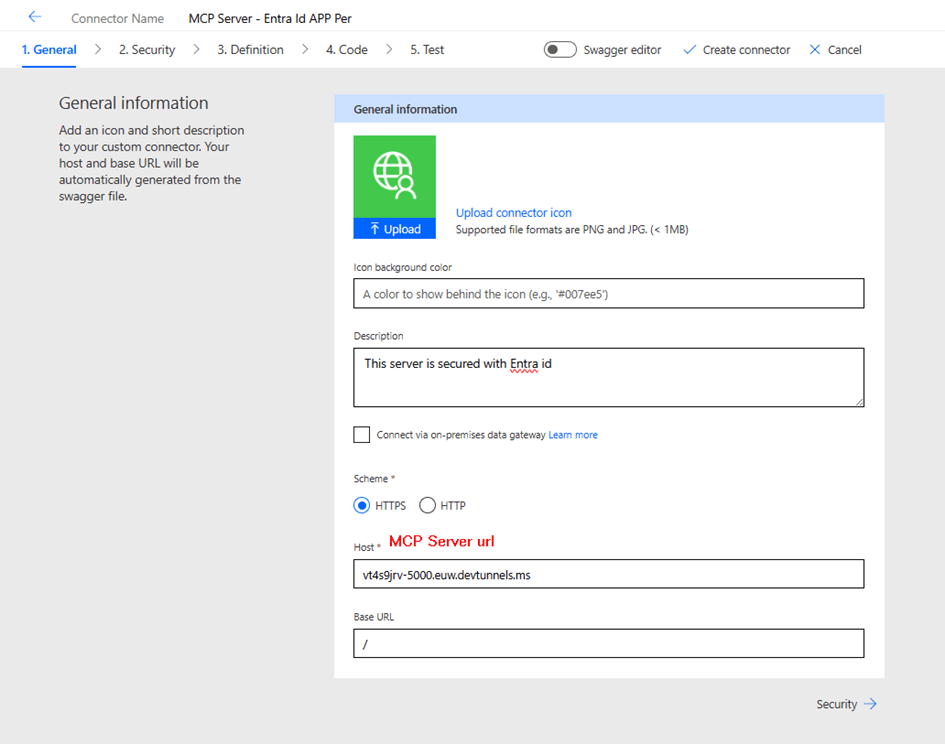
- Configure:
- Security → OAuth 2.0
- Enable Service Principal support
- Security → OAuth 2.0
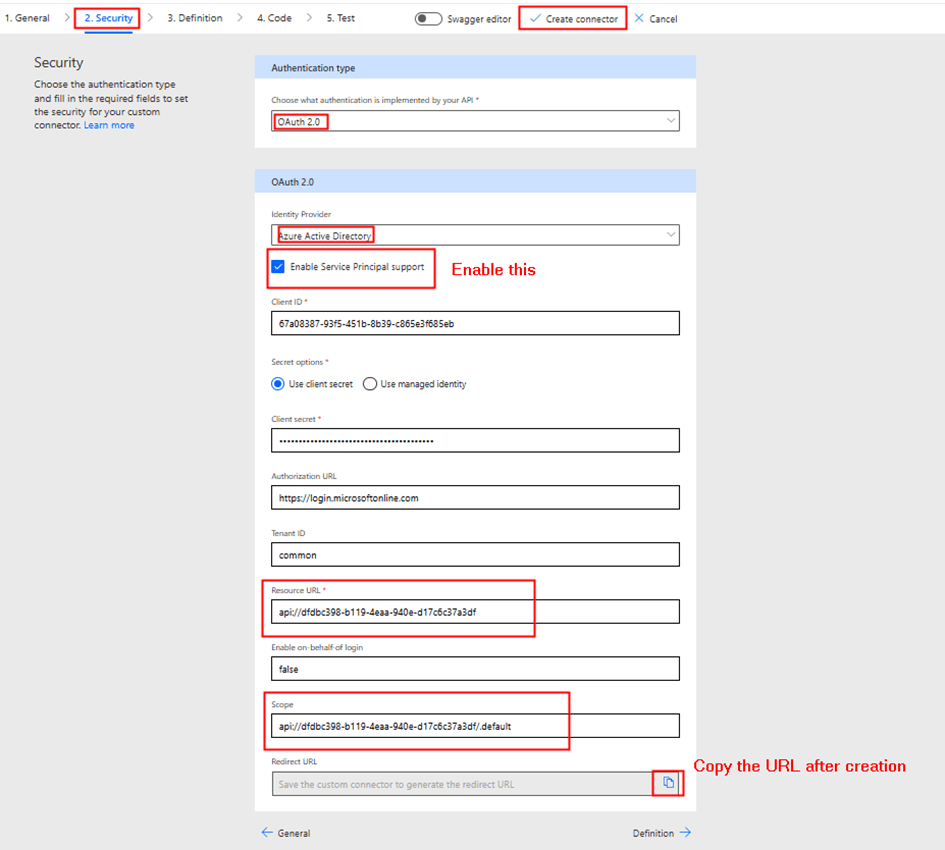
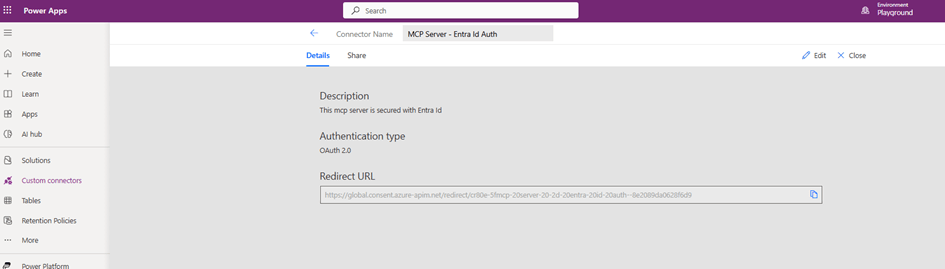
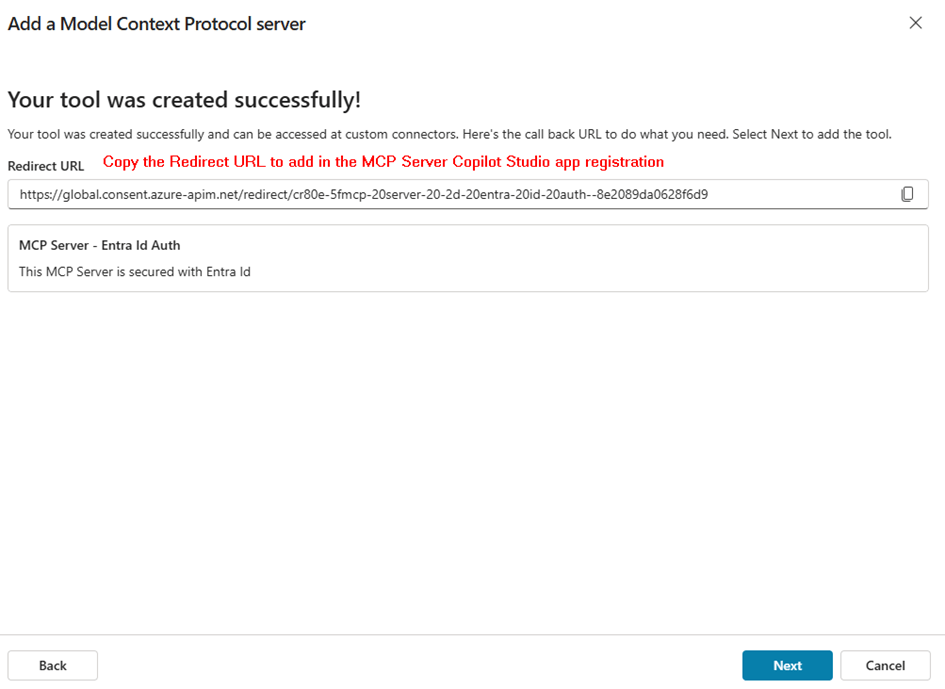
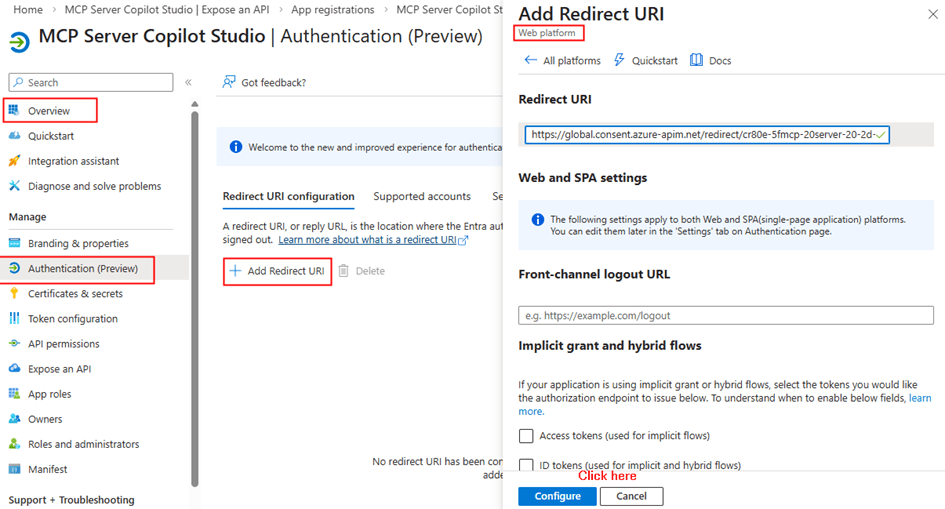
This connector uses the service principal credentials. After the entering the above details, click create connector. After the connector is created, copy the redirect URL to enter it in the Copilot studio client app registration
Now we can add the action Invoke server as below
Update the connector. Now Toggle Swagger editor to add x-ms-agentic-protocol: mcp-streamable-1.0 as shown below
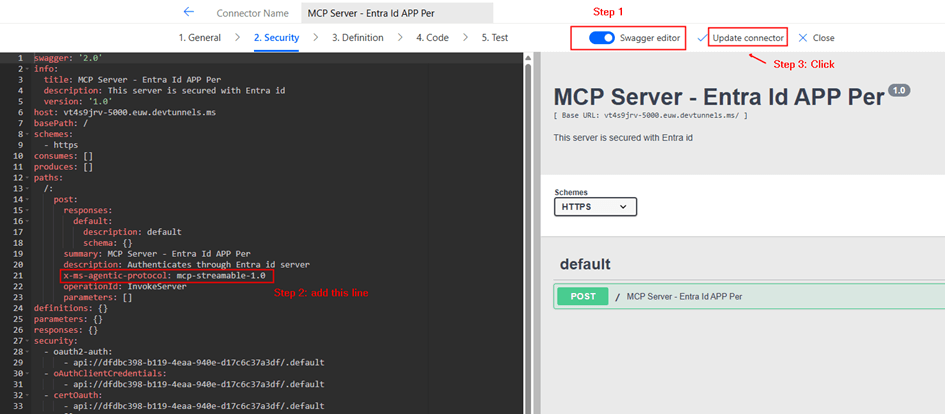
What It Does
Declares MCP Server Compatibility with Power Platform Agents
This extension tells Power Platform (and AI agents like Copilot) that your connector:
| Component | Meaning |
| x-ms- | Microsoft-specific extension (not standard OpenAPI) |
| agentic-protocol | Indicates the API supports agentic/AI agent operations |
| mcp-streamable-1.0 | Uses Model Context Protocol v1.0 with streaming support |
What This Enables
- Agentic Discovery – Agents can discover available tools/operations
- Streaming Responses – Support for long-running async operations with streaming results
- Native MCP Integration – Direct compatibility with MCP clients and servers
- Agent Invocation – AI agents can invoke your MCP server endpoints intelligently
Step 4: Create Connection Using Service Principal
After updating the connector:
- Create a new connection from the Test Tab in custom connector creation interface
- Provide the below from your Copilot studio client app registration:
- Client ID
- Client Secret
- Tenant ID

This creates a shared connection
Key difference:
- No user login prompt
- Connection is tied to service principal, not individuals
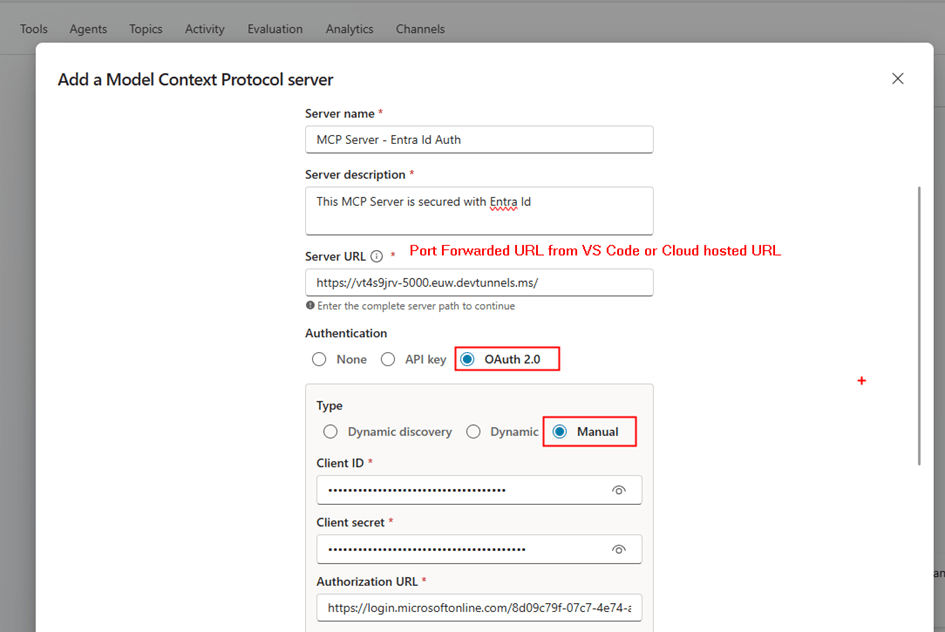
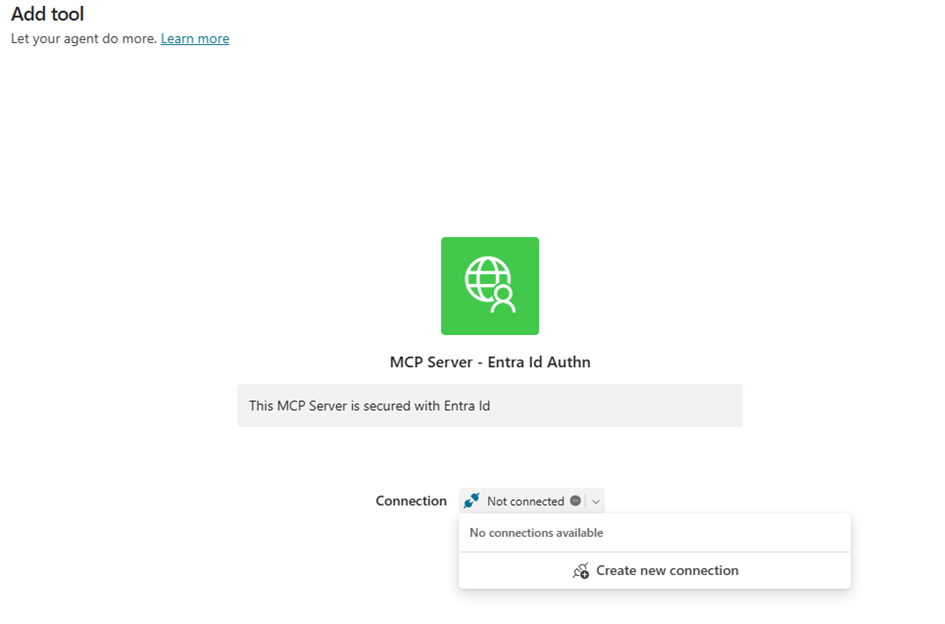
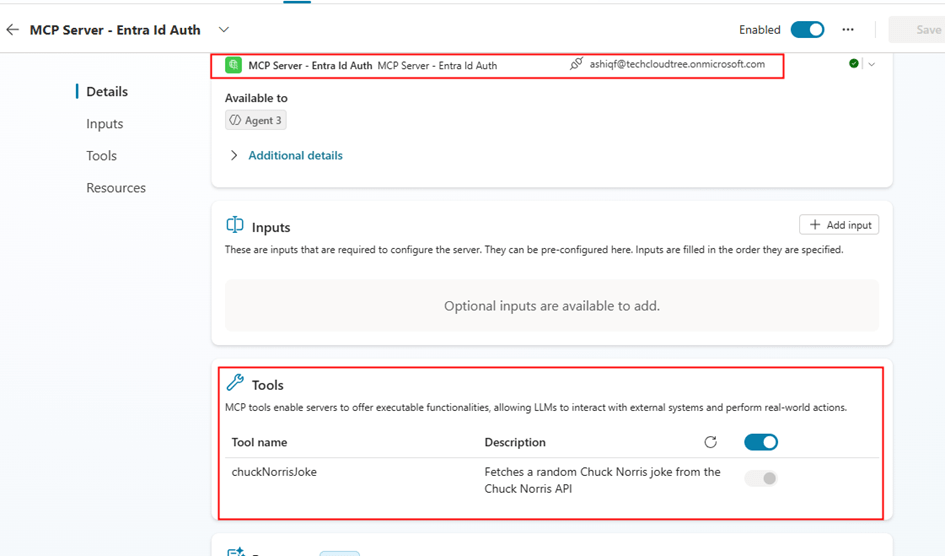
Step 5: Add MCP Server to Copilot Studio
Now go to Copilot Studio:
- Open your agent
- Add Tool → Browse existing MCP Servers
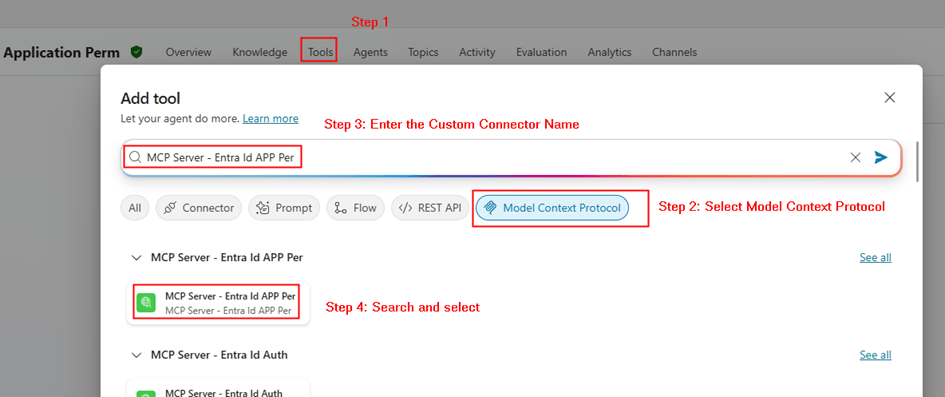
- Select your MCP connector and the connection as below

Important configuration in Copilot studio after the tool/MCP server is added:
- Credentials to use: Maker provided
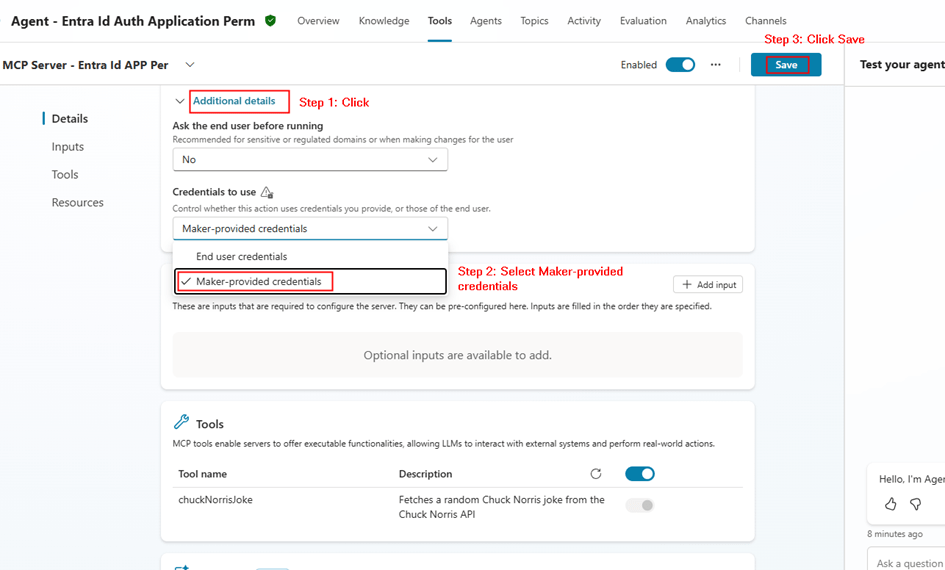
- Save
This ensures:
- The agent always uses the same connection
- No per-user authentication required
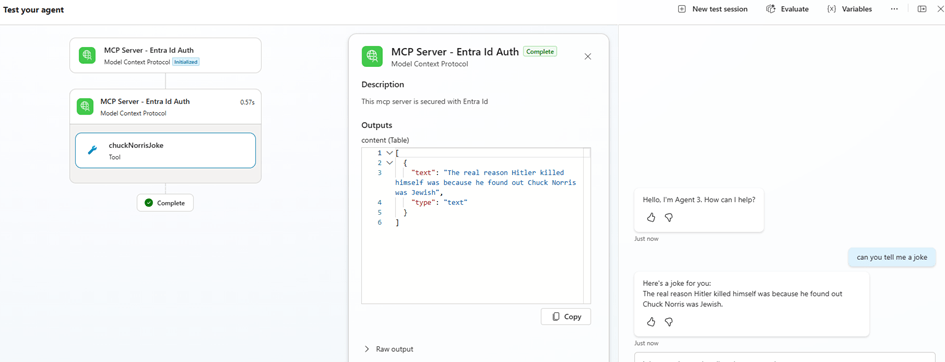
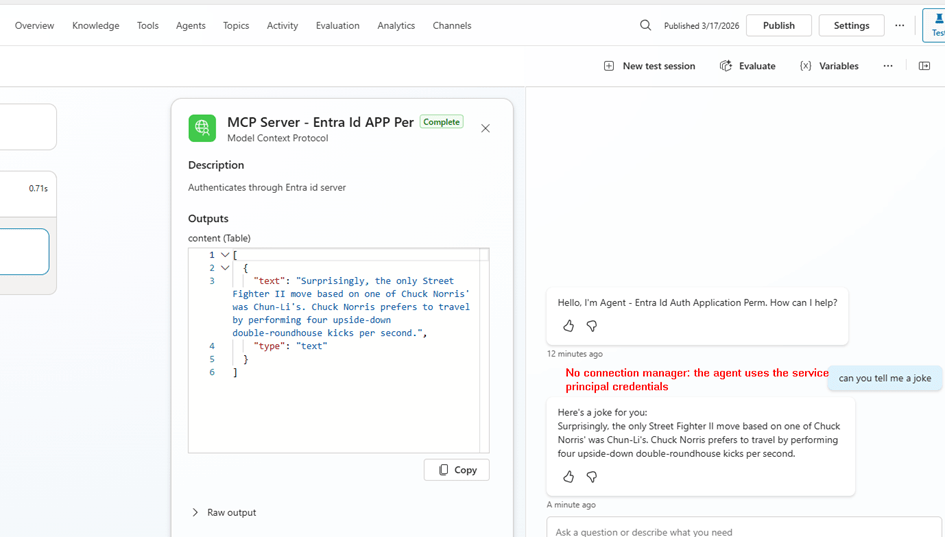
Step 6: Test the MCP Agent
Now test your agent:
- Invoke MCP tool
- Verify response
You should see:
- No login prompts
- Consistent responses
- Backend authentication working
Delegated vs Application Permissions
| Feature | Delegated | Application |
| Identity | User | App |
| Token Type | User token | App token |
| Consent | User/Admin | Admin only |
| Connection | Per user | Shared |
| Use Case | User-specific data | Background/shared APIs |
Summary
In this post, we covered:
- Securing MCP Server using application permissions
- Creating app roles for application access
- Assigning application permissions to client app
- Creating custom connector in Power Platform
- Using service principal connection
- Adding MCP server to Copilot Studio via existing connector
- Configuring maker-provided authentication
Why This Matters
Using application permissions is critical when:
- You want centralized authentication
- Your MCP tools don’t require user context
- You want to avoid connection sprawl
- You need consistent behavior across all users
This model is especially useful for:
- Enterprise APIs
- Shared automation tools
- Backend integrations
Final Thoughts
Both delegated and application permission models have their place.
- Use delegated when user identity matters
- Use application permissions when it doesn’t
By implementing service principal authentication for your MCP Server, you enable:
- Scalable architecture
- Simplified connection management
- Secure, app-driven integrations with Copilot Studio