With the assumption that you already know about Microsoft Graph and its capabilities I will directly jump in with the steps and instructions to call Microsoft graph Endpoints as a daemon app using Application permissions with the help of HTTP connector. Calling graph from a flow opens a wide range of possibilities which are not available with the prebuilt connectors. As of now you will not be able to call Microsoft graph with application permissions using a custom connector.
Pre-Requisites:
Access to HTTP Premium Connector in Power Automate
Register an application in Azure AD and obtain the client id, client secret & tenant id for the registered application. In this example I have added the Application permission Calendars.Read to access all the recent events of a user from Outlook.
It is not required in the Azure AD application to have a redirect URI.
Power Automate Flow:
It is now time to generate the graph token using the HTTP connector in flow which is a pre-requisite to call the Graph API endpoint. The only authentication flow to generate a access token for application permissions is Client credentials.
To generate a token
Store the Client Secret on a String variable
Make a HTTP request using the HTTP connector with the following details. Make sure to replace the string for tenantId, azureAdAppclientId and azureAdAppclientSecret
Method 1:
Add a HTTP connector action to the flow for making a POST request per the following information
For the client secret make sure to URL encode using the expression encodeUriComponent(variables(‘clientSecret’)) else the request will fail due to the presence of special characters.
To extract the token from the above request, add the parse JSON action with Content from the HTTP request body and the following schema
Summary: I have written a blog to get the attendee details of a meeting using this approach to Microsoft graph event endpoint API. Hope you have found this informational & thanks for reading. If you are visiting my blog for the first time, please do take a look at my other Microsoft graph in Power Automate blogposts.
Microsoft graph is the gateway to data and intelligence in Microsoft 365 which connects multiple services like SharePoint, Teams, Planner etc and devices. Microsoft graph has one common endpoint that is RESTful Web API enabling you to access Microsoft Cloud service resources. With that said if you want to communicate with Microsoft Graph Services or any API services, custom connectors can be used to address needs which are not available as prebuilt connectors in Power Apps and Power Automate. The purpose of this blog post is to show how to
Call Microsoft Graph API in Power Apps using custom connector
Call Microsoft Graph API in Power Automate using custom connector
Custom connector supports the following authentication types
Anonymous (No Authentication)
Basic Authentication (UserName & Password)
API Key
OAuth 2.0
As of the time I am writing this article, custom connector supports only authentication flow Authorization code & not client credentials. If you use OAuth 2.0, it means you can use only delegated permissions & not application permissions as permission type in the custom connector. To be more precise, the logged in user from PowerApps or flow actions/trigger connection user should have access to the resource to be accessed from Microsoft Graph & cannot access the resource as a daemon app (Application Permission). Find below the pre-requisite for the custom connector
Premium Plan (App/user based) for all users intended to use the custom connector in Power Apps or Power Automate. To test the custom connector you can also get a community plan if you do not have a premium plan.
Create & setup Custom Connector to call Microsoft Graph API:
Custom connector can be created from Power Apps maker portal or Power Automate portal. Custom connector created from any of the above-mentioned interfaces can be used in a Power App or Power Automate cloud flow. A custom connector is nothing but a wrapper around a REST API that allows Power Apps or Power Automate and Azure Logic Apps to communicate with that REST API.
Azure Active Directory Application:
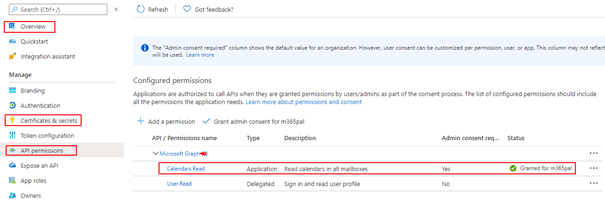
To access the Microsoft Rest API there must be an Azure AD app registered with appropriate graph permission intended for the operations through a custom connector. For this example I have registered an AD application with the following delegated permissions
Calendars.Read
To display the users recent events in Power Apps gallery control
Sites.Manage.All
To create a New list item in SharePoint list from Power Apps and Power Automate
User.Read
To display users profile information from an Extension Attribute in Power Apps
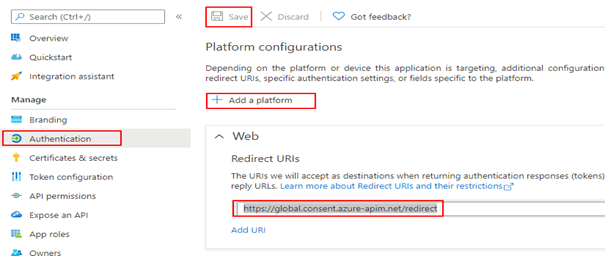
Obtain the Client ID from the Overview section of the Azure AD app and create a secret from the Certificates & secrets under Manage blade. Once the secret is created, copy the value to be used in the custom connector.
The Redirect URI is common and will be created while creating the custom connector. Now we are ready to create the custom connector, go to Power Automate portal and expand Data on the left panel > Custom connectors > + New custom connector > Create from blank
After entering the connector name, you will get the below screen. Do not have the word SharePoint part of your connector name to avoid issues.
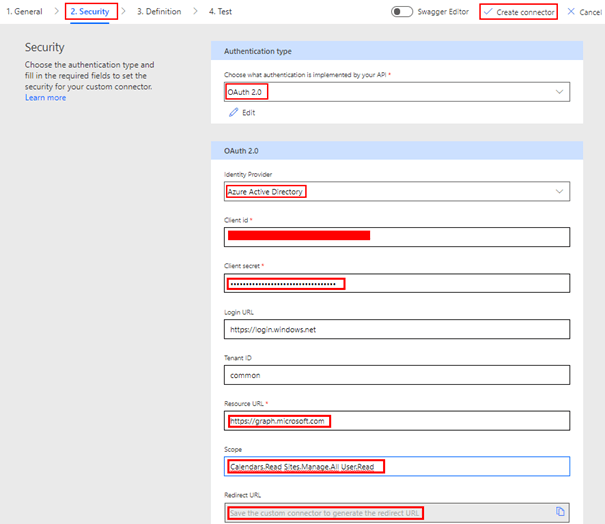
Enter graph.microsoft.com on Host and some description about the connector. You can also change the logo to a custom one. Now click Security on the right bottom corner to enter the Azure AD application information for the OAuth 2.0 authentication type. Under the section OAuth 2.0
Change the Identity provider to Azure Active Directory
Enter the Client id & Client secret of the Azure AD application
Enter the Scope as Calendars.Read Sites.Manage.All User.Read based on the permissions you have added on the Azure AD app. Leave a space between each permission
After the above information is filled in, click Create connector which will autogenerate the Redirect URL https://global.consent.azure-apim.net/redirect. This is the URL we have added as a Redirect Web URI in the Azure AD application. The connector is now ready to add actions based on Graph API endpoint to
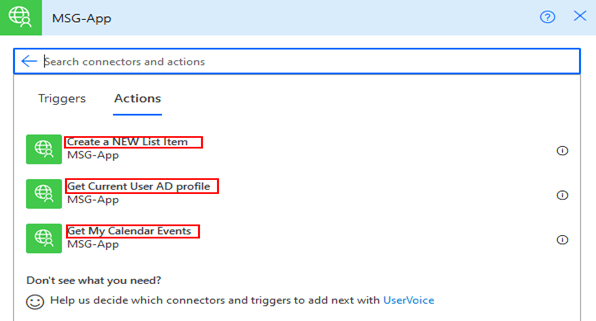
Get users recent events from the users default Outlook calendar
Create a List item in SharePoint List
Get users custom extension attribute from users Active directory profile
Get users recent events from the Outlook calendar:
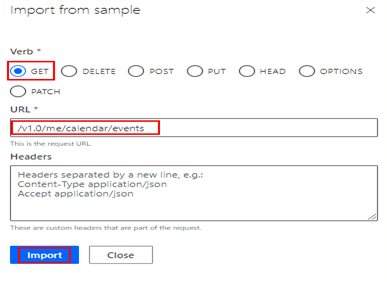
After the custom connector is created in the above step, now click the Definition tab of the Custom Connector > click + New action which will create the following screen to enter information about the action
After the Summary, Description and Operation ID is entered. Click + Import from sample under the Request section to the enter the Graph API endpoint url https://graph.microsoft.com/v1.0/me/calendar/events.
It is Okay to exclude the url https://graph.microsoft.com since we have provided the information in the Security tab.
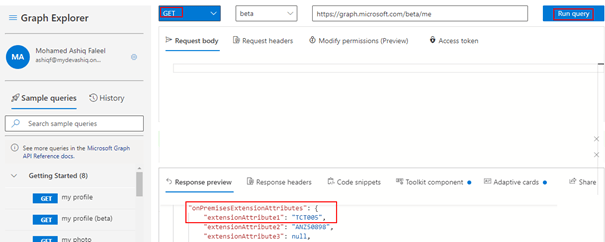
Now we are ready to provide default response for the action. To get the request response sample for the graph api endpoint, SignIn to the Graph Explorer with your organizational ID to copy the response of the API request to be used in the custom connector action
After running the query in the graph explorer tool, copy the whole content (CTRL+A) from the Response preview section as shown on the above screenshot. If there is any error related to permissions while executing the http request in the explorer tool, make sure you have consented to the permissions in the Modify permissions tab.
Click + Add default response and then paste the content copied from the graph explorer tool on Body as shown below
Click Import and then click Update connector. Let us add the second action to create a list item in a SharePoint list
You should replace the SiteId and listId in the above URL. Easy way to get the ListId and SiteId is by viewing the Viewing the page source of the SharePoint site with the list open
Request Body:
For this example I have a SharePoint list with a default column Title and a single line of text column by the name Location.
Once again click + New action on the Definition tab to add an action for creating a new list item.
After the Summary, Description and Operation ID is entered click + Import from sample under the Request section to the enter the Graph API endpoint url with the Verb now selected as POST and the request body or payload
Click Import. To get the request response sample for the graph api endpoint, go to the graph explorer to copy the request response as shown below for the above POST request to create the list item
Click + Add default response and then add the response copied from the graph explorer tool on the Body section as shown below
Click Import button and then click Update connector. Let us add the second action to read the users active directory profile to extract extension attribute information
Get users custom extension attribute from users Active directory profile:
On my tenant I have added additional properties on extension attribute in Azure AD profile of the user & displayed them on the User profile card using the profile card graph API. The graph API to get the extension attribute information of the user is in Beta as of now
Once again click + New action on the Definition tab to add the third action for getting the users profile information from Azure active directory.
After the Summary, Description and Operation ID is entered click + Import from sample under the Request section to the enter the Graph API endpoint url with the Verb selected as GET
Click Import. Go to the graph explorer to copy the request response for the GET request for https://graph.microsoft.com/beta/me and then click + Add default response to paste the request response copied from the graph explorer tool. Click Import button and then click Update connector. We have till now added three actions which can be tested in the same interface
Test the Action:
To test the different actions added in the connector, click the Test tab and then click + New connection.
You will be prompted to sign in using the Organization ID and provide a consent for the permissions requested as a scope on the custom connector.
After the connection is created, you can test the different actions available as shown below for one of the action CreateListItem in SharePoint
The custom connector creates the Swagger definition, you can also view and update the Swagger definition by turning on Swagger Editor
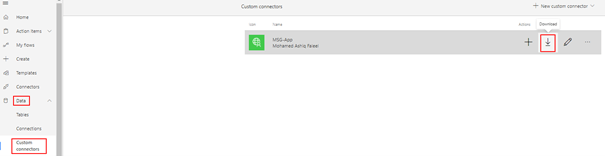
If you look at the security definitions in the above screenshot for the connector we have created till now, the authentication flow used to authenticate the user is Authorization code which supports only delegated permissions and not application permissions in MS Graph. The Swagger definition file can be downloaded from interface shown below
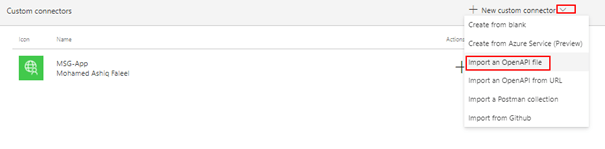
The Swagger definition file can be used to re-create the custom connector by clicking the Down arrow and then by clicking Import an OpenAPI file. On the popup window enter the Connector Name and select the downloaded Swagger file to recreate the connector after filling in information on the Security tab.
You download the Swagger definition file of the custom connector with the above mentioned actions from this github link.
Call Microsoft Graph API in Power Apps using custom connector:
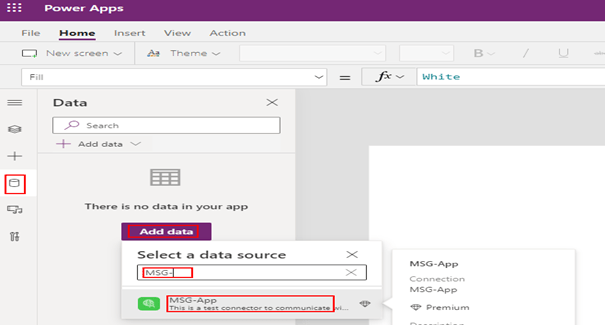
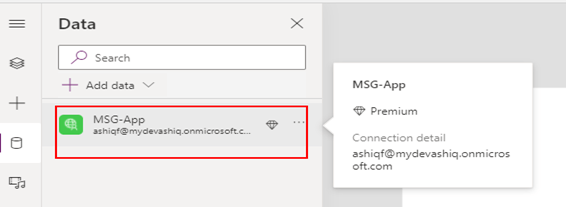
To call a custom connector in Power Apps, the first step is to add the connector to the Power App by the app maker. Click Data on the left panel and then click the button Add data > look for the connector by the name > Click the connector name to create a connection.
Once the connection is created & added, you will be able to use it in the different controls added to the app
I added the following controls to
Label – To display the Extension attribute of the user from the action GetUserProfile
Gallery – To display the users recent calendar events from the action
Button – To create new item on the list and to get information from Graph about the user calendar events and to get the users AD profile
A Button control to load the data from Microsoft Graph GET actions GetUserProfile & GetMyEvents on a context variable.
Once we have the data loaded on the context variable using the OnSelect button click event, the data can be displayed on different controls. Use the graph explorer tool to validate the response of the request and to help with display the data on a control. Find below the response for the me endpoint which provides the profile information of user including the extension attribute.
To display the Extension attribute1 information on a label control, the code is
I have added a gallery control to display the calendar events. First step is to bind the gallery control to the context variable (userCalendarEvents) using Items property of the control
Items: userCalendarEvents
On the gallery control fields
field1: ThisItem.subject
field2: ThisItem.organizer.emailAddress.name
For constructing the above formula (Field1 and Field2) for displaying the information on the different fields in the control, graph explorer response preview will help you
I have added a button control to create the list item using the action CreateListItem with the following formula on the OnSelect event
The user has to create a connection to the Custom Connector & provide consent for the Graph permission (User.Read Sites.Manage.All Calendars.Read) for the first time
The users of the app should have premium license (App/user based)
Call Microsoft Graph API in Power Automate using custom connector:
To use a custom connector by a user in a flow Instant/Scheduled/Automated, it
Must be shared to the user by the custom connector Owner/creator
Premium license for the flow user
Consent to be provided for the graph permissions. The consent can be individual or admin consent
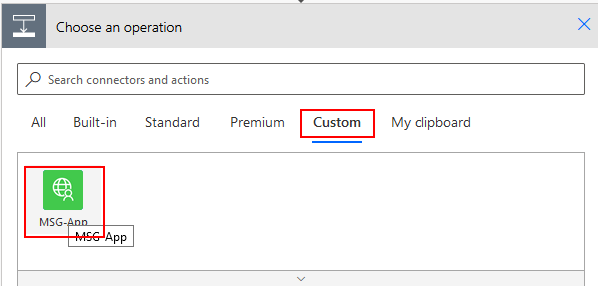
Add the action to the flow by clicking Custom and then select the custom connector as shown below
Now select the action
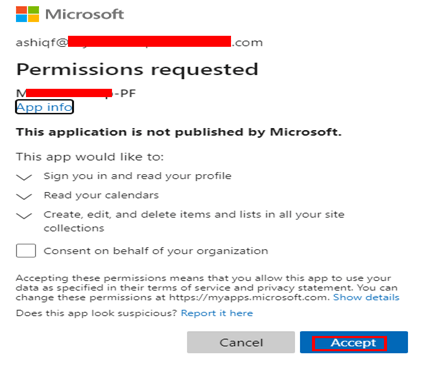
It will ask you to Sign In to create the connection and there will be a prompt to provide consent to the permission for the AD application for the first time as shown below
Enter the parameter values to create the list item
Summary: Microsoft Power Apps and Power Automate are great and simple to get started with no code. If you are a pro developer and want to extend the capabilities with Microsoft Graph & other external/custom RESTFul API’s you can do so with the custom connector. Hope you have found this informational & thanks for reading. If you are visiting my blog for the first time, please do take a look at my other blogposts.