
In this blog post, I am going to show you how to manage users for a Power App which has SharePoint as a data source. Let’s take an example, you’ve built a Power App application which has its data stored in SharePoint. After the application is developed, you want to share the app with some users. To do so you’ll have to give the user access to
- PowerApps
- Access to the Data source (SharePoint in this case), it could be Read/Write based on the use case
Only after the user has been granted access, they would be able to use the application. To setup the process for managing users we are going to use an action “Edit App Role Assignment” under the connector “PowerApps for App Makers” in the flow. Find the steps to executed to make this happen
- Create an Interface/screen for the Admins in PowerApps (custom role) to maintain (Add/Remove) the users of the application
- Flow for granting access to the users
- Action to grant access to the PowerApps
- Action to add the user to the SharePoint site
Step 1: Create an Interface for the Admins in PowerApps to manage the users for the application
Create a list (User Roles) on the SharePoint site which acts as a data source for application with the below schema to maintain the users
| Column | Type |
| UserName | Person or Group |
| Role | Choice (value: Admin, User) |
| RoleStatus | Single line of text (Default value: Add) |
Add a screen on the Power App as shown on the image below. I’ve given some information on the image the type of controls I’ve added on the screen. This screen will be shown only to the Admin role, the navigation to this screen could be based on click of a button placed somewhere on the screen. The visibility of the button to navigate to the admin interface could be set based on the data (Role) from the list User Roles list. In this example, I will have two roles an Admin and User. Find the below screen in PowerApp built for managing the users

Once the user name and the role has been entered on the section 1, click add which adds the user information to the list User Roles. Once a user is added, the flow will be triggered which has actions to grant access for a Power App.
Step 2: Flow for granting access to the users
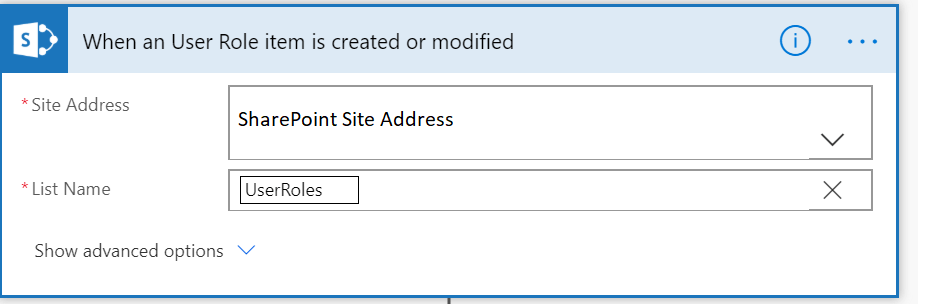
I will be using a flow to grant access to PowerApp & SharePoint site. Let’s build the automated flow with trigger “When an item is created or modified” connected to the list User Roles
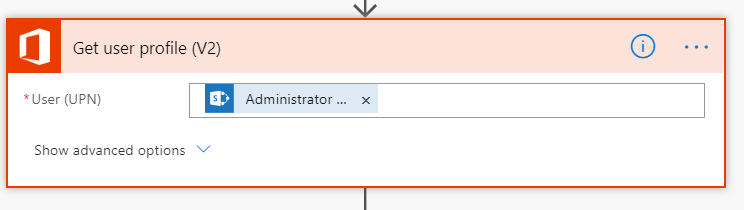
Add the action “Get User profile”, the input should be the email address of the user who must be given access to PowerApp. This step is required to get the user guid, to be given on a later step for granting access to PowerApp action
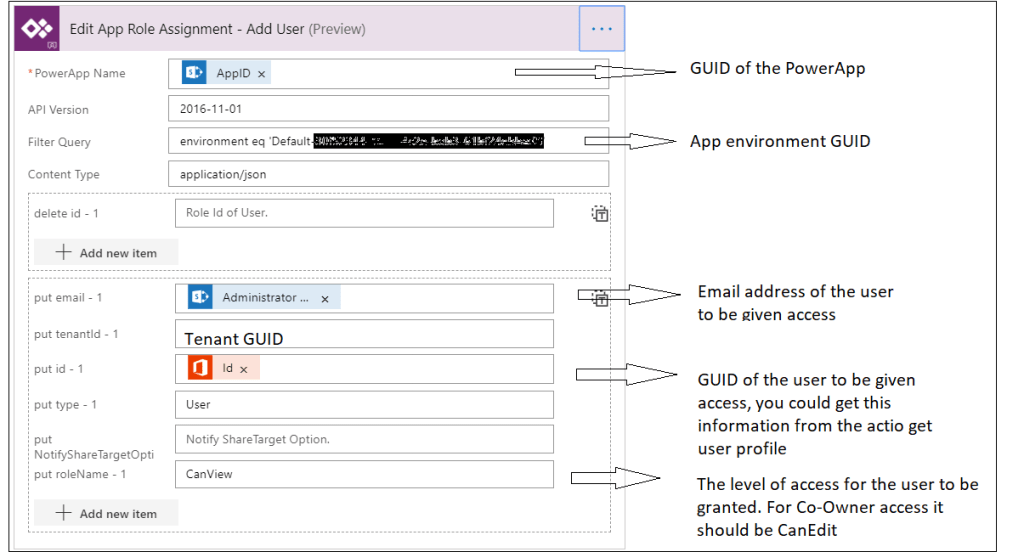
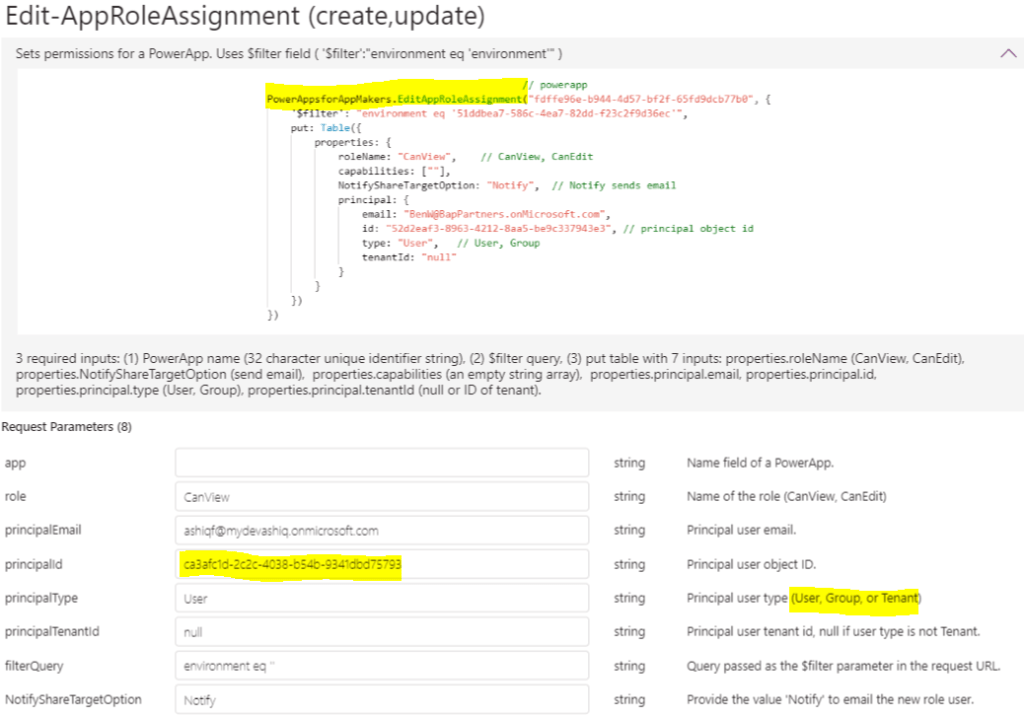
Now Add the action “Edit App Role Assignment” under the connector “PowerApps for App Makers”, this action is in preview mode by the time I am writing this post. To get more details on the different actions and its parameters with this connector go through this link. Make sure the connection to this action has access (Owner/Co-Owner) to share an App to a user. You would be able to get the GUID (App ID) of the Power App by going to the details section of an app.
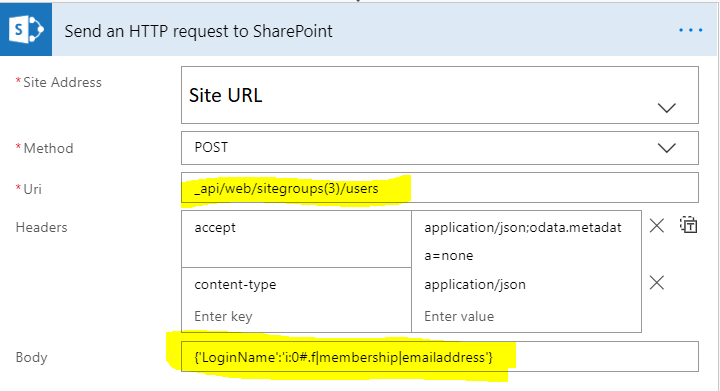
Now let’s add an action to grant the user access to SharePoint site. I would be using a flow action “Send an HTTP request to SharePoint” to call a Rest API (POST) to get the user added to the SP site groups (Members/Viewers/Visitors). The connection for this action should have access (Site Owner) to share the site. Find the rest api details to add the user to a group
URI: _api/web/sitegroups(groupId)/users
Method: POST
Request Body: {‘LoginName’:’i:0#.f|membership|Emailaddressoftheuser’}
To get the SharePoint group id, navigate to the url https://domainname.com/sites/sitename/_layouts/15/user.aspx and click the group name and copy the URL which will have the groupid at the end.
https://domainname/sites/sitename/_layouts/15/people.aspx?MembershipGroupId=3
Find the action with the configurations
Execute the flow by adding the user to the list from the PowerApps interface, the flow gets triggered which will in turn grant the user access to PowerApp & SharePoint. Tada!!!
To revoke the access to a user, if you scroll back to the admin interface image for managing the user there is a delete button. Assume that the delete button click will update the column status on the User Roles list to “Revoke” for a user which would then trigger the same flow. On the same flow add a Switch which would then based on the value in the RoleStatus (Add/Revoke) column, add steps to revoke the access. This could be achieved in multiple ways. For e.g After the delete button is clicked the item on the UserRoles list can be deleted which will in turn call a flow created using the trigger “When an Item is deleted” with actions to revoke access
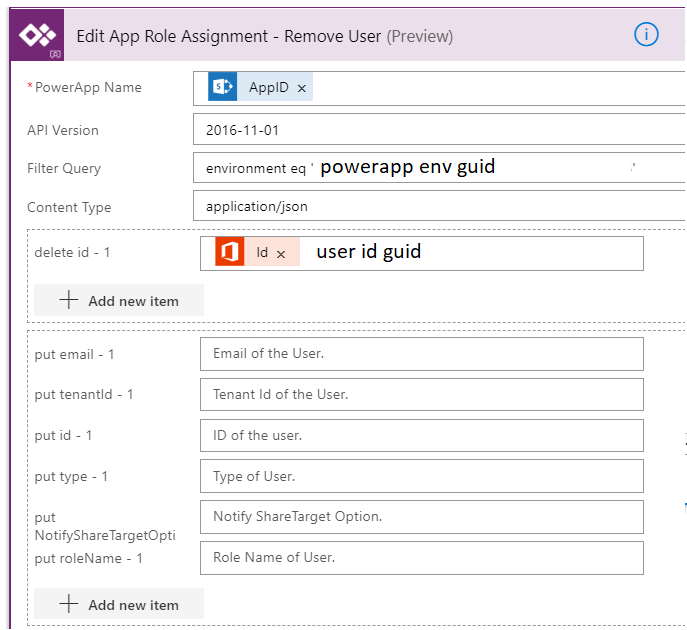
Action to Revoke Power App access, its the same action we used for adding user to an app but with some different parameters as shown below
The rest api details for revoking the user access from a SharePoint group
URI: _api/web/sitegroups(groupId)/users/removeByLoginName
Method: POST
Request Body: {‘loginName’:’i:0#.f|membership|Emailaddressoftheuser’}

The action to grant access to Power App can also be called from a Power App by creating a connection to the data source “PowerAppsforAppMakers” as below
Summary:This approach would help the super users of the app to manage user permissions for the Power App within Power Apps interface. On this post we have seen adding the user permission to SharePoint data source. Based on needs there should be ways to add users to different data sources if there’s an api endpoint or with the help of standard connectors available in Power Platform. Let me know any feedback or comments on the comment section below
