
In Modern SharePoint lists you can display list item content in a more modern way using the Tiles view layout. If you have very big list with multiple columns along with picture columns you get a horizontal scroll bar on the list view, the Tiles view can solve this issue since the content will be displayed on the tile card where you can design the layout of the tile card to display the different list column values.

There are many blog posts & PnP Samples which will help you to create a Tiles view using JSON row formatting. If you are new to JSON row formatting, I recommend you to go through this link from Microsoft. Microsoft has recently brought in interface to format the list item row & do conditional formatting by creating rules based on column values

On this blog post, lets see how to create Tiles view as shown above for the Images stored as attachments in the list item. If you add an attachment to list item in SharePoint list, the attachments are stored in the following path
Components used in this blog post
- Power Automate Flow: To get the path of the attached file (Image file in this case), we will be creating an automated Flow which gets triggered on List item creation to get the path of the image & update it to the custom hyperlink list column (ProductPhotoHL).
- JSON: To create a Tile view layout using list row view formatting.
Pre-Requisites:
- Create a SP List by the name ProductInformation with the following columns
- Title: Single line of text
- ProductPhotoHL: Hyperlink (to the image)
- ProductPhotoPic: Picture (to the image)
- ProductPrice: Number
- Features: Multiple lines of text
- Couple of list items with Images as attachments after the Power automate flow is created
- Only images as attachments
- Not more than one image as an attachment
Power Automate to get the path of the Image attachment URL:
Create an automated flow with Trigger When an item is created and configure the trigger to the ProductInformation list. Add the Get Attachments action connected to the Product Information list & for Id parameter it should the List item Id (ID) selected using the dynamic content from the trigger When an item is created.
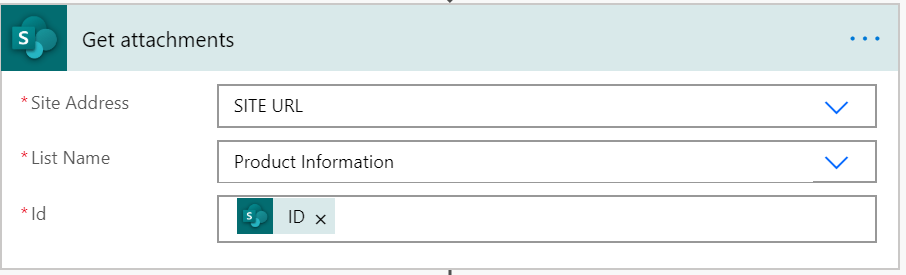
Now with the above action we have the attachment URL of the image, this must be updated to the list column ProductPhotoHL & ProductPhotoPic of the ProductInformation list in order to be displayed in the Tile view. To create the above shown Tile view ProductPhotoPic (Picture) is not required but I’ve used it show you that we can create a Thumnail of the image on the default list view using the Picture column ProductPhotoPic. By the time I am writing this post the Power Automate action Update item is not capable to update a column with Picture as a DataType but it can update a HyperLink column. Action Send an HTTP request to SharePoint to make HTTP requests to any SharePoint Rest endpoints, I’ve used this action to update the ProductPhotoPic (Picture) column as below

I’ve said this on the pre-requisite section that there should not be more than one attachment. In the Body of the HTTP request, the Url parameter for the ProductPhotoHL & ProductPhotoPic gets only the first attachment URL from the previous action “Get attachments” AbsoluteUri as dynamic content. To get the first attachment URL you can use any of the following formula from the expression
- first(body(‘Get_attachments’))?[‘AbsoluteUri’]
- body(‘Get_attachments’)?[0]?[‘AbsoluteUri’]
I’ve used the function first() to get the first item from the array. The flow is ready, add couple of items to the list by filling in information only for Title, ProductPrice, Features & a Image as an attachment. The flow gets triggered which will update the ProductPhotoHL & ProductPhotoPic with the image attachment url. You can download the flow template from the following GitHub repo link.
Create Tiles View layout using JSON:
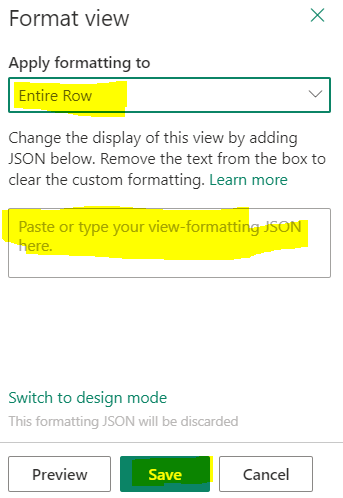
I’ve used the sample from PnP List view formatting samples to create items in tile layout for images. On the sample JSON I’ve updated the column ProductPhoto to ProductPhotoHL. The updated JSON is available here for download. Now copy the JSON & go to the List view & click on the down arrow (All Items)>Format current view>Advanced mode as shown below

The Apply formatting to should be set to Entire Row & paste the JSON to box as shown on the picture and then Save it.
Now you will have another layout by the name Tiles added to the existing layouts List & Compact List as shown below, select it

Now its time to see the need for the column ProductPhotoPic of datatype Picture, with the default layout you can see the thumbnail of the image added as an attachment

Summary: There are many samples available in PnP Github repo for List Row View & Column view formatting. In document & picture libraries the Tiles view layout are added by default, there is also a Column by the name Thumbnail in a Picture library. You can display a Thumbnail view of Images in PowerApps gallery for the Images stored in Document library, go through this link for more information. If you are storing images on a seperate document library & not as an attachment, the url of the image can be added on the HyperLink column. Hope you find this interesting & helpful.
