Send Teams channel message aka proactive message using custom Teams bot and Power Automate – Part 1

Microsoft Teams connector in Power Automate has actions which can send a simple text message or Adaptive card as a flow bot in a Teams channel. Messages or cards are posted as the user who’s signed into the connector in the flow or by using the flow bot.

Messages can be posted on a Teams channel only if the signed in user or account of the connector is a member or an Owner of the Microsoft Team. Recently I had a requirement from my customer to post or broadcast messages on numerous Teams channels (> 1000). It is impossible per the limits for Microsoft Teams to have a dedicated service account as a member of all teams in scope. There is no graph API with application permission which can send a message in a channel. In this blog post, let us see how I have overcome the limitation of posting a message or card in multiple teams with the help of

  1. Custom Teams App with a Bot
  2. Installation of Teams App in Teams
  3. Bot connector REST API to post a Message or Adaptive Card aka proactive message

Custom Teams App with a Bot:

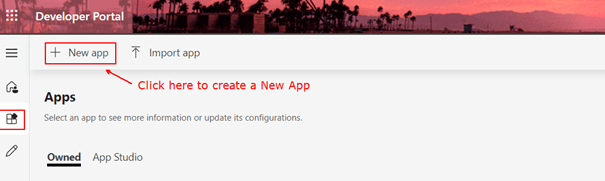
The teams in scope to receive the channel post or Adaptive card message should have a custom Teams app installed. The Teams app should have a Bot as its app features enabling the Microsoft team to receive the message. In this section, let us see how to create a Teams App with a Bot using the Developer Portal for Teams. Step 1: Login to the Teams Developer portal using your Microsoft 365 login ID and then Click + New app as shown below

Step 2: In the following screen for the Basic information of the app, enter the following mandatory information like Short name, App ID (Auto Generated), Short description, Long description, Developer or company name, Website (Valid HTTPS URL), Privacy policy url, Terms of use url. Once all of the above information is entered, click Save at the top left corner as shown below.

To apply a custom logo or an app icon for the Teams app, click Branding on the left navigation bar in the Teams developer portal as shown above.

Application (client) ID – Teams Activity Feed:

You can leave the Application (client) ID as blank. This section will be filled for custom Teams Activity Feed use case.

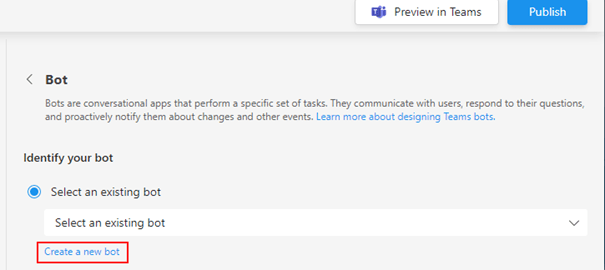
Step 3: On the left navigation, click App features > Bot

Step 4: Click Create a new bot which will take you to the Bot management portal. If you already have a bot where you are an Owner, it will be listed in the dropdown as shown below.

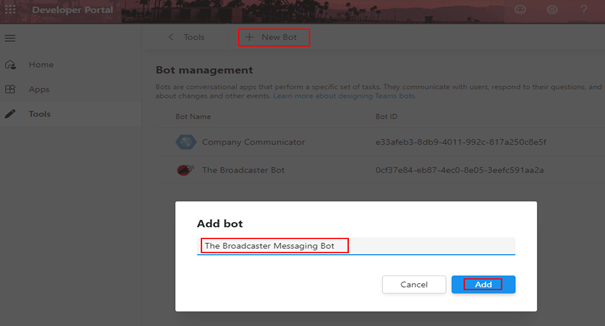
Step 5: In the Bot management, click + New Bot > Enter the name of the bot > Add

This step also registers an Azure AD app registration in the Azure AD Portal.

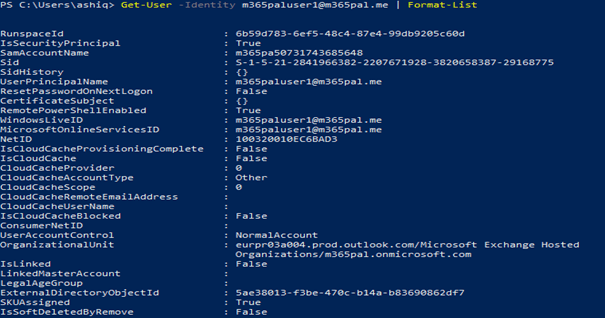
Step 6: Once the bot is added. In the Bot management portal url from the Developer Portal, copy the Bot ID and keep it handy to be used in the Power Automate cloud flow.

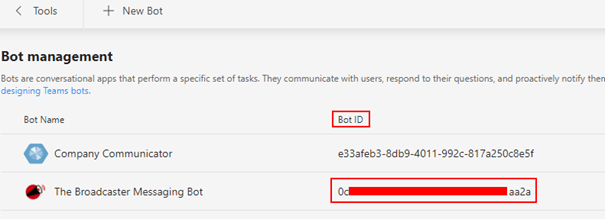
Step 7: Now click the registered bot in the above screen to Add a secret as shown below. As soon as the secret is generated, copy the value and keep it handy to be used in Power Automate cloud flow.

To change the logo of the Bot, login to this URL https://dev.botframework.com/bots

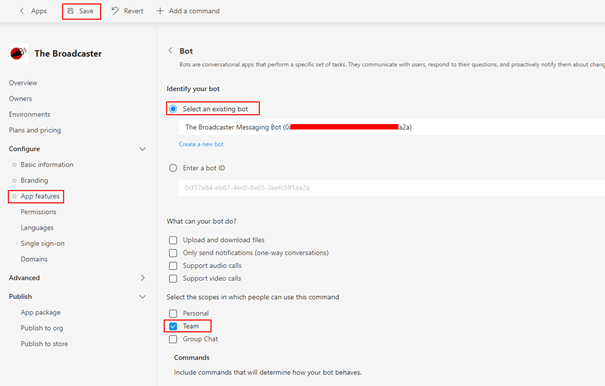
Step 8: Go back to the created Teams app in the Developer Portal, in App features > Select the created bot > Set the scope to Team > Save

Installation of Teams App in Teams:

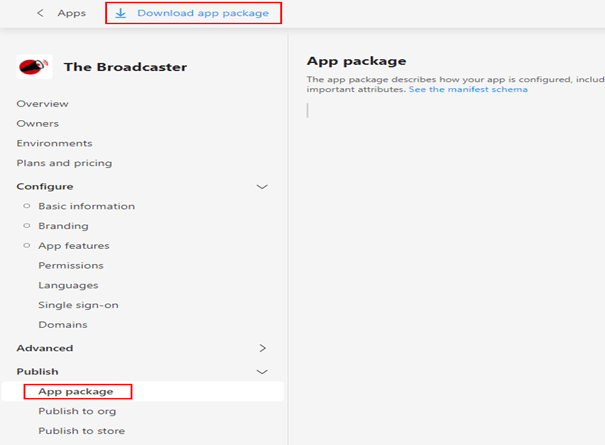
The Teams app is now configured with required features to send Teams channel conversation post. Download the App manifest package from the Developer Portal as shown below

Upload app in Microsoft Teams [Side Loading]:

Go through this Microsoft Documentation link to sideload the Teams App to your Teams client as a developer before publishing the package to the Teams Organization App catalog.

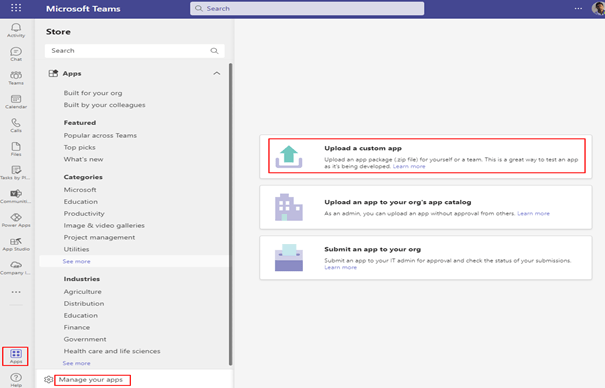
Go to the Teams Desktop Client > Apps > Manage your apps > Upload a custom app > Select the App manifest Zip package from above step > Add to a team > Select the Team to install the app > Setup a bot.

Find below the screenshot for your reference from Teams Desktop client

To validate the installation of the app, go to the Installed Team > Manage Team > Apps > You can find the installed app as shown below

Upload app in Microsoft Teams [Organization App Catalog]:

After the app is tested, the app can be deployed at scale once the app is available in the Teams Organization App catalog through Graph API. The pre-requisite to call the Graph API enpoint to install the app is the

  1. Teams ID (Group ID)
  2. Teams APP ID from the App catalog

Summary:

In the next post I will cover how to use Bot Framework REST API in Power Automate Cloud Flow to send the Adaptive card message in a Teams Channel. If you are visiting my blog for the first time, please do look at my other blogposts.

Do you like this article?

Subscribe to my blog with your email address using the widget on the right side or on the bottom of this page to have new articles sent directly to your inbox the moment I publish them.

How to create & setup Dynamic Microsoft 365 Group or Distribution list based on the user’s domain for Teams, Yammer and Exchange

There are many organizations maintaining multiple domains on a single Microsoft 365 or Azure AD tenant, in those cases there might be a need to create dynamic Microsoft 365 groups, security groups & distributions list based on the user’s domain to manage the group’s membership. On this blogpost, let us see how to

  1. Create Dynamic Microsoft 365 group based on the user’s domain for Teams & Yammer
  2. Create a Dynamic distribution list based on user’s domain in Exchange online

To begin with let us see some basics of a Dynamic group. The membership of a dynamic group will automatically update as people join, leave, or move within the organization whenever the user’s Azure Active Directory attributes are changed. In simple terms, rules determines the group membership. The users will be added or removed automatically as and when the user attributes change or users join and leave the tenant which reduces the administrative effort of adding and removing users from a group. Dynamic group can be created based on variety of attributes including role, location, department etc.

Create Dynamic Microsoft 365 group based on the user’s domain for Teams & Yammer

Microsoft Teams and Yammer (Microsoft 365 Connected) supports dynamic membership. It enables the membership of Team or Yammer to be defined by one or more rules that check for certain attributes in Azure AD. Microsoft Teams & Yammer creates a Microsoft 365 group in Azure AD. For this post, the membership rule will be simple one which is based on the user’s domain and country. You can also have a complex rule involving multiple Azure AD attributes like Title, Geography, Department etc. Before we proceed further, there are some pre-requisite & facts to be considered before creating a dynamic group.

  • User Administrator or Global administrator role in Azure AD
  • Users you foresee to be part of a dynamic group membership rule should have an Azure AD premium License P1 or P2
    • Microsoft 365 E3, E5, Front line workers MF3 & MF1 has Azure AD premium 1 service which should suffice.
  • An Azure AD organization can have maximum of 5000 dynamic groups.
  • Any number of Azure AD resources can be members of a single group.

Dynamic Membership based on Domain for Teams:

To create a Dynamic membership MS team, create a Microsoft 365 group first with Dynamic membership in Azure Active directory. You can create a dynamic group from PowerShell but here I will be using Azure Ad GUI to create the dynamic Microsoft 365 group with rule to add users based on their domain and country. I have added a domain m365pal.me to my Azure AD tenant which I will be using here for this example.

  1. Sign in to Azure AD Admin center with administrator role in the Azure AD organization
  2. Click Groups and then click + New Group
  3. Select the Group type as Microsoft 365. Dynamic membership will also work with Security group but for team it should be Microsoft 365 group.
  4. Enter the Group Name & Group email address
  5. Select the Membership type as Dynamic User
  6. Select the Owner and then
  7. Under Dynamic user members section, click Add dynamic query
  8. In Dynamic membership rules panel, add rule to define membership based on users domain & country
    • First rule for Domain: under Property column select userPrinicipalName, Operator should be Contains and the Value should be the domain name in format “@yourdomain.com”. This rule will add all users with the UPN user@yourdomain.com. Now click + Add expression to add the second rule
    • Second rule for country: under Property column select country, Operator should be  Equals and the value should be the country name.
  1. You can also validate the rules by clicking the link Validate Rules and then by adding users to check if the user satisfies the rule
  2. Click Save. This is how it should look like
  1. Click Create.
  2. After waiting for couple of minutes, check the group membership. Please find below screenshot for the group which has two members satisfying the condition. You can also notice the + Add members link is disabled since the group is dynamic membership and not assigned. To modify the rules, click the link Dynamic membership rules link.
  1. Now we are ready to create the MS Teams, go to https://teams.microsoft.com/ and then click Join or create a team at the left bottom corner and then Click Create a team
  2. Click From a group or team and then click Microsoft 365 group
  3. Now select the group you have created in Azure AD and then click Create.
  1. The team is now created, you can find the team on the list. Check the membership of the team which will have the two users satisfying the rules and the owner of the group. One more thing to notice here is the message which says The membership settings prevents you from adding or removing members.
  1. Voila! Dynamic Microsoft team is now created & setup.

If you have an existing team to be converted to a Dynamic team, find the Microsoft 365 group in Azure AD for the Team you wish to convert and then update the membership status from Assigned to Dynamic user with membership rules

Dynamic Membership based on Domain for Yammer:

Yammer (Microsoft 365 Connected) also supports dynamic membership. Find the steps below to create a dynamic yammer group based on the user’s domain. Find the steps below

  1. Sign in to https://yammer.com/ with your organizational ID
  2. Click Create a Community and then Enter the name of the Community
  3. Click the button Create
  1. Now sign in to Azure AD Admin center to the update the membership settings of the Microsoft 365 group connected to the Yammer community. Find the yammer group and then click
  1. Click Properties under the Manage blade and then change the membership type from Assigned to Dynamic user
  1. After updating the membership type to Dynamic user. You will now have option to enter the dynamic query. Click dynamic query
  1. In Dynamic membership rules panel, add rule to define membership based on users domain
    • Rule for Domain: under Property column select userPrinicipalName, Operator should be Contains and the Value should be the domain name in format “@yourdomain.com”. This rule will add all users with the UPN user@yourdomain.com. Now click + Add expression to add rules based on need
    • Click Save
  1. Click Save. Wait for couple of minutes for the membership to be updated.
  2. Now check the Yammer group in Yammer.com for the membership status. Please find below screenshot for your reference which will not have the + icon on the highlighted members section for adding users since this is now a dynamic yammer group

Also, Microsoft 365 group/Security group can be used for different use cases. See some sample use cases below

  • You can use to target SharePoint page/news to specific audience with the help of Microsoft 365 group or Security group. Will it not be more powerful if you use dynamic groups within a SharePoint to target content certain group of audience!
  • Assign Microsoft Licenses to users based on Dynamic Group.
  • Grant access to an App (PowerApps etc) using the dynamic group targeting certain departments, geographies etc

Reference:

https://docs.microsoft.com/en-us/azure/active-directory/enterprise-users/groups-create-rule

https://docs.microsoft.com/en-us/azure/active-directory/enterprise-users/groups-dynamic-membership

https://docs.microsoft.com/en-us/microsoftteams/dynamic-memberships

https://docs.microsoft.com/en-us/yammer/manage-yammer-groups/create-a-dynamic-group

https://docs.microsoft.com/en-us/yammer/manage-yammer-groups/yammer-and-office-365-groups

https://docs.microsoft.com/en-us/azure/active-directory/enterprise-users/directory-service-limits-restrictions

Create a Dynamic distribution list based on user’s domain in Exchange online:

Dynamic distribution groups are mail-enabled Active Directory group to distribute email messages to all its members within a Microsoft Exchange organization. Unlike regular distribution lists that contain a defined set of members, the membership list for dynamic distribution groups is calculated each time a message is sent to the group, based on the filters and conditions that you define in the group. You can create a Dynamic Distribution list from Exchange Admin center as shown below but the options to write advanced filter conditions or rules are limited so PowerShell is preferred.

Dynamic Distribution list from PowerShell:

Make sure the Exchange online PowerShell module is installed. There are some limitations to create a recipient filter (Rules) that worked based on user’s domain with the operator like or contains but there is a workaround. The filter works based on the exchange property WindowsEmailAddress which is always the primary SMTP address, you can also consider using the property WindowsLiveID. Follow the steps below to create a Dynamic Distribution list based on user’s domain

  1. Load the module by the running the command Import-Module ExchangeOnlineManagement
  2. Connect to the Exchange online PowerShell in Microsoft 365
Connect-ExchangeOnline -UserPrincipalName userId@domain.com -ShowProgress $true
  1. After authentication, enter the following command to create the Dynamic DL based on User’s domain. I have added the RecipientTypeDetails in the RecipientFilter to apply the filter rule only to user mailboxes which excludes the SharedMailboxes
New-DynamicDistributionGroup -Name "All Users - M365PAL DL" -RecipientFilter "(RecipientTypeDetails -eq 'UserMailbox') -and (WindowsEmailAddress -eq '*@yourdomain.com')"
  1. You can also validate the users using the following script
Get-Recipient -RecipientPreviewFilter (Get-DynamicDistributionGroup "All Users - M365PAL DL").RecipientFilter
  1. To view the attributes to be used in the recipient filter enter the following command
Get-User -Identity user@yourdomain.com | Format-List

Reference:

https://docs.microsoft.com/en-us/exchange/recipients/dynamic-distribution-groups/dynamic-distribution-groups

https://docs.microsoft.com/en-us/powershell/module/exchange/get-user

https://docs.microsoft.com/en-us/exchange/recipients/dynamic-distribution-groups/view-dynamic-distribution-group-members

Summary: On this post we have seen how to create dynamic groups based on user’s domain. Do some planning to start using the dynamic groups which will help reduce lot of administrative overhead. Hope you have found this informational & helpful. Let me know any feedback or comments on the comment section below