Text-to-Speech and Audio Playback in Power Apps using Azure and Power Automate

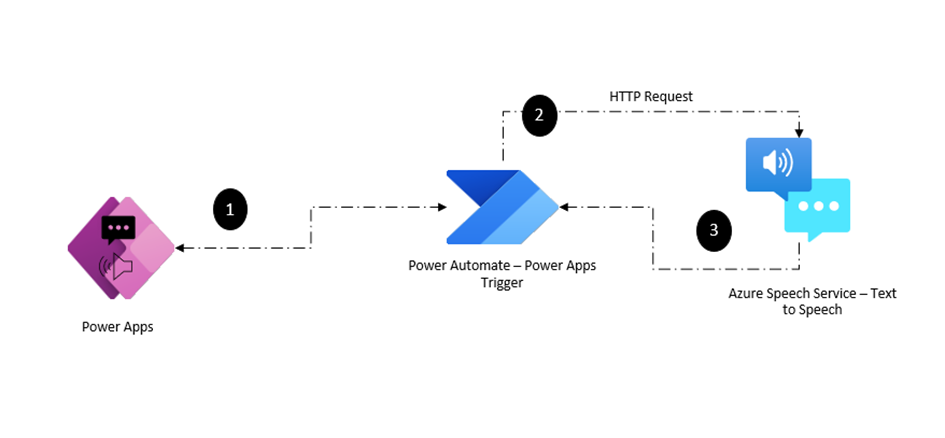
Capabilities like text-to-speech (TTS) and audio playback can take your applications to new heights of user engagement and accessibility. In this blog post, we’ll look at integrating text-to-speech and audio playback functionalities into Power Apps using Power Automate and Azure Speech Services. Whether you’re looking to provide dynamic narration, streamline communication, or enhance accessibility, this post will walk you through the steps to integrate TTS capabilities into your Power Apps projects.
Prerequisites:

Before you begin, ensure that you have the following prerequisites in place:

  • Maker role in Power Platform environment
  • Premium License – HTTP Connector
  • Azure Subscription Access
    • Azure Speech services – Text to speech

Creating Speech Services in Azure for Text to Speech:

Azure provides Speech Services that enable developers to integrate advanced speech capabilities into their applications, including Text to Speech (TTS). With Azure Speech Services, you can convert text into speech in various languages and voices.

Step 1: Create the resource Speech services in the Azure Portal

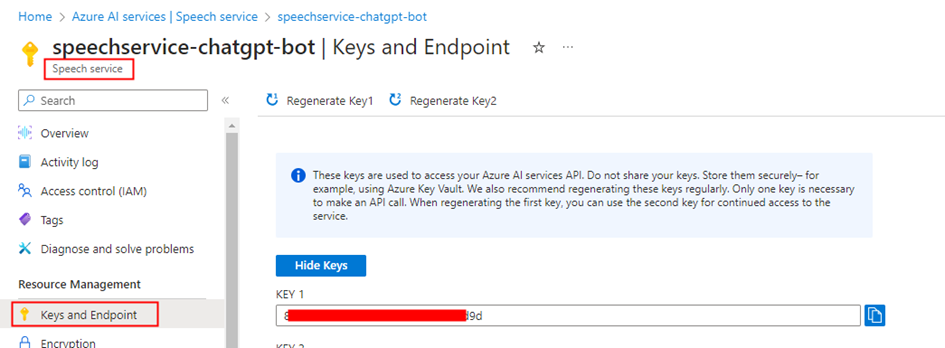
Step 2: Copy the Key from the Keys and Endpoint section within the Resource Management blade. This Key is used for authentication when making requests to the Speech service APIs, enabling text-to-speech conversion in the Power Automate flow through the HTTP connector.
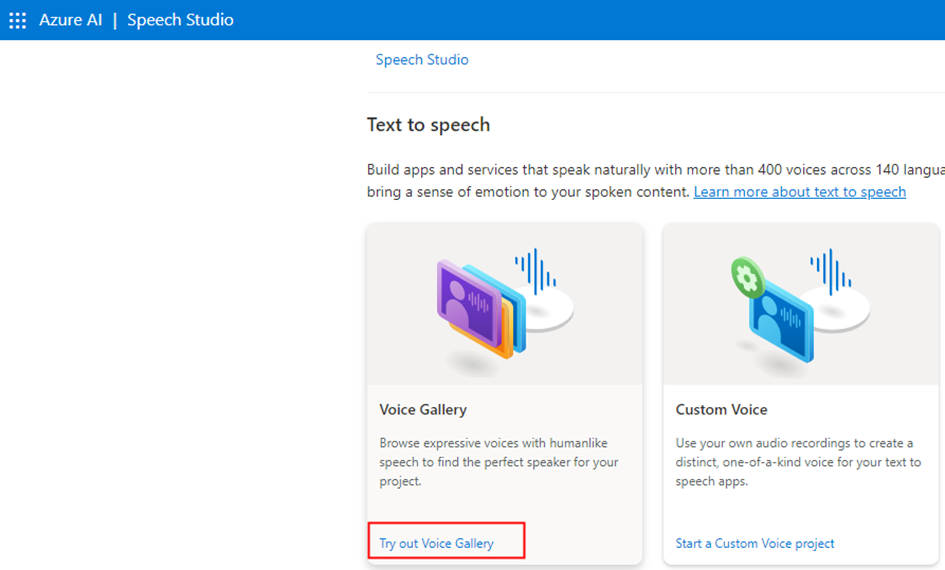
Step 3: Go to the Speech Studio to choose a voice from the gallery provided in Text to Speech section. Alternatively, you can create a custom voice using your own audio recordings. The Speech Studio can also be accessed from the Overview section of the Speech service in the Azure portal.
Power Automate Flow to convert the text to speech:

The Power Automate serves as a tool in orchestrating the integration between Power Apps and Azure Speech Services, enabling communication between the components. Create an Instant Power Automate flow with the trigger “PowerApps (V2)” either from the Power Automate portal or directly from the Power Apps maker interface. Add a text input varTextInput as shown below to send the text from the Power Apps

The next step involves converting the text to speech/audio utilizing the Text to Speech REST API through the HTTP connector action. Add the HTTP action with request details as below
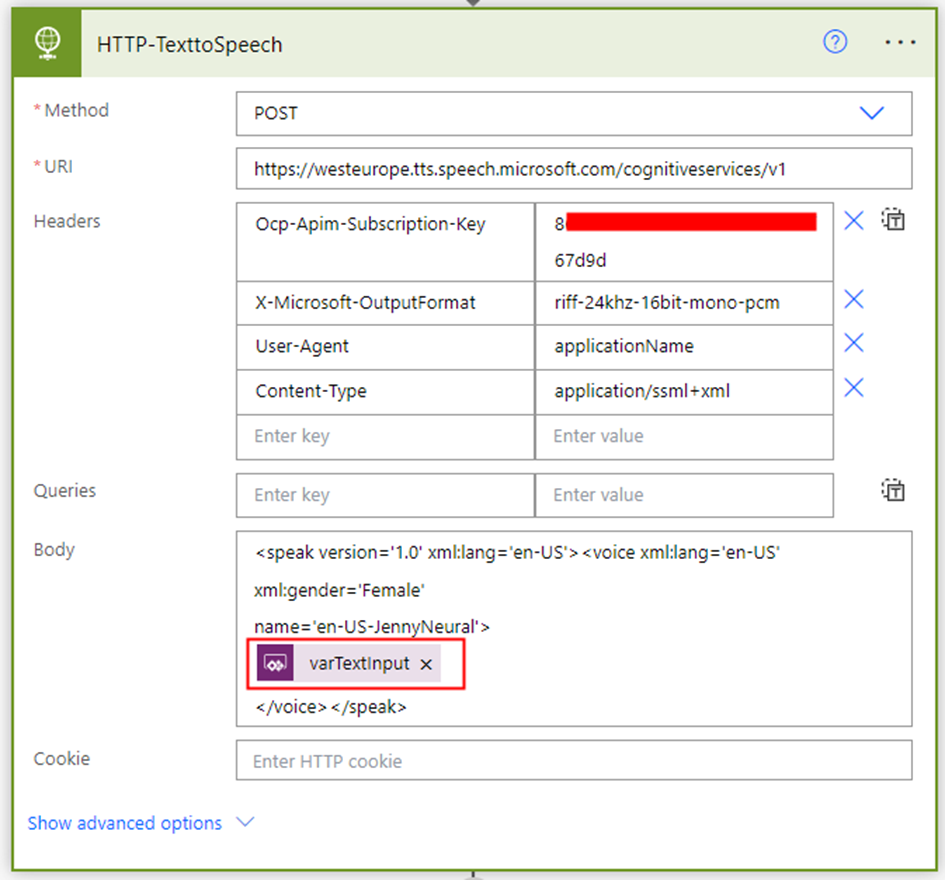
Method: POST

URI: Depending on the region where you’ve created the Azure Speech resource, select the corresponding Rest API endpoint from the list in the Microsoft documentation. For instance, if the Speech Service resource is created in West Europe, the URL will be:

https://westeurope.tts.speech.microsoft.com/cognitiveservices/v1

Headers:

Ocp-Apim-Subscription-KeyKeyCopiedEarlierfromtheAzureSpeechResource
X-Microsoft-OutputFormatriff-24khz-16bit-mono-pcm
User-AgentapplicationName
Content-Typeapplication/ssml+xml

Body:

<speak version='1.0' xml:lang='en-US'><voice xml:lang='en-US' xml:gender='Female'
name='en-US-JennyNeural'>
@{triggerBody()['text']}
</voice></speak>

In the request body, add the varTextInput included to the Power Apps trigger. I have added the voice en-US-JennyNeural, you can select it from the voice gallery as discussed above.

Next, add a Compose action to convert the audio generated from the HTTP action into base64 format. This will serve as the text output passed in the Respond to a PowerApp or flow action, as shown below:
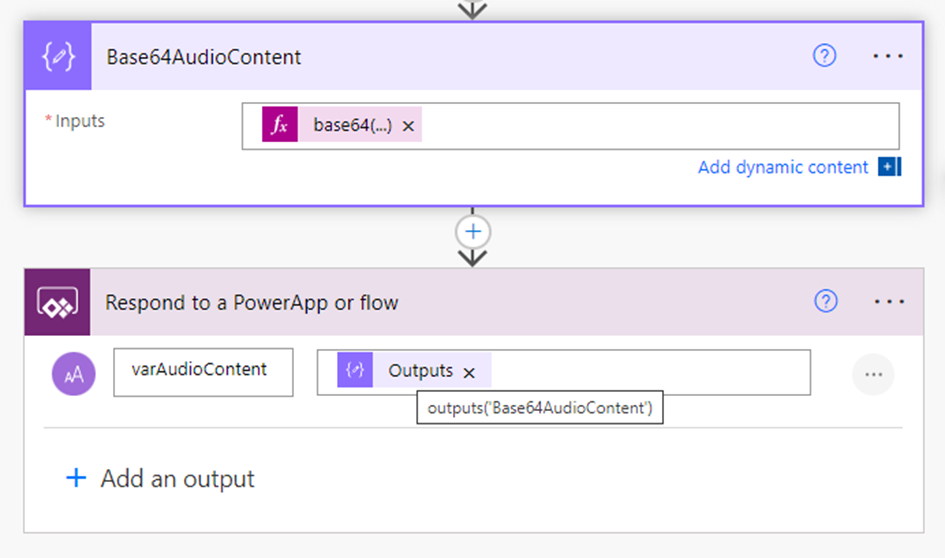
Base64AudioContent compose action expression: base64(body(‘HTTP-TexttoSpeech’))

Save the flow.

Power Apps for Text Narration:

Let’s develop the app for the text narration feature, where users can input text to be converted into audio using the Power Automate flow created earlier. On the Canvas, add a Text Input control for entering the desired text, an Audio control to play the audio generated from the Azure text-to-speech service, and a button to trigger the Power Automate flow. Make sure the flow is added to the Power Apps. Add the following code to the OnSelect property of the button

// Reset the Audio1 control to its default state, clearing any previous audio.
Reset(Audio1);

// Run the TexttoSpeechFlow Power Automate flow, passing the text from TextInput1 as input.
// Store the result (converted audio) in the varconvertedAudio variable.
Set(varconvertedAudio, TexttoSpeechFlow.Run(TextInput1.Text));

// Set the playAudioContent variable to false, ensuring that any previous audio playback is stopped.
Set(playAudioContent, false);

// Set the playAudioContent variable to true, triggering playback of the newly converted audio.
Set(playAudioContent, true);

The variable playAudioContent will be used in Audio control Star property to play the audio automatically
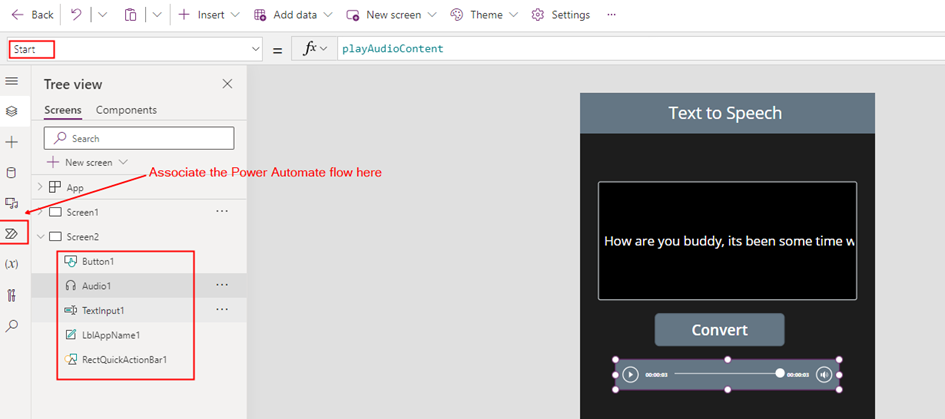
The Media property of the Audio control should have the following formula, depending on the output variable added in the ‘Respond to PowerApps or flow’ action of the Power Automate flow

"data:audio/x-wav;base64,"&varconvertedAudio.varaudiocontent

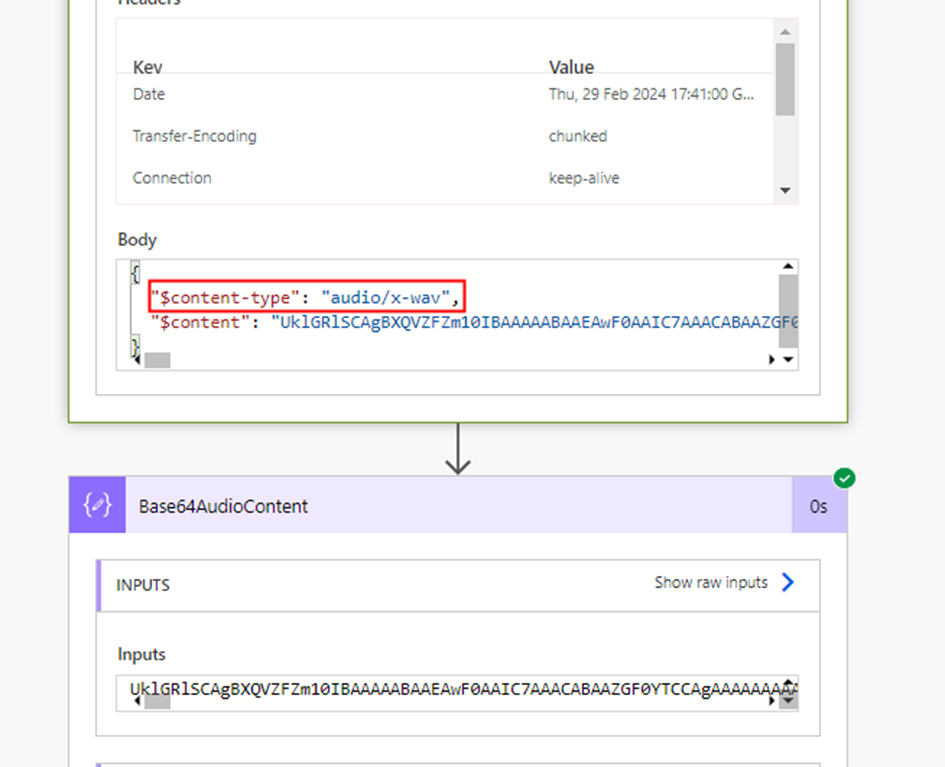
The x-wav is the format of the generated audio from the Text to Speech REST API in the Power Automate flow which can be validated from the output of the HTTP action HTTP-TexttoSpeech
You are now ready to test your app.

Summary:

By combining the power of Power Automate and Azure Speech Services developers can quickly integrate text-to-speech and audio playback functionalities into their Power Apps. Hope you have found this informational & thanks for reading. If you are visiting my blog for the first time, please do look at my other blogposts.

Do you like this article?

Subscribe to my blog with your email address using the widget on the right side or on the bottom of this page to have new articles sent directly to your inbox the moment I publish them.

Streamlining Integration: Using Azure Managed identities in Power Apps and Power Automate to access Microsoft Graph API – Part 3

In both Part 1  and Part 2 of the blog series, I’ve covered the utilization of Managed Identities in Power Apps and Power Automate for secure access to Microsoft Graph API. This included a deep dive into setting up and configuring the Azure API Management service with the Microsoft Graph permissions for the managed identity. In Part 2, I’ve explored the process of exporting the API as a connector in Power Platform, securing it with API key authentication.

The Part 3 aims to enhance the security of the connector by implementing Entra ID OAuth authentication.

Entra ID Apps:

To enhance the security of the custom connector published from Azure API Management for Microsoft Graph APIs using Entra ID OAuth authentication instead of Subscription key, it is essential to create two Entra ID applications. One application should represent the API from API Management, while the other should represent the client application to be utilized in the Entra ID OAuth authentication for the custom connector.

Registering an Application in Microsoft Entra ID for API Representation:

In the Entra ID portal, navigate to App registrations and click + New registration. Enter a name, such as APIM PP Resource, and proceed by clicking the Register button, leaving all settings as default. This app represents the APIs added in the Azure API management instance.

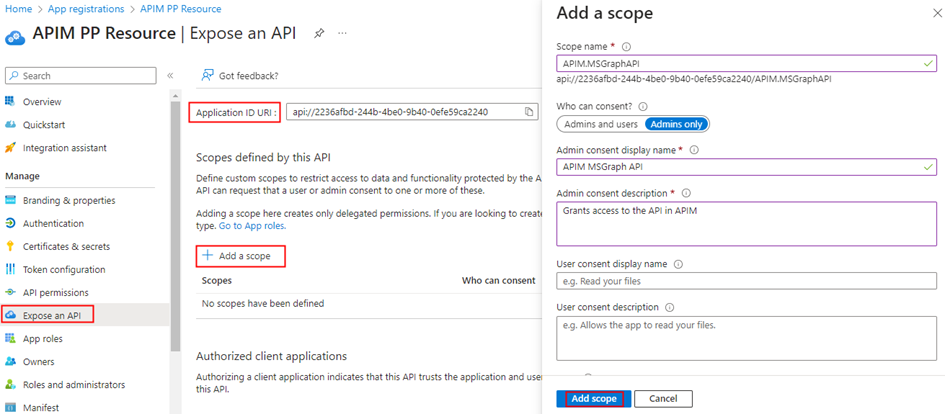
  • Under the Manage section in the side menu, select Expose an API. Set the Application ID URI with the default value and remember to copy this value for future use.
  • Click on the Add a scope button to access the Add a scope panel:
    1. Enter a new Scope name as APIM.MSGraphAPI
    2. Set Admin consent display name to APIM MSGraph API
    3. Provide Admin consent description as “Grants access to the API in APIM.”
    4. Ensure the Enabled scope state is selected.
    5. Complete the process by selecting the Add scope button to create the scope.

Registering an Application in Microsoft Entra ID for Client Representation:

Create another Entra ID app to be used in the custom connector for securing with Entra ID OAuth Authentication. In the Entra ID portal, navigate to App registrations and click + New registration. Enter a name, such as APIM PP Client, and proceed by clicking the Register button, leaving all settings as default.

  1. Retrieve the Client ID, Tenant Id from the Overview section of the Entra ID app and generate a secret through the Certificates & secrets under the Manage blade. Once the secret is successfully created, copy its value for use in configuring the custom connector OAuth Authentication.
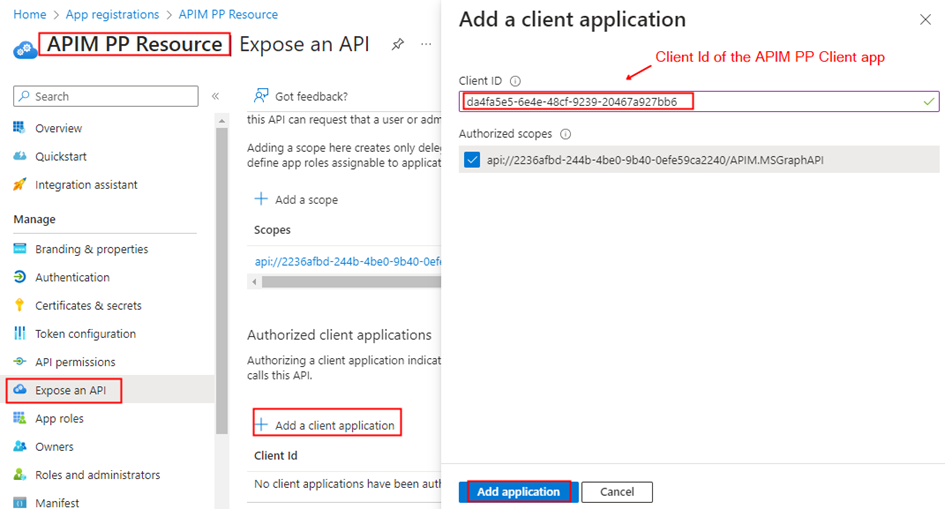
  2. Go to the Entra ID app APIM PP Resource created earlier. In the Manage section, click on Expose an API and then Add a client application by selecting + Add a client application in the popout panel. Enter the Client ID of the APIM PP Client app registered now. Select the authorized scope created in the previous section, then proceed by clicking Add Application. This ensures the application APIM PP Resource trusts the client application APIM PP Client and users should not be asked to consent when the client calls the APIs published API Management instance.

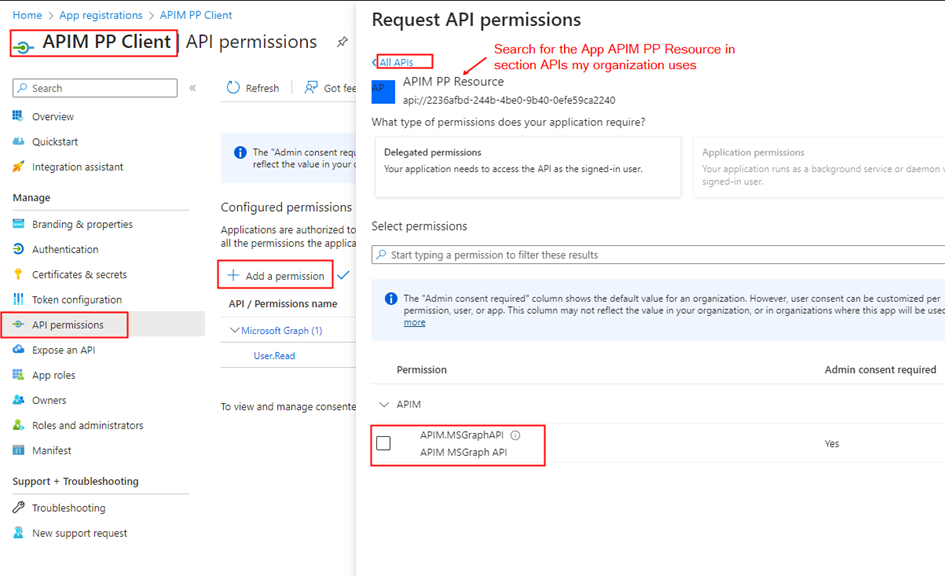
Note: If you prefer users/admins to provide consent for the permission while creating a connection for the custom connector, add the APIM.MSGraphAPI Scope to the APIM PP Client app, as shown below. In this scenario, the step mentioned in bullet no 2 becomes unnecessary.

Configuring Custom Connector Authentication to Entra ID OAuth:

Following the export of the API from the Azure API Management as a custom connector in Power Platform in Part 2 of this blog series, proceed to the Power Apps or Power Automate maker portal to edit the connector.

  1. Access the custom connectors, locate the exported connector in the Power Platform Environment where the connector was exported from API Management
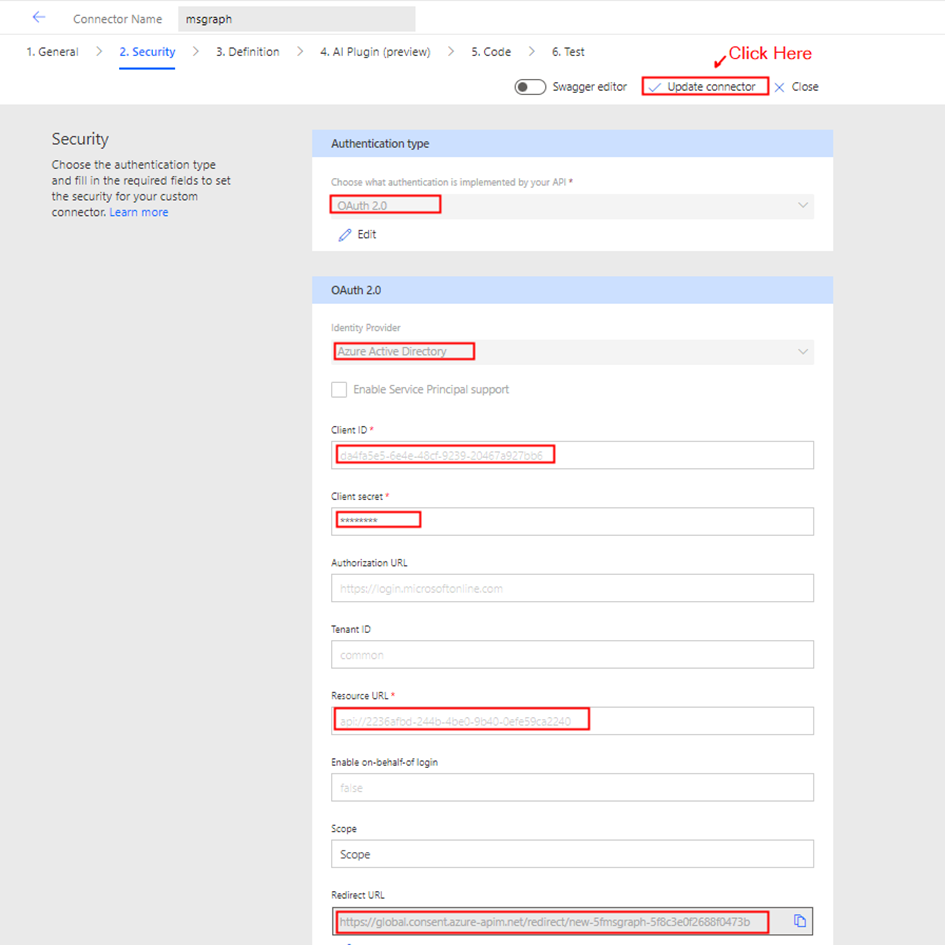
  2. Within the Authentication type settings, originally set to API Key, click Edit, and modify it to OAuth 2.0.
  3. Choose the Identity provider as Azure Active Directory. Enter the Client ID and Client secret obtained from the APIM PP Client app copied earlier. Set the resource URL to the Application ID URI generated from the APIM PP Resource app.
  4. Click Update connector to generate a Redirect URL on the same screen—ensure to copy this URL.
  1. Navigate to the APIM PP Client app in the Entra ID portal and add a Web Redirect URI, paste the copied Redirect URL.

Azure API Management: Configure JWT validation policy to Authorize requests from Custom connector:

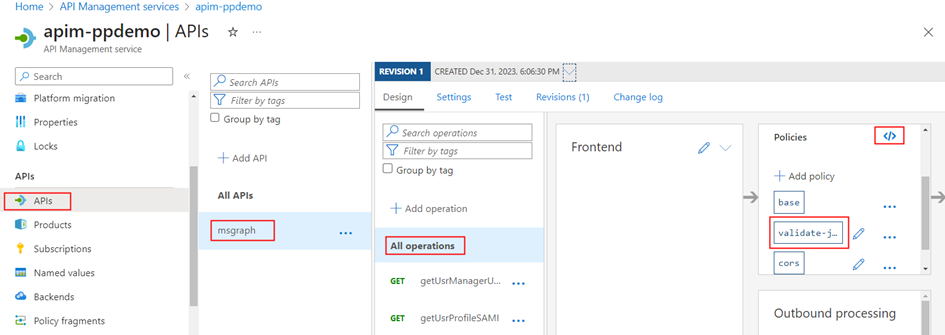
The JWT validation policy pre-authorizes requests from the Power Platform Custom connector as it adds the layer of security to ensure that incoming access tokens are valid and meet specific criteria before the APIM starts processing requests to the added MS Graph API endpoints. The policy checks the value of the audience claim in an access token obtained from Microsoft Entra ID with in the custom connector. The audience claim typically specifies the intended recipient of the token, ensuring that the token is meant for the intended API.

By configuring the following JWT validation policy in the <inbound> policy section below the node <base />, you enforce the validation of the access token, and if the token is invalid, an error message is returned.  Don’t forget to replace the TenantId and the required claims value to the client id of the app APIM PP Resource.

<validate-jwt header-name="Authorization" failed-validation-httpcode="401" failed-validation-error-message="Unauthorized. Access token is missing or invalid.">

<openid-config url="https://login.microsoftonline.com/replaceherewithTenantId/v2.0/.well-known/openid-configuration" />
<issuers> <issuer>https://sts.windows.net/replaceherewithTenantId/</issuer>
</issuers>
<required-claims>
<claim name="aud">
<value>api://replaceherewiththeClientIDoftheApp-APIM PP Resource</value>
</claim>
</required-claims>
</validate-jwt>

Note:  If you attempt to establish the connection from the Test Tab and subsequently execute the action, you will encounter the following error “Access denied due to missing subscription key. Make sure to include subscription key when making requests to an API.

Creating a Product:

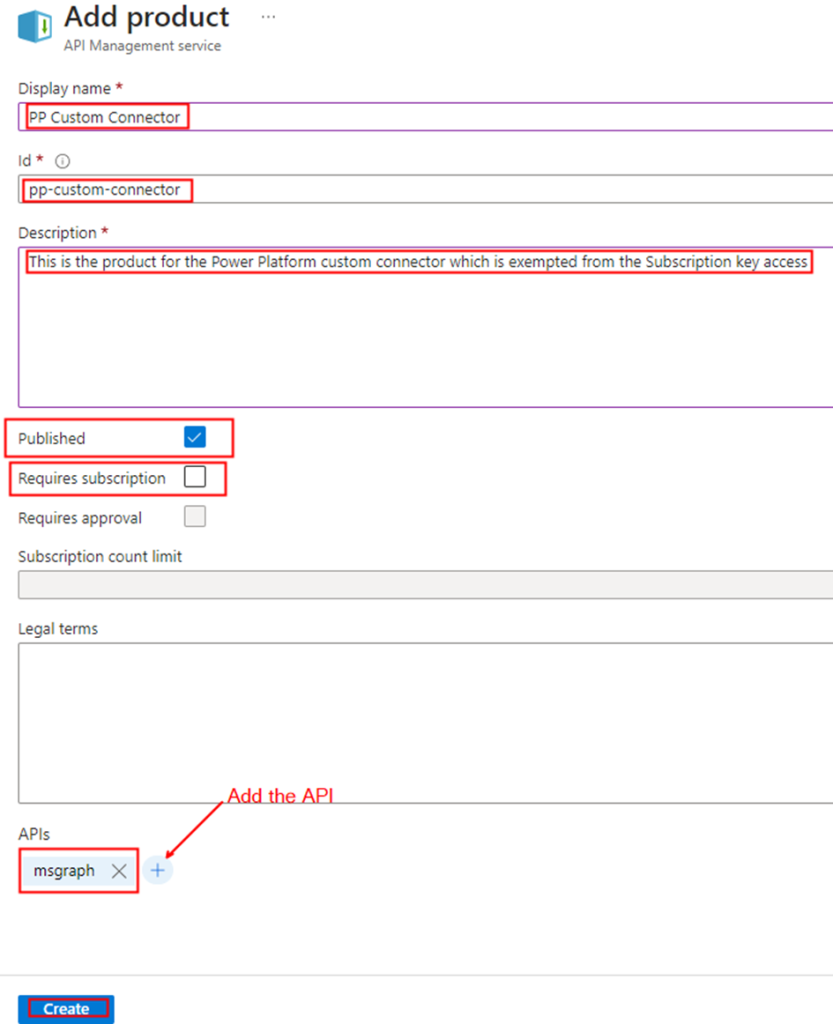
To enable the custom connector to generate tokens for API access from API Management, it’s necessary to associate the APIs with a Product that doesn’t require a subscription key. Follow these steps:

  • In the left navigation pane, go to Products and click on + Add.
  • Provide the Product Name, Description, uncheck the box Require subscription option, select the relevant API, and proceed to create the Product.

Testing the Custom connector:

Navigate to the Power Platform Maker portal and access the custom connector interface. Edit the connector to initiate the creation of a connection within the Test tab. Click on + New connection and click Create. Notably, you’ll observe that it doesn’t prompt for the API Subscription key, as discussed in the Part 2 of the article.

Once the connection is created, return to the edit mode of the custom connector to initiate testing of the actions. Navigate to the Test tab, where you can select the specific connection and choose the operation you wish to test. Test the operation and validate the results of the custom connector action.

Summary:

This concludes the blog series, where we delved into the secure access of Microsoft Graph APIs in Power Platform with the help of Azure API management, employing both Subscription keys and Entra ID OAuth authentication. Demonstrated the usage of managed identities in Power Platform, the methods explored here, particularly for securing Microsoft Graph API with application permissions, are adaptable for various services. Addressing the significant security risk of Broken Access Control, I have highlighted the importance of correctly implementing authentication mechanisms to prevent potential exploitation by attackers.

For those with existing Entra ID app registrations seeking to enhance security with API Management, the credential manager feature offers a solution. Utilizing the Grant Type Authorization code for Delegated Permission and Client Credentials for Application Permission ensures a comprehensive approach to safeguarding your applications and APIs. Hope you have found this informational & thanks for reading. If you are visiting my blog for the first time, please do look at my other blogposts.

Do you like this article?

Subscribe to my blog with your email address using the widget on the right side or on the bottom of this page to have new articles sent directly to your inbox the moment I publish them.