Streamlining Integration: Using Service Principal authentication on Custom connectors with Microsoft Graph Application Permissions

Microsoft recently announced a long awaited feature: support for Service Principals in Custom connectors which is currently in Public Preview. This empowers you to authenticate as a service principal instead of relying on user accounts. It’s a game-changer that paves the way for a multitude of scenarios, especially those requiring seamless, uninterrupted access for automated processes, free from the constraints of user involvement.

In one of my earlier posts, I discussed how to harness the power of Microsoft GRAPH API within custom connectors through delegated permission. In this article, I’ll delve into the step-by-step process of configuring service principal authentication in a custom connector for the Graph API with Application permissions to send emails. While I’ve chosen to focus on email communication, remember that you have the flexibility to opt for any of the supported Graph application permissions.

Setting up the Service Principal:

Let’s headover to the Microsoft Entra Admin center to register an AD App and grant the application permissions to send emails using the Graph API. Register an AD application with the following Application permission

Mail.Send: Send Mail as any user
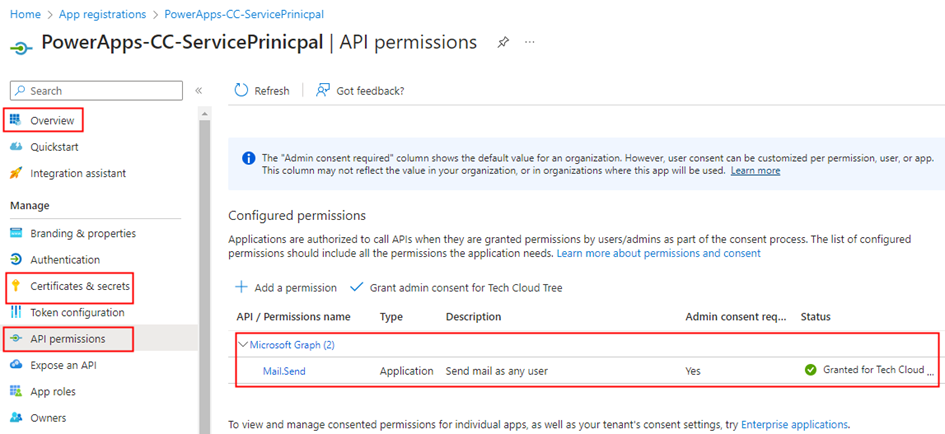
Retrieve the Client ID & Tenant ID from the Overview section of the Azure AD app, and then proceed to generate a secret within the Certificates & secrets section under the Manage blade. Once the secret is generated, copy its value for use within the custom connector configuration. Add a Web Redirect URI https://global.consent.azure-apim.net/redirect as shown below
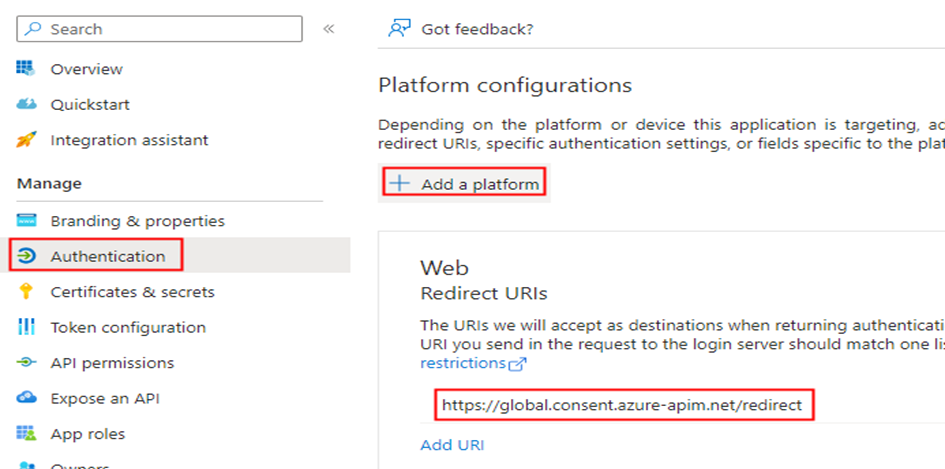
The Redirect URI is common and will be created while creating the custom connector.

Create Custom Connector:

With the service principal now created, let’s proceed to create the custom connector from the Power Apps maker portal. Choose the environment where you intend to create the custom connector. Navigate to Custom connectors on the left navigation menu, then click on + New custom connector and select Create from blank.

Once you’ve provided the connector name, you’ll be presented with the following screen. Enter graph.microsoft.com in the Host field and provide a brief description of the connector. Additionally, you have the option to customize the connector’s logo to your preference.
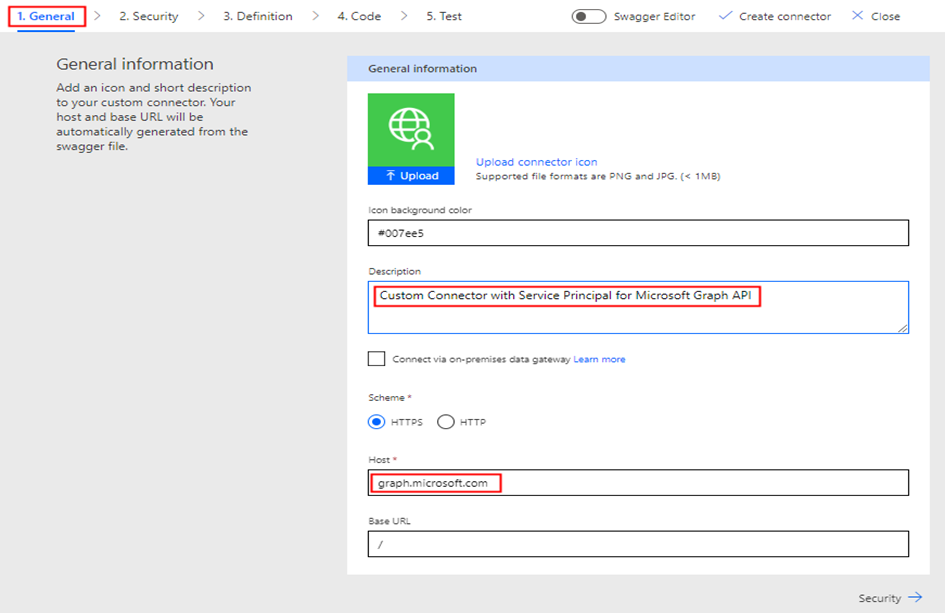
Now click Security at the lower-right corner of the above screen, which allows you to input the Azure AD application information for the service principal/App registration created earlier in the Entra Admin portal.

Here’s the step-by-step configuration:

  • Choose Authentication type as OAuth 2.0.
  • Change the Identity provider to Azure Active Directory.
  • Check the box Enable Service Principal support
  • Enter the Client ID and Client Secret from the Azure AD application.
  • Keep the Authorization URL as https://login.microsoftonline.com and Tenant ID as common.
  • Enter the Resource URL as https://graph.microsoft.com
  • For the Scope, specify Mail.Send based on the permissions you have added to the Azure AD app. If you have multiple permissions, separate them with spaces.

Once you’ve filled in this information, click Create connector. This action will automatically generate the Redirect URL as https://global.consent.azure-apim.net/redirect This URL should match the Redirect Web URI you previously added in the Azure AD application. With this configuration, your connector is now ready for the adding the actions based on the Graph API endpoints for sending emails.

Create Action to Send email:

With the connector successfully created, it’s time to create the action for sending emails. This action can be utilized in both Power Apps and Power Automate. The Graph API endpoint for sending emails is:

Http Request Mode: POST

Request URI: https://graph.microsoft.com/v1.0/users/{fromEmailAddress}/sendMail

The request parameter fromEmailAddress is to collect the information from the user while using the action

Request Body:

{
  "message": {
    "subject": "Mail sent using Custom Connector",
    "body": {
      "contentType": "Text",
      "content": "This is a sample email sent using Custom Connector which uses Service prinicipal"
    },
    "toRecipients": [
      {
        "emailAddress": {
          "address": "mailboxaddress@domain.com"
        }
      }
    ]
}
}

Proceed to the Definition tab of the Custom Connector. Here, select + New action, which will generate the following screen for you to enter information about the action.
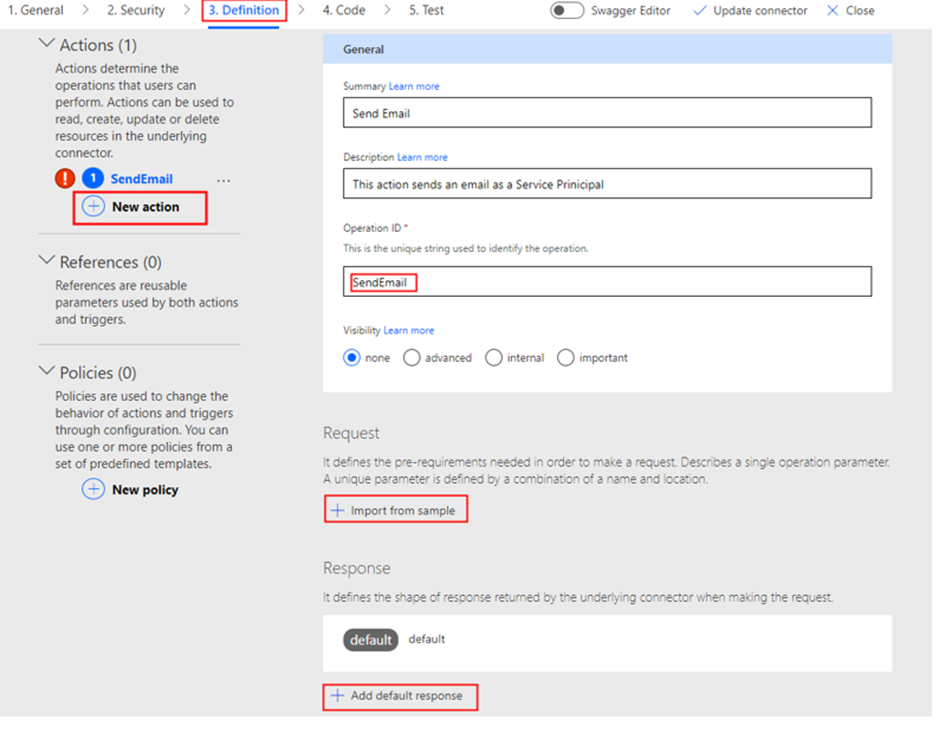
After the Summary, Description and Operation ID is entered. Click + Import from sample under the Request section to the enter the Graph API endpoint request details as shown below

Click Import on the screen above. You can optionally provide a sample response by entering details in the default response section in the Add Action interface which will help you identify objects in Power Apps if the request has a response. For more information, please refer to my earlier blog post, which I have referenced in the introduction section. Don’t forget to update the connector.

Create Connection:

Once the connector with the Send Email action is set up, you can now proceed to test the action for sending emails. The first step is to create the connection, navigate to the below interface and click on + New connection under the section Test and then on the following popup select the Authentication Type as Service Principal Connection.
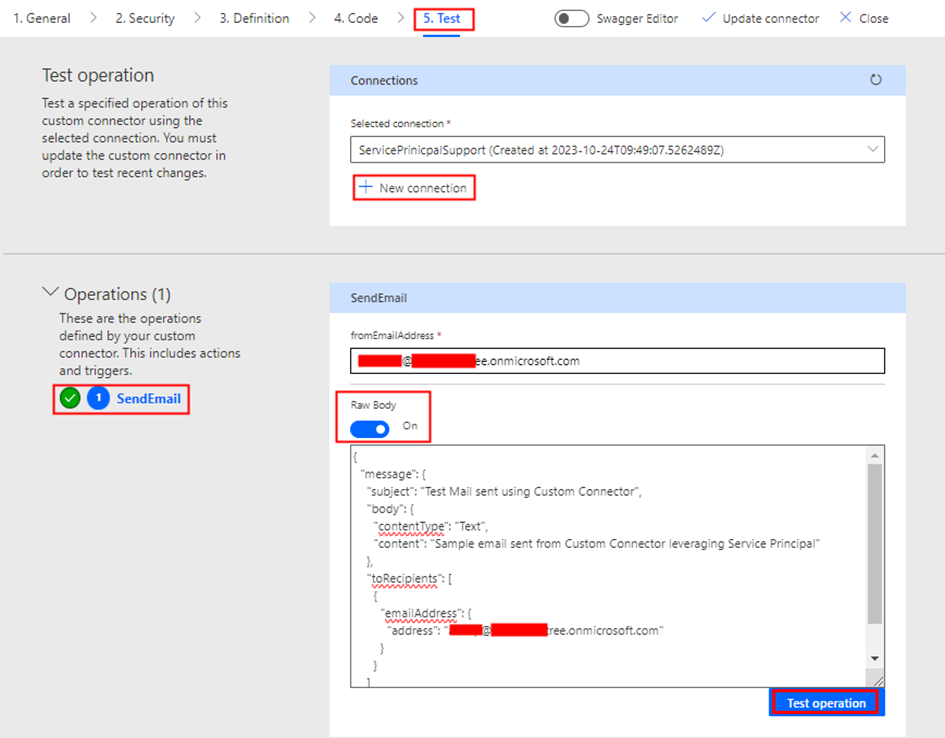
Enter the Client ID, Secret, and the Tenant ID you copied earlier to create the connection. You would now be able to test the action.

To use this in the Power Apps, after adding the connector, you would be able to call the action using the below code:

ServicePrinicpalSupport.SendEmail("fromEmailAddress@domain.com", {
        'message': {
            'subject': "Mail sent using Custom Connector from Power Apps",
            'body': {
                'contentType': "Text",
                'content': "Sample email sent from Custom Connector leveraging Service Principal"
            },
            'toRecipients': [
                {
                    'emailAddress': {
                        'address': "toUseraddrees@domain.com"
                    }
                }
            ]
        }
    });

The connections created uses the Authentication Type Explicit Authentication.

https://learn.microsoft.com/en-us/power-platform/admin/security/connect-data-sources#authenticating-to-data-sources

Sharing Connector:

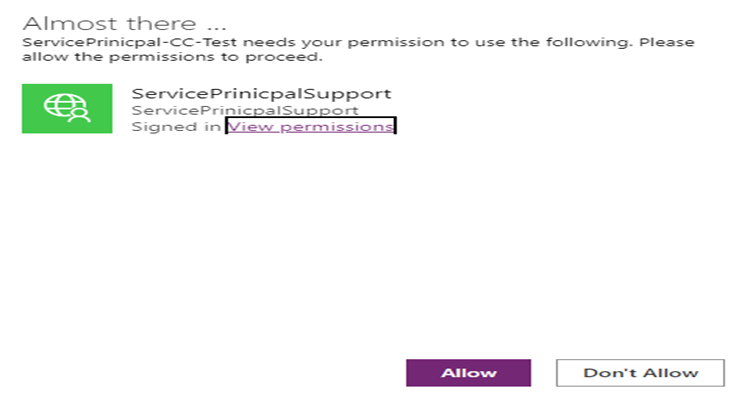
When the app is shared with the user, the user will not be prompted to create a connection; instead, the consent window below will appear to allow the connection. You can use the PowerShell command Set-AdminPowerAppsApiToBypassConsent if you want to bypass consent for the app users. The connection is shareable, allowing you to share it for editing, using, sharing, etc., with other users.
Authentication Flow:

The authentication flow for custom connectors enabled with Service Principal uses the OAuth 2.0 client credentials flow, while for the custom connectors without Service Principal authentication, the OAuth 2.0 Authorization code flow is used. Below, you’ll find the Swagger details for the custom connector, showing both scenarios for connecting to Microsoft Graph using OAuth2 with Azure Active Directory

Swagger definition for Service Principal AuthenticationSwagger definition for Non Service Principal Authentication
securityDefinitions:   oauth2-auth:     type: oauth2     flow: accessCode     tokenUrl: https://login.windows.net/common/oauth2/authorize     scopes:       Mail.Send: Mail.Send     authorizationUrl: https://login.microsoftonline.com/common/oauth2/authorize   oAuthClientCredentials:     type: oauth2     flow: application     tokenUrl: https://login.windows.net/common/oauth2/authorize     scopes:       Mail.Send: Mail.Send security:   – oauth2-auth:       – Mail.Send   – oAuthClientCredentials:       – Mail.SendsecurityDefinitions:   oauth2-auth:     type: oauth2     flow: accessCode     tokenUrl: https://login.windows.net/common/oauth2/authorize     scopes:       Mail.Send: Mail.Send     authorizationUrl: https://login.microsoftonline.com/common/oauth2/authorize security:   – oauth2-auth:       – Mail.Send

Summary:

In this blog post, I have shown you how to use Service principal authentication in custom connector with application permissions to send an email through the Graph API. You can apply this feature for any supported Microsoft Graph Application permission such as SharePoint, Exchange, Teams, Azure AD, and more. It’s a game-changer, making automated processes smooth and user-free. Hope you have found this informational & thanks for reading. If you are visiting my blog for the first time, please do look at my other blogposts.

Do you like this article?

Subscribe to my blog with your email address using the widget on the right side or on the bottom of this page to have new articles sent directly to your inbox the moment I publish them.

Send Teams Activity Feed notification from Power Automate using custom Teams Bot

Activity feed notifications appears in the Teams activity feed panel with link to various locations thus enabling developers to build actionable content. These notifications are sent as push notifications in the Teams client. In this blogpost, let us see how to send Teams activity feed notification using

  1. Custom Teams App with a Bot
  2. Power Automate standard action: Post a feed notification

Pre-Requisites:

Custom Teams App with a Bot:

Microsoft graph has API endpoints to send activity feed notifications to Teams users. The pre-requisite to use the activity feed graph endpoint is to have a custom Teams app scoped to a Team, or in a chat or user.

Step 1: Custom Teams App scoped to Team:

For this blogpost, I have used a custom Teams app scoped to a Team. Refer to the following blogpost to create a custom Team app scoped to a Team with a Bot capable of sending an Adaptive card message on a channel

Do not install the Teams App yet before completing the other steps given below. After the Teams bot is created, a custom Azure Active directory Application must be registered.

Step 2: Azure AD Application – Microsoft Graph Activity Feed permission:

Register an Azure AD application to add the Microsoft Graph permission to be send activity feed. Copy the Application (client) ID and Tenant Id of the registered app from the Overview section and create a secret from the Certificates & secrets under Manage blade per the screenshot shown below. Once the secret is created, copy the value to be used in the Power Automate cloud flow

Add the application permission TeamsActivity.Send with an admin consent.

Step 3: Link the AD app to the Teams App

The AD application with permission to send activity feed is created, the next step is to link the Teams app created in Step 1 with the AD app. In the Teams Developer portal, enter the Application (client) ID in the apps Basic Information under the Overview section as shown in the below screen shot

Don’t forget to Save the App in the Developer portal after the Application ID is entered. Now go to the App Features and then click Activity Feed notification as shown below

Click + Add an activity and enter the following information per the screenshot below

Type: informationBroadcasted

Description: Information Broadcasted Activity

Title: Notification from {actor} broadcasted by {broadcastedBy}

Click Save. The Teams app is now ready to be installed, follow the instructions here to install the bot in a Team for testing the Activity Feed notifications.

Power Automate Cloud Flow to send Adatpive card message and Activity Feed:

The Teams app is ready and now let’s create an Instant cloud flow with manual trigger to send an Adaptive card message to a Teams channel (General or any standard channel) and then Deep link to the adaptive card post in the Teams Channel to the activity feed notification.  I have used a Premium HTTP connector action to send the adaptive card using Bot Framework REST API. Go through the following post to send the Adaptive card

In the flow after the action HTTP-SendAdaptiveCardMessage, add a compose action with the following expression to get the Message ID of the Adaptive card channel message

body('HTTP-SendAdaptiveCardMessage')?['id']

Add two compose action to store the TeamIdorGroupId and TeamChannelID as shown below

Add a HTTP action (Premium) to send the activity feed to all Team members (Beta) using the Graph Activity Feed API. Find the details below for the HTTP request

Type: POST

URI: https://graph.microsoft.com/beta/teams/teamIdorGroupId/sendActivityNotification

Replace teamIdorGroupId from the compose action

Body:

{
  "topic": {
    "source": "entityUrl",
    "value": "https://graph.microsoft.com/v1.0/teams/@{outputs('Compose-TeamIdorGroupId')}/channels/@{outputs('Compose-ChannelID')}/messages/@{outputs('Compose-MessageId')}"
  },
  "activityType": "informationBroadcasted",
  "previewText": {
    "content": "Urgent Information"
  },
  "recipient": {
    "@odata.type": "microsoft.graph.teamMembersNotificationRecipient",
    "teamId": "@{outputs('Compose-TeamIdorGroupId')}"
  },
  "templateParameters": [
    {
      "name": "broadcastedBy",
      "value": "Mohamed Ashiq Faleel"
    }
  ]
}

If you are having issues (Invalid Expression) while saving the flow, add additional @ keyword in the recipient as shown below

Click Show advanced options in the HTTP action to enter the Authentication details. Enter the Client (Application) ID, Secret and Tenant Id from Step 2

Time to test the Power Automate flow. Find below the Activity Feed message for a Teams user

Note:

The Teams app can also be enabled with Resource Specific Consent, to do so in the Teams Developer portal click Permissions on the Left bar. In the section Team Permissions select TeamsActivity.Send.Group under Application. If you have done this, Step 2 is not required. I will cover this in a different blog post.

Power Automate standard action: Post a feed notification:

There is a standard Teams action Post a feed notification which creates an activity feed with/without Deep link to a chat or Teams Channel using the Power Automate Teams Bot. Find below the action

Summary:

Isn’t this powerful to have engaging and actionable content for the users in Teams. There can be many use cases which could be applied for this setup e.g: Notify user and deep link to a Power App added in Teams channel etc. Hope you have found this informational & thanks for reading. If you are visiting my blog for the first time, please do look at my other blogposts.

Do you like this article?

Subscribe to my blog with your email address using the widget on the right side or on the bottom of this page to have new articles sent directly to your inbox the moment I publish them.

Find the Microsoft 365 account license and service details for a user using Microsoft Graph API

Is there a need to find the type of Microsoft 365 license and the different services assigned for a user to troubleshoot an issue related to the service they have been assigned? You have come to the right place, this post will help you find the details using the Microsoft Graph API endpoints. In Microsoft 365, licenses from licensing plans also known as SKUs give users access to the Microsoft 365 services that are defined for those plans. To find the details, there are endpoints in Graph which gives you those details

GET https://graph.microsoft.com/v1.0/me/licenseDetails

GET https://graph.microsoft.com/beta/me

Microsoft Graph Explorer:

There are various tools to make request against different graph endpoints but here I will be using Microsoft Graph Explorer tool.

After you login to Microsoft Graph Explorer tool, make a request to any of the above given endpoints. Find below screenshot for the GET request to the endpoint me/licenseDetails

In the above picture, the sku Id is nothing but the Microsoft 365 license plan and the service plans array shows list of the Microsoft 365 Services (SharePoint, Power Apps, Power Automate, Exchange, Yammer etc) enabled for the user. If there are multiple license assigned for the same user then you get the list as an array with different skuid’s.

For reference, here are some of the most common sku id information that you might need:

NameID
Office 365 E118181a46-0d4e-45cd-891e-60aabd171b4e
Microsoft 365 E305e9a617-0261-4cee-bb44-138d3ef5d965
Microsoft 365 E506ebc4ee-1bb5-47dd-8120-11324bc54e06
E5 Developer Licensec42b9cae-ea4f-4ab7-9717-81576235ccac
Microsoft 365 F117b4a1d6-2c65-478e-a046-51cf40d25d76
Power BI (Free)a403ebcc-fae0-4ca2-8c8c-7a907fd6c235
Flow Freef30db892-07e9-47e9-837c-80727f46fd3d

Here are some of the most common Service plan Id information:

NameID
SharePoint Online5dbe027f-2339-4123-9542-606e4d348a72
Yammer7547a3fe-08ee-4ccb-b430-5077c5041653
Power Apps9c0dab89-a30c-4117-86e7-97bda240acd2
Power Automate07699545-9485-468e-95b6-2fca3738be01
AAD Premium 2eec0eb4f-6444-4f95-aba0-50c24d67f998
Exchange Onlineefb87545-963c-4e0d-99df-69c6916d9eb0

For more information on the different Microsoft 365 license & service details, refer the below link

https://docs.microsoft.com/en-us/azure/active-directory/enterprise-users/licensing-service-plan-reference

The beta/me endpoint also gives information on the licenses & service plans:

To get this information for a different user, make a get request to the following endpoint with the user ID

To get the information for all users in your tenant

https://graph.microsoft.com/beta/users?$select=id,displayName,assignedLicenses,assignedPlans

If your tenant has more users, consider looking at the following documentation

https://docs.microsoft.com/en-us/graph/paging

Office Profile:

The information can also be accessed from your Office Profile, after logging in to the Office.com

  • Click the Profile icon and then click View account which will take you to the below screen shown on the left side

Now click Subscriptions which will show the all the different SKU’s assigned to you & the different service plan’s. Refer to the above picture on the right side.

PowerShell:

To access this information with PowerShell, refer the following documentation:

https://docs.microsoft.com/en-us/microsoft-365/enterprise/view-account-license-and-service-details-with-microsoft-365-powershell?view=o365-worldwide

Reference:

https://docs.microsoft.com/en-us/graph/api/user-list-licensedetails

https://docs.microsoft.com/en-us/azure/active-directory/enterprise-users/licensing-service-plan-reference

Summary: On this post we have seen how to get information on the assigned Microsoft License & services details for a user. Hope you like this article & find it informational.

Batch SharePoint requests [GET, POST, PATCH, DELETE] in PowerAutomate and MS Graph

Batching helps you in optimizing the performance of your application by combining multiple requests into a single request. SharePoint Online & MS Graph APIs supports the OData batch query option. Batch requests MUST be submitted as a single HTTP POST request to the batch endpoint of a service as below for

The request body of the above POST request must be made up of an ordered series of query operations [GET] and/or ChangeSets [POST or PATCH or DELETE]. You can have different combination of change sets.

In this blog post, I am going to show you how to batch multiple SharePoint requests for Creating, Reading, Updating & Deleting List items in

  1. PowerAutomate
  2. MS Graph

Pre-Requisites:

Have the following items ready to follow along this post

  1. SharePoint Site
    1. Site Id [GUID of the Site]
    2. Create a SharePoint List by the Name EmployeeInformation with the schema
      1. Title [Default]
      2. Location [Custom: Single Line of Text]
    3. List Id [GUID of the above list]
  2. Graph Explorer to test the Graph batching

Batch SharePoint requests in PowerAutomate:

If there is a requirement for multiple requests to be performed in SharePoint from your flow, the batch request with SharePoint Online REST API helps in reducing the execution time of your flow by combining many operations into a single request to SharePoint. Create an Instant Flow with trigger “Manually trigger a Flow” and the action Send an HTTP request to SharePoint to send the batch requests.

Lets now prepare the parameters to be passed for the Send an HTTP request to SharePoint action:

Site Address: https://mydevashiq.sharepoint.com/sites/test77

Method: POST

Headers:

  • Key: accept Value: application/json;odata=verbose
  • Key: content-type Value: multipart/mixed; boundary=batch_cd329ee8-ca72-4acf-b3bf-6699986af544

The boundary specification with batch_guid used on the content type header can be any random guid. In the request body the batch_guid will be used. To understand more about the OData batch operation, go through this documentation.

Body:

The request body given below is for reading all the items [GET], creating a list item, deleting an existing item & updating an existing item on the EmployeeInformation List using REST API endpoints. A ChangeSet (random guid) is used to group one or more of the insert/update/delete operations and MUST NOT contain query operations [GET]. For the query operation there must be separate batch as per the example below

--batch_cd329ee8-ca72-4acf-b3bf-6699986af544
Content-Type: application/http
Content-Transfer-Encoding: binary

GET https://domain.sharepoint.com/sites/sitename/_api/web/lists/GetByTitle('EmployeeInformation')/items?$select=Title,Location HTTP/1.1
Accept: application/json;odata=nometadata

--batch_cd329ee8-ca72-4acf-b3bf-6699986af544
Content-Type: multipart/mixed; boundary="changeset_64c72699-6e7c-49c4-8d9b-6b16be92f7fc"
Content-Transfer-Encoding: binary

--changeset_64c72699-6e7c-49c4-8d9b-6b16be92f7fc
Content-Type: application/http
Content-Transfer-Encoding: binary

POST https://domain.sharepoint.com/sites/sitename/_api/web/lists/GetByTitle('EmployeeInformation')/items HTTP/1.1
Content-Type: application/json;odata=verbose

{
    "__metadata": {
      "type": "SP.Data.EmployeeInformationListItem"
    },
    "Title": "Mohamed Shaahid Faleel",
    "Location": "England"
}

--changeset_64c72699-6e7c-49c4-8d9b-6b16be92f7fc
Content-Type: application/http
Content-Transfer-Encoding: binary

DELETE https://domain.sharepoint.com/sites/sitename/_api/web/lists/GetByTitle('EmployeeInformation')/items(37) HTTP/1.1
If-Match: *

--changeset_64c72699-6e7c-49c4-8d9b-6b16be92f7fc
Content-Type: application/http
Content-Transfer-Encoding: binary

PATCH https://domain.sharepoint.com/sites/sitename/_api/web/lists/GetByTitle('EmployeeInformation')/items(30) HTTP/1.1
Content-Type: application/json;odata=nometadata
If-Match: *

{
    "Title": "Mohamed Faleel",
    "Location": "USA
}

--changeset_64c72699-6e7c-49c4-8d9b-6b16be92f7fc--

--batch_cd329ee8-ca72-4acf-b3bf-6699986af544--

Once the above action is executed the response can be parsed to get the required information if you’ve used a GET request as per this documentation from Microsoft. PFB the screenshot of the action

The request body can be generated dynamically based on the requirement.

Batch SharePoint requests in MS Graph:

As we have done batching using the SharePoint REST APIs, in a similar manner you can combine multiple requests in one HTTP call using JSON batching for MS Graph. Here I will use the MS Graph explorer to test the batch request. Find the request parameters

Endpoint URL: https://graph.microsoft.com/v1.0/$batch

Method: POST

Body:

I’ve used the Site Id and List Id for the EmployeeInformation list to construct the SP endpoint URL’s as per the documentation for Creating, Reading, Updating & Deleting SP list items.

{
    "requests": [
      {
        "id": "1",
        "method": "POST",
        "url": "/sites/{77b3a8c8-549f-4848-b82c-8bb6f4864918}/lists/{2f923934-d474-4473-8fc0-3486bd0c15c5}/items",
         "body": {
          "fields":{"Title":"Test from Graph","Location":"Oslo"}
        },
        "headers": {
          "Content-Type": "application/json"
        }
      },
      {
        "id": "2",
        "method": "GET",
        "url": "/sites/{77b3a8c8-549f-4848-b82c-8bb6f4864918}/lists/{2f923934-d474-4473-8fc0-3486bd0c15c5}/items"
      },
      {
        "id": "3",
        "url": "/sites/{77b3a8c8-549f-4848-b82c-8bb6f4864918}/lists/{2f923934-d474-4473-8fc0-3486bd0c15c5}/items/44",
        "method": "PATCH",
        "body": {
            "fields":{"Title":"Mohamed Ashiq Faleel","Location":"Stockholm"}
        },
        "headers": {
          "Content-Type": "application/json"
        }
      },
      {
        "id": "4",
        "url": "/sites/{77b3a8c8-549f-4848-b82c-8bb6f4864918}/lists/{2f923934-d474-4473-8fc0-3486bd0c15c5}/items/50",
        "method": "DELETE"
      }
    ]
  }

On a same way you can batch different APIs endpoint from MS Graph. JSON batching also allows you to sequence the requests. Find below the screenshot from Graph explorer

Graph explorer also generates code snippets for the different programming languages

JavaScript Code snippet

Summary: On this post we have seen how to batch SharePoint requests using PowerAutomate & MS Graph. Microsoft has used request batching on many first party features. Hope you have found this informational & helpful in some way. Let me know any feedback or comments on the comment section below

Access Active Directory user profile attributes using Graph API

Using graph API you can access all the Active directory attributes. The me endpoint gives your profile information https://graph.microsoft.com/v1.0/me. To get a specific user’s information the endpoint should be https://graph.microsoft.com/v1.0/users/useremailaddress

For getting any specific AD attribute you can pass the required attribute as a query string https://graph.microsoft.com/v1.0/me?$select=jobTitle,department,displayName

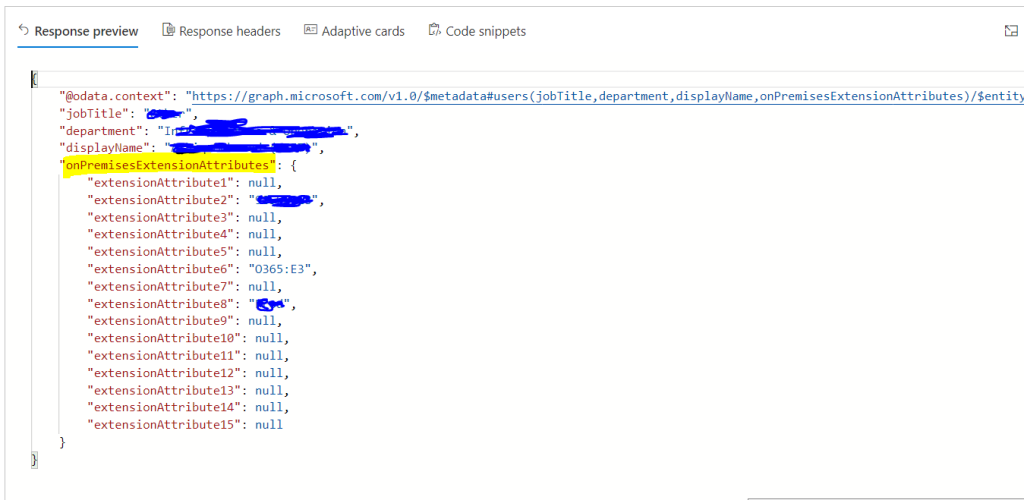
In bigger active directory implementation, there will also be information stored on the Extension attributes, to get the information you will have to pass the name of the attribute “OnPremisesExtensionattributes” as a query string in the format as

 https://graph.microsoft.com/v1.0/me?$select=jobTitle,department,displayName, OnPremisesExtensionattributes

Graph explorer is a nice tool to test the Graph endpoints. Refer the documentation from Microsoft on the different available AD endpoints

Graph Explorer

The beta ME endpoint https://graph.microsoft.com/beta/me gives more information of the user

The User profile service Rest API endpoint in SharePoint http://siteurl/_api/SP.UserProfiles.PeopleManager/GetMyProperties does not provide all the active directory information. For e.g Location, OnPremisesextensionAttributes etc information is not available. SharePoint UPS synchronizes the AD data of all users in schedule basis. So the other option is to use the Graph Endpoint if you need those information for your application customization.

Endpoint point to get a specific attribute is

https://siteURL/_api/SP.UserProfiles.PeopleManager/GetMyProperties?$select=PictureUrl,AccountName

For more information about different endpoint, refer this documentation from Microsoft.

@ mention user & channel in Teams using MS Graph API

There are ways to @mention a user while posting a conversation in Teams channel using flow action but as far as I know its not possible as of now to @mention a Teams channel using Flow actions. In this post, I will show you how to @mention a channel & user using a POST call to a MS Graph beta endpoint. To construct the endpoint URL you will need to know the TeamID & ChannelID, to get the information go to Teams > click the three dots > click Get link to channel > Copy the URL

Now decode the copied url, I’ve used Meyerweb Decoder. Your url will look something like below

End Point URL: https://graph.microsoft.com/beta/teams/groupIDorTeamID/channels/Channel ID/messages

Method: POST

Request Body:

{
 "importance": "high",
  "subject": "@Mention in Teams channel post!",
  "body": 
  {
    "content": "Hello <at id ='0'>Channel Name</at>, Test message on the channel with at mention.",
    "contentType": "html"
  },
  "mentions": [
    {
      "id": 0,
      "mentionText": "Channel Name",
      "mentioned": {
                        "conversation": {
                            "id": "ChannelID",
                            "displayName": "Channel Name",
                            "conversationIdentityType@odata.type": "#Microsoft.Teams.GraphSvc.conversationIdentityType",
                            "conversationIdentityType": "channel"
                        }
      }
    }
  ]
}

I’ve used Graph explorer to test the endpoint, if you have not signed in do sign in

Once you run the query on the explorer, you will see the Post in Channel with at mention as shown below

To @mention a user using Graph API, the endpoint is same as before but the request body has some changes as shown below

Request Body:

{
  "body": {
    "contentType": "html",
    "content": "Hello World User Display Name"
  },
  "mentions": [
    {
      "id": 0,
      "mentionText": "User Display Name",
      "mentioned": {
        "user": {
          "displayName": "User Display Name",
          "id": "UserID",
          "userIdentityType": "aadUser"
        }
      }
    }
  ]
}

To get your UserID, you can use the endpoint https://graph.microsoft.com/v1.0/me/

Reference: https://docs.microsoft.com/en-us/graph/api/channel-post-messages?view=graph-rest-beta&tabs=http

Summary: The endpoint which has been used in this post are beta endpoints. Graph API can be easily called using Power Automate, if you need some example on using a Graph API refer this post. Hope you find this post useful & informational. Let me know if there is any comments or feedback below.

Post a Teams Conversation on a Channel using API call/HTTP Request

On this blog post, I am going to cover different options to post a Teams conversation in a Teams channel using API call.

  • Using a Flow with HTTP Request trigger & Flow action
  • Create an Incoming Webhook in Teams
  • Graph Endpoint to create a Teams conversation

I do now see more requirements from customer to integrate Teams with different applications. These options for posting a message in a Teams channel could be to used on an External application or from a SharePoint Site using SPFx.

Create a Flow with HTTP Request trigger

Create an Instant flow with Trigger “When a HTTP request is received” a premium trigger which gets triggered to a HTTP request. This is a responsive trigger as it responds to an HTTP Request. The structure of the requests/responses that Microsoft Flow uses is a RESTful API web service known as REST. The API or HTTP post URL will be generated only after the flow is saved with at least one action.

Let’s say I would like to post a Teams conversation with @mention to a specific user and some message. In this case I will have to pass the information either in Parameters or on the body of the call. On this example we will be passing the information on the request Body

{
    "To":"ashiqf@####.onmicrosoft.com",
    "Message": "Hello from HTTP Request"
}

Copy the above sample and paste it on the popup you get after clicking on Generate Schema. The tool will automatically generate the JSON schema for you. Also jsonschema.net could be used to generate the schema

Find the generated schema below for the information email address & message which would be passed on the request body while making the POST call

Add the action “Post a message as the Flow bot to a channel”, this will create a Teams conversation on a specific channel in a Team. On the below screenshot, look at the way I am doing @mention to a user, leaving a New line & making a text appear Bold

After you save the flow, the HTTP Post URL will be generated for us to use in an external application or where ever we want. The API is not secured its anonymous. Lets now use Postman client to trigger. Don’t forget to set the headers for content-type to application/json, Information on the body & method to POST else the trigger will fail

After the Post button is clicked on Postman client which would then trigger the flow. The message on Teams channel will appear as shown below

In Postman client, there is an option to generate the code to call the API for different programming languages

As already said, the HTTP post URL is anonymous. If you would like to secure the flow actions, you could do it after the flow is triggered with some validations. If you look at the output from the Flow run for the Trigger, there is information on the field “User-Agent”, with this information you would able to add some validations

Create an Incoming Webhook in Teams for a Specific channel

Incoming webhooks could be used to create Teams Conversations on a specific channel on a team. It’s special type of Connector in Teams that provides a simple way for an external app to share content in team channels

To create a Webhook, go to the Teams channel where you would like to have the conversation posted. Click connectors

Create Webhook

Look for Incoming Webhook from the list of connectors then click Add

Provide a Name for the webhook and click Create. Now the URL will be generated, click Done

The generated URL will be on this format, get this copied

I will now use post man to create a conversation in Teams, it has to be Post request with the information passed on the Body. The header information is not required for this POST call

{"text":"<b>Post using Incoming Webhook</b><br>Message from External Application!"}
Postman Client
Teams Channel conversation

Ref: https://docs.microsoft.com/en-us/microsoftteams/platform/webhooks-and-connectors/how-to/add-incoming-webhook

Refer the below Microsoft documentation which has some example to create an Adaptive card in teams

https://docs.microsoft.com/en-us/microsoftteams/platform/webhooks-and-connectors/how-to/connectors-using

Graph Endpoint to create a Teams conversation

There is also endpoint (REST) available in MS-Graph to post/create a Teams conversation. The time I am writing this post, its a Beta endpoint and its not recommended for production use

POST /teams/{id}/channels/{id}/messages

The ID of the Teams and the Channel ID must be passed along with the bearer Token to create a team’s conversation. To get the bearer token create a Azure AD app with API permissions for Graph to create a message. The permission could be either Delegated or Application permissions based on the requirement. There are lot of articles which covers the steps to create an App in Azure so am not going to cover those in this post.

Ref: https://docs.microsoft.com/en-us/graph/api/channel-post-messages?view=graph-rest-beta&tabs=http

Summary:

I’ve described different ways to create team’s conversation using API calls. Hope you find this post informative & useful. If you have any comments or questions, let me know on the comment section.

Get attendees details of a meeting event using Power Automate/MS Flow

Its fairly easy to create an event using Power automate in Office 365 Outlook using the action Create Event but there is no action to get the attendees details on who has Accepted, tentatively accepted, Declined & No response if you are trying to automate.

MS Graph comes to the rescue to get the attendees details, there is an endpoint available to fetch the attendee’s details of an outlook event.

Let’s assume you are creating Outlook Event using flow action Create Event which has a connection using a different account (For e.g a service account with mailbox enabled). After the event is created the Event ID (Unique ID of an Event) is stored on a SharePoint Custom list or SQL etc to get the attendees information.

Before you start, you need to make sure you have the following:

  • Access to an Office 365 tenant with administrative access to Azure AD
  • Access to create flows in Microsoft Flow

Step 1 – Create an Application in Azure AD with API permissions to Calendar

You will need to register an application within Azure AD.

Navigate to Azure Active Directory from https://portal.azure.com and select App registrations. Select New registration. I am not going to list the steps required to create an Application in Azure AD, there are lot of blog posts & Microsoft articles which covers the steps. For this requirement, Redirect URI is not required to filled on the Azure app.

To get authorized to call Microsoft Graph in Power Automate/MS Flow, we’ll need the following information:

  • Tenant ID
  • Client ID
  • Client secret
  • API Permission to Read Calendar
  • Token Endpoint

Once the application is created, go to the API Permissions. To configure application permissions for the AD app to get the event information, API permission to the Calendar is required. Find the steps below to grant read permission to the calendar

  1. Click on the API Permissions menu item in the navigation panel.
  2. Click on the Add a Permission button.
  3. Click Microsoft Graph under the tab Microsoft APIs.
  4. Click on the Application Permissions button.
  5. Expand the Calendars section.
  6. Select the Calendars.Read option. This step gives access to the app for reading all the calendars in the mailboxes across the tenant.
  7. Click on the Add Permissions button.
  8. Click on the Grant Admin Consent button.
  9. Click on the Yes button to confirm consent.
API Permissions on the AD App

I use the Graph Explorer https://developer.microsoft.com/en-us/graph/graph-explorer# to test & explore different endpoints.

This explorer will not work for delegated permissions since it uses your permissions to access the API endpoint but you can use Postman to test the graph endpoint with the Oauth authentication.

Find the documentation for the different endpoints available for Calendar in the link

For this requirement we are interested in the following HTTP request/endpoint to the get details of a different user using the version 1.0

GET /users/{id | userPrincipalName}/calendar/events/{id}

Step 2 – Create a Flow

With the Azure AD application created, you have to create a flow using it. You could even create a Azure logic Apps. Find the steps below to create a scheduled flow

First, go to https://flow.microsoft.com and go to My flows. Select New > Create Scheduled-from blank to create a new flowThis flow will be running on scheduled basis to get the attendees details.

Flow Trigger

Call the token endpoint of the tenant’s Azure AD which will provide us an access token for Microsoft Graph in return for the information contained in the request body. Use the Flow action HTTP which is premium action to make a HTTP post request for getting a token.

Before we construct the HTTP request, we need encode the client secret to avoid having URL unsafe characters:

encodeUriComponent(variables('ClientSecret'))
The HTTP methodPOST
The request URLhttps://login.microsoftonline.com/your tenant id/oauth2/v2.0/token
The Content-Type headerapplication/x-www-form-urlencoded
The request bodytenant=tenantID&client_id=clientID&client_secret=@{decodeUriComponent(variables(‘ClientSecret’))}&grant_type=client_credentials&scope=https://graph.microsoft.com/.default

The token endpoint URL can be obtained from the AD App by clicking on the Endpoint link as shown below

Active Directory App – Overview
HTTP Action

When the above HTTP request is made, we get authenticated, and in the response, we’ll receive the access token for calling Microsoft Graph. Before we can use the access token, we need to parse the JSON in the response body to make the token available to us in the dynamic content panel

The next step is to the parse the JSON response of the HTTP – Get Access token action and get the token type and access token to make a call to the Graph endpoint. To do this Add the action Parse JSON

  • The Content has to be the Body of the action HTTP – Get Access token and to build the schema.
  • Run the flow, copy the outputs [Body] of the action HTTP – Get Access token
  • Click the button Generate from Sample, paste the Body and click Done. These steps will generate the schema automatically
Parse JSON Action

The next step is to call the Graph endpoint using the HTTP action with the token type & access token on the Headers obtained from the above method

GET URI: https://graph.microsoft.com/v1.0/users/useremailaddress/calendar/events/eventID/attendees

Event ID should be the ID of the event you would like to get the attendees information and Headers information is constructed from the Parse JSON – Access token.

Run the Flow, you will now have the attendee’s information in the JSON format as shown below. The JSON will have information about the users details and the responses. JSON Parse action could be used to parse the JSON and get the information as per the requirement

Hopefully you enjoyed reading this article and find it useful.