Call Microsoft Graph API using a certificate in a Power Automate HTTP connector

In this blog article, let us see how to call a Microsoft Graph API as an application in a Power Automate HTTP connector using a certificate credentials instead of a secret from the Azure Active directory application. Microsoft recommends using a certificate (instead of a client secret) as a credential for a higher level of assurance. Find below the list of actions to enable calling the Graph API using certificate credentials

  1. Creation of Self-Signed certificate
  2. Application Registration in Azure AD Portal
  3. Creation of Power Automate cloud flow with the HTTP Connector
    • Method 1: Without using Azure Key Vault
    • Method 2: Azure Key Vault to store Certificate

Pre-Requisites:

Creation of Self-Signed certificate:

The first step is to create a certificate. A self-signed certificate can be created by using the Windows PowerShell command New-SelfSignedCertificate or PnP PowerShell command New-PnPAzureCertificate. The self-signed certificate will be used in the Azure AD application. Find below PnP PowerShell command to create the certificate with the default validity of 10 years and secured with a password.

New-PnPAzureCertificate -CommonName "MSFlow Certificate" -OutPfx MSFlow.pfx -OutCert MSFlow.cer -CertificatePassword (ConvertTo-SecureString -String "pass@word1" -AsPlainText -Force)

From the above screenshot, the certificate files MSFlow.pfx and MSFlow.cer will be available on C:\Users\ashiq\Desktop\Projects\PowerAutomate. Copy the PfxBase64 and the password which will be used in the HTTP connector while calling the Graph API. To get the details of an existing certificate, the PnP command

Get-PnPAzureCertificate -Path "MSFlow.pfx" -Password (ConvertTo-SecureString -String "pass@word1" -AsPlainText -Force)

If you already have a self-signed certificate available, find the below command to convert the certificate to PfxBase64 encoding

$fileContentBytes = get-content 'C:\Users\ashiq\Desktop\Projects\PowerAutomate\MSFlow.pfx' -Encoding Byte
[System.Convert]::ToBase64String($fileContentBytes) | Out-File 'PfxBase64.txt'

Application Registration in Azure AD Portal:

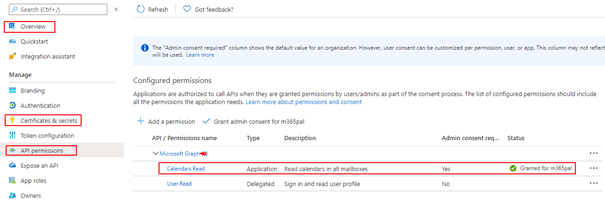
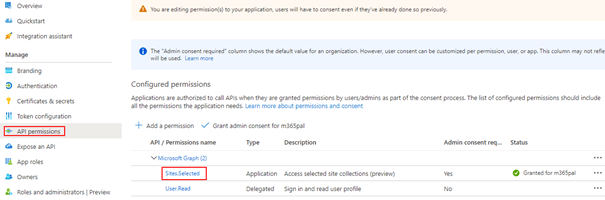
Register an application in Azure AD and obtain the client id & tenant id for the registered application. In this example I have added the Application permission with Admin Consent to access all the recent events of a user from Outlook.

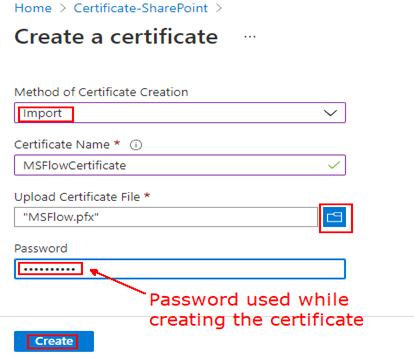
To add the above created self-signed certificate, click Certificates & secrets under the Manage blade. Click Upload certificate > Select the certificate file MSFlow.cer > Add

Once the certificate is added successfully, you would be able to see the certificate Thumbprint with the Start date & Expiry date

Creation of Power Automate cloud flow with the HTTP Connector:

Let us see below how to access a Microsoft Graph API with & without using the Azure Key Vault.

  1. Method 1: Without using Azure Key Vault
  2. Method 2: Azure Key Vault to store Certificate

Method 1: Without using Azure Key Vault

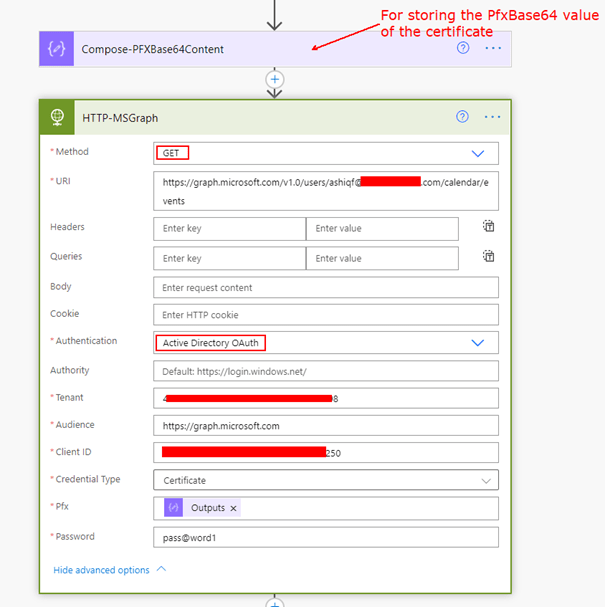
In the cloud flow, add a Compose action to store the PfxBase64 value copied during the creation of the certificate. Now add the HTTP action to get the users events from the default calendar

Request Type: GET

URL: https://graph.microsoft.com/v1.0/users/{id | userPrincipalName}/calendar/events

Authentication: Active Directory OAuth

  • Tenant: TenantId
  • Audience: https://graph.microsoft.com
  • Client ID: Azure AD Client Id
  • Pfx: Output of the compose action
  • Password: Certificate password during the creation Find below screenshot for your reference

Find below screenshot for your reference

Run the flow, it should be able to get the outlook events as an application for the given user.

Method 2: Azure Key Vault to store Certificate

Azure Key Vault is a cloud service for storing and accessing secrets enabling your applications accessing it in a secure manner. Follow this article to upload the above generated certificate to the Azure key vault.

After the certificate is uploaded to the Azure Key Vault, with the help of the premium Azure Key Vault connector you would be able to access & use the secret in your cloud flow or logic app.

Step 1: Add the action Get secret in the flow. After entering the name of the Key Vault and the sign button is clicked, the connection would be established.

If you have any issues establishing a successful connection to the Azure Key Vault in your Power Automate cloud flow, refer to the blog post https://ashiqf.com/2021/07/18/azure-key-vault-in-power-automate-cloud-flow-could-not-retrieve-values/

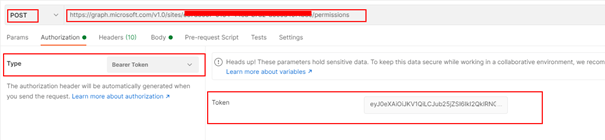
Step 2: Select the certificate name from the list of secrets. Add the HTTP action with the details below

Request Type: GET

URL: https://graph.microsoft.com/v1.0/users/{id | userPrincipalName}/calendar/events

Authentication: Active Directory OAuth

  • Tenant: TenantId
  • Audience: https://graph.microsoft.com
  • Client ID: Azure AD Client Id
  • Pfx: Output of the action Get secret from the dynamic content
  • Password: null should be added from the expression right next to dynamic content.

Run the flow, it should work as intended. Refer to my other blog posts related to Microsoft Graph API in Power Automate:

Call Microsoft Graph API as a daemon application with application permission from Power Automate using HTTP connector

Call Microsoft Graph API in Power Apps and Power Automate using a Custom connector

Call Microsoft Graph API as a signed in user with delegated permission in Power Automate or Azure Logic apps using HTTP Connector

Batch SharePoint requests [GET, POST, PATCH, DELETE] in PowerAutomate and MS Graph

Summary:

There are different authorization flows available in Microsoft Graph which could be leveraged based on needs. If you are visiting my blog for the first time, please do look at my other blogposts.

Do you like this article?

Subscribe to my blog with your email address using the widget on the right side or on the bottom of this page to have new articles sent directly to your inbox the moment I post them.

Call Microsoft Graph API as a daemon application with application permission from Power Automate using HTTP connector

With the assumption that you already know about Microsoft Graph and its capabilities I will directly jump in with the steps and instructions to call Microsoft graph Endpoints as a daemon app using Application permissions with the help of HTTP connector. Calling graph from a flow opens a wide range of possibilities which are not available with the prebuilt connectors. As of now you will not be able to call Microsoft graph with application permissions using a custom connector.

Pre-Requisites:

  • Access to HTTP Premium Connector in Power Automate
  • Access to register Azure AD Application in Azure AD Portal

Application Registration in Azure AD Portal:

Register an application in Azure AD and obtain the client id, client secret & tenant id for the registered application. In this example I have added the Application permission Calendars.Read to access all the recent events of a user from Outlook.

It is not required in the Azure AD application to have a redirect URI.

Power Automate Flow:

It is now time to generate the graph token using the HTTP connector in flow which is a pre-requisite to call the Graph API endpoint. The only authentication flow to generate a access token for application permissions is Client credentials.

To generate a token

  1. Store the Client Secret on a String variable
  2. Make a HTTP request using the HTTP connector with the following details. Make sure to replace the string for tenantId, azureAdAppclientId and azureAdAppclientSecret

Method 1:

Add a HTTP connector action to the flow for making a POST request per the following information

HTTP Method: POST

URI: https://login.microsoftonline.com/yourtenantId/oauth2/v2.0/token

Headers: Content-Type: application/x-www-form-urlencoded

Body:

Replace the tenantId, client id and client secret from the variable

tenant=yourtenantId&client_id=azureAdAppclientId&client_secret=@{decodeUriComponent(variables('azureAdAppclientSecret'))}&grant_type=client_credentials&scope=https://graph.microsoft.com/.default

For the client secret make sure to URL encode using the expression encodeUriComponent(variables(‘clientSecret’)) else the request will fail due to the presence of special characters.

To extract the token from the above request, add the parse JSON action with Content from the HTTP request body and the following schema

{
    "type": "object",
    "properties": {
        "token_type": {
            "type": "string"
        },
        "scope": {
            "type": "string"
        },
        "expires_in": {
            "type": "integer"
        },
        "ext_expires_in": {
            "type": "integer"
        },
        "access_token": {
            "type": "string"
        },
        "refresh_token": {
            "type": "string"
        }
    }
}

Add the Body from the dynamic content from the HTTP – GET Token action to the content of the Parse JSON action

Include the access token from the Output of the Parse JSON action when calling the Microsoft Graph API on the Headers sections as shown below

To get the users events from the default calendar

https://graph.microsoft.com/v1.0/users/{id | userPrincipalName}/calendar/events

Method 2:

You can also make a request to Graph API using the Active Directory OAuth Authentication under the advanced options of the action as shown below

My other blog post to call Microsoft graph API in Power Apps and Power Automate using a custom connector.

Summary: I have written a blog to get the attendee details of a meeting using this approach to Microsoft graph event endpoint API. Hope you have found this informational & thanks for reading. If you are visiting my blog for the first time, please do take a look at my other Microsoft graph in Power Automate blogposts.

How to use Microsoft graph SharePoint Sites.Selected application permission in a Azure AD application for more granular control

As per this announcement made on Feb 2021, Microsoft graph now provides option to have granular permissions level using Sites.Selected application permission for the AD application instead of granting permission for all the sites in the tenant. The permission Sites.Selected does not provide access to any SharePoint site collections for the application unless the AD application has been assigned with permission roles read or write by an Admin. On this post let us see how to grant a site permission (Read or Write) to an AD Application with Sites.Selected permission by using postman client. As of the time I am writing this post there is no user interface to assign permissions to specific site collections for the application.

Pre-Requisite:

  1. Register Azure AD Application (APP 1) in Azure AD Portal with the following permissions
    • Sites.Selected (Admin Consented)
  2. Another AD Application (APP 2) with following permission only for the admins to assign selected roles to the above App
    • Sites.FullControl.All (Admin Consented)

App Registration:

Start with registering the above said two Azure AD applications

APP 1:

Register an Azure AD application with the following permission

APP 2 (Admin App):

Another app for admins for granting roles to APP 1

Grant permission role to the SharePoint site for the Azure AD Application:

This step is grant permission for the Azure AD application with Sites.Selected application permission to a given site collection. Perform the following steps to grant the role (Read/Write or Read and Write) to the AD app (APP 1)

  1. Gather the Client ID, Tenant ID and Client secret of the admin app
  2. In PostMan, make a HTTP request to generate the access token for the admin app – APP 2

Request Method: POST

Request URL: https://login.microsoftonline.com/yourtenantID/oauth2/v2.0/token

Request Header:

Key: Content-Type

Value: application/x-www-form-urlencoded

Request Body:

grant_type: client_credentials

scope: https://graph.microsoft.com/.default

client_id: adminappclientid

client_secret: adminappclientsecret

  1. Copy the access_token to be used for granting roles.
  2. Get the Client ID of the Azure AD Application – APP 1 with Sites.Selected permission
  3. Decide on the Role (Read or Write) for the granting the Site specific role for the APP 1 with Sites.Selected permission.
  4. Get the SiteId of the SharePoint site to be assigned permissions for the application (App 1). An easy way to get the siteId is by viewing the page source from the browser with the site open.
  5. In PostMan, make a HTTP request to grant the site role to the APP 1. Replace the siteId with the actual siteId which will be a guid

Request Method: POST

Request URL: https://graph.microsoft.com/v1.0/sites/siteId/permissions

Request Header:

Key: Content-Type

Value: application/json

Request Body: raw

Replace the id with APP 1 client id and the display name of the APP 1

{

  "roles": ["write"],

  "grantedToIdentities": [{

    "application": {

      "id": "xxxxxx-APP1GUID-4ad9-xxxx-4d36e68b0454",

      "displayName": "AppNamewithSelectedPermissions-App1"

    }

  }]

}
  1. Paste the access token on the token box as shown below with Authorization type selected as Bearer Token
  1. Send the request for granting the role for APP 1. After the request is made the APP 1 with the Sites.Selected permission has access to the site with write role we have granted to. The same way you can assign app access to multiple SharePoint sites.

Grant the Role using PnP PowerShell:

There is a PnP PowerShell cmdlet to grant access to SharePoint site for the registered AD application with Sites.Selected permission. The command to grant permission can be executed by the Site Collection administrator after creating a connection to the site

Connect-PnPOnline https://tenantname.sharepoint.com/sites/siteName -Interactive

You will be prompted to enter credentials including the second factor. After the connection is created, enter the following command to grant Write permission to the AD App

Grant-PnPAzureADAppSitePermission -AppId 'AzureAppIdwithSitesdotselectedpermission' -DisplayName 'App Name here' -Site 'https://tenantname.sharepoint.com/sites/sitename' -Permissions Write

To install PnP PowerShell module on the local workstation, enter the following command

Install-Module -Name PnP.PowerShell

There is also a PnP cmdlet to register an AD app in the Azure Active directory.

Grant the Role by an Admin using the Graph Explorer tool:

Role can also be assigned by an admin with out having the admin AD app (APP 2) using the graph explorer tool. This can be done only by an Admin

If there is any error related to permissions, make sure the admin consents to Sites.FullControl.All for the Graph tool. There is also an SPFx community webpart developed by a community member with User Interface for this operation

https://github.com/pnp/sp-dev-fx-webparts/tree/master/samples/react-sites-selected-admin

Reference:

Assign permission role programmatically: https://docs.microsoft.com/en-us/graph/api/site-post-permissions?view=graph-rest-1.0&tabs=csharp

Summary:

On this post we have seen how to grant access to Azure AD which has the Sites.Selected permission. You can also grant permission/role to an app with sites.selected permission programmatically. If you are using SharePoint API instead of Graph API in the Azure AD app registration, Sites.Selected is available on Application Permission as shown below

Hope you have found this informational & thanks for reading. If you are visiting my blog for the first time, please do look at my other blogposts.

Do you like this article?

Subscribe to my blog with your email address using the widget on the right side or on the bottom of this page to have new articles sent directly to your inbox the moment I publish them.