In a SharePoint modern page, you as an author would be able to turn on or turn off comments while creating a page. Everyone with minimum Read access on a SharePoint site would be able to Post, Like, reply to a comment at a single level, @mention a person while commenting in a SharePoint page.
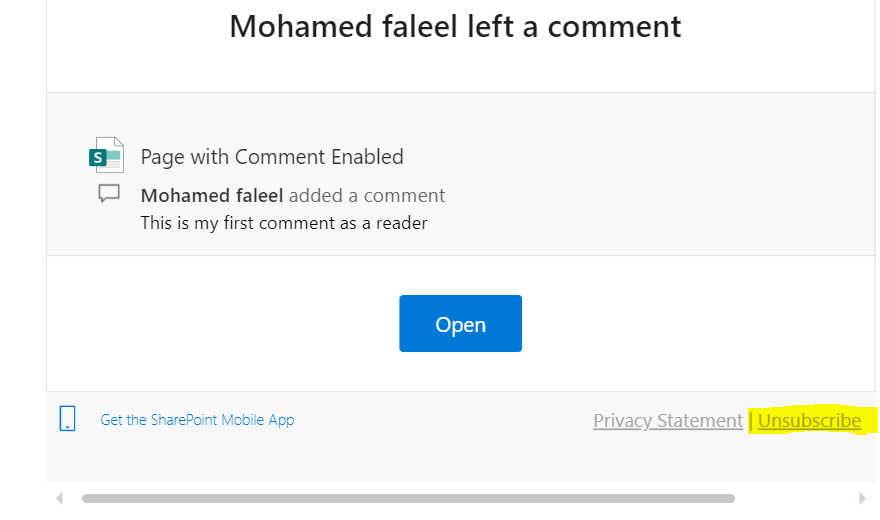
When someone comments on a page or news post, SharePoint notifies the author or the person mentioned in the header of the page via an email. The SharePoint mobile app also alerts the author whenever a comment is made. If there are multiple comments, it will be batched so that the authors receive a single email when several comments have been made within a short period of time. Additionally, author gets email notices when users reply to comments or leave a “like”. Author or a user can unsubscribe from notifications by clicking the “Unsubscribe” link in the footer of the email.
UnSubscribe
User with contribute access on a site would be able to delete any comments posted on the page which is quite an issue & not yet addressed by Microsoft. User with Read access to the site would be able to delete only the comments they have posted. Do you know where the comments are stored when ever you make a comment, they are stored in a separate data store with references to the Site Pages library guid & the item id of the page. The comments & likes are accessible via Rest API of the site. Find the different endpoints available for executing below actions
Getting comments & likes of a page item
Posting a comment on a page
Deleting a existing comment
There are couple of nice blog posts covering this topic with the API details. Find the links below:
On this blog post I am going to show you how to access the comments details of a SharePoint page using Power Automate.
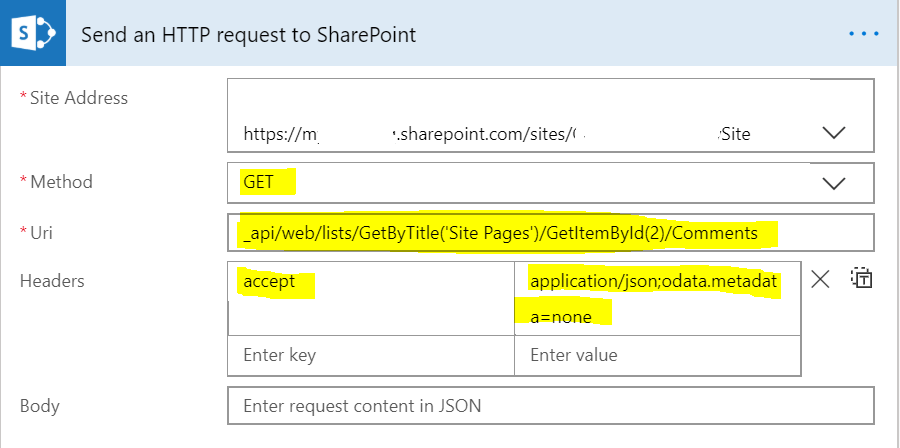
Let’s create an automated flow with trigger “Manually Trigger a Flow”, add an action “Send an Http request to SharePoint” since the API to retrieve the comments is an SharePoint rest API.
The API for getting the comments of a SharePoint page is
The odata.metadata=none option reduces the size of the payload significantly, and for many scenarios this is all that you need when working with list items
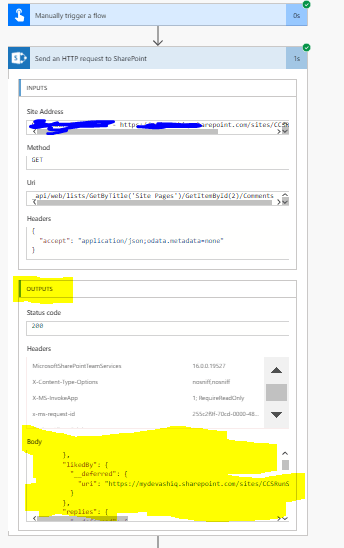
Run the flow, the output of this action would have all the data related to the comments posted by users on the page in a JSON format. To get the required information we will have to parse the JSON with the help of the Parse JSON action. Add the Parse to JSON action as below with content to the Body from Outputs of the action “Send an Http request to SharePoint”
Click on the button “Generate from sample” which loads a popup “Insert a Sample JSON payload” paste the run data of the flow for generating the schema automatically. To get the run data, go to the run history and click the run and go to outputs of the action “Send an Http request to SharePoint” copy everything inside the Body
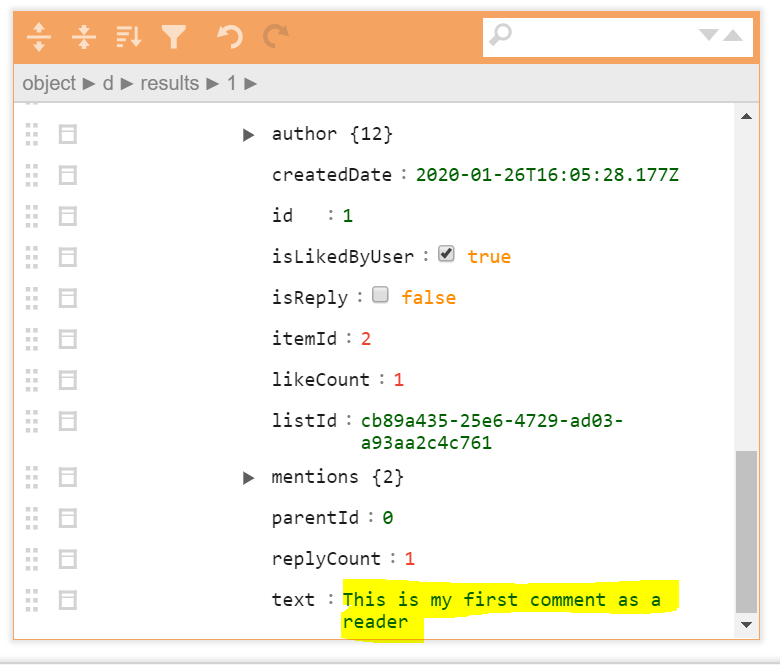
Find the information of the body in the JSON online viewer to decide what information you need & what is available on JSON output
Add the compose action to see all the information available from the Output of the parse action, I’ve added only text which has the comment text & email has the email address of the user posted the comment
Summary: There are different Rest API endpoints available for comments & likes in Modern SharePoint page, you can select the any of them based on the requirement. The api’s can also be used on SPFx solutions for customizing Comments feature. Hope you find this post useful. Let me know if there is any comments or feedback by posting a comment below.
There are many developers & power users using SharePoint lists as a data source to store data submitted from a Power App. There should be various reasons for this, please find mine below
Enterprise users with license (E5, E3, E1) has access to Power App & SharePoint as a service
SharePoint is a standard connector & not a premium one which means the user would be able to access SharePoint with the license they have assigned. Its not required for the users to have an additional license (App based license or user based license) to access the premium connectors like Azure SQL etc
There are many triggers & actions available for SharePoint connector
Let’s say on the Power App you have developed or developing has many custom logics on different screens. For e.g data being stored on different lists on click of a button in a Power App screen/form. If the user has to store data to SharePoint from Power App, user should have at the least edit/contribute access which means the user to be added on the out of the box site members group.
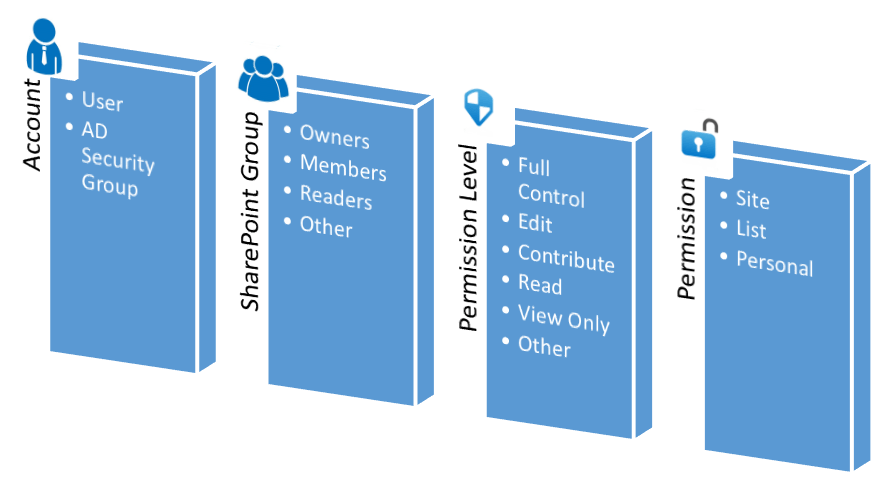
If the power app user gets to know the SharePoint site url which is connected as a data source in the Power App, the user would be able to access all the lists from the site by going to the Site contents page or by directly going to the list view url. This might create an issue because the user might edit, create or delete an item from the SharePoint interface rather from the Power Apps interface. As an app owner, you would like to avoid this. There is a way to avoid this by creating a custom permission level for the app users in SharePoint. Please find the steps below
Scroll the page to the bottom & click on the button “Copy Permission Level”
Name the permission level as “Power Apps – Custom Permission” & give some meaningful description
Remove/Uncheck the permission “View Application Pages” under the category “List Permissions”
Scroll down and click “Create” button
The custom permission level is ready, let’s assign this to a new SharePoint group. Find steps below to create a new group & assign the custom permission level to the group
Change the Owner field to the Site Owners group – Optional Step
Scroll down & select the Permission level created above
Click Create
The group is ready, add the power app users to this group. This access will not allow the members of this group to access the Site contents (Application Page), view forms or views (Allitems.aspx) but they would be able to create/update from Power Apps. Technically the user would still be able to access/modify the list content programmatically using CSOM/JSOM etc, but the GUI in SharePoint is blocked. They will receive an access denied message while trying to access the list view/form or site contents page.
Note:
After the users are added to the group which has the restricted permission level, make sure the users are not part of others groups like Members, Visitors etc. You can confirm this from the Check Permissions on the link https://domain.sharepoint.com/sites/sitename/_layouts/15/user.aspx
Summary: You can play around with the different types of permissions while creating the permission level for Power Apps users, grant only the required permissions. A site owner will have access to create or update permission level. Microsoft has very detailed documentation on permission levels. In a SharePoint site, the permissions are inherited from the Site>Lists>Item. Based on the need, the permissions can be broken at any level. Hope you find this post useful. Let me know if there is any comments or feedback by posting a comment below.
Adaptive Cards a new way for developers to display & exchange content in a common and consistent way across different applications. It can be hosted on
Bot Framework Webchat
Cortona Skills
Outlook Actionable Messages
Windows Timeline
Microsoft Teams
Windows Notifications
SDKs (.NET, JavaScript, Android, React, iOS etc) are available for authoring & rendering cards inside your own apps. Microsoft has got a very great documentation on this. The schema explorer has got information about all the list of available Card elements, containers & actions sets to use. Adaptive card templating features which is now available in preview mode to help create, reuse & share the cards you develop & enable you to separate the data from the layout in an Adaptive card. There is also a plugin available called as Adaptive Card Viewer in Visual studio code for visualizing the card & a Team app called as App Studio.
Develop a card using the Adaptive Card Designer from the scratch or you can start with some available samples. Card Authors describe their content as a simple JSON object with the help of the designer which could then be rendered natively inside a Host Application as shown above, automatically adapting to the look and feel of the Host.
On this blog post, I am going to show you how to create an Outlook actionable message using a sample (Input Form) available in Adaptive card designer, this collects information (Name, Email) from the user & storing it in a SharePoint list using two flows. On submission of the form, a simple response message will be shown using a response Adaptive card. For the outlook version requirements for actionable message, click on this link. Find the flows to be created below
Instant flow with the manual trigger for sending the adaptive card in an email
Instant Flow using trigger When a Request is received for sending information to SharePoint list
Actionable messages can be via Email which I am focusing on this blog post or using connectors. Check here the supported scenarios via an Email.
Steps Involved to create actionable message via an Email:
Creating the Adaptive card for the host application (Outlook)
Creating the Flows
Let’s start with creating the card using the Adaptive Card designer
Adaptive Card Creation:
There is going to be two adaptive cards
First one is the initial form to be sent on email using the sample Input form
Second one is a response card which will be shown after the input form is submitted
First Adaptive Card:
Go the designer & click on Open Sample, select Input Form as shown below
Adaptive Card Designer
Then change the host app from the default Bot Framework Webchat to Outlook Actionable Messages. Remove the Phone number Text Block [Element] & the corresponding Text.Input [Inputs] field to keep it simple. Remove the Submit action set, add the action set of type Action.Http for us call the flow with method POST for us to interact with SharePoint
Update the following attributes of the just added element action set
Rename the Title of the element to Submit from Action.Http
Add the Id submit
Change the Style to Positive from Default
Select the Method to POST
Url to be set to our second FLOW (When a Http request is received) HTTP POST url later once we have it ready with us
Click the Add New header, enter “Authorization” to Name and leave the Value blank. If this is not done, you will receive an HTTP 401 unauthorized message while clicking the button on the email. The HTTP request is received flow does not have any authentication its anonymous so be careful with the URL and have some steps to validate on the flow so check if its triggered from valid source
Add one more header, enter “Content-type” to Name and Value should be “application/json”. This is required to make the POST request from the email
The first card is ready, lets us go ahead and create the second one which is the response card. This will be shown once the response is submitted
Second Adaptive Card:
This is going to be a very simple card, lets start from the scratch. Go to the designer and select New Card
Add a Container
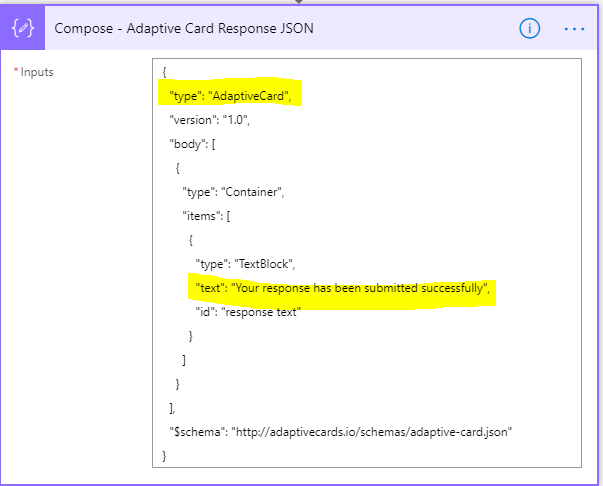
Add a TextBlock with text “Your Response has been submitted successfully” on the container
Click Copy Card JSON from ribbon for this card to be used on the flow. We now have the adaptive cards ready with us, let’s go ahead and the create the flows using Power Automate. Find the generated JSON below
Instant Flow using trigger When a Request is received:
This flow is an Instant flow with trigger “When a HTTP request is received”, this is going to be called from email for submitting the Input form to a SharePoint list. Create a SharePoint list with two columns for us to store the Name and Email submitted from the adaptive card on email.Create the flow with the trigger as said above. The POST url will be generated after the flow is saved with an action. Click Generate from sample on the trigger and copy and paste below information which would automatically generate the schema for you. If you have more advanced JSON schema with, try using this tool.
{
	"inputName": "",
	"inputEmail": ""
}
Click Advanced options to select the method POST. Add the action create item to store the user form response to SharePoint list created above with the request body information mapped to Title (Name – inputName) & Email (inputEmail) using the dynamic content
Add the Compose action, paste the JSON of the second adaptive card to the Inputs.
Compose action
Add the Response action, a premium one with the header key CARD-UPDATE-IN-BODY and the value as true. The body parameter should be the outputs of the compose action JSON
Response Action – Premium Action
Save the flow, the POST url will now be generated copy it and go to the first adaptive card and paste it on the url attribute for the Submit action set. After this copy the JSON from ribbon, we are now ready for creating the next flow
Instant flow with the manual trigger for sending the Adaptive Card
This flow is an instant flow with trigger Manually Trigger a flow for sending the adaptive card an outlook actionable message in an Email. You can have a different type of trigger based on the requirement. Add the compose & send an email (v2) action, paste the JSON for the first adaptive card to the inputs field of compose action. Make sure JSON also has the POST Url of the first flow on the Action set. On the compose action, also include the script tags as given below
<script type=”application/adaptivecard+json”>
— JSON of First Adaptive Card—
</script>
<script type="application/adaptivecard+json">
{
    "$schema": "http://adaptivecards.io/schemas/adaptive-card.json",
    "type": "AdaptiveCard",
     "version": "1.0",
    "body": [
        {
            "type": "ColumnSet",
            "columns": [
                {
                    "type": "Column",
                    "width": 2,
                    "items": [
                        {
                            "type": "TextBlock",
                            "text": "Tell us about yourself",
                            "weight": "Bolder",
                            "size": "Medium"
                        },
                        {
                            "type": "TextBlock",
                            "text": "We just need a few more details to get you booked for the trip of a lifetime!",
                            "isSubtle": true,
                            "wrap": true
                        },
                        {
                            "type": "TextBlock",
                            "text": "Don't worry, we'll never share or sell your information.",
                            "isSubtle": true,
                            "wrap": true,
                            "size": "Small"
                        },
                        {
                            "type": "TextBlock",
                            "text": "Your name",
                            "wrap": true
                        },
                        {
                            "type": "Input.Text",
                            "id": "myName",
                            "placeholder": "Last, First"
                        },
                        {
                            "type": "TextBlock",
                            "text": "Your email",
                            "wrap": true
                        },
                        {
                            "type": "Input.Text",
                            "id": "myEmail",
                            "placeholder": "youremail@example.com",
                            "style": "Email"
                        }
                    ]
                },
                {
                    "type": "Column",
                    "width": 1,
                    "items": [
                        {
                            "type": "Image",
                            "url": "https://upload.wikimedia.org/wikipedia/commons/b/b2/Diver_Silhouette%2C_Great_Barrier_Reef.jpg",
                            "size": "auto"
                        }
                    ]
                }
            ]
        }
    ],
    "actions": [
        {
            "type": "Action.Http",
            "title": "Submit",
            "url": "HTTP POST FLOW URL",
            "id": "submit",
            "style": "positive",
            "method": "POST",
            "body": "{\"inputName\":\"{{myName.value}}\",\"inputEmail\":\"{{myEmail.value}}\"}",
            "headers": [
                {
                    "name": "Authorization",
                    "value": ""
                },
                {
                    "name": "Content-type",
                    "value": "application/json"
                }
            ]
        }
    ]
}
</script>
Instant Flow for sending the actionable message
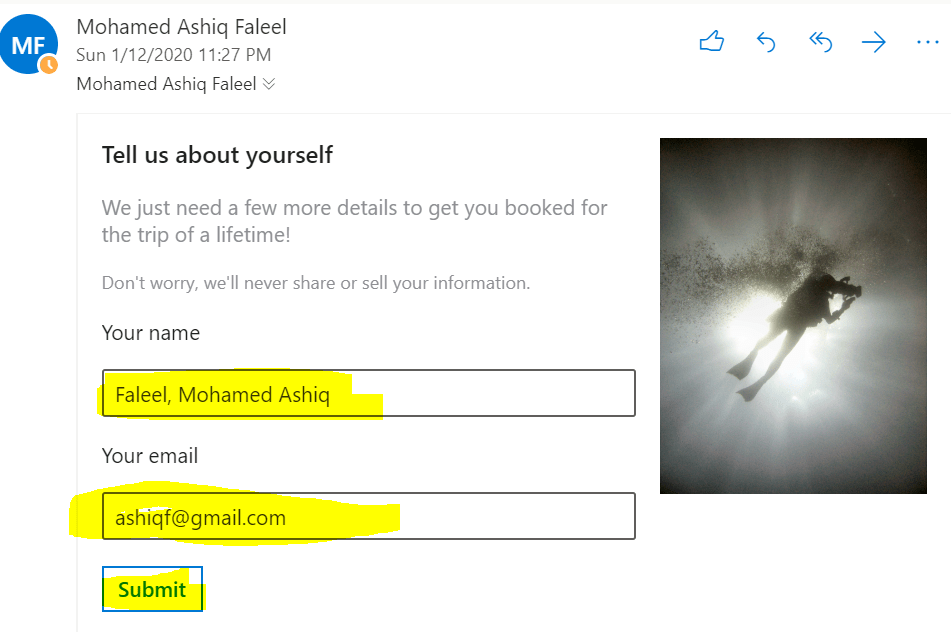
On the Send an email (V2) action, click the html view and select the outputs of the compose JSON which has the first adaptive card JSON. The flow is ready, click the Test link on the right corner of your flow to trigger it. The email will be received to the sender as below
Email – Input for collection information (Name & Email)
Once the information is Submitted, you would see the response as below
Email response after the form is submitted
If you would like to test with the tenant or global users, then register your adaptive card actionable message on the Actionable Email Developer Dashboard to enable this service. Enter the Flow URL (HTTP Request response), scope & sender email address. For more information on the developer dashboard refer here. Regarding security of the actionable message, refer here.
New Provider Registration
Once your provider is approved. Add the Provider Id (originator) field to the originator attribute in your JSON of the adaptive cards next to the type key, as follows:
“originator”: “ProviderId”,
Summary: You now have an actionable message adaptive card on outlook for collecting information from users on email. It provides you more functionality than the available Out of the box actions Approvals or Emails with options. To know the future road map, click here to know. Hope you have enjoyed reading this post and find it useful. If you have any comments or feedback, please provide it on the comments section below.
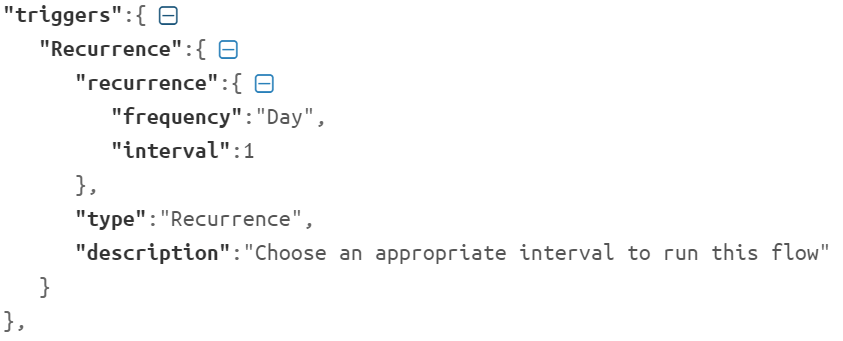
Microsoft Power Automate & Power Apps have turned quite important & popular service now a days within Office 365, there are many users (developers & IT pro users) who are creating business applications leveraging these services very quickly but if an app or a flow is deleted by mistake then its not an easy job to spin it back up with out involving Microsoft support. In this blog post, am going to give you some ideas to back up a Flow & Power Apps automatically with the help of connectors available in Power automate. Once it is backed up, I will show you steps to restore from the back up.
Once I’ve deleted a flow accidentally and I was not able to restore it back, I have recreated the complete flow with all the steps which took some time. I will show you steps to back up & restore your Flow & Power Apps.
Backup & Restore your Flow
Backup & Restore your Power Apps
Backup & Restore your Flow:
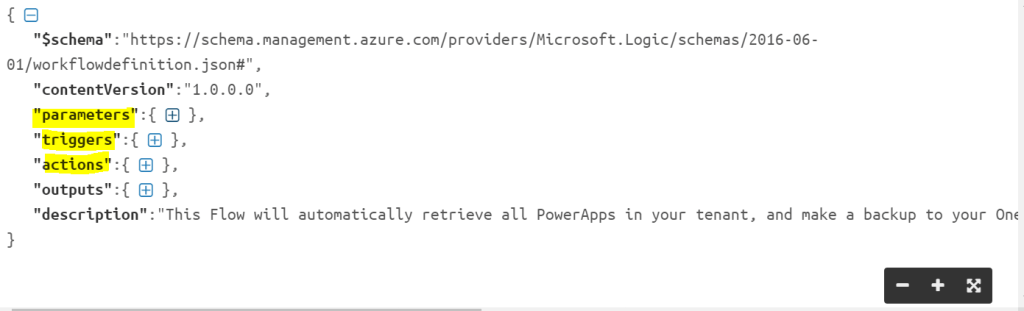
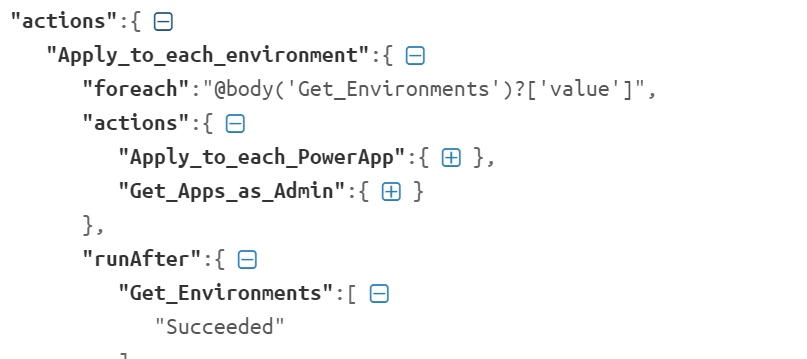
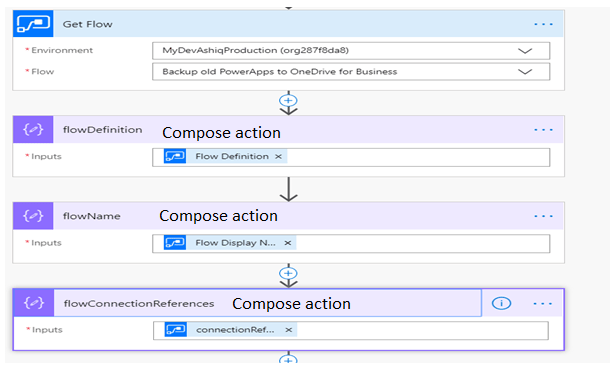
A flow could be backed up by copying the flow definition & connection references with the help of an action “Get Flow” under the flow connector “Power Automate Management”. With the flow definition & connector references we would be able to restore it back whenever needed. Thanks to John Liu for the tips & guidance on showing us a way to copy the flow definition. Before showing you steps to get the flow definition & connection references, I will show you some examples on the type of information it stores on these fields.
Flow Definition:
It has details about the triggers & actions used with in a flow in a JSON format.
Flow Definition
Triggers: Information about the trigger used in the flow (Instant, Automatic, Scheduled)
Actions: Information about all actions used in the flow
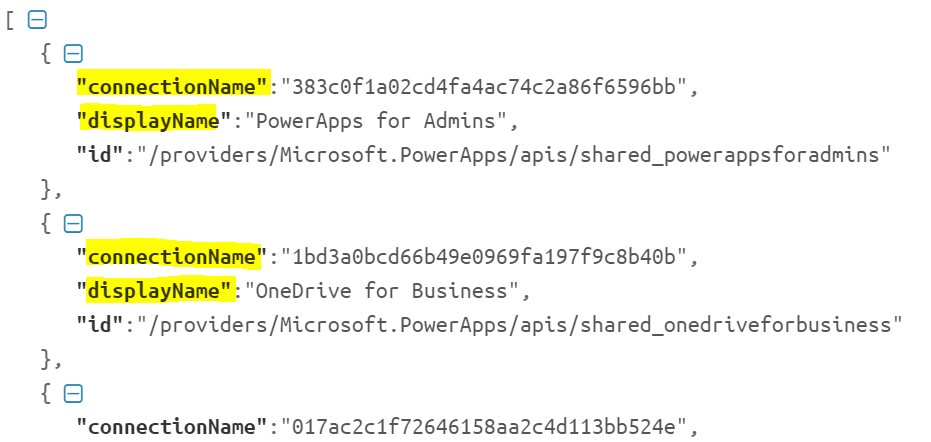
Connection References:
It has details about all connections used against each action
Connection References
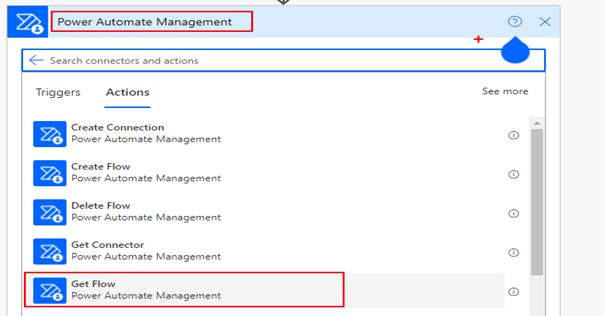
Add the action “Get Flow” under connector “Power Automate Management“, which has the fields flow definition & connection references.
Find below the list of actions under the Power Automate management connector
This action would be able to get only the flows to which you have access to. If you don’t see the flow under the drop down, enter the Flow ID by selecting custom value.
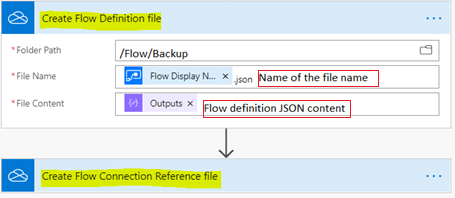
Now let’s store the Flow definition & connection references to a file in some location so that we would be able to retrieve the files for restoration. On this example I will use “One Drive for business connector” action “Create File” to store the content in two files but you can also get it stored on SharePoint Document Library, Azure Blob, GitHub etc. The extension of these files can also be .txt but I’ve used .json.
One Drive for Business connector
Restore Flow:
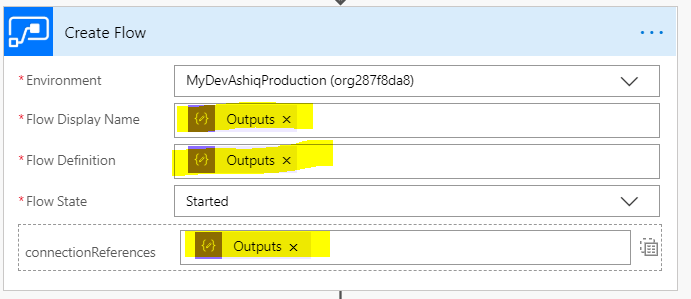
Flow action “Create Flow” helps us to restore flow from the flow definition & the connection references stored on One drive. Only the file content should be passed for the Flow Definition, connectionReferences and not the actual file.
Backup & Restore your Power App:
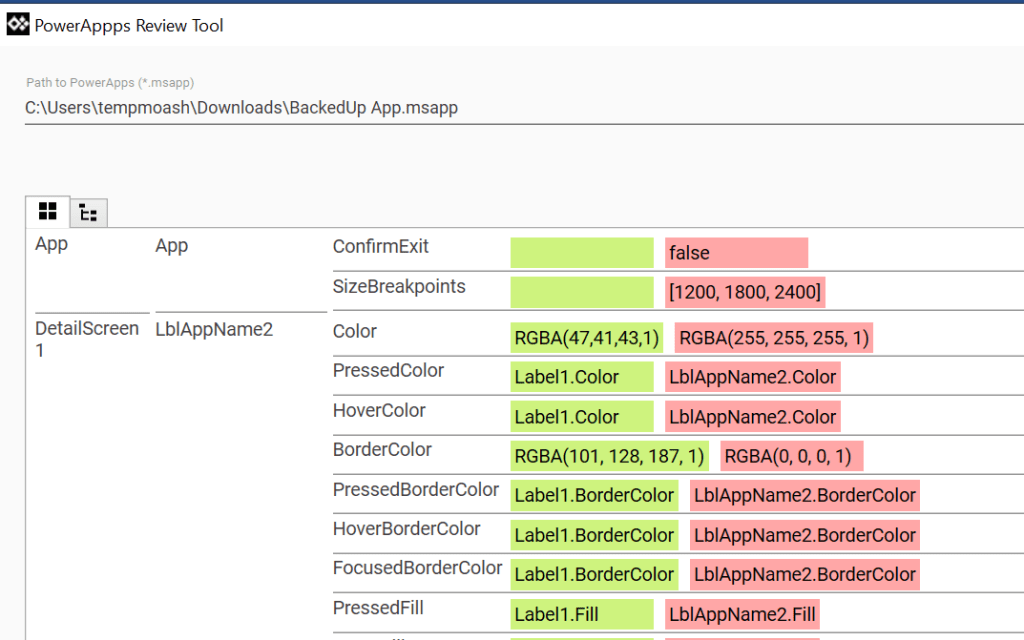
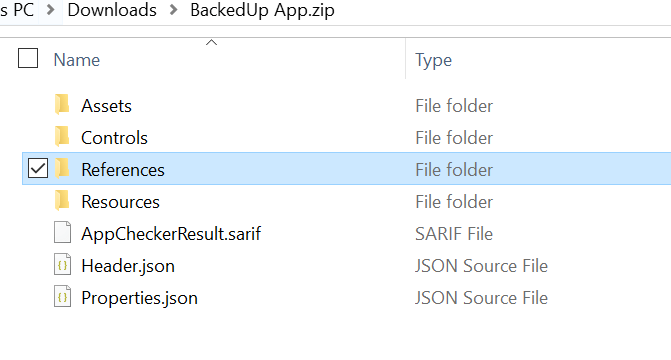
A Power App could be backed up by creating a MSAPP file for the PowerApp to be backed up. The file with extension .msapp is just a ZIP file which has all the definitions of the app. There are open source tools (Review Tool, Theme editor, App merger, Phone to tablet converter) available in github which helps us to peek at the definitions of the .msapp file.
PowerApps Review Tool
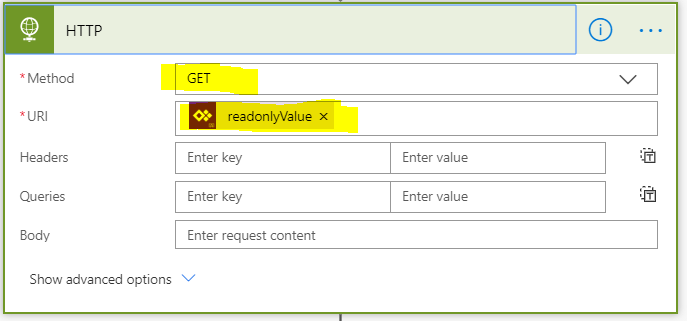
PowerApps for App Makers connector has an action called “Get App” which helps us to get all the information related to the specified app. This action has a field called “readonlyValue”. It points to a link that has the PowerApps msapp file. With the help of the premium connector HTTP, we will make a GET request to the readonlyValue link (Blob storage path). This step allows you to retrieve the contents of the msapp file which could then be stored as a backup file in Onedrive, SharePoint, Github etc. Lets now look at the contents of the msapp file, change the extension of the .msapp file to .zip file and open it.
Assets
All the media files (Images, Videos, Audio)
Controls
Information about all the controls (First Party, Custom components etc) used in the different screens of the app. Data is in JSON format.
References
Information about Datasources, Templates (Label, Gallery, Textbox etc), Resources (Images etc), Themes used in the app etc
Resources
Publish information, user locale etc
Properties.json
Information of the app like Author, PowerApp name, no of screens etc
Properties.json file
Add the action “Get App”, enter the App ID of the Power App
Get App action
This action retrieves all the information of the app including the “readonlyvalue” as explained above. Using this result we will make a GET request using the HTTP connector to retrieve the app data in this Flow.
HTTP (Premium connector)
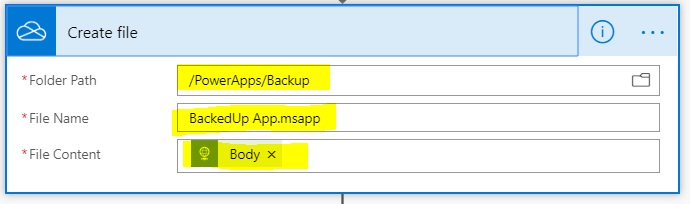
Add the action “Create file” in OneDrive for Business connector and set the body from HTTP connector. This allows you to save your app to OneDrive for Business. As said earlier you can instead store it to other storage like Azure Blob Storage, SharePoint document library, GitHub etc.
Restore Power App:
The msapp file is with us now, lets now restore the PowerApp. Create a Blank app from the Power Apps studio then open the.MSApp file via the File > Open > Browse menu option. This enables you to select the .MSApp file from your local file system then save & publish the App. The app is now back. Let me know on the comment section if there is a automated way to restore the PowerApp from the MSApp file.
Summary: On this blog post, we have seen ways to backup & restore your app & flow using a Flow. If you are an Power App/Power Automate environment admin (Premium license), you could backup all the apps & flow available in the environment using the Apps for Admin connector. There are Power Shell cmdlets available for Admins & creators which could also be used. If you have a more complex business application including PowerApps Canvas, multiple flows, custom connector, Model driven apps, entity etc, solutions is recommended. Exporting a solution as a package is very easy by click of a button, restoring is also quite an easy task. Hope you find this post useful, let me know your feedback on the comments section.