This is in continuation to my earlier post using Adaptive card for collecting information in Outlook also known as Outlook actionable message. On this post I am going to show you how to collect information from a user in Teams and storing the values back in a SharePoint list. The following Power Automate actions under Microsoft Teams connector are now available in preview mode which helps us to capture data back from a Teams adaptive card meaning you would be able to make POST calls back to the flow by click of a button (Action.Submit) on the Adaptive card
- Post an adaptive card as the Flow bot to a Teams user, and wait for a response
- Post an adaptive card as the Flow bot to a Teams channel, and wait for a response
Once an Adaptive card is posted in Teams using the above actions, the flow run will not continue until the recipient or someone in the channel (if sent to channel) responds to inputs that are required within the card till then the flow is put on wait for maximum period (Async calls) of 30 days as per the documentation. Post that period the flow will time out if no one responds to the card. There can be use case to collect responses from users in Teams & post it to Azure services like SQL etc, this avoids the users to have access to premium services or license since the card is sent using Power automate. The use case I’ve chosen for this post is to collect Name & Email address of a teams user by sending them an input form which stores the responses in a SharePoint list after the user responds. Find the resources I’ve used for this example
- Adaptive Card Designer for creating JSON
- Automated Flow with action to post an JSON Adaptive card using the connector MS Teams
- SharePoint custom list with columns Name & Email
- Microsoft Teams with the Flow App installed
Adaptive Card Creation:
Let’s start by designing the card using the Adaptive card designer. Click on Open Sample, select Input Form as shown below

Then change the host app from the default Bot Framework Webchat to Microsoft Teams – Light (Optional Step). Remove the Phone number Text Block [Element] & the corresponding Text.Input [Inputs] field to keep it simple & I’ve also changed the Adaptive card image URL on the right column to the following URL since the image default image on the sample has got some issues rendering on teams. Find some information on image size & resolutions limits here.

Click Copy Card JSON from ribbon for this card to be used on the flow. We now have the adaptive cards JSON ready with us, let’s go ahead and the create the flow using Power Automate. Find the generated JSON below
{
    "$schema": "http://adaptivecards.io/schemas/adaptive-card.json",
    "type": "AdaptiveCard",
    "version": "1.0",
    "body": [
        {
            "type": "ColumnSet",
            "columns": [
                {
                    "type": "Column",
                    "width": 2,
                    "items": [
                        {
                            "type": "TextBlock",
                            "text": "Tell us about yourself",
                            "weight": "Bolder",
                            "size": "Medium"
                        },
                        {
                            "type": "TextBlock",
                            "text": "We just need a few more details to get you booked for the trip of a lifetime!",
                            "isSubtle": true,
                            "wrap": true
                        },
                        {
                            "type": "TextBlock",
                            "text": "Don't worry, we'll never share or sell your information.",
                            "isSubtle": true,
                            "wrap": true,
                            "size": "Small"
                        },
                        {
                            "type": "TextBlock",
                            "text": "Your name",
                            "wrap": true
                        },
                        {
                            "type": "Input.Text",
                            "id": "myName",
                            "placeholder": "Last, First"
                        },
                        {
                            "type": "TextBlock",
                            "text": "Your email",
                            "wrap": true
                        },
                        {
                            "type": "Input.Text",
                            "id": "myEmail",
                            "placeholder": "youremail@example.com",
                            "style": "Email"
                        }
                    ]
                },
                {
                    "type": "Column",
                    "width": 1,
                    "items": [
                        {
                            "type": "Image",
                            "url": "https://download-ssl.msgamestudios.com/content/mgs/ce/production/SolitaireWin10/dev/adapative_card_assets/v1/tile_spider.png",
                            "size": "auto"
                        }
                    ]
                }
            ]
        }
    ],
    "actions": [
        {
            "type": "Action.Submit",
            "title": "Submit"
        }
    ]
}
Flow Creation:
Create an Instant flow with trigger “Manually trigger a Flow”, this will post an Adaptive card to a Teams user with the Input form which collects response to a SharePoint list. Create a SharePoint list with two columns for us to store the Name and Email submitted from the adaptive card on Teams.
Add the flow action “Post an adaptive card as the Flow bot to a Teams user, and wait for a response”, on the action
- Enter the email address of the user in the Recipient field
- Paste the JSON copied from the card designer in the Message field
- Enter information to be shown to the user on the field Update message after the Submit button is clicked
- Field Should update card to be set as Yes
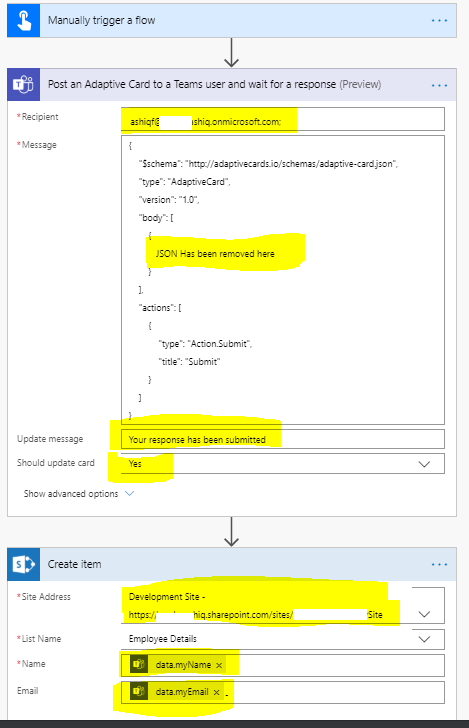
Now add the action “Create item” to store the form response in the SharePoint list created above with the request body information mapped to Name (myName) & Email (myEmail) using the dynamic content. The dynamic content has also information about the user (Email, Display Name, Response time etc) responded in Teams

The flow is ready, Run the flow to test it. The recipient would have received the card in Teams as below

After the user keys in the Name & Email address on Teams and clicking Submit button will complete the flow till then the flow will be in wait state for a period of 30 days maximum. The data will be submitted to the SharePoint list and the card will be updated with the update message as below

There is an Adaptive card designer in Power Automate which is an experimental feature currently with which you would able to design/update Adaptive card in the Power Automate action. To enable it, click the cog wheel on your flow environment and click “View All Power Automate settings”. On the popup toggle the Experimental Features to On and click Save button.

Go back to the flow in Edit mode, the Teams action will now have an Adaptive card designer as shown below

Senior Program Manager for Power Automate Audrie Gordon has a great video on Adaptive cards for Power Automate which has lot of information.
If you run in to an error while submitting the form or triggering the flow, look at the Troubleshooting tips for Adaptive cards. There are few known issues documented here with regards to using this action on Power Automate.
Reference: https://docs.microsoft.com/en-us/power-automate/overview-adaptive-cards
Collecting responses from Multiple team users:
If you want to collect from responses from multiple users, refer the following blog post
Collect response from multiple users with Adaptive Card in Teams using Power Automate
Summary: You now have created an input form for collecting information from a user in teams. To know the future road map for Adaptive cards, click here to know. There are couple of amazing templates available in the Flow environment, just search for Adaptive card in templates where you get template for different use cases. Hope you have enjoyed reading this post and find it useful. If you have any comments or feedback, please provide it on the comments section below.

This all looks great. Except in my Flow the “Post an adaptive card as the Flow bot to a Teams user, and wait for a response” action does not show up in Dynamic content on subsequesnt actions. Any ideas how to troubleshott this?
LikeLike
Apologies for the delayed response. On the Powerautomate action’s “Post an Adaptive Card to a Teams user and wait for a response” message field the JSON generated from adaptive card designer has to be put. On the screenshot I’ve removed the JSON, if there is a JSON on the message field you should be able to select the custom field values provided in JSON on Id parameter (i.e myName, myEmail etc).
LikeLike
Hi. Great article. I have one query though. I have a scenario where I have to send a survey form to 1000 employees within my org each day and collect their responses and process them further/take actions based on their responses.
Now the functionality that I have observed while waiting for response on Adaptive Cards, is that it would not process the next user unless the first one responds to the form (since we would have to go apply for Each, because the wait for Response Adaptive card activity takes only 1 email at a time). I figured out the Degree of parallelism concept as well, but that is having a limit of just 50. Yes 50 only! So even if I build parallel branches within a single flow, and give them 50 max limit, I am not sure how will I cover a larger number of users. Do you have any thoughts on this? I am really stuck here so would be helpful to hear your ideas.
LikeLike
Apologies for the delayed response but here you go, I have written an article to post an Adaptive card for collecting response from multiple users
Not sure if this is going to be help you since it was few months back you have asked about this but it might help somebody
LikeLiked by 1 person