Using Microsoft Graph in Power Apps and Power Automate offers several advantages for streamlining integration with various Microsoft 365 services and applications. Additionally, securing these integrations with Azure Managed Identities significantly enhances the overall security of the solution. Azure Managed Identities enable applications and services to authenticate with Azure services seamlessly and securely. When it comes to using Microsoft Graph API, you don’t need a client secret anymore. This makes it simpler to manage and keeps everything more secure. This blog series, divided into multiple articles, is dedicated to utilizing managed identities either System Assigned or User Assigned in Power Platform to access MS Graph API endpoints. It leverages Azure API Management service with the support of a custom connector. The focus of this particular article is on configuring the Azure API management service with the necessary Microsoft Graph permissions for the managed identity.
Pre-requisites & permissions:
Here are the resources and permissions required to follow along this blogpost:
Azure Subscription/Entra ID:
You need an Azure subscription to create and manage Azure API Management instances.
- Azure Managed Identity – User or System Assigned:
- Create or use an existing Azure Managed Identity. This can be either a user-assigned identity or a system-assigned identity of the APIM resource, depending on your requirements.
- Global Admin or Privileged Administrator Role:
- The user should have Global Administrator or Privileged Administrator role in the Microsoft Entra ID to grant Admin consent for the MS graph permissions on the Managed Identity using Microsoft Graph PowerShell SDK.
Power Platform Environment:
Set up a Power Platform Environment where you plan to create and use custom connectors.
- Role:
- Ensure that the user/maker has the System Administrator/Customizer/Maker role on the Power Platform Environment. This role is required to create custom connectors.
- DLP Policy:
- Make adjustments to allow custom connector endpoints, especially in cases where endpoints are blocked by the tenant scoped DLP policy.
- License:
- A Power Apps or Power Automate Premium license is necessary for creating and using custom connectors. Ensure that the user has the required premium license assigned.
Azure API Management Setup with Microsoft Graph Permissions:
Create a Azure API Management resource and turn on System assigned managed identity and if available, add a User Assigned Managed Identity in the Security section of the API Management instance. Execute the following PowerShell script which user Microsoft Graph SDK to add the permission User.Read.All to either the System or User assigned managed identity. Adjust the permissions as needed for your specific requirements. Before executing the script, replace the permission and the display name of the Managed identity depending on the managed identity you have used. If you have used a System Assigned managed identity, ensure that it corresponds to the display name of the API Management instance.
# Install Microsoft Graph PowerShell module if not already installed

$PermissionName = "User.Read.All"
$DisplayNameOfMSI = "replaceherewithactualnameofManagedIdentity"
$GraphAppId = "00000003-0000-0000-c000-000000000000"

# Connect to Microsoft Graph
Connect-MgGraph -Scopes "Directory.ReadWrite.All","AppRoleAssignment.ReadWrite.All"

# Get Managed Identity Service Principal

$MSI = (Get-MgServicePrincipal -Filter "displayName eq '$DisplayNameOfMSI'")
# Sleep for a while to allow time for service principal creation if needed

Start-Sleep -Seconds 10
# Get Microsoft Graph Service Principal
$GraphServicePrincipal = Get-MgServicePrincipal -Filter "AppId eq '$GraphAppId'"

# Retrieve the App Role from the Microsoft Graph Service Principal based on the specified Permission Name
$Role = $GraphServicePrincipal.AppRoles | Where-Object {$_.Value -eq $PermissionName}

# Create an App Role Assignment HashTable for assigning the role to the Managed Identity
$AppRoleAssignment = @{

    principalId = $MSI.Id

    resourceId = $GraphServicePrincipal.Id

    appRoleId = $Role.Id }

# Assign the Graph permission
New-MgServicePrincipalAppRoleAssignment -ServicePrincipalId $MSI.Id -BodyParameter $AppRoleAssignment
You can download the above script from this link. If you prefer using the Azure AD PowerShell module, keep in mind that it is planned for deprecation. In such a case, you can get the script from this link.
Note: You’ll discover equivalent commands for Microsoft Graph PowerShell as opposed to the Azure AD PowerShell cmdlets on the following link
Upon successful execution of the script, the following message will be displayed

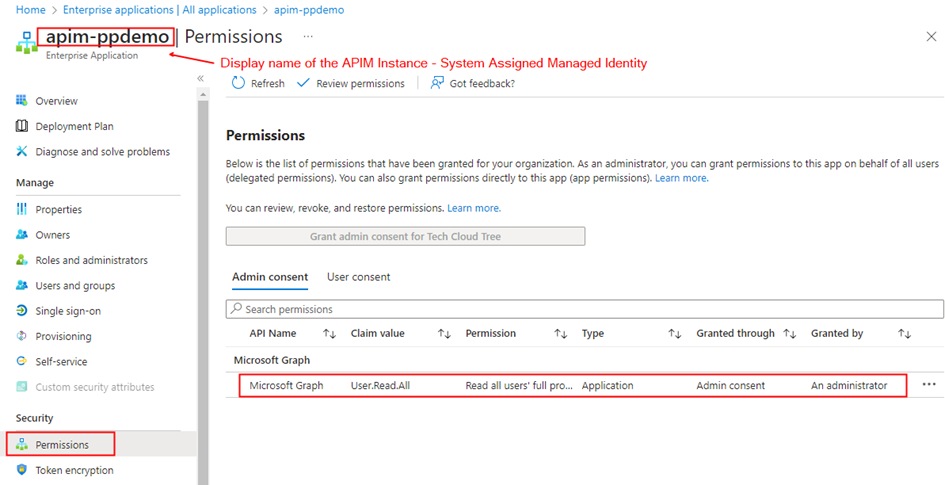
The permission granted to the Managed identity can be validated from the Entra ID portal as shown below

Configure the Microsoft Graph API endpoint in API Management and configure policy:
| Setting | Value |
| Display name | msgraph |
| Web service URL | https://graph.microsoft.com/v1.0 |
| API URL suffix | msgraph |
In the API Management instance, on the left menu select APIs > + Add API. Select HTTP and enter the following settings. Then select Create.
System Assigned Managed Identity:
Navigate to the newly created API and select Add Operation. Enter the following settings for accessing the API through System Assigned Managed Identity (SAMI) and select Save.
| Setting | Value |
| Display name | getUsrProfileSAMI |
| URL for GET | /users/{User (UPN)} |
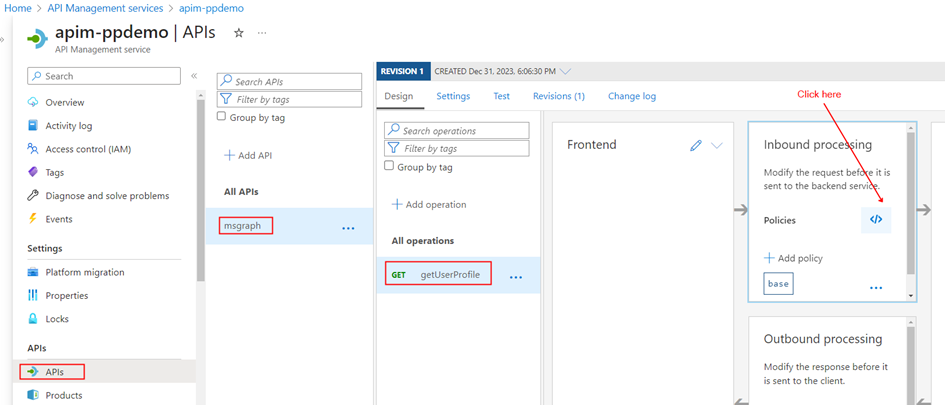
Select the Operation getUserProfile. In the Inbound processing section, select the (</>) (code editor) icon to use the authentication-managed-identity policy to authenticate with the Microsoft Graph API endpoint using the Managed Identity. This policy uses the managed identity to obtain an access token from Microsoft Entra ID for accessing the specified graph resource.

Replace with the following code in the inbound node:
<inbound>
  <base />
  <authentication-managed-identity resource="https://graph.microsoft.com" />
</inbound>
User Assigned Managed Identity:
If you prefer to utilize a user-assigned managed identity, click on Add Operation, input the specified settings for accessing the API via User Assigned Managed Identity (SAMI), and then click Save
| Setting | Value |
| Display name | getUsrManagerUAMI |
| URL for GET | /users/{User (UPN)}/manager |
The Inbound processing section should have the following code
<inbound>

    <base />

    <authentication-managed-identity resource="https://graph.microsoft.com" client-id="ReplaceitwiththeAppcationIdoftheUAMI" />

 </inbound>
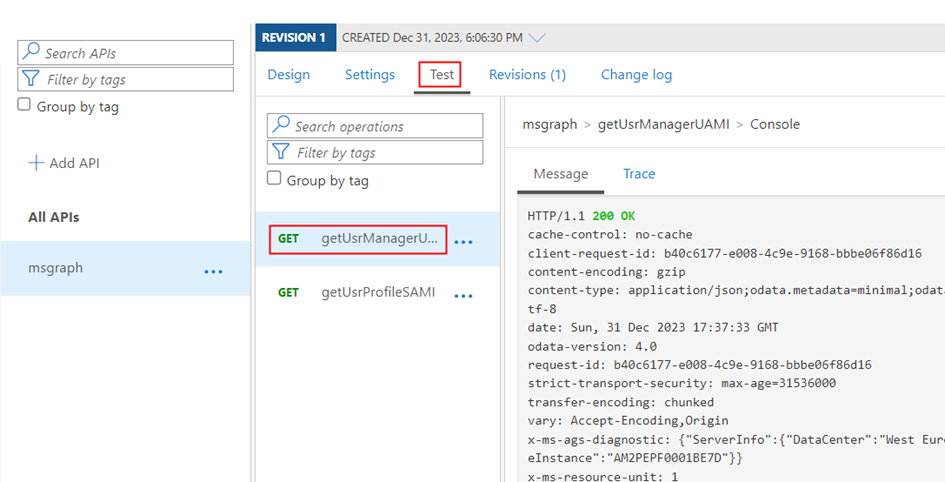
You would now be able to test the Graph API endpoint for both the identities from the Test tab.

Add CORS Policy to API in API Management:
CORS settings allow or restrict web applications or services hosted on different domains from making requests to your API. If you want to enable cross-origin requests to the configured Graph API’s from Power Platform Custom connector, you need to configure CORS settings in the API Management service. In the left menu, select APIs and select the API that you will export as a custom connector. If you want to, select only an API operation to apply the policy to.
In the Policies section, in the Inbound processing section, select + Add policy. Select Allow cross-origin resource sharing (CORS).
Add the following Allowed origin: *
Select Save.

I have added * which allows all URL’s but you can be specific by adding the only the relevant URL’s such as https://make.powerapps.com, https://make.powerautomate.com etc
Summary:
Up to this point, we have set up the API Management instance with Graph API endpoints for both System Assigned and User Assigned identities. In the upcoming article, we will delve into exporting the API to the Power Platform as a custom connector, implementing security through API key authentication. Hope you have found this informational & thanks for reading. If you are visiting my blog for the first time, please do look at my other blogposts.
Do you like this article?
Subscribe to my blog with your email address using the widget on the right side or on the bottom of this page to have new articles sent directly to your inbox the moment I publish them.