Streamlining Integration: Using Azure Managed identities in Power Apps and Power Automate to access Microsoft Graph API – Part 2

In Part 1 of the blog series on using Managed identities in Power Apps and Power Automate to access Microsoft Graph API securely, I have delved into the setup and configuration of the Azure API management service with the necessary Microsoft Graph permissions for the managed identity. Building upon that foundation, Part 2 aims to take it further your integration journey in making the API’s available as a connector in Power Apps and Power Automate secured with API key Authentication.

Azure API Management Instance: Managing API Subscription Keys

APIs published through the Azure API Management instance are by default secured by Subscription keys. These keys play a crucial role in establishing connections in Power Apps or Power Automate after exporting APIs as custom connectors.

To manage these keys, navigate to the left navigation menu under the “Subscriptions” blade in the Azure portal within your API Management (APIM) instance. Here, you have the option to generate a new key or utilize an existing one. Copy the key from the portal to create the connection in the later section.

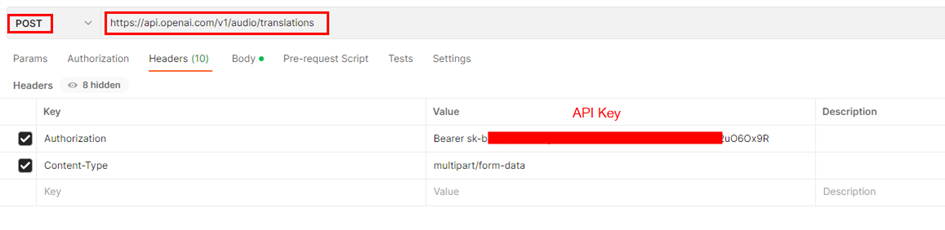
You can test the API by using the Subscription key from Postman as shown below:            

Exporting API as a Connector in Power Platform:

To harness the capabilities of the APIs within your API Management instance secured with the Managed identities, exporting them as connectors in Power Platform is a major step in order to be used in Power Apps and Power Automate. Follow these simple steps for a seamless integration:

In the left navigation menu, navigate to Power Platform under the APIs blade.

  • Click on Create a connector to initiate the connector creation process.
  • Choose the specific API (e.g., msgraph) that you wish to export as a connector.
  • Select the Power Platform environment where you have Maker/Admin role access.
  • Under API Display Name, enter a name for the connector. This will be the identifier for your connector within Power Platform.
  • Click on the “Create” button to complete the process.

Once the connector is created, navigate to your Power Apps or Power Automate portal. You’ll see the API listed under Custom Connectors on the left navigation bar in Environment where the connector has been created from the API Management instance.

  • Click on the Edit icon to initiate the analysis and testing of connector actions.
  • Explore the Definition tab to view the view the API operations within the APIM instance now listed as Actions.
  • Verify the Authentication type of the connector by navigating to the Security tab, where the setting is configured to API key for streamlined validation.
  • Begin by creating a connection in the Test tab. Click on + New connection to start testing.
  • Enter the Subscription key, which you previously copied from the Azure portal for the API Management (APIM) instance. This key establishes the secure link between your connector and the APIM services. If there is no error, the connection will be created.

In the event of encountering below error message indicating that connection creation has been blocked by Data Loss Prevention (DLP) policy

Add the Gateway URL copied from the API management instance under the Overview section on the portal as a connector pattern allowed in the Business/Non Business category of the DLP policy.

Note: Please be aware that in the API Management instance, within the APIs Policies section, if you haven’t included the wildcard (*) as I did for CORS, and have instead specified particular URLs like https://make.powerapps.com, an additional policy in the Custom connector is required to be added under the Definitions tab. Specifically, you need to add a policy to set the request Origin header.

Testing the Custom Connector:

Once the connection is created, return to the edit mode of the custom connector to initiate testing of the actions. Navigate to the Test tab, where you can select the specific connection and choose the operation you wish to test. Test the operation and validate the results of the custom connector action.

Summary:

This completes the Part 2 of the blog series where we have explored the process of accessing Microsoft Graph APIs securely within the API management with Subscription key authentication using managed identities (System and User) as a connector in Power Platform. In our next article, we will delve into the enhancing security further by implementing OAuth authentication within the custom connector for API management APIs. Stay tuned. Hope you have found this informational & thanks for reading. If you are visiting my blog for the first time, please do look at my other blogposts.

Do you like this article?

Subscribe to my blog with your email address using the widget on the right side or on the bottom of this page to have new articles sent directly to your inbox the moment I publish them.

Streamlining Integration: Leveraging Service Principal Authentication for SQL Connector in Power Apps and Power Automate

In the ever-evolving landscape of business processes and data management, efficient integration is the key to success. Securing and managing connections in Power Apps and Power Automate is a critical aspect of integration. This blog post delves into how to use Service Principal authentication to create a connection for Azure SQL Server database with the SQL Server connector in Power Apps and Power Automate. The other supporting authentication types for the SQL Server connector are Azure AD Integrated, SQL Server Authentication, and Windows Authentication.

Prerequisites:

  • An existing Azure SQL Database deployment with Owner role.
  • Access to an existing Microsoft Enterprise tenant for creating an Azure AD App registration.

Setting up the Service Principal:

Let’s headover to the Microsoft Entra Admin center to register an AD application. To register an app, you need to either be a Microsoft Entra admin or a user assigned the Microsoft Entra ID Application Developer role.

To register your application:

In the Azure portal, select Microsoft Entra ID > App registrations > New registration (Microsoft only – Single Tenant)

Retrieve the Client ID, Tenant ID, Display name from the Overview section of the Azure AD app, and then proceed to generate a Secret within the Certificates & secrets section under the Manage blade. Once the secret is generated, copy its value

Granting SQL Roles to Service Principal in Azure SQL Database:

Now that the service principal is created, you can grant an SQL role either from SQL Management Studio or the Azure Portal. In this post, I have used the Azure portal. Follow these steps:

  1. In the Azure portal, navigate to your SQL database’s Overview page.
  2. From the left menu, select “Query editor (preview).”
  3. Connect to the database using either SQL Server Authentication or Microsoft Enterprise Authentication.
  4. In the query window, execute the following script to create a new user in the SQL Server database authenticated with the Azure AD provider.
  5. Run a second query to add the newly created user to the “db_owner” database role. You can assign the role based on your specific requirements.
CREATE USER [PPServicePrinicipal-AzureSQLServer-DisplayNameoftheServicePrincipal] FROM EXTERNAL PROVIDER
GO
EXEC sp_addrolemember 'db_owner', [PPServicePrinicipal-AzureSQLServer- DisplayNameoftheServicePrincipal]
GO

Create Connection:

The service principal has access to the Azure SQL database, let’s proceed to create the connection using the SQL Server connector. In the Power Apps maker portal, navigate to Connections and click on + New Connection as shown below:

From the connectors list, choose SQL Server, and then select the Authentication type as Service Principal (Azure AD application). Enter the Tenant ID, Client ID, and the secret that you copied earlier for the service principal. Finally, click Create, as shown below:

The connection has now been successfully created and is ready for use in Power Apps and Power Automate.

Use the connection in Power Automate Flow:

In the Power Automate Portal, begin by creating an Instant flow. Add the Get Rows action from the SQL Connector and ensure that you’ve selected the connection associated with the Service Principal created earlier.

For the Server name, choose Enter custom value, and enter the Azure Server name in the format serverName.database.windows.net. For the Database name, select ‘Enter custom value’ and enter the Database Name. As for the Table, it may automatically load, or you can select ‘Enter custom value’ and specify it as [dbo].[TableName].

Execute the flow, and it should run successfully. While I’ve tested it with a Trigger (When and item is created etc) and it didn’t work, I will provide an update here as soon as I gather more information.

Use the connection in Power Apps:

Begin by creating a blank Power App from the Power Apps maker portal. Add the SQL connector from the Data section in the left navigation bar, and select the SQL connection you have created earlier. Provide the SQL server name and the database name, then click Connect. This will allow you to select tables and create the data source connection.

Add a Gallery control and then test it.

Caveats:

References:

https://learn.microsoft.com/en-us/connectors/sql/#service-principal-azure-ad-application

https://learn.microsoft.com/en-us/azure/azure-sql/database/authentication-aad-service-principal-tutorial?view=azuresql#create-the-service-principal-user-in-azure-sql-database

Summary:

In this blog post, I’ve shown how to utilize Service Principal authentication with the SQL Server connector in Power Automate and Power Apps. While there are still some limitations, it’s encouraging to see that Microsoft is actively working to expand the capabilities of Service Principal authentication. If you found this post helpful, you might also be interested in my previous article, where I discuss the use of Service Principal authentication with custom connectors via the Graph API. Hope you have found this informational & thanks for reading. If you are visiting my blog for the first time, please do look at my other blogposts.

Do you like this article?

Subscribe to my blog with your email address using the widget on the right side or on the bottom of this page to have new articles sent directly to your inbox the moment I publish them.

Streamlining Integration: Using Service Principal authentication on Custom connectors with Microsoft Graph Application Permissions

Microsoft recently announced a long awaited feature: support for Service Principals in Custom connectors which is currently in Public Preview. This empowers you to authenticate as a service principal instead of relying on user accounts. It’s a game-changer that paves the way for a multitude of scenarios, especially those requiring seamless, uninterrupted access for automated processes, free from the constraints of user involvement.

In one of my earlier posts, I discussed how to harness the power of Microsoft GRAPH API within custom connectors through delegated permission. In this article, I’ll delve into the step-by-step process of configuring service principal authentication in a custom connector for the Graph API with Application permissions to send emails. While I’ve chosen to focus on email communication, remember that you have the flexibility to opt for any of the supported Graph application permissions.

Setting up the Service Principal:

Let’s headover to the Microsoft Entra Admin center to register an AD App and grant the application permissions to send emails using the Graph API. Register an AD application with the following Application permission

Mail.Send: Send Mail as any user

Retrieve the Client ID & Tenant ID from the Overview section of the Azure AD app, and then proceed to generate a secret within the Certificates & secrets section under the Manage blade. Once the secret is generated, copy its value for use within the custom connector configuration. Add a Web Redirect URI https://global.consent.azure-apim.net/redirect as shown below

The Redirect URI is common and will be created while creating the custom connector.

Create Custom Connector:

With the service principal now created, let’s proceed to create the custom connector from the Power Apps maker portal. Choose the environment where you intend to create the custom connector. Navigate to Custom connectors on the left navigation menu, then click on + New custom connector and select Create from blank.

Once you’ve provided the connector name, you’ll be presented with the following screen. Enter graph.microsoft.com in the Host field and provide a brief description of the connector. Additionally, you have the option to customize the connector’s logo to your preference.

Now click Security at the lower-right corner of the above screen, which allows you to input the Azure AD application information for the service principal/App registration created earlier in the Entra Admin portal.

Here’s the step-by-step configuration:

  • Choose Authentication type as OAuth 2.0.
  • Change the Identity provider to Azure Active Directory.
  • Check the box Enable Service Principal support
  • Enter the Client ID and Client Secret from the Azure AD application.
  • Keep the Authorization URL as https://login.microsoftonline.com and Tenant ID as common.
  • Enter the Resource URL as https://graph.microsoft.com
  • For the Scope, specify Mail.Send based on the permissions you have added to the Azure AD app. If you have multiple permissions, separate them with spaces.

Once you’ve filled in this information, click Create connector. This action will automatically generate the Redirect URL as https://global.consent.azure-apim.net/redirect This URL should match the Redirect Web URI you previously added in the Azure AD application. With this configuration, your connector is now ready for the adding the actions based on the Graph API endpoints for sending emails.

Create Action to Send email:

With the connector successfully created, it’s time to create the action for sending emails. This action can be utilized in both Power Apps and Power Automate. The Graph API endpoint for sending emails is:

Http Request Mode: POST

Request URI: https://graph.microsoft.com/v1.0/users/{fromEmailAddress}/sendMail

The request parameter fromEmailAddress is to collect the information from the user while using the action

Request Body:

{
  "message": {
    "subject": "Mail sent using Custom Connector",
    "body": {
      "contentType": "Text",
      "content": "This is a sample email sent using Custom Connector which uses Service prinicipal"
    },
    "toRecipients": [
      {
        "emailAddress": {
          "address": "mailboxaddress@domain.com"
        }
      }
    ]
}
}

Proceed to the Definition tab of the Custom Connector. Here, select + New action, which will generate the following screen for you to enter information about the action.

After the Summary, Description and Operation ID is entered. Click + Import from sample under the Request section to the enter the Graph API endpoint request details as shown below

Click Import on the screen above. You can optionally provide a sample response by entering details in the default response section in the Add Action interface which will help you identify objects in Power Apps if the request has a response. For more information, please refer to my earlier blog post, which I have referenced in the introduction section. Don’t forget to update the connector.

Create Connection:

Once the connector with the Send Email action is set up, you can now proceed to test the action for sending emails. The first step is to create the connection, navigate to the below interface and click on + New connection under the section Test and then on the following popup select the Authentication Type as Service Principal Connection.

Enter the Client ID, Secret, and the Tenant ID you copied earlier to create the connection. You would now be able to test the action.

To use this in the Power Apps, after adding the connector, you would be able to call the action using the below code:

ServicePrinicpalSupport.SendEmail("fromEmailAddress@domain.com", {
        'message': {
            'subject': "Mail sent using Custom Connector from Power Apps",
            'body': {
                'contentType': "Text",
                'content': "Sample email sent from Custom Connector leveraging Service Principal"
            },
            'toRecipients': [
                {
                    'emailAddress': {
                        'address': "toUseraddrees@domain.com"
                    }
                }
            ]
        }
    });

The connections created uses the Authentication Type Explicit Authentication.

https://learn.microsoft.com/en-us/power-platform/admin/security/connect-data-sources#authenticating-to-data-sources

Sharing Connector:

When the app is shared with the user, the user will not be prompted to create a connection; instead, the consent window below will appear to allow the connection. You can use the PowerShell command Set-AdminPowerAppsApiToBypassConsent if you want to bypass consent for the app users. The connection is shareable, allowing you to share it for editing, using, sharing, etc., with other users.

Authentication Flow:

The authentication flow for custom connectors enabled with Service Principal uses the OAuth 2.0 client credentials flow, while for the custom connectors without Service Principal authentication, the OAuth 2.0 Authorization code flow is used. Below, you’ll find the Swagger details for the custom connector, showing both scenarios for connecting to Microsoft Graph using OAuth2 with Azure Active Directory

Swagger definition for Service Principal AuthenticationSwagger definition for Non Service Principal Authentication
securityDefinitions:   oauth2-auth:     type: oauth2     flow: accessCode     tokenUrl: https://login.windows.net/common/oauth2/authorize     scopes:       Mail.Send: Mail.Send     authorizationUrl: https://login.microsoftonline.com/common/oauth2/authorize   oAuthClientCredentials:     type: oauth2     flow: application     tokenUrl: https://login.windows.net/common/oauth2/authorize     scopes:       Mail.Send: Mail.Send security:   – oauth2-auth:       – Mail.Send   – oAuthClientCredentials:       – Mail.SendsecurityDefinitions:   oauth2-auth:     type: oauth2     flow: accessCode     tokenUrl: https://login.windows.net/common/oauth2/authorize     scopes:       Mail.Send: Mail.Send     authorizationUrl: https://login.microsoftonline.com/common/oauth2/authorize security:   – oauth2-auth:       – Mail.Send

Summary:

In this blog post, I have shown you how to use Service principal authentication in custom connector with application permissions to send an email through the Graph API. You can apply this feature for any supported Microsoft Graph Application permission such as SharePoint, Exchange, Teams, Azure AD, and more. It’s a game-changer, making automated processes smooth and user-free. Hope you have found this informational & thanks for reading. If you are visiting my blog for the first time, please do look at my other blogposts.

Do you like this article?

Subscribe to my blog with your email address using the widget on the right side or on the bottom of this page to have new articles sent directly to your inbox the moment I publish them.

Convert Speech to Text using OpenAI Whisper in Power Apps

OpenAI has released a new neural network called Whisper, which is an open-source model that can convert speech to text with impressive accuracy. This model is specifically designed to transcribe spoken language into text with high precision and speed, making it an ideal tool for a variety of applications, such as virtual assistants and video captioning. Whisper relies on advanced machine learning algorithms to analyze audio signals from multiple languages and convert them into written text. OpenAI has recently made API endpoints available to the public since March 1, 2023, allowing developers to easily integrate this powerful technology into their own applications.

The Speech to Text Open API can

  • Transcribe audio into whatever language the audio is in.
  • Translate and transcribe the audio into English.

As of the date I am writing this post, this model is not available in Azure. In this blog post, I will cover how to use the Microphone control and File Upload control to convert speech to text using the OpenAI Whisper API in a Power Automate flow.

Download Link to the Sample App: https://github.com/ashiqf/powerplatform/blob/main/OpenAI-SpeechtoText.msapp. Replace the API Key in the Power Automate flow HTTP Action Authorization Header.

OpenAPI Speech to Text API:

The speech to text API provides two endpoints, transcriptions and translations. At present, the maximum file size allowed for uploads is 25 MB and the supported audio formats are mp3, mp4, mpeg, mpga, m4a, wav, and webm. In this blog post, I utilized the Translation API to demonstrate its capability to convert English audio into text, it can understand other languages as well

POST https://api.openai.com/v1/audio/translations

If you have not yet created an API key, please sign up/login for OpenAI and obtain it from there.

Body:

Integration with Power Apps:

I have used a Power Automate flow with the Power Apps trigger to invoke the Speech to Text API via the HTTP connector in Power Automate. Alternatively, you can achieve the same outcome by constructing a Custom Connector. This sample app can be downloaded from this github link.

Microphone Control:

The audio control captures audio input through the device’s microphone and will be sent to the Power Automate flow for conversion into text using the Whisper API. The audio format of the recording depends on the type of device being used

  • 3gp format for Android.
  • AAC format for iOS.
  • Webm format for web browsers.

I’ve tested this control from the app accessed through the web browser. If you encounter an unsupported audio format for OpenAI, you can use utilities such as FFMpeg. Additionally, a .Net version of the control is available for download which can be used in Azure Function. John Liu (MVP) has written a sample Azure function that handles the conversion of audio formats using the aforementioned utility.

Step 1: To add a microphone control to the canvas, insert the Microphone control from the command bar. To preview the recorded audio from the Microphone control, add an Audio control

Step 2: Add a button to convert and to trigger the Power Automate flow. Find below the Power FX code

//Generates a JSON Text with the binary of the Audio file or Recorded audio
Set(varJson,JSON(Microphone1.Audio,JSONFormat.IncludeBinaryData));
Set(strB64Audio, Last(Split(varJson, ",")).Value);
Set(strB64AudioContent, Left(strB64Audio, Len(strB64Audio) - 1));
//Extract Audio Format
Set(varAudioFileType,Mid(varJson,Find(":",varJson)+1,Find(";",varJson)-Find(":",varJson)-1));
//Call the Power Automate Flow
Set(audioText,'SpeechtoText-OpenAIWhisper'.Run(strB64AudioContent,varAudioFileType).audiotext);

The Power FX code performs the following task

  • Stores the audio captured by a Microphone control in a variable as JSON data, including binary data.
  • Extracts the base64-encoded audio content from the JSON data using the string manipulation functions Split, Left, Mid.
  • Determines the audio file type by parsing a string variable.
  • Uses the extracted audio content and file type to call the Power Automate flow ‘SpeechtoText-OpenAIWhisper’ to obtain the corresponding text transcription which comes in later section of this post.
  • Assigns the resulting text transcription to a variable named ‘audioText’, this is assigned to a Text Label to display the converted text from the OpenAI Whisper API.

Step 3: Add a Label control to display the converted Text set to the variable audioText

File Upload Control

As of the day I am writing this post there is no file control that can handle all types of files in Power Apps, I have created a custom component utilizing the Attachment control to create a file attachment control. For further details, please refer to blogpost Uploading Files Made Easy: A Guide to Using the Attachment Control in Power Apps to add the control to the app.

Step 1: Add the file attachment control to the app from the component library. Set the input property for Maximum Attachments to 1 from the component.

Step 2: To extract the binary content of an audio file, add an Image control to the app. The Image control is capable of working with any type of file to extract its content.

Step 3: Add a Button control to convert the Audio from the uploaded file. Find the PowerFX below

//Generates a JSON Text with the binary of the Audio file using the Image control
Set(varFileContent,JSON(Image1.Image,JSONFormat.IncludeBinaryData));
//Extract Base64 content
Set(varExtractedFileContent,Last(Split(varFileContent,",")).Value);
//Remove the last character " from the string
Set(varExtractedFileContent,Left(varExtractedFileContent,Len(varExtractedFileContent)-1));
//Extract Audio Format
Set(varAudioFileType,Mid(varFileContent,Find(":",varFileContent)+1,Find(";",varFileContent)-Find(":",varFileContent)-1));
//Call the Power Automate Flow
Set(audioText,'SpeechtoText-OpenAIWhisper'.Run(varExtractedFileContent,varAudioFileType).audiotext);

Step 4: Add a Label control to display the converted Text set to the variable audioText

Power Automate Flow

Now, let’s create a Power Automate flow with the Trigger type Power Apps to invoke the OpenAI Whisper API and convert speech to text. Step 1: Add two compose action (input parameters) to receive the audio format and content from either the recorded audio captured by the Microphone control or the uploaded audio file from the file attachment control in the Power Apps

{
  "$content-type": @{outputs('Compose-AudioFormat')},
  "$content": @{triggerBody()['Compose-FileContent_Inputs']}
}

Step 2: Add a HTTP connector to make a request to the Whisper API endpoint. Refer to the blog post How to use form-data and form-urlencoded content type in Power Automate or Logic Apps HTTP action for handling multipart/form-data in the HTTP action

Request Body:

{
  "$content-type": "multipart/form-data",
  "$multipart": [
    {
      "headers": {
        "Content-Disposition": "form-data; name=\"model\""
      },
      "body": "whisper-1"
    },
    {
      "headers": {
        "Content-Disposition": "form-data; name=\"file\";filename=\"audiofile.webm\""
      },
      "body": @{outputs('Compose-FileContent')}
    }
  ]
}

Step 3: Add the Respond to a PowerApp or a flow action to pass the converted text back to the app. To get the converted text, use the following expression

body('HTTP-CallaOpenApiModel')['Text']

The expression was constructed based on the response of the Whisper API call. In the event that the response property changes in the future, please ensure to update the expression accordingly.

Summary:

In this post, I’ve outlined a step-by-step guide on how to develop a basic app with Speech to Text functionality using Power Apps and a Power Automate flow leveraging the OpenAI’s Whisper API. The possibilities for using this technology are endless, from creating virtual assistants to generating audio captions and translations. Furthermore, the Whisper API can also be used to transcribe video files, adding even more versatility to its capabilities. It’s worth noting that while Azure offers its own Speech to Text service, it currently does not rely on the OpenAI Whisper Model. However, it’s possible that the two services will eventually integrate in the future. Hope you have found this informational & thanks for reading. If you are visiting my blog for the first time, please do look at my other blogposts.

Do you like this article?

Subscribe to my blog with your email address using the widget on the right side or on the bottom of this page to have new articles sent directly to your inbox the moment I publish them.

How to copy an existing DLP Policy in Power Platform

DLP policies are essential in ensuring that data is managed uniformly across an organization, thereby preventing critical business data from being accidentally published to social media or other connectors. These policies can be created at both the tenant and environment levels, with management handled through the Power Platform admin center. However, it is currently not possible to copy an existing DLP policy from the Admin center. This limitation can create difficulties when there is a need to create new policies based on an existing one.

In this blog post, we will explore various options for copying existing DLP policies to streamline the process. By using these options, you can save time and effort when creating new policies based on existing ones.

  • Power Automate Flow
  • DLP Editor Power Apps from CoE starter kit app
  • Power Shell

Note: To create a DLP policy at the Tenant level, you must be a Power Platform or Global Administrator role in AD.

Power Automate Flow:

The Power Platform Connector for Admins, available in both Power Automate and Power Apps, offers a range of environment lifecycle management capabilities, including DLP policy management.

To copy an existing DLP Policy, we will be utilizing the action List DLP Policies and Create DLP Policy in a Button Flow

Step 1: In the trigger, create two parameters to get the input for the existing Policy Name and the New DLP Policy name followed with the action List DLP Policies from the connector Power Platform for Admins to list all the policies in the Organization

Step 2: To select the DLP policy that you want to copy in a Power Automate flow, add a Filter Array action. This action filters the DLP policies obtained from the List DLP Policies action based on a condition. Specifically, it checks whether the displayName of the DLP Policy from the DLP Policies list action matching with the trigger input Existing DLP Policy Name. Once the Filter Array action is executed, it returns a new array containing only the DLP policy that meets the condition. This filtered array can then be used as input for creating a New DLP policy

Step 3: Add the action Create DLP Policy from the Power Platform for Admins connector with the first property Display Name from the Trigger input. For the other input parameters for the action, use the expression from Output of the Filter Array action as shown below

body('Filter_array')[0]['defaultConnectorsClassification']
body('Filter_array')[0]['connectorGroups']
body('Filter_array')[0]['environmentType']
body('Filter_array')[0]['environments']

Save the changes to ensure that they are preserved. Once you have saved the flow, you can test it to make sure that it works as intended. I have the flow definition saved in my github if you wanted to take a copy of it.

CoE Starter Kit App:

The Center of Excellence (CoE) starter kit core components solution includes a Canvas app DLP Editor with a range of useful features to manage and administer DLP policies. One such feature is the ability to copy an existing Data Loss Prevention (DLP) policy, making it easy to replicate policies across multiple environments or tenants.

This app uses the Power Platform for Admins connector.

Power Shell:

Power Apps Administration PowerShell provides a convenient set of cmdlets that enable you to easily create and manage Data Loss Prevention (DLP) Policies. Microsoft has provided a helpful sample script that allows you to manage your tenant and environment policies. With this script, you can perform a wide range of tasks related to DLP policies, including creating new policies, reading existing policies, updating policies, and removing policies. The sample can be found here. By breaking down the sample script into manageable sections, you can gain a deeper understanding of how DLP policies work and how you can modify them to suit your organization’s needs with PowerShell.

Summary:

This blog post provides a overview of different methods that can be used to copy existing Data Loss Prevention (DLP) policies, which is currently not available from the Power Platform admin center. These techniques can help automate the DLP policy creation process, saving time and effort.

Do you like this article?

Subscribe to my blog with your email address using the widget on the right side or on the bottom of this page to have new articles sent directly to your inbox the moment I publish them.

What is GraphQL and how to consume a GraphQL Query based API in Power Automate

I had a recent requirement to call a GraphQL based API secured with OAuth2 in Power Automate, this blog post is to share my learnings on GraphQL & how to call them in Power Automate. Let us quickly see some introduction to GraphQL

GraphQL is an open-source query language for your APIs with a service-side runtime for executing the queries based on pre-defined schema. It is not tied to any specific database but rather backed by your existing code and data.

  • A GraphQL API is different from a REST API in that it allows the client application to query for certain fields of resources. Send a GraphQL query to your API and get exactly what you need, like the name of a user and only receive that data.
  • GraphQL APIs get’s all the data a client needs in a single request.
  • It replaces multiple REST requests with a single call to fetch the data you specify.
  • Provides an abstraction layer to the client, which means that clients do not need to query multiple URLs to access different data.  

Find some comparisons against REST

RESTGraphQL
HTTP Verbs (GET, POST, PATCH, PUT, DELETE) determines the operation to be performedYou will provide a JSON body aka GraphQL query whether you have to read or fetch values (GET) or a mutation (POST, PATCH, PUT, DELETE) to write values
Multiple API Endpoints http://api.com/users http://api.com/products etcSingle API Endpoint
http://api.com/graphql

When a HTTP GraphQL request is made with a query, the GraphQL server parses the query and respond back with data usually in a specific JSON format. There can also be variables in a query which makes it more powerful and dynamic. In GraphQL, the HTTP verb is predominantly POST but there can be implementations where Query & Variables are sent in URL encoded query parameters in the URL. I have used GitHub to learn & test GraphQL queries against my GitHub account.

GitHub GraphQL Explorer:

Github has GraphQL API that allows you to query and perform operations against repositories, users, issues, etc. To follow along this blogpost, sign in with your GitHub account on the GitHub GraphQL explorer URL https://docs.github.com/en/graphql/overview/explorer for testing some GraphQL queries

  1. Create a Repository in your GitHub account
  2. Get all your existing repositories

Let’s make first query on the explorer to get your GitHub Id for creating a new repo, the query is

{
  viewer {
    login
    id    
  }
}

In Explorer

Type your queries on the left side panel and hit play to see the JSON response on the right side. Click the Docs link on the right top corner to go through the documentation. The GitHub graphql explorer can be a great starting point to learn and to write queries

Tip: Hitting Ctrl+Space on the explorer will show you all the available fields that you can query against the API.

Create a Repository in your GitHub account:

Find below the query & variables to create a Repo in your GitHub account. The ownerId on the query variables should be value copied from the previous query. The other observation on the query is we are using mutation since we are creating a repository

Query to create a Repo with out passing a query variable:

mutation createRepo {
 createRepository(input:
{
  name: "GraphQLDemoRepo-Blog",
  ownerId: "xxxxxxxxxxxxxxxxxxxxxx",
  visibility: PRIVATE
}){
  repository
  {
    name
    createdAt
  }
}
}

Get all your existing repositories

Find below the query to get all your existing repositories

{
  viewer {
    name
    repositories(first: 100) {
      totalCount
      nodes {
        name
      }
    }
  }
}

Till now we have seen couple of example queries in GitHub explorer, let us now see how to consume them in Power Automate

Call a GraphQL query in Power Automate:

HTTP connector in Power Automate can be used to call a GraphQL query based API but you will have to first convert the GraphQL query (Query+Variables) to a HTTP request with raw body. You can use the Postman utility to help you with the conversion. To call the above mentioned GraphQL query to create a Repo in Postman, the first step is create a Personal Access token. Create the token as per the instructions given in the following documentation with the scope repo selected

https://docs.github.com/en/github/authenticating-to-github/creating-a-personal-access-token#creating-a-token

In Postman, add a new request as per the following detail

Method: POST

Request URL: https://api.github.com/graphql

Authorization Type: Bearer Token

Token value should be the Personal Access token you have generated above. Find below screenshot for your reference in order to set the authorization token

In the request Body tab, enter the Query and GraphQL variables for creating the repo after selecting the Body type to GraphQL from none

On the query tab, CTRL+Space also works in Postman which autoprompts with some suggestions for fields.

Execute the request by clicking Send button which will create a New repo by the Name GraphQLDemo-blog in your github account. To call this GraphQL query in Power Automate, click the Code button as shown above on the right panel of the postman request and then select HTTP to auto generate a code snippet for making a HTTP request with raw body

Copy the request body as shown above. On the Power Automate HTTP connector, enter the following details to create the Repo

Method: POST

URI: https://api.github.com/graphql

Headers:

Key: Authorization

Value: Bearer PersonalAccessToken

Body: Value copied from Postman

Test the flow. If all is well you can see the repo created in your github account. Find below screenshot from run history

References:

https://graphql.org/learn/

https://docs.github.com/en/graphql/overview/about-the-graphql-api

https://docs.github.com/en/graphql/guides/forming-calls-with-graphql#about-queries

https://www.apollographql.com/docs/apollo-server/deployment/azure-functions/

Playground to test GraphQL queries (No Authentication required): http://graphql.github.io/swapi-graphql/

Summary: On this post we have seen how to call a GraphQL query based API from Github in Power Automate using a HTTP connector to create a Repo, this can be replicated to consume any other GraphQL based APIs. You can also construct dynamic request body on the HTTP connector for various operations. Hope you have found this informational & thanks for reading. If you are visiting my blog for the first time, please do look at my other blogposts.

Trigger an Azure Webjob from Power Automate

On this post let us see how to trigger or run a WebJob from Power Automate. WebJob is a powerful service in Azure keeping in mind the supported file types or programs it can run. Before proceeding with the instructions to call a WebJob in Power Automate, let us see some basics of an Azure WebJob. WebJobs is a feature of Azure App Service that enables you to run a program or script in the same instance of the Azure web app with no additional cost. As of now it is not supported in App service plan for Linux. There are two types of WebJobs

  1. Continuous WebJob
    • Starts immediately when the WebJob is created. To keep the job from ending, the program or script typically does its work inside an endless loop.
    • Runs on all instances that the web app runs on. You can optionally restrict the WebJob to a single instance.
  2. Triggered WebJob
    • Starts only when triggered manually or on a schedule based on CRON expression.
    • Runs on a single instance that Azure selects for load balancing.

Supported file types for scripts or programs:

The following file types are supported:

  • .cmd, .bat, .exe (using Windows cmd)
  • .ps1 (using PowerShell)
  • .sh (using Bash)
  • .php (using PHP)
  • .py (using Python)
  • .js (using Node.js)
  • .jar (using Java)

Check here the documentation from Microsoft to choose between Flow, Logic Apps, Functions & Webjobs for your automation services with comparisons against each other. If you are using a Function app with a Consumption plan your function can run only to a max of 10 mins. If you have a long running task on a webjob, set this property in the App service Application setting from the Configuration blade as shown below

The above setting is to avoid idling out if there is no CPU activity. The IDLE timeout setting is set to 1 hour in the above screenshot.

Azure WebJobs SDK:

There is a Powerful Azure WebJobs SDK which simplifies the task of writing background processing code that runs in WebJobs. It makes it easier to write code that reads or writes from Azure Storage account and it also facilitates to trigger the WebJob if there is any new data on the queue, blob, table, service bus for an event driven architecture. Azure functions is built on the WebJobs SDK. If you set your web app to run continuous or scheduled (timer-trigger) WebJobs, enable the Always on setting on your web app’s Azure Configuration page to ensure that the WebJobs run reliably. This feature is available only in the Basic, Standard, and Premium tiers of the App service plan.

Create and Deploy a WebJob:

To call a WebJob from Power Automate, let us create a Triggered WebJob (.Net Framework) from Visual Studio. There is a also support for .NET Core console apps as WebJobs. Refer this documentation from Microsoft to create a WebJob from Visual Studio. In Visual studio there is a template to create a WebJob project as shown below

This is how the VS project looks like

The Program.cs has the code to ensure that the Job will be running continuously, for this case it is not required comment or remove the code which is highlighted. The Functions.cs has the code to pick up the message from the Storage Queue (Event-Driven) through the WebJobs SDK runtime, the WebApp must set to Always on to make it work. For this example, it is not required since it is going to be a triggered Job so the file Functions.cs can be deleted.

If you have any arguments to be passed from Power Automate, you can access it on your code as shown below

To deploy the WebJob, right click the project and select Publish. If there is no publish profile yet, create one or export it from Azure WebApp and then Publish. To know more about the Publish settings In the Publish tab, choose Edit as shown below

The WebJob will be now in Azure. Go to your Azure WebApp or App Service and click WebJobs under the settings blade to find the WebJob deployed from Visual Studio. Find the WebJob in the Azure portal

WebJobs API endpoint for the WebJob:

There are API endpoints available for the Azure WebJob which will be used for triggering the WebJob from Power Automate. Go through the following documentation for more details on the list of available endpoints:

https://github.com/projectkudu/kudu/wiki/WebJobs-API

To Trigger or Start a WebJob, you should have the Webhook URL from the Azure Portal. To get the URL, click Properties after selecting the WebJob as shown below

Copy the Web hook URL, User Name and Password to be later used in Power Automate. Let us trigger the WebJob from Postman client using the above information

Method: Post

URL: https://yourappname.scm.azurewebsites.net/api/triggeredwebjobs/webjobname/run

Authorization Type: Basic Auth

User Name and Password copied from the Portal

This will trigger the Job.

If there are parameters to be passed, the API would be like

https://youwebappname.scm.azurewebsites.net/api/triggeredwebjobs/youwebjobname/run?arguments={arg1} {arg2}

Trigger from Power Automate:

Till now we have the WebJob published in Azure, can we call an API in Power Automate. Yes, it is possible with the help of the Premium action HTTP as shown below

Voila! The WebJob has been triggered from Power Automate.

Summary: On this post we have seen how to call a WebJob using PowerAutomate. There is also a trigger to calla  Flow from a PowerApp, which could be used to start the WebJob. Hope you have found this informational & helpful. Let me know any feedback or comments on the comment section below

How to use a sample PCF component in your Power Apps

If you are PowerApps developer and wanted to extend the capabilities by bringing in third party or community driven PCF (Power Apps Component Framework) components, you can find lot of samples from the Power Apps community website PCF.gallery, Power Apps Community and from Microsoft for Model driven and Canvas apps.

Sample components from Microsoft

If you are new to component framework, I recommend going through the documentation from the following link:

https://aka.ms/pcfdocs

The PowerApps component framework enables the developers to create code components for model-driven and canvas apps. I have recently used a control from the PCF gallery community site, let’s see how to package and deploy a sample control to the Power Apps environment and then consume it on your Canvas app. There are two methods to deploy a code component:

  1. Import the solution in to CDS
  2. Power Apps CLI

To follow along the blog post, have the following available and installed on your environment

  1. Install Power Apps CLI and Node.js
  2. Access to Power Apps CDS Environment
  3. Developer Command prompt for Visual Studio 2017 or 2019
  4. Power Platform Administrator
  5. Enabling the PowerApps component framework on canvas applications

Method 1: Import the solution in to CDS:

For this post, I have chosen the React Face pile component from Microsoft Power Apps samples github repo. Follow the steps to create the solution ZIP file to be imported on the solutions gallery. If you already have the solution package, directly proceed to the Step 10.

Step 1: Download as a ZIP package and extract to a folder on your computer or git clone from the Microsoft Github repository. I have downloaded on C:\ PCF\Controls\sample-controls

git clone https://github.com/microsoft/PowerApps-Samples.git

Step 2: Open the Developer command prompt and navigate to the folder on the computer where you have downloaded the React Face pile component using the cd folder-path-react-facepile-component command e.g folder-path: C:\ PCF\Controls\sample-controls\PowerApps-Samples\component-framework\TS_ReactStandardControl

Step 3: Install all the required dependencies by running the command

npm install

Step 4: Create a folder (e.g ReactStandardControlSolution) on the root of the React face pile component project (e.g C:\ PCF\Controls\sample-controls\PowerApps-Samples\component-framework\TS_ReactStandardControl) either manually or using the command mkdir ReactStandardControlSolution

Step 5: Navigate to the created folder by using the command cd ReactStandardControlSolution

On your command prompt, you should now be on e.g C:\ PCF\Controls\sample-controls\PowerApps-Samples\component-framework\TS_ReactStandardControl\ ReactStandardControlSolution

Step 6: Create a new solution project using the following command. The solution project is used for bundling the code component into a solution zip file that is used for importing into Common Data Service.

pac solution init --publisher-name developer --publisher-prefix dev

The Published-name and publisher-prefix values should be unique to your environment

Step 7: Add the reference using the command shown below. This reference informs the solution project about which code components should be added during the build. The path should to the root of the downloaded react face pile component and not to the newly created solution folder

pac solution add-reference --path C:\ PCF\Controls\sample-controls\PowerApps-Samples\component-framework\TS_ReactStandardControl\

Step 8: To generate the ZIP package, enter the following command

msbuild /t:build /restore

Step 9: The generated ZIP file will be available on \bin\debug\ folder once the build is successful

Note: Make sure there is no spaces on the folders you create to avoid deployment issues

Reference:

https://docs.microsoft.com/en-us/powerapps/developer/component-framework/import-custom-controls

https://docs.microsoft.com/en-us/powerapps/developer/component-framework/use-sample-components

Step 10: Now it’s time to import the solution to the solutions gallery by signing into Power Apps and select Solutions from the left navigation. On the command bar, select import and then browse to the Zip file solution created from the above steps. After the solution is imported successfully, the solution is available to use in Power Apps canvas and Model driven apps.

Reference: https://docs.microsoft.com/en-us/powerapps/maker/common-data-service/import-update-export-solutions

Let’s see the next method to deploy the code component

Method 2: Power Apps CLI:

In the previous method Power Apps CLI was used to generate the solution package and then the solution was imported to the gallery, on this method the code component will be directly pushed to the CDS service instance using the CLI push command.

Step 1: Create an authentication profile to the CDS instance by executing the following command on a command prompt, it’s not necessary to open a VS command prompt.

pac auth create --url https://xyz.crm.dynamics.com

To get the url sign into Power Apps and select your environment which has CDS in the top right corner and the environment you are planning to deploy the code component. Select the settings button in the top right corner and select Advanced settings. Now copy the URL from the webbrowser which should look like below

https://orgchangedhere.crm4.dynamics.com/main.aspx?settingsonly=true

The URL is https://orgchangedhere.crm4.dynamics.com/

Once your profile is successfully created, you should see the following message on your command prompt

Step 2: Navigate to the root folder of the custom component project using the cd folderpath command which has the .pcfproj file (e.g C:\ PCF\Controls\sample-controls\PowerApps-Samples\component-framework\TS_ReactStandardControl)

Step 3: Install all the required dependencies by running the command

npm install

Step 4: Run the following command to push the code components to the CDS instance

pac pcf push --publisher-prefix contoso

Note: The publisher prefix that you use with the push command should match the publisher prefix of your solution in which the components will be included.

Reference:

https://docs.microsoft.com/en-us/powerapps/developer/component-framework/import-custom-controls#deploying-code-components

List of common PAC commands

https://docs.microsoft.com/en-us/powerapps/developer/common-data-service/view-download-developer-resources

The component is now ready to be used in the Canvas or a Model driven app after the code deployment using Method 1 or Method 2.

To add the component in a Canvas App:

Follow along then the documentation from Microsoft

https://docs.microsoft.com/en-us/powerapps/developer/component-framework/component-framework-for-canvas-apps#add-components-to-a-canvas-app

Find below the sample controls I’ve added on the Power App canvas app

To add the component in a Model Driven app:

https://docs.microsoft.com/en-us/powerapps/developer/component-framework/add-custom-controls-to-a-field-or-entity

Summary: You can also create a custom component from scratch or extend the functionality from the available samples based on your needs. Hope you have found this informational & helpful in some way. Let me know any feedbacks or comments on the comment section below

Multiple ways to access your On-premise data in Microsoft 365 and Azure

If your organization is using a hybrid cloud environment, this post will shed some light to integrate on-premise resources with Microsoft 365 & Azure services. Hybrid integration platforms allows enterprises to better integrate services and applications in hybrid environments (on-premise and cloud). In this blog post, I will write about the different services & tools available with in Microsoft Cloud which allows you to connect or expose your On-premises data or application in Office 365. There are still many enterprise organizations on Hybrid mode due to various factors. It can be a challenging task to integrate your on-premises network but with right tools & services in Office 365 & Azure it can be easier. Find below the high-level overview & some references on how to

  1. Access your on-premise data in Power Platform & Azure Apps (Logic Apps, Analysis Services & Azure Data factory)
  2. Programmatically access your on-premise resources in your Azure Function app
  3. Access on-premise resources in Azure automation account
  4. Expose your on-premise Application or an existing WEB API in Office 365 cloud

Access on-premise data in Power Platform & Azure Apps (Logic Apps, Analysis Services & Azure Data factory):

The on-premises data gateway allows you to connect to your on-premises data (data that isn’t in the cloud) with several Microsoft cloud services like Power BI, Power Apps, Power Automate, Azure Analysis Services, and Azure Logic Apps. A single gateway can be used to connect multiple on premise applications with different Office 365 applications at the same time.

At the time of writing, with a gateway you can connect to the following on-premises data over these connections:

  • SharePoint
  • SQL Server
  • Oracle
  • Informix
  • Filesystem
  • DB2

To install a gateway, follow the steps outlined in MS documentation Install an on-premises data gateway. Install the gateway in standard mode because the on-premises data gateway (personal mode) is available only for Power BI.

Once the data gateway is installed & configured its ready to be used in the Power platform applications.

  1. PowerApps
  2. PowerAutomate
  3. PowerBI

The other catch the gateway is not available for the users with Power Automate/Apps use rights within Office 365 licenses as per the Licensing overview documentation for the Power Platform. Data gateways can be managed from the Power Platform Admin center.

Shane Young has recorded some excellent videos on this topic for PowerApps & PowerBI.

To use in

  1. Azure Logic Apps
  2. Azure Analysis service
  3. Azure Data Factory

create a Data Gateway resource in Azure.

High Availability data gateway setup:

You can use data gateway clusters (multiple gateway installations) using the standard mode of installation to setup a high availability environment, to avoid single points of failure and to load balance traffic across gateways in the group.

No need to worry about the security of the date since all the data which travels through the gateway is encrypted.

Data gateway architecture:

Find below the architecture diagram from Microsoft on how the gateway works

I recommend you to go through On-premises data gateway FAQ.

Integration Service Environment:

As per the definition from Microsoft an integration service environment is a fully isolated and dedicated environment for all enterprise-scale integration needs. When you create a new integration service environment, it’s injected into your Azure Virtual Network allowing you to deploy Logic Apps as a service in your VNET. The private instance uses dedicated resources such as storage and runs separately from the public global Logic Apps service. Once this logic apps instance is deployed on to your Azure VNET, you can access your On-premise data resources in the private instance of your Logic Apps using

  • HTTP action
  • ISE-labeled connector for that system
  • Custom connector

For the pricing of ISE, refer this link.

Programmatically access your on-premise resources in your Azure Function app

As you all know Azure Functions helps in building functions in the cloud using serverless architecture with the consumption-based plan. This model lets the developer focus on the functionality rather than on infrastructure provisioning and maintenance. Okay let’s not more talk about what a Function app can do but let us see on how to connect to your on-premise resources (SQL, Biztalk etc) within your function.

During the creation of a Function app in Azure, you can choose the hosting plan type to be

  • Consumption (Serverless)
  • Premium
  • App Service plan

Consumption based plan is not supported for the on-premise integration so while creating the app the hosting plan has to either premium or app service based plan & the Operating system has to to be Windows. On-premise resources can be accessed using

  1. Hybrid Connections
  2. VNet Integration

Hybrid Connections:

Hybrid Connections can be used to access application resources in private networks which can be on-premise. Once the Function app resource is created in Azure, go to Networking section of the App service to setup & configure. Go through the documentation from Microsoft for the detailed instructions to set this up.

How it works:

The Azure Hybrid Connection represents a connection between Azure App Service and TCP endpoint (host and port) of an on-premise system. On the diagram below Azure Service Bus Relay receives two encrypted outbound connections. One from the side of Azure App Service (Web App in our case) and another from the Hybrid Connection Manager (HCM). HCM is a program that must be installed on your on-premise system. It takes care of the integrations between the on-premise service (SQL in this case) with Azure Service Bus Relay.

Once the setup is done, you can create a connection string in Appsettings.json file or from Azure function app interface of your function app. After this you can access the data in your function app code.

I’ve found a couple of interesting blogs about this setup.

VNet Integration:

In the Networking features of the App service, you can add an existing VNET. An Azure Virtual Network (VNet) is a representation of your own network (private) in the cloud. It is a logical isolation of the Azure cloud dedicated to your subscription.

In Azure Vnet you can connect an on-premise network to a Microsoft VNet, this has been documented from Microsoft here. Once there is integration between your Azure Vnet & on-premise network and the VNet is setup on your function app you are set to access on-premise resources in your function app.

Access on-premise resources in Azure automation account:

Azure Automation is a service in Azure that allows you to automate your Azure management tasks and to orchestrate actions across external systems from right within Azure. Hybrid runbook worker feature allows you to access on-premise resources easily. The following diagram from Microsoft explains on how this feature works

I’ve written a blogpost recently about this feature for automating on-premise active directory.

Expose your on-premise Application or an existing WEB API in Office 365 cloud:

Azure Active Directory’s Application Proxy provides secure remote access to on-premises web applications (SharePoint, intranet website etc). Besides secure remote access, you have the option of configuring single sign-on. It allows the users to access on-premise applications the same way they access M365 applications like SharePoint Online, PowerApp, Outlook etc. To use Azure AD Application Proxy, you must have an Azure AD Premium P1 or P2 license.

How it works:

The following diagram from Microsoft documentation shows how Azure AD and Application Proxy works

Find below documentations on how to

  1. Add an on-premises application for remote access through Application Proxy in Azure Active Directory
  2. Secure access to on-premises APIs with Azure AD Application Proxy
  3. Use Azure AD Application Proxy to publish on-premises apps for remote users
  4. Deploy Azure AD Application Proxy for secure access to internal applications in an Azure AD Domain Services managed domain

Once the connector service is installed from your Azure AD application proxy, you can add an on-premise app as shown below

The above step will register an application with App registrations.

Summary: I’ve given some overview about the different services & tools to connect & integrate on-premise resources with Microsoft cloud. Hope you like this post & find it useful. Let me know any feedback or comments on the comment section below

Change the original Owner of a Power App & Flow

Has there been a requirement or a need to change the owner/creator of the PowerApps or a Flow built by your organizational users? There could be various reasons for this request

  • App/flow creator would have left the organization
  • App/flow creator would have changed role within the organization
  • Handing over the app to the operations team…

By the time I am writing this post there are no Powershell command or actions available in Flow/PowerApp to change the original Owner of the flow but still you would be able to assign a Owner for the flow created by an user who has left the Organization from the Flow Admin center, I will cover the steps on this post. The good news is Microsoft has plans to release this feature as per this user voice request.

Prerequisite: Environment Admin or Power Platform Admin

Change the Owner of a Power App:

There are different ways to change the Owner of Power Apps using

  1. Power Shell
  2. Flow
  3. Power App

PowerShell cmdlets for PowerApps:

There is a PowerApps cmdlet for Administrators Set-AdminPowerAppOwner which allows you change the Owner of the App

Prerequisite: The following modules should be installed. It requires Administrator access on the workstation to install the modules

Install-Module -Name Microsoft.PowerApps.Administration.PowerShell
Install-Module -Name Microsoft.PowerApps.PowerShell -AllowClobber

If you don’t have admin access, then you can import the modules to your workstation using the following commands

Save-Module -Name Microsoft.PowerApps.Administration.PowerShell -Path
Import-Module -Name Microsoft.PowerApps.Administration.PowerShell
Save-Module -Name Microsoft.PowerApps.PowerShell -Path
Import-Module -Name Microsoft.PowerApps.PowerShell

Power Shell cmdlet for changing the Owner:

# This call opens prompt to collect credentials (Azure Active Directory account and password) used by the commands 
Add-PowerAppsAccount
Set-AdminPowerAppOwner -AppName '6aac46a2-a0f3-43f3-a2fb-51111785437c' -AppOwner '4cea7f11-c013-4bee-a6d1-ae3381a7f386' -EnvironmentName 'Default-2r6e8761-108d-417e-9bb4-e7c4e3ba2e23'
  1. EnvironmentName is the environment of the PowerApp you would like to change the Owner. To get the environment name, the powershell command will help Get-PowerAppEnvironment
  2. App Name is the App ID of the PowerApp. To get this information run the command Get-PowerApp ‘Name of the powerapp’
  3. AppOwner is the Azure Active directory object id of the new Owner. It is the Unique id of the user in the tenant, you can get this information in multiple ways. To get it from flow, the following action would help. The outputs of this action should have the attribute Id which is the id of the user to be passed on the Powershell command.

The old owner will get viewer access to the app but you can get it changed if required. For other Powershell cmdlets for PowerApps & flow refer this article from Microsoft.

PowerShell Tip:

To get help on any Power shell cmdlet, type Get-Help cmdletname (e.g get-help Set-AdminPowerAppOwner). To get some examples type get-help Set-AdminPowerAppOwner -examples

PowerApps for Admin Connector in Flow:

There is a preview action by the name “Set App Owner” under the connector PowerApps for admin which also helps you to change the owner of the PowerApp

PowerApps for Admin Connector in PowerApp:

The same connector used in the flow can also be used in PowerApp to change the owner for the powerapp. There is a Powerapps tool Connector Browser Tool from Microsoft to test the PowerApps for Admin connector which can be used to change the Owner of the app. The app is available as a package for download from this link, the link to the blogpost from Microsoft. You can select any actions, after entering values for the parameters click Submit.

You can test connector for Flow as well on this tool.

Assign a new Owner to a Power Automate Flow:

A new Owner can be assigned to an existing Power Automate flow by using the

  1. PowerShell cmdlets for Makers & Admins
  2. Power Automate Admin Center

Assign an Owner for a Flow created by an user who has left Organization by using PowerShell:

After installing the PowerShell module for PowerApps cmdlet for Administrators, enter the following command to get the Object ID of the user who created the flow

Connect-AzureAD
Get-AzureADUser -ObjectID username@yourorgname.com | Select-Object ObjectId

Establish a connection to use the Power cmdlets by entering the following command which opens a prompt to collect credentials (Azure Active Directory account and password of Power Platform Administrator or Global Admin)

Add-PowerAppsAccount

After copying the ObjectId of the user, enter the following PowerShell command Get-AdminFlow to get all the flows created by the user

Get-AdminFlow -CreatedBy userObjectId

The above command provides you the information of the Flow details. Copy the FlowName in GUID format and EnvironmentName. Now to assign a new Owner, enter the Set-AdminFlowOwnerRole command after changing the userObjectId, flowNameGUID and the environmentGUID

Set-AdminFlowOwnerRole -PrincipalType User -PrincipalObjectId userObjectId -RoleName CanEdit -FlowName flowNameGUID -EnvironmentName environmentGUID

If you get a 200 OK then the new owner is assigned to the Flow. You can also remove an Owner by the following command, the only catch is you will not be able to remove the creator of the flow

Remove-AdminFlowOwnerRole

Get-AdminFlowOwnerRole

Assign an Owner for a Flow created by an user who has left Organization by using the Admin Center:

This can be done by connecting to the Flow Admin center, click the environment which has the flow

Click resources & then click Flows

Then look for the flow which needs the update, click the flow & click Manage sharing to add Owner

You can also export the flow as a package & then recreate it to have a new Owner. Follow this blogpost from Microsoft.

Summary: On this post, I’ve covered different ways to update the owner for PowerApps & Flow using Powershell & Admin connector in Flow & PowerApps. Hope you find this post useful & informational. Let me know if there is any comments or feedback below.