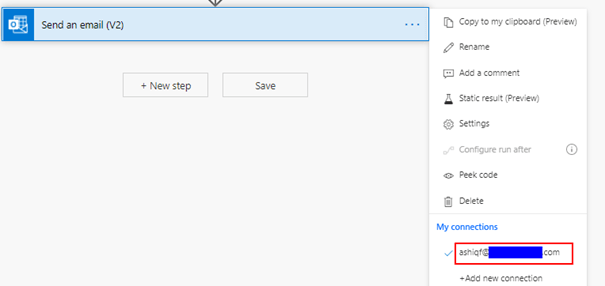
Power Automate cloud flows are widely used to automate many business processes and Email is one of most widely used action to send out notifications. Having said that, there will be definitely request to send the email from a generic address instead of the flow creator email address or the email action’s connection owner email address as shown below:
By default, the from Address of the mail generated from Power Automate uses the Flow creator email address as shown above under My connections. To send an email from generic email address, you can
Create a Shared mailbox in exchange online (No license required) and grant access to the flow creator and then use any of the following action in the flow
Send an email
Send an email from a shared mailbox
Use an existing Microsoft 365 group in
Send an email
Setup Shared Mailbox in Exchange Online & Power Automate email actions:
Find steps below to create a shared mailbox in Exchange online & provide delegated permission (Send as) to the flow creator.
Sign into Exchange Admin center. Go to Recipients > Shared and then click New Add Icon. Enter the Name, email address & domain for the shared mailbox and then click Create.
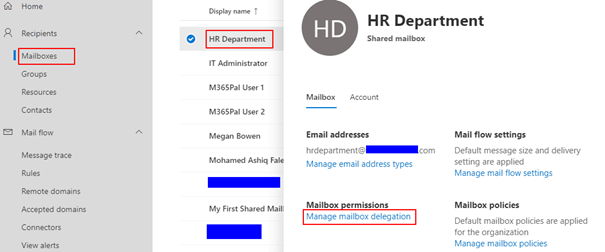
Open the newly created mailbox which opens the mailbox details pane as shown below. Click Manage mailbox delegation.
To use the action Send an email from a Shared Mailbox in the flow
Grant Read and manage and Send As permissions by clicking Edit button>Add permissions and then select the user (Flow Creator) you want to grant permissions to.
Find the flow action for reference
To use the action Send an email in the flow. Grant Send As permissions by clicking Edit button>Add permissions and then select the user (Flow Creator) you want to grant permissions to.
It takes approximately an hour for the permissions to be reflected so as to use in the Power Automate action.
Microsoft 365 group in Send an Email action:
If you have a Microsoft 365 group or a Microsoft Team, you can use the mailbox associated to group in Microsoft Flow for sending the email (Send as). Microsoft Teams creates a Microsoft 365 group whenever a team is created. Let us see how to enable a M365 group in order to use in Power Automate action Send an email action by providing Send as permissions to the flow creator or the email action’s connection owner. Find steps below to grant Send as permissions
Sign into Exchange Admin center. Go to Recipients > Groups and then click the Microsoft 365 group you wish to be used in the flow. Go to Settings>Click Edit manage delegates
Add the Flow creator email address and grant Send as permission
Save changes
Tip:
By default, the Microsoft 365 group are not capable to receiving emails from external senders. To enable it Check the box as shown on the above picture “Allow External senders to email this group”
If the permissions are not set right, you might get any of the following message in the flow
You are not authorized to send mail on behalf of the specified sending account
Specified folder not found. The error could potentially be caused by lack of access permissions. Please verify that you have full access to the mailbox
Summary:
To send an email from third party application you can use the trigger “When a HTTP request is received” with the email action. This trigger generates an anonymous API endpoint which could be used on applications to trigger the flow. Hope you have found this informational. If you are visiting my blog for the first time, please do look at my other blogposts.
Do you like this article?
Subscribe to my blog with your email address using the widget on the right side or on the bottom of this page to have new articles sent directly to your inbox the moment I publish them.
This post is in continuation to my journey with IoT leveraging Microsoft cloud services & it’s technology and based out of few questions I have been asked in few of the events I’ve spoken on the Topic Controlling Devices using Power Apps. In this post let us see how to turn on/off a LED connected to an Arduino UNO board by sending a message from Azure IoT hub or Power Apps with the help of a .NET core console application created from Visual studio code.
What is Arduino UNO Board:
Arduino Uno is an open-source & low cost microcontroller board based on Microchip ATmega328P microcontroller. The board is equipped with digital and analog Input/Output pins that can be interfaced with other circuits. If there is a need to collect data from sensors (Temperature, Humidity etc) then the mode of the pin should be Input and for controlling devices or activating relays the pin mode must be Output. For this example since we will have to turn on/off a LED, the pin mode has to set as Output.
Arduino IDE:
The IDE is a cross platform application written using C++. If you have worked with an Arduino board already, you would have probably used the Arduino IDE to deploy code called as Sketch. The code written on the sketch is compiled to a HEX file (Machine language) which can be understood by the microcontroller once the sketch is uploaded. The hex file is then sent to the Arduino UNO board using the USB port.
Find below the design with information on the different components used:
Azure IoT Hub:
IoT hub is a managed service hosted in cloud that acts as a central message hub for bi-directional communication from the device to the cloud and the cloud to the device. There is an also a Free-Tier limited to one per subscription which can add up to 500 devices and 8000 msgs/day as of today based on the Pricing calculator. Create a IoT Hub for us to send a message to the Arduino UNO device as per the instruction given in the article. After the IoT hub is created.
A device must be registered with your IoT hub before it can connect. There are different ways to register a device like using Azure Cloud shell, in this case we will use portal. Click IoT Devices under the Explorers blade on the IoT hub and click on + New, enter the Device ID and click save.
Copy the Primary key of the registered device
Copy the Hostname from the IoT Hub Overview blade
These values will be used later in the .NET console application
Arduino Sketch:
Let us now create a simple Arduino project sketch from Visual studio code to send signal to Arduino Board using the serial port with the help of the Nuget package System.IO.Ports. Make sure the Arduino IDE and the Arduino extension for VS code is installed. The Arduino board can now be plugged in to the USB port of your laptop or computer with the provided cable. Follow the below mentioned steps to create an Arduino sketch template from VS Code
Create a folder on the development machine for the Arduino project and then open the folder in Visual Studio code
In VS Code, hit the key CTRL+Shift+P to open the command pallete
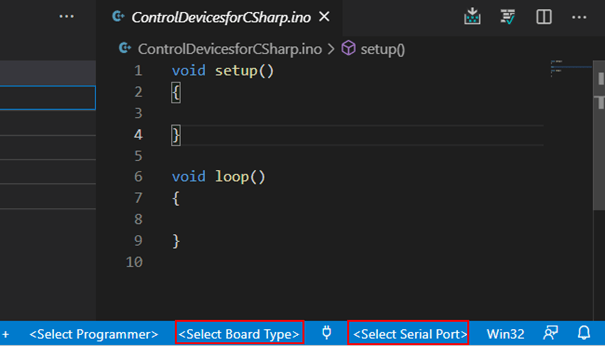
Type the command Arduino: Initialize which will try to create a file with name app.ino. Change the name of the file relevant to your project. I have named it as ControlDevicesforCSharp.ino.
You will now be prompted to select the name of the Arduino board. I have selected Arduino UNO. You can also select the board and port from the VS Code right bottom corner as shown below
The serial port will be visible if the board in plugged in and recognized by the computer. This is how it looks after the board and the port is selected.
Now update the code as shown below to receive signal from the console application. If it receives a value of A to the character variable inputValue from the console application, then the PIN 13 is set to HIGH which means it generates 5v as an output and if the inputValue is B the PIN 13 is set to LOW which means the Output of the pin will be zero as opposed to 5v when set to HIGH. If you want, you can connect a LED to the PIN 13 with a 220 ohm resistor bu the pin 13 has a in-built LED to test. You can also notice on the code the PIN mode for 13 is set to Output.
#define BaudRate 9600

char inputValue;
int led1 = 13;

void setup() {
  // Initialize serial communication at 9600 bits per second
  Serial.begin(BaudRate);
  // Prepare the digital output pins
  pinMode(led1, OUTPUT);
  // Initially all are off
  digitalWrite(led1, LOW);
}

// the loop function runs over and over again forever
void loop()
{
  // Reads the input
  inputValue = Serial.read();
  if(inputValue == 'A')
  {
    // Turn on the LED
    digitalWrite(led1, HIGH);
  }
  else if (inputValue == 'B')
  {
    // Turn off the LED
    digitalWrite(led1, LOW);
  }
}
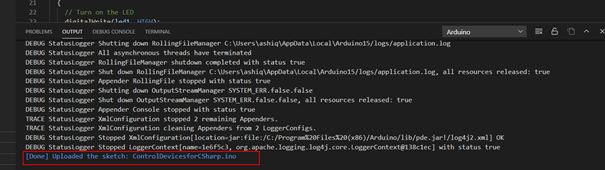
Now you verify the sketch by pressing CTRL+AL+R if there is any compile error. If all is well, you can now upload the sketch by pressing the key CTRL+ALT+U. If the upload is successful, you will the following message on the VS output terminal
Now the sketch is ready, it is now time to create the console application to receive message from Azure IoT hub to control the LED from cloud applications like Power Apps.
.NET core console Application:
The package System.IO.Ports supports to control serial ports which will be used to send message to Arduino board (A or B) to turn on or off the LED. Follow the below given steps to create the console application
Use the same directory you have used to create the Arduino sketch. On the VS Code terminal window, enter the command dotnet new console to create a new console application
Add the package System.IO.Ports using the nuget package manager plugin by CTRL+SHIFT+P > NuGet Package Manager: Add Package or enter the command on the terminal window dotnet add package System.IO.Ports –version 6.0.0-preview.1.21102.12
Method Encoding.ASCII.GetString(receivedMessage.GetBytes()) reads the message
Method deviceClient.CompleteAsync(receivedMessage, _ct) deletes the message from the queue
The following code establishes the connection on the serial port COM4
// Initialises the serial port communication on COM4
SerialPort = new SerialPort("COM4")
{
                BaudRate = 9600,
                Parity = Parity.None,
                StopBits = StopBits.One,
                DataBits = 8,
                Handshake = Handshake.None
};
// Subscribe to the event
SerialPort.DataReceived += SerialPortDataReceived;
// Now open the port.
SerialPort.Open();
With the help of the following method to Subscribe
static void SerialPortDataReceived(object sender, SerialDataReceivedEventArgs e)
{
 var serialPort = (SerialPort)sender;
 // Read the data that's in the serial buffer.
 var serialdata = serialPort.ReadExisting();
}
The code SerialPort.Write(“A”) send the message to the Arduino Sketch.
Now run the dotnet application using the command dotnet run. Now send a message from the Azure IoT explorer or from Azure portal IoT device explorer ON1 or Off1 to turn On/Off the LED connected to PIN 13