Postman collections makes the creation of custom connectors in Power Automate easier & quicker. As of time I am writing this article, to create a custom connector using Postman collection in Power Automate the version of Postman collection has to be V1. The current version of collections exported from Postman is V2. There is a NPM package by the name Postman Collection Transformer to rescue which helps converting the collection to V1 and vice versa.
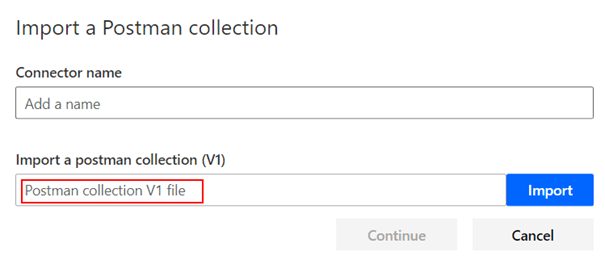
Step 4: V1 Postman collection is ready, you can now proceed with the creation of custom connector in the flow portal.
As pointed out by Richard Wilson, there are third party portals (Requires Registration) available which helps in converting the format of the Postman collection.
Hope you have found this informational & thanks for reading. If you are visiting my blog for the first time, please do look at my other blogposts.
Do you like this article?
Subscribe to my blog with your email address using the widget on the right side or on the bottom of this page to have new articles sent directly to your inbox the moment I publish them.
Content type multipart/form-data is used to send both text and binary data to the server and x-www-form-urlencoded is used more generally used to send text data in a query string in the form of name value pairs separated by ampersand. In this blog post, let us see how to use the content-type
multipart/form-data
x-www-form-urlencoded
in a Power Automate or Logic apps HTTP action to post data with an API which has implemented the content-type. Find below the screenshot from postman with a sample API
multipart/form-data in HTTP Action:
From the above screenshot, the API is called using the content type multipart/form-data. The multipart refers to the data (in the above screenshot it is To, From & Body) which is divided into multiple parts and sent to server. For each key value pair aka part, you will have to construct something like
{
      "headers": {
        "Content-Disposition": "form-data; name=\"KEY\""
      },
      "VALUE": "what ever value you would like to send"
}
Backslash is used close the Content-Disposition header value else you will get Invalid-JSON.
To call the API displayed from the above screenshot on the HTTP Action, the body of the HTTP action should have the two attributes $content-type and $multipart as shown below
{
  "$content-type": "multipart/form-data",
  "$multipart": [
    {
      "headers": {
        "Content-Disposition": "form-data; name=\"To\""
      },
      "body": "whatsapp:+123456"
    },
    {
      "headers": {
        "Content-Disposition": "form-data; name=\"From\""
      },
      "body": "whatsapp:+178910"
    },
    {
      "headers": {
        "Content-Disposition": "form-data; name=\"Body\""
      },
      "body": "Your appointment is coming up on July 21 at 4PM"
    }
  ]
}
You can upload files using the form-data content type
The file content can be the output of the SharePoint or OneDrive connector.
x-www-form-urlencoded in HTTP Action:
The x-www-form-urlencoded content type has its form data which is encoded and sent in a single block on the HTTP request body. To call the sample API from the screenshot posted at the top of this post in the HTTP Action, the form values must be encoded & the values be separated by ampersand. Expression encodeUriComponent can be used to encode the form values
Headers:
Key: Content-Type
Value: application/x-www-form-urlencoded
Body (Separated by &):
Key=Value&Key=Value
Find below screenshot for your reference
Hope you have found this informational & thanks for reading. If you are visiting my blog for the first time, please do look at my other blogposts.
Do you like this article?
Subscribe to my blog with your email address using the widget on the right side or on the bottom of this page to have new articles sent directly to your inbox the moment I publish them.
SharePoint connector in Power Automate is very rich with various actions that can make the developers or makers life simple when it comes to interacting with SharePoint data. There might be some actions like
Breaking permission to a list item
Creating a site
Adding user to a SharePoint group etc
which is not possible through the SharePoint standard connector or MS Graph API as of the time I am writing this article, SharePoint REST API to rescue. The SharePoint online REST API enables developers to remotely interact with SharePoint data. There is an action Send an HTTP request to SharePoint which could come handy in many scenarios, the point to note here is the action uses the context of user aka flow creator while executing the API. In this blogpost, let us see how to call a SharePoint REST API to create a Modern SharePoint communication site as an application in a Power Automate cloud flow using the HTTP connector with the help of a Self-Signed certificate. Find below the list of steps to enable calling the SharePoint REST API using certificate credentials
Creation of Self-Signed certificate
Application Registration in Azure AD Portal
Creation of Power Automate cloud flow with the HTTP Connector
Method 1: Without using Azure Key Vault
Method 2: Azure Key Vault to store Certificate
Pre-Requisites:
Access to HTTP Premium Connector in Power Automate
Register an application in Azure AD and obtain the client id & tenant id for the registered application. In this example I have added the Sites.Read.All Application permission with Admin Consent to create the SharePoint communication site, this permission is more than enough to create the site as an Application. Grant appropriate permission based on the requirements, for e.g to break permission on list items grant Sites.Manage.All. Find below screenshot for your reference for granting permissions
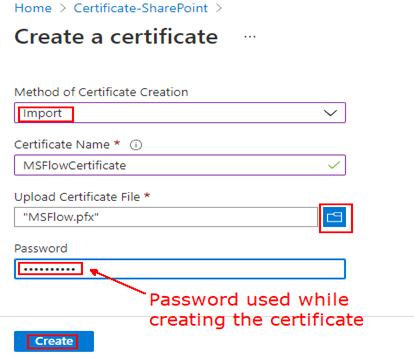
To add the above created self-signed certificate, click Certificates & secrets under the Manage blade. Click Upload certificate > Select the certificate file MSFlow.cer > Add
Creation of Power Automate cloud flow with the HTTP Connector:
Let us see below how to access the SharePoint REST API to create a SharePoint site with & without using the Azure Key Vault.
Method 1: Without using Azure Key Vault
Method 2: Azure Key Vault to store Certificate
Method 1: Without using Azure Key Vault
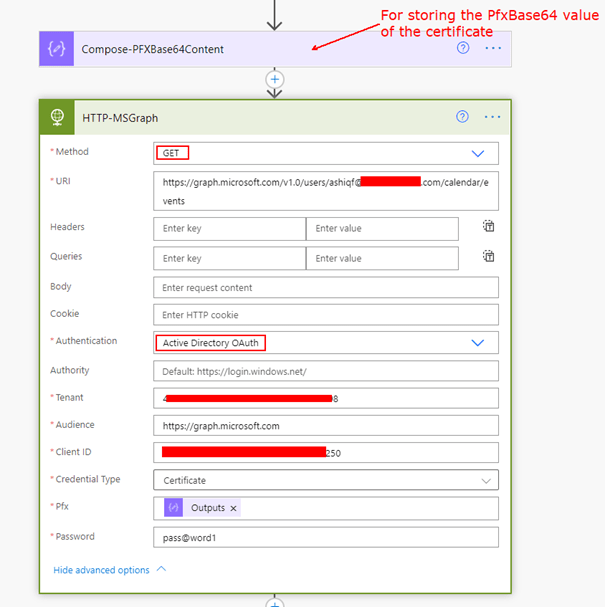
In the cloud flow, add a Compose action to store the PfxBase64 value copied during the creation of the certificate. Now add the HTTP action to create a Modern Communication site
Password: Certificate password given during the creation
Find below screenshot for your reference
Run the flow, it should be able to create the Site. Find below screenshot of the flow run
Method 2: Azure Key Vault to store Certificate
Azure Key Vault is a cloud service for storing and accessing secrets enabling your applications accessing it in a secure manner. Follow my blog article which I have written to call a Microsoft Graph API with Certificate using a Azure Key Vault to store the certificate
Custom Connector can be used to call a SharePoint REST api in the context of the user. If you are visiting my blog for the first time, please do look at my other blogposts.
Do you like this article?
Subscribe to my blog with your email address using the widget on the right side or on the bottom of this page to have new articles sent directly to your inbox the moment I publish them.
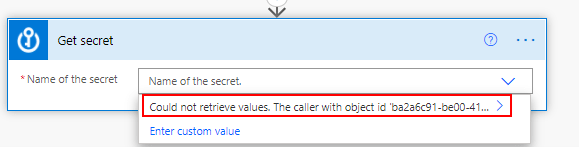
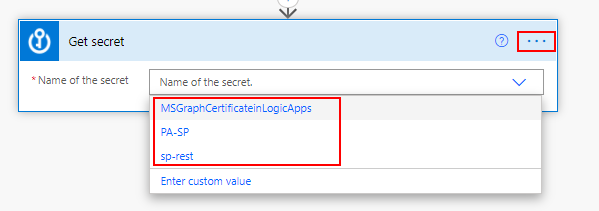
Recently I was trying to connect Azure key vault to retrieve certificate details using the action called Get Secret in a cloud flow, as of the time writing this article I am not able to successfully establish the connection. It gave me an error Could no retrieve values as shown below instead of prompting me to enter the credentials to create the connection successfully.
To create a successful connection, follow the steps outlined
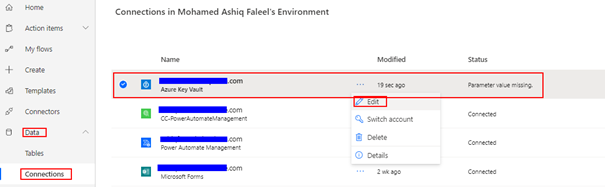
Step 1: Go to the Connection as shown below from the Left navigation bar > Select the Azure Key vault connection > Edit.
The first step of adding the Get Secret action in flow would have created the connection with the status Parameter value missing
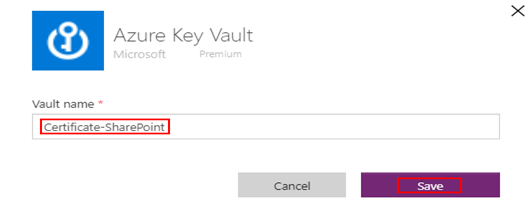
Step 2: Enter the name of the Azure Key vault and click Save
Step 3: Click Fix connection & sign in using the account which has access to the Azure Key Vault. After this step, the status will be connected.
Step 4: Go back the cloud flow which has the action, the action would now be able to get the secrets from Key Vault as expected. To make sure the action has the correct connection, click the three dots and verify from the My connections list
Summary:
Hope Microsoft fixes this issue for the Azure Key vault connector. I have used Azure Key vault to store Secret & Certificates for authenticating against MS Graph to access its rich api endpoints. Hope you have found this informational & thanks for reading. If you are visiting my blog for the first time, please do look at my other blogposts.
Do you like this article?
Subscribe to my blog with your email address using the widget on the right side or on the bottom of this page to have new articles sent directly to your inbox the moment I publish them.
In this blog article, let us see how to call a Microsoft Graph API as an application in a Power Automate HTTP connector using a certificate credentials instead of a secret from the Azure Active directory application. Microsoft recommends using a certificate (instead of a client secret) as a credential for a higher level of assurance. Find below the list of actions to enable calling the Graph API using certificate credentials
Creation of Self-Signed certificate
Application Registration in Azure AD Portal
Creation of Power Automate cloud flow with the HTTP Connector
Method 1: Without using Azure Key Vault
Method 2: Azure Key Vault to store Certificate
Pre-Requisites:
Access to HTTP Premium Connector in Power Automate
The first step is to create a certificate. A self-signed certificate can be created by using the Windows PowerShell command New-SelfSignedCertificate or PnP PowerShell command New-PnPAzureCertificate. The self-signed certificate will be used in the Azure AD application. Find below PnP PowerShell command to create the certificate with the default validity of 10 years and secured with a password.
From the above screenshot, the certificate files MSFlow.pfx and MSFlow.cer will be available on C:\Users\ashiq\Desktop\Projects\PowerAutomate. Copy the PfxBase64 and the password which will be used in the HTTP connector while calling the Graph API. To get the details of an existing certificate, the PnP command
Register an application in Azure AD and obtain the client id & tenant id for the registered application. In this example I have added the Application permission with Admin Consent to access all the recent events of a user from Outlook.
To add the above created self-signed certificate, click Certificates & secrets under the Manage blade. Click Upload certificate > Select the certificate file MSFlow.cer > Add
Once the certificate is added successfully, you would be able to see the certificate Thumbprint with the Start date & Expiry date
Creation of Power Automate cloud flow with the HTTP Connector:
Let us see below how to access a Microsoft Graph API with & without using the Azure Key Vault.
Method 1: Without using Azure Key Vault
Method 2: Azure Key Vault to store Certificate
Method 1: Without using Azure Key Vault
In the cloud flow, add a Compose action to store the PfxBase64 value copied during the creation of the certificate. Now add the HTTP action to get the users events from the default calendar
Password: Certificate password during the creation Find below screenshot for your reference
Find below screenshot for your reference
Run the flow, it should be able to get the outlook events as an application for the given user.
Method 2: Azure Key Vault to store Certificate
Azure Key Vault is a cloud service for storing and accessing secrets enabling your applications accessing it in a secure manner. Follow this article to upload the above generated certificate to the Azure key vault.
After the certificate is uploaded to the Azure Key Vault, with the help of the premium Azure Key Vault connector you would be able to access & use the secret in your cloud flow or logic app.
Step 1: Add the action Get secret in the flow. After entering the name of the Key Vault and the sign button is clicked, the connection would be established.
There are different authorization flows available in Microsoft Graph which could be leveraged based on needs. If you are visiting my blog for the first time, please do look at my other blogposts.
Do you like this article?
Subscribe to my blog with your email address using the widget on the right side or on the bottom of this page to have new articles sent directly to your inbox the moment I post them.
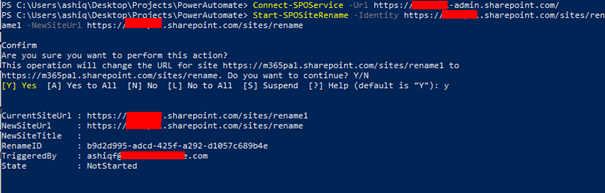
There is a possibility to change the SharePoint online site address of an existing site by a SharePoint admin or Global admin. There are different options to change the site URL from
Couldn’t create the site, please go back and try again.
SharePoint Online PowerShell to the rescue, run the following command as an Administrator after creating a site with some address from the start page or admin center to rename the URL