Philips Hue is a smart lighting solution provider with range of smart lights that can be controlled with your smart devices like your mobile phone, Google Home, Alexa etc through the applications developed by Philips. On top of applications from Philips, the Hue system also enables OAuth 2.0 to allow third party integrations to connect to Hue system resources. In this blog post, let us see how to use the Philips Hue OAuth 2.0 remote API to integrate with the Power Platform for controlling the lights.
Pre-Requisites:
- Lights connected to the Hue Bridge. Hue bridge is a device which is the brain of the Philips hue smart lighting system that links the lights to the internet.
- Register an account in the Philips Hue Developers portal
The first step is to create a Remote Hue API app which provides you with OAuth credentials to remote control the Hue lights.
Add Remote Hue API App:
After logging in to the Philips Hue Developers Portal, access the URL https://developers.meethue.com/my-apps/ to add the App. Click on the link Add new Remote Hue API app
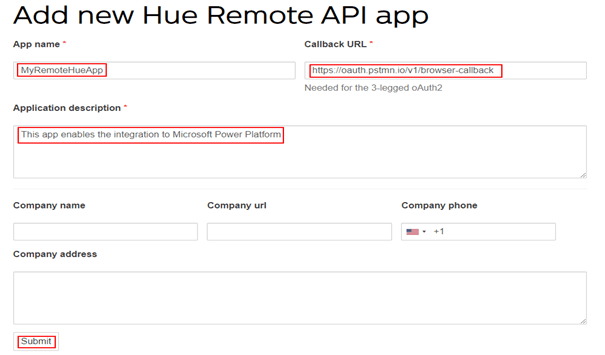
After entering the App name, Callback URL and the description, click the Submit button. For the callback URL I have provided the Postman browser call back url https://oauth.pstmn.io/v1/browser-callback facilitating OAuth 2.0 token generation from Postman. You can also enter http://localhost/ as the callback url. Find below screenshot of the newly registered Remote Hue API app

Copy the ClientId & ClientSecret which will be required to generate access token for controlling the Hue lights. The next step is to generate the access token.
Access Token Generation:
To access a Philips Hue API endpoint to turn on/off or change colours of light, an access token is required. To generate an access token, the first step is to generate an authorization code. Construct the following URL
GET https://api.meethue.com/oauth2/auth?clientid=<clientid>&appid=<appid>&deviceid=<deviceid>&devicename=<devicename>&state=<state>&response_type=code- ClientId: From the app registration.
- ClientSecret: From the app registration.
- AppId: From the app registration, the name of the app. Per the above screenshot, it is myremotehueapp
- DeviceId: The device identifier must be a unique identifier in a string format for the app or device accessing the Hue Remote API.
- DeviceName: The name of the app accessing the remote api.
- State: any string
The url should look something like
Access the URL in a browser, you will be prompted to accept or decline the permission grant to the created app.
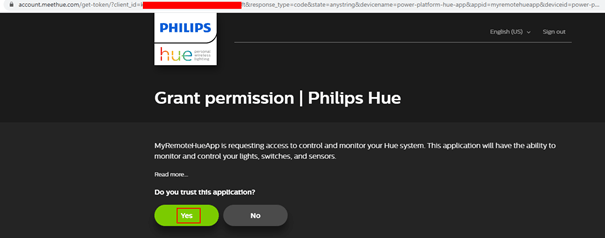
Once the app is trusted, there will be an authorization code automatically generated on the browser address bar as shown below
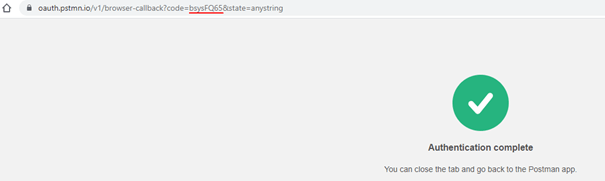
Make a note of the code which will be used to generate access token. To Deactivate an existing App or see all the list of existing apps, login to https://account.meethue.com/apps.
To generate an access token using Basic Authentication, make the following HTTP request using Postman or any other tool
Type: POST
URL: https://api.meethue.com/oauth2/token?code= bsysFQ65 &grant_type=authorization_code
Replace the code value with yours generated from the authorization grant request.
Authorization Type: Basic Auth. Username should be ClientId of the App and Password should be ClientSecret
Find below screenshot from Postman with the above HTTP POST request, make a note of the access token and refresh token from the response section of the request.
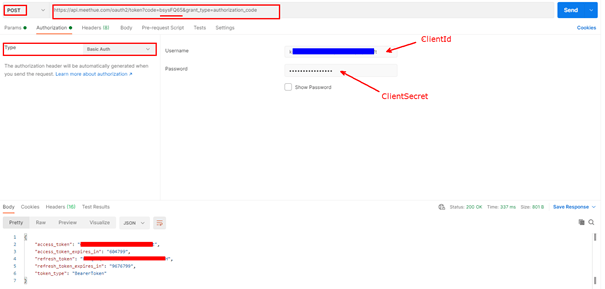
The Access token is approximately valid for 7 days and the refresh token for 100 days. Let us now see, how to refresh the access token.
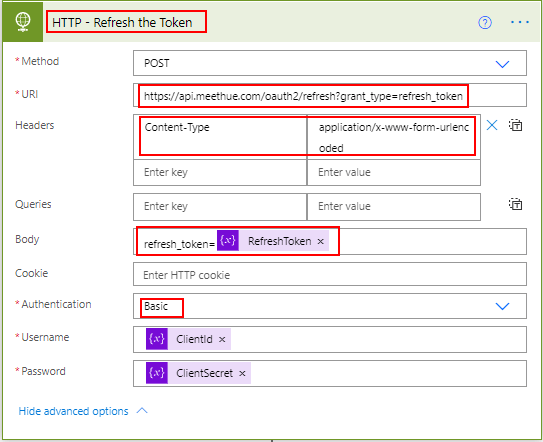
Refresh Access token:
The access token is valid only for 7 days, to use it beyond 7 days there must be a new access token generated using the Refresh token. Find below the request details using Basic Authentication
Type: POST
URL: https://api.meethue.com/oauth2/refresh?grant_type=refresh_token
Authorization Type: Basic Auth. Username should be ClientId of the App and Password should be ClientSecret
Headers:
Key: Content-Type
Value: application/x-www-form-urlencoded
Body:
refresh_token=refreshtokenfromthefirstrequest
Find below screenshot of the request

Besides Basic authentication, Hue Remote API supports Digest method. For more details on the remote authentication, go through the documentation https://developers.meethue.com/develop/hue-api/remote-authentication-oauth/
Control the Hue Lights using the generated Access token:
Till now we have seen how to register a remote API app, generate access token and to refresh it before it expires. Let us now see how to use the access token to turn on/off, change colours etc with the remote API endpoints. To enable this experience, there must be a username created first.
User Name Creation:
Find the HTTP request details to enable the Link button
Type: PUT
URL: https://api.meethue.com/bridge/0/config
Body-RAW: { “linkbutton”:true }
Headers:
Content-Type: application/json
Authorization: Bearer access_token

Immediately after the above request, make the following HTTP request to create the User Name
Type: POST
URL: https://api.meethue.com/bridge/
Body-RAW: { “devicetype”: “myremotehueapp” }
The devicetype is the appid or the name of the remote app
Headers:
Content-Type: application/json
Authorization: Bearer access_token

Copy the username from the above request response.
Turn On/Off Hue Lights:
To turn On/Off the light, the first step is to get the Light no you are trying to control. To get the list of lights, make the following request with the user name generated above
Type: GET
URL: https://api.meethue.com/bridge/username/lights/
Replace the username in the URL
Body: None
Headers:
Authorization: Bearer access_token
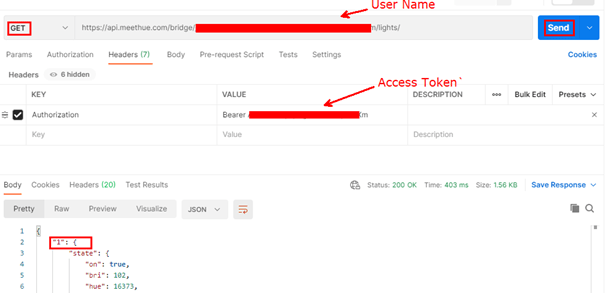
In the above request response, the light no is 1 which is the first light on my Hue system.
To Turn On/Off:
Find the HTTP request details to turn on/off
Type: PUT
URL: https://api.meethue.com/bridge/{{username}}/lights/{{lightno}}/state
Replace the username & lightno in the URL
Body-Raw: {“on”:true} or {“on”:false}
True for Turning On and False for Turning off
Headers:
Authorization: Bearer access_token
Content-Type: application/json
Set colours of the Hue Light:
The Philips Hue system uses Chromaticity to set the colour of the light. Chromaticity consists of two independent parameters, often specified as hue (h) and colourfulness, where the latter is alternatively called saturation, chroma. Find below diagram which will help you to set the colour of the light

Find below HTTP request details for setting the colour to RED
Type: PUT
URL: https://api.meethue.com/bridge/{{username}}/lights/{{lightno}}/state
Replace the username & lightno in the URL
Body-Raw:
{
"on":true,
        "xy": [
            0.720000,
            0.250000
        ],
  "bri":100,
  "transitiontime": 0
}
Change the XY values for different colours. To increase/decrease brightness update the bri attribute. With the help of the above diagram, for colour GREEN the XY value is 0.350000, 0.550000
Headers:
Authorization: Bearer access_token
Content-Type: application/json
For information on the Light API, refer to the documentation https://developers.meethue.com/develop/hue-api/lights-api/
Control Lights in Power Platform:
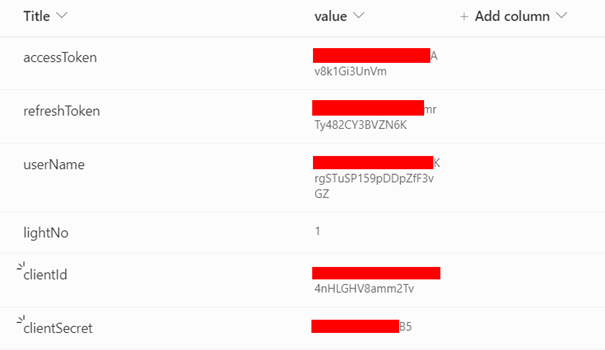
As you have seen above, to control the lights an access token and username is required. Store the information in a SharePoint list which will make it easier to get the Client Id, Client Secret, light no, refresh token etc. Find below the list schema I have created to manage the Light configuration.
Refresh the Access Token:
As the token is valid only for 7 days, create a scheduled Power Automate cloud flow which can run once in 6 days to create a new token using the Refresh token. Refer to the earlier section for the API endpoint details to refresh the token.
- After the trigger is added, add the SharePoint connector to get values of the Refresh Token, Client Id, Client Sercret etc
- Initialize variables to store the values retrieved from the SharePoint list
- Add a Switch control to store the values on the variable.
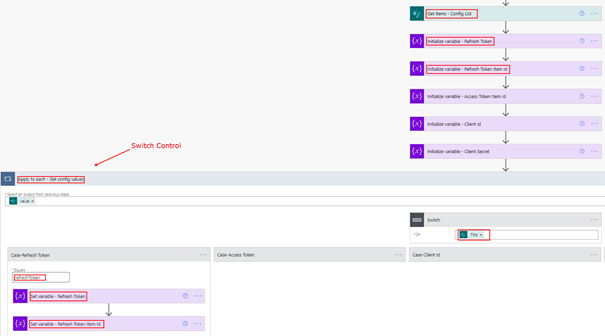
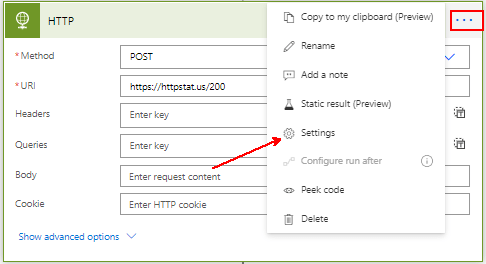
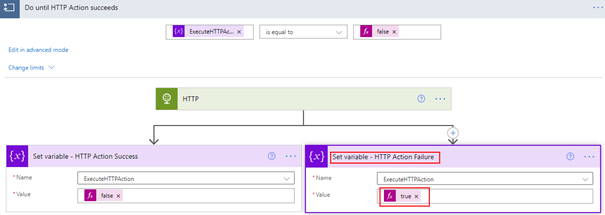
- Add a HTTP action to refresh the token as shown below
- Add the JSON parse action to get the new token values including the new Refresh Token. Once the refresh token is used, it cannot be used again.
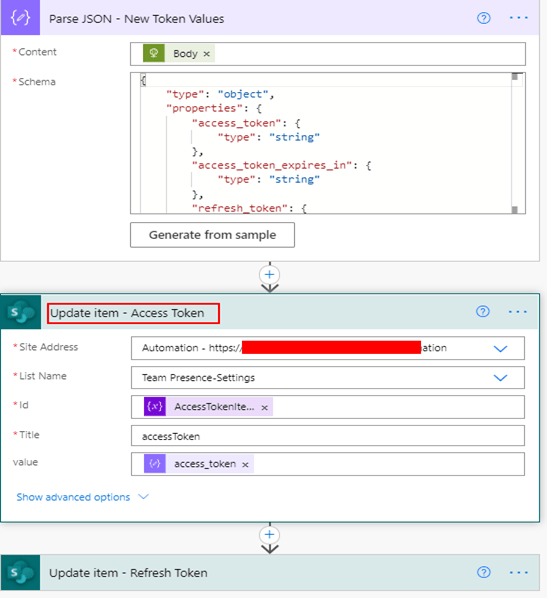
- After getting the new values, update the access token & Refresh token in the SharePoint list.
- The package of this cloud flow can be downloaded from here. https://github.com/ashiqf/PowerAutomate/tree/PhilipsHue-RefreshtheAccessToken
Turn On/Off from Power Automate or Power Apps:
To turn on/off or set different colours of the light from Power Automate or Power Apps, create a Flow with HTTP action & call the API given in the above section. To call the flow in Power Apps, use the Power Apps trigger or use a custom connector.
Control Lights from a .Net application:
Find code below to turn on/off light from a .NET application
private static async Task<string> TurnOnPhilipsHue(string accessTokenPhilipsHue, string userNamePhilipsHue, string lightNoPhilipsHue)
{
	string requestUrl = "https://api.meethue.com/bridge/" + userNamePhilipsHue + "/lights/"+ lightNoPhilipsHue + "/state";
	using var client = new HttpClient();

	var payload = "{\"on\": true,\"bri\": 102}";
	client.DefaultRequestHeaders.Authorization = new AuthenticationHeaderValue("Bearer", accessTokenPhilipsHue);
	var requestData = new StringContent(payload, Encoding.UTF8, "application/json");
	var response = await client.PutAsync(String.Format(requestUrl), requestData);
	var result = await response.Content.ReadAsStringAsync();
	return result;
}
There is also SDK for C#, do look at it on this url https://developers.meethue.com/develop/tools-and-sdks/ for more details.
Summary:
I have used this light to build a Microsoft Teams status light, will post the link as soon as it is available. Hope you have found this informational & thanks for reading. If you are visiting my blog for the first time, please do look at my other blogposts.