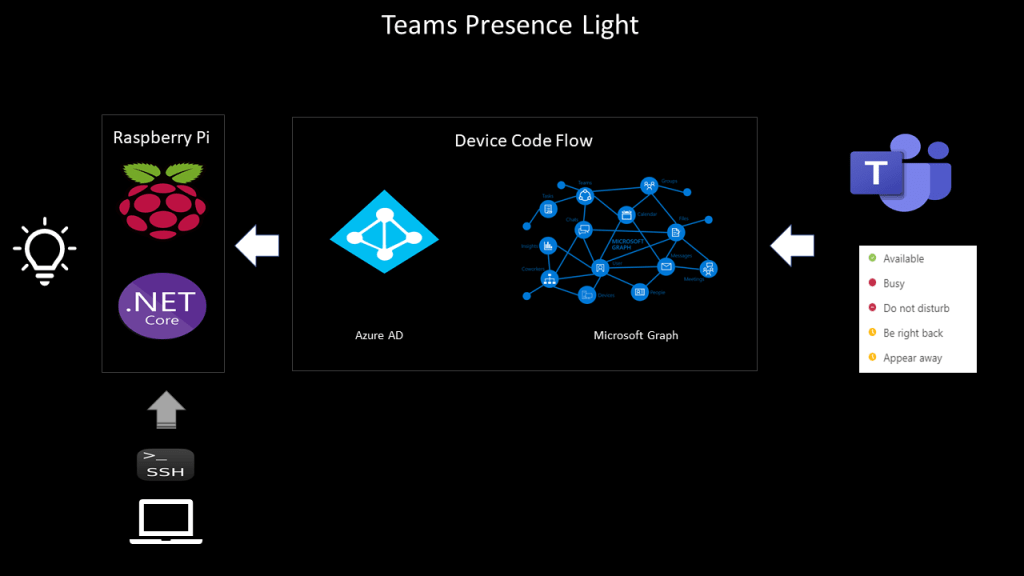
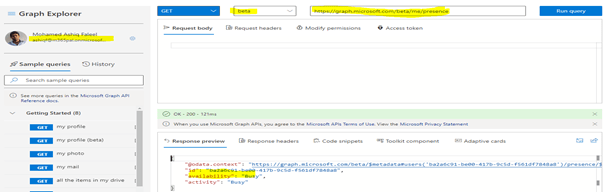
Almost every one of us is working from home these days due to the Corono situation we are in as of the time I am writing this article. I wrote a recent blog post about controlling devices from PowerApps with the help of a Raspberry PI and thought of extending the project by creating a Teams presence light with the help of a Raspberry Pi & couple of LED’s with different colours. This was possible due to the availability of the presence API endpoint in MS Graph, this helps us get the user’s current team presence (Available, Busy, Be right back, Do not disturb etc) for a logged in user. As of the time I am writing this article application permissions are not supported.
Device Code Flow:
The supported permission type is Delegated to get the presence information in MS graph, the user must sign in to get the users Teams presence. So how can a user signin/authenticate on a device like Raspberry Pi if we are only using a Terminal window to develop & run the application which I will doing it here, Device code flow to the rescue which is an authentication flow to get the data from MS graph for handling delegated permissions with remote signin/authentication using an auto generated device code. This flow lets the user use another device (for instance the windows client with the VS Code) to sign-in interactively. By using the device code flow, the application obtains tokens through a two-step process especially designed for these devices like Raspberry Pi. Examples of such applications are applications running on iOT, or Command-Line tools (CLI).
Refer this blog post for the steps & instructions to develop applications remotely on a Raspberry Pi using VS code.
Application Design:
There will be a .NET core console application polling the MS Graph presence endpoint every 5 seconds and based on the status, the corresponding coloured lights will be turned on. Find below the high-level design of the application
Active Directory application registration:
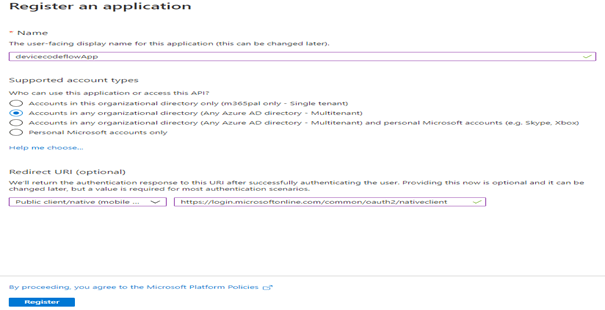
Start with registering an Application in Active directory with the following settings
Supported Account Types: Accounts in any organizational directory
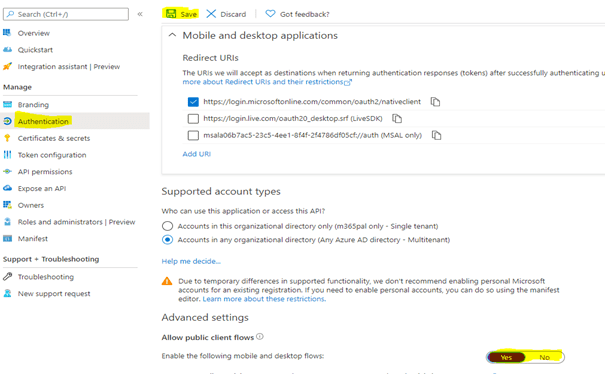
Enable Allow public client flows a required setting for the device code flow to work as shown below
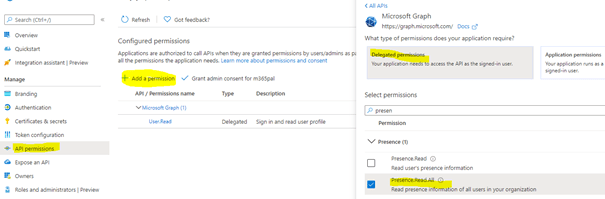
Add the permission Presence.Read.All if you going to create a presence light for some other user other than the signed in user and Presence.Read if its going to be only for the signed in user. Once the permission is added, grant admin consent.
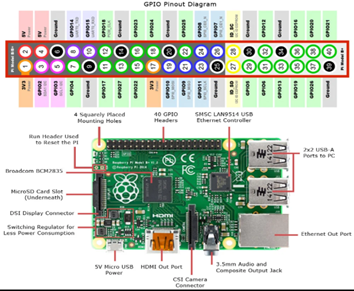
In this example, GPIO pins 12 and 13 are used with Green and Red LED’s but you can also use a RGB LED matrix supported for Raspberry Pi which are readily available in the market. Use the Client Id and the tenant id of the application in the app.
Provide the GPIO pins the root permissions through the command on the terminal window /usr/bin/gpio export 12 out and /usr/bin/gpio export 13 out.
Run the application by using dotnet run
Method AcquireByDeviceCodeAsync(IPublicClientApplication pca) generates the device code
As soon as the application is run from the command line, the code is generated as shown below
Code pca.AcquireTokenSilent(Scopes, accounts.FirstOrDefault()).ExecuteAsync(); generates the token which will used along with the graph GET request for getting the teams presence status of the user
The Token will be valid only for 3599 seconds which is close to 1 hour. Generate one more token using the same line of code after an hour which I have not handled in the sample code.
Polling will happen every 5 seconds using the .NET Timer_timer.Change(TimeSpan.FromSeconds(0), TimeSpan.FromSeconds(5));
Based on the teams presence, the corresponding lights will be turned on using the below code
switch (presenceStatus)
{
                        case "Available":
                            Console.WriteLine($"{DateTime.Now} : User is Available");
                            controller.Write(pinGreen, PinValue.High);
                            controller.Write(pinRed, PinValue.Low);
                            break;
                        case "Busy":
                            Console.WriteLine($"{DateTime.Now} : User is Busy");
                            controller.Write(pinGreen, PinValue.Low);
                            controller.Write(pinRed, PinValue.High);
                            break;
}
Code for this application can be found in this GitHub repo link.
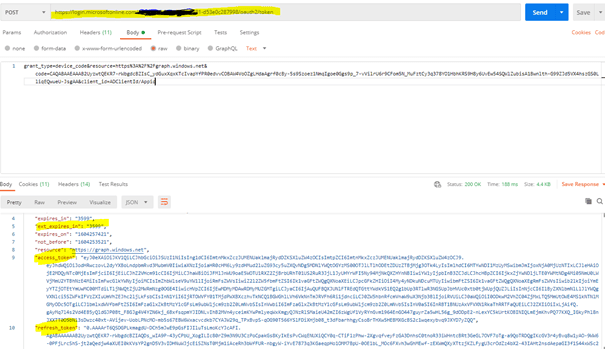
Request Body: grant_type=device_code&resource=https%3A%2F%2Fgraph.windows.net&code=CAQABAAEAAAB2UyzwtQEKR7-rWbgdcBZIsC_ydGuxXqxKTcIvapYfPR0edvvCOBAW4VoOZgLHdaAgrf0cBy-5s9Szoez1NmqIgoe0Ggs9p_7-vVilrU6r9CFom5N_M(Information from the Previous response)&client_id= ADClientId/Appid
Will generate the token in the response
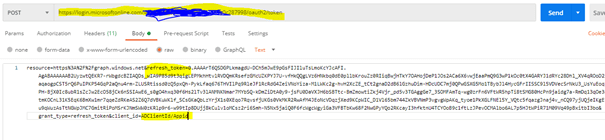
Refresh Token:
This token is used to generate access token after the initial one expires by making another request with information like this in the request body
All of these are handled for us by the Microsoft Authentication library for .NET.
Summary: I’ve used MSAL for .NET library but there are also libraries for MSAL for Python and for other languages as well based on your comfort with the programming language. Hope you have found this informational & interesting. Let me know any feedback or comments on the comment section below
I have recently purchased a Raspberry Pi 4 to explore IoT with Microsoft 365 platform. The Raspberry Pi is a low-cost credit-card sized computer which can be connected to a monitor, keyboard, mouse and to Internet via Wi-Fi or ethernet port. In addition, the Raspberry Pi has a 40 pin GPIO (General Purpose I/O) connector for us to connect sensors (Input) and to control devices (Output) through a relay. It enables people of all ages to explore computing and to learn how to program in languages like Scratch, Python, .NET core etc. One of the most popular operating system for the Raspberry Pi is Raspbian which is also the official one but there are also other operating systems like Ubuntu, Windows 10 IoT core (Not supported for Raspberry Pi 4). On this blog post, I will cover the different components used to integrate Raspberry Pi with Microsoft 365 service PowerApps & Azure services like Azure functions & Azure IoT hub to control devices. Find below the design and the different components used
Environment Setup
Raspberry Pi setup for IoT with .NET Core
Visual Studio Code setup for remote development
Azure IoT hub
.NET Core Console Application
Azure Function – HTTP Trigger
Power Apps
Custom Connector
Canvas Apps
Environment Setup:
Raspbian OS is based on the Debain Operating System which has been optimized for Raspberry Pi hardware and it is the official one. You can find here some instructional videos on the following link to the install the OS on your Raspberry Pi
If you have ordered a Raspberry Pi with a starter kit, most of the sellers would have loaded the Raspbian OS image on the SD card as a part of the kit. Once the OS is installed & configured, it is ready for use with the default username pi and the password is raspberry. Find below the schematic and the GPIO pin out diagram. On the sample code I have used Pin 17 and Pin 18 to control devices
Remote Tools:
There are tools to connect raspberry Pi remotely from your Windows client. Software xrdp provides a graphical interface for the users to remotely connect Raspberry Pi using Microsoft’s RDP mstsc.exe. Follow along this blogpost to set this up on the Raspberry Pi to enable remote connectivity. You can also use PuTTY a SSH tool to remotely connect with Raspberry Pi device. To know the IP address of the device, login to the Router to which the raspberry pi is connected or through the command hostname -I on the command line. To use PuTTY client & VS Code remote development plugin, SSH must be enabled on the Raspberry Pi OS. By default, it is disabled to enable follow the below steps
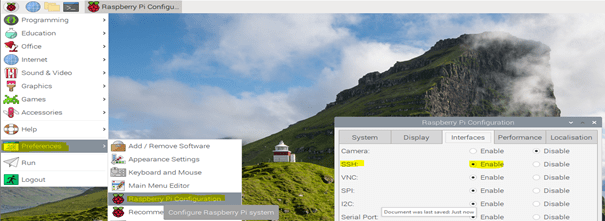
Launch Raspberry Pi Configuration from the Preferences menu.
Navigate to the Interfaces tab.
Select Enabled next to SSH.
Click OK
Raspberry Pi Setup for IoT with .NET Core:
.NET core is an open source development platform maintained by Microsoft and .NET community on Github. I have chosen .Net core and the programming language C# in which I am comfortable with. There are also python libraries to control GPIO pins in Raspberry Pi. To use .NET core IoT librariesinstall .NET core 3.1 on Raspberry Pi. Follow the instructions below to install .NET core
Copy the Direct link of the .NET core SDK from the link for Linux ARM32. Based on information gathered from few blogposts .NET core is supported for ARM64 though Raspberry Pi is 64 bit. Get the latest link from https://dotnet.microsoft.com/download/dotnet-core/3.1
Open a Terminal window in Raspberry Pi. Enter the following command to download the .Net core sdk binary
To make it available permanently on all the sessions. Run the following command to open the .profile file to save the information
sudo nano .profile
Add the following lines at the end of the file by scrolling and then save it (CTRL+S) and then exit using (CTRL+X)
# set .NET Core SDK and Runtime path
export DOTNET_ROOT=$HOME/dotnet
export PATH=$PATH:$HOME/dotnet
Run the command dotnet –info to know the version of the .Net core
Visual Studio Code setup for remote development:
You can develop applications remotely on a Raspberry Pi device using VS Code with the help of a plugin Remote Development which uses SSH to connect. After the plugin in installed, perform the following steps to remotely connect the Raspberry Pi device
Have the IP address of the Raspberry Device ready which will be used to add a SSH host. Use the command hostname -I on the Raspberry Pi’s terminal window will reveal the IP address
Go to the VS code and press CTRL+SHIFT+P together and type Remote-SSH: Connect to Host & select
Click Add New SSH Host
Type ssh pi@x.x.x.x -A and then press Enter. X.X.X.X is the IP address of your raspberry device and pi is the username (Default)
Select the configuration file. I have used default, %USERPROFILE%\.ssh\config on Windows 10
Host will be added. You are now ready to connect remotely provided the SSH is enabled on the Raspberry Pi.
Azure IoT Hub:
IoT hub is a managed service hosted in cloud that acts as a central message hub for bi-directional communication from the device to the cloud and the cloud to the device. There is a also a Free-Tier limited to one per subscription which can add up to 500 devices and 8000 msgs/day as of today based on the Pricing calculator. Go through the Microsoft documentation about IoT hub. Create a IoT Hub for us to send a message to the Raspberry Pi device for us control the device as per the instruction given in this article. After the IoT hub is created
A device must be registered with your IoT hub before it can connect. There are different ways to register a device like using Azure Cloud shell, in this case we will use portal. Click IoT Devices under the Explorers blade on the IoT hub and click on + New, enter the Device ID and click save.
Copy the Primary key of the registered device
Copy the Hostname from the IoT Hub Overview blade
These values will be used later in the .NET console application
Device Explorer:
It is a tool which helps you to manage devices by connecting to the IoT hub you have just created, it can be also done from the Azure portal, Azure Cli etc. It is very easy to connect to the IoT hub using the connection string. Download the device explorer from the https://aka.ms/aziotdevexp
To get the connection string, click Shared access policies under Settings blade and click iothubowner policy. Copy the Connection string-primary key and paste it on the Configuration section of the Device explorer and click Update as shown below
To send a message to the device click the tab Messages to Device and for registering new devices click Management.
.NET Core Console Application:
The Microsoft .NET core team also has a .NET core IoT library. The package System.Device.Gpio supports GPIO pins to control sensors (Pin Mode: Input) and devices like relay, LED’s (Pin Mode: Output). In this case we will be using the Pin no 17 & 18 to turn on or off a LED with Pin mode set as Output.
Setup for controlling devices:
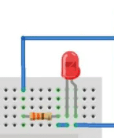
To control a LED, connect a 220 ohm resistor to the long lead and the other end to a GPIO Pin (17 & 18) & the short LED lead to any one of the GPIO Ground.
In my setup I have used a Breadboard, GPIO Extension board & GPIO extension cable. GPIO Pin’s 17 & 18 are used, there are many other pins for us to use. Look at the GPIO pin schematics for more details on the pins. There are also relays designed for Raspberry Pi which helps controlling real devices, there are different relays module (4 channel, 8 channel, 10 channel etc) available in the market.
Connect Remotely to Raspberry Pi using VS code:
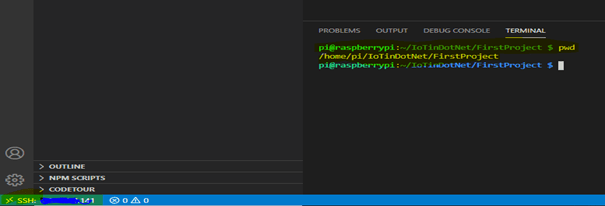
Connect the VS code to the Raspberry Pi using SSH by using keyboard shortcut CTRL+SHIFT+P and click Remote-SSH: Connect to Host and click the IP of the raspberry PI or the hostname based on the VS code setup (SSH Host) we have done earlier
After the password (Default: raspberry) is entered. If you see on the left bottom corner of the VS code with SSH: IP Address or host name, it is then successfully connected
In the terminal window you can enter all bash commands in context of Raspberry Pi.
VS Code Plugin:
To add a package from VS code to the Console app project install a plugin Nuget Packet manager. You can also use the CLI command on the terminal window to add the package but the plugin will help us to add different packages using the UI. All the packages will be installed on Raspberry Pi device as shown below
I also recommend you install to C# and CodeTour extensions (code walkthrough for the code I’ve used for this sample project).
Create the first Console Application to control a LED:
Follow the below steps to control a LED connected to GPIO PIN 22 using the .NET IoT package System.Device.Gpio
On the VS Code terminal window, enter the command dotnet new console to create a new console application
Add the package System.Device.Gpio using the nuget package manager plugin by CTRL+SHIFT+P > NuGet Package Manager: Add Package
Add the following code to the Program.cs file
using System;
using System.Device.Gpio;

namespace DemoProject-GPIOControl
{
    class Program
    {
        static void Main(string[] args)
        {
            Console.WriteLine("Turning on Light from Pin 22");
            using var controller = new GpioController();
            controller.OpenPin(22, PinMode.Output);
            controller.Write(22, PinValue.High);
            Console.ReadKey();

        }
    }
}
Run the command on the Terminal window dotnet run. There will be an unauthorized exception as below
Unhandled exception. System.UnauthorizedAccessException: Setting a mode to a pin requires root permissions.
 ---> System.UnauthorizedAccessException: Access to the path '/sys/class/gpio/gpio17/direction' is denied.
 ---> System.IO.IOException: Permission denied
Enter the following command on the terminal window to provide root permission for Pin no 22: /usr/bin/gpio export 22 out. This command has to be executed everytime you restart the Raspberry Pi unless you provide root permissions to the account which could be done by setting a value on the root configuration file.
Now run the dotnet console app using the command dotnet run which will turn on the LED light connected to PIN 22. The output voltage on PIN will be 3.2 volt if the pinvalue is set to High and will be Zero if its set to Low.
Code controller.Write(22, PinValue.Low); will turn off the light
To remotely debug on the Linux Arm, follow the instruction on this article.
To disconnect in VS code, click File > Close Remote Connection
Method Encoding.ASCII.GetString(receivedMessage.GetBytes()) reads the message
Method deviceClient.CompleteAsync(receivedMessage, _ct) deletes the message from the queue
Do not forget to run the commands /usr/bin/gpio export 17 out and /usr/bin/gpio export 18 out based on the pins you are controlling. Then run the dotnet application using the command dotnet run. Now send a message from the Device explorer or from Azure portal IoT device explorer ON1 or Off1 to turn On/Off the LED connected to PIN 17 and ON2 or Off2 to turn On/Off the LED connected to PIN 18.
On this example we have used Cloud to device messages which sends a one way notification but you can also use Direct Methods & Device Twin to control devices, go through the following documentation from Microsoft with guidance to send cloud to device communications using different methods
Find here the sample of the console application from GitHub. Now the console application is ready, let us create the Azure Function app to use it in the PowerApps.
Azure Function App – HTTP Trigger:
I’ve used a Consumption plan Function app which gets triggered on a HTTP request to send a message to IoT hub registered device using the method ServiceClient.SendAsync from the package Microsoft.Azure.Devices to send a one way notification to the registered Raspberry Pi device. The message will be sent to the device on the HTTP request as query string (Parameter name: name)
Create a Function App from the Visual Studio 2019, I’ve used VS 2019 but you can also use VS Code
Add the HTTP trigger with authorization Level of the Function App as Function
Add the Nuget Package Microsoft.Azure.Devices
Have the connection string handy for the iothubowner policy used on the device explorer.
Copy the following Code:
 using System;
 using System.IO;
 using System.Threading.Tasks;
 using Microsoft.AspNetCore.Mvc;
 using Microsoft.Azure.WebJobs;
 using Microsoft.Azure.WebJobs.Extensions.Http;
 using Microsoft.AspNetCore.Http;
 using Microsoft.Extensions.Logging;
 using Newtonsoft.Json;
 using Microsoft.Azure.Devices;
 using System.Text;
 using System.Net;

 namespace FunctionApp_IoT
 {
     public static class Function1
     {
         static ServiceClient serviceClient;
         static string connectionString = "HostName=YourIoTHub-env.azure-devices.net;SharedAccessKeyName=iothubowner;SharedAccessKey=Yourkey";
         static string targetDevice = "Your Device ID";
         [FunctionName("Function1")]
         public static IActionResult Run(
             [HttpTrigger(AuthorizationLevel.Function, "get", "post", Route = null)] HttpRequest req,
             ILogger log)
         {
             log.LogInformation("C# HTTP trigger function processed a request.");

             string name = req.Query["name"];

             serviceClient = ServiceClient.CreateFromConnectionString(connectionString);

             SendCloudToDeviceMessageAsync(name).Wait();

             return new OkObjectResult(new { status = "Light turned On or Off" });

         }
         private async static Task SendCloudToDeviceMessageAsync(string condition)
         {
             var commandMessage = new
              Message(Encoding.ASCII.GetBytes(condition));
             await serviceClient.SendAsync(targetDevice, commandMessage);
         }
     }

 }
Publish the function app to Azure. Test it by sending HTTP requests using Postman tool or browser. The function API is ready, we are now ready to call the function in PowerApps
So far we have progressed till a HTTP API endpoint using serverless which sends a message to the Raspberry Pi through the IoT hub, if we have to call this API on PowerApps we will have to create a custom connector which allows you to connect to any RESTful API endpoint. Bear in mind that to use a PowerApp which has a custom connector, the users should have a premium license.
Custom Connector:
Let us go ahead and create the custom connector, you can find here on the GitHub repo for the swagger definition file for creating the custom connector. Download the file and go to your Power Platform environment and click to the Custom Connectors link under Data.
Click the Import an OpenAPI file under New custom connector and import the Swagger definition file you have downloaded from the repo
Once it is imported, change the host on the General tab based on the function app URL and the Security will have authentication type as API Key and on the Definition tab there will be one action which be called from the PowerApps to control devices. After the settings are configured you can create the connector by clicking the link Create connector. You can test the connector by creating the connection by passing in the Code parameter of the function app and pass the message to test the operation. Make sure the console app is running in order to receive the message & to turn on/off the device.
PowerApps Canvas App:
Once the custom connector is created you can use it on the PowerApps canvas app by creating a connection to the connector like below
After the connection is created and added on the app, you can use on the PowerApps controls like Toggle, button etc to turn on/off the devices using the code ‘IOT-ControlDevice’.ControlDevice({name: “on1”}) / ‘IOT-ControlDevice’.ControlDevice({name: “off1”}). If a toggle control is used, the code will be something like this
Voila, now you were able to control devices from PowerApps.
Summary: On this post we have seen how to integrate Azure IoT with PowerApps and to control devices through a PowerApps. This is just a sample, you can extend this example based on your needs. Hope you have found this informational & interesting. Let me know any feedback or comments on the comment section below
This blogpost will help you to explore and interact with MS graph API endpoint’s using the following tools
Postman client
Signed in as a user/On-behalf-of API call (Delegated permission)
Application/daemon API call (Application permissions)
Graph Explorer
I have used MS graph extensively on different MS cloud services like SharePoint, PowerAutomate, PowerApps, Azure services like Azure functions and on devices like Raspberry Pi. It is a very powerful service in Microsoft 365 platform. Let start with some basics
Introduction:
MS Graph API is a RESTful web API which enables you to access different Microsoft 365 cloud service resources through its unified programmability model.
Microsoft Graph exposes REST APIs and client libraries to access data on the following Microsoft cloud services:
Microsoft 365 services: Delve, Excel, Microsoft Bookings, Microsoft Teams, OneDrive, OneNote, Outlook/Exchange, Planner, SharePoint, Workplace Analytics.
Enterprise Mobility and Security services: Advanced Threat Analytics, Advanced Threat Protection, Azure Active Directory, Identity Manager, and Intune.
Windows 10 services: activities, devices, notifications, Universal Print (preview).
Dynamics 365 Business Central.
Permission Types:
MS Graph exposes granular permissions that controls the access of the apps that has to the different resources like sites, users, groups etc. There are two types of permission
Delegated permissions are used by apps that have a signed-in user present. For these apps, either the user or an administrator consents to the permissions that the app requests and the app can act as the signed-in user when making calls to Microsoft Graph.
Application permissions are used by apps that run without a signed-in user present. For e.g Apps that run as background services or daemons. Application permissions can only be consented by an administrator.
Access token:
To call a MS Graph API all you need is an access token in the authorization header of an HTTP request.
The access tokens are issued by the Microsoft identity platform which contains information to validate if the requestor has appropriate permissions to perform the operation they are requesting. An active directory app is a pre-requisite to generate an access token to call a Graph API endpoint.
There are also Microsoft identity platform authentication libraries for .NET, JS Android, Objective-C, Python, Java, Angular facilitating validation, cookie handling, token caching and on maintaining a secure connection. Let’s now go ahead and see the tools
MS Graph Explorer:
Graph explorer is a web-based tool which can be used to build and test requests using Microsoft Graph API. The explorer can be accessed from the following URL:
There will be a default Active directory application on the Organizational Active directory of the M365 tenant by the name Graph Explorer with application id de8bc8b5-d9f9-48b1-a8ad-b748da725064. This app can be accessed from the Enterprise applications blade of the Active directory as shown below
Delegated permissions are used by Graph Explorer. Based on your access role & admin consent’s you would be able to call different Microsoft Graph API from this tool. After you have signed into the Graph Explorer tool, the access token will be generated automatically
To view the token information, copy the token and paste it on the utility https://jwt.ms/
If your token has a scp (Scope) claim, then it’s a user based token (Delegated permissions). It is a JSON string containing a space separated list of scope the use has access to call different graph endpoints. You can also find other information related to the issued token, token issued at (iat), expirty not before (nbf), expiry time (exp). The data is in UNIX time stamp but you can convert this information to standard time using the online URL
Postman is a tool that can be used to build and test requests using the Microsoft graph API’s. To use this tool for testing the Graph API endpoint’s, register an app in Azure Active directory as per the instructions from this blog post. Provide the permission (Delegated & Application) as per your need to test it using Postman.
Copy the client id, client secret & tenant ID of the registered app. To access the various endpoints like authorization and token, click on the Endpoints from the Overview section of the Active directory app.
Setting up the environment using Postman collections:
There are Postman collections with many MS graph API requests created by Microsoft for us to explore. Import the collections and setup the environment (Client ID, Client secret, tenant id) for Application API calls and on-behalf-of API calls as per the instruction from the following article
To generate an application token, make a POST request to Get App-Only Access Token from the collection Microsoft Graph. The grant_type is client_credentials since it is Application permissions.
Token Validity:
The token is valid for 3599 seconds which is 1 hour. Post that the token will expire, you will have to regenerate the token by making another call.
The AccessToken (Application API call) will be generated and automatically stored on the Environment (Microsoft Graph environment) AppAccessToken with the help of a script on the Tests tab in Postman. Copy the access token value & paste it on the utility https://jwt.ms/. Find the decoded token below which has information like the Application ID/client id of the AD app, display name and roles to which the app has access to poll the graph endpoint.
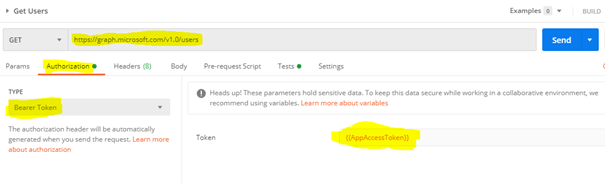
Graph API call:
The call to the Graph should have the bearer token
Signed-in user/on-behalf-of API Token:
To generate a Signed-in user token, make a POST request to Get user Access Token from the collection Microsoft Graph. The grant_type is password since it is delegated permissions.
The AccessToken (Signed-in user API call) will be generated and automatically stored on the Environment (Microsoft Graph environment) UserAccessToken with the help of a script on the Tests tab in Postman.
Copy the access token value & paste it on the utility https://jwt.ms/. Find the decoded token below which has information like the Application ID/client id of the AD app, display name and scopes (scp) to which the app has access to poll the graph endpoint. If you remember the Application API token had roles & not scopes, so this is how you can identify the token type.
Storing the production User ID and password is not recommended on the Environmental variables since the information is stored in Postman but this can be handled by generating an access token from the request Authorization tab, set the type as OAuth 2.0 and click Get New Access Token button
Fill in all the information gathered from the App in Azure AD like Appid, Secret, Endpoints (Authorization and Token), state can be any random value
Click Request token, this will prompt the user to enter the Username and password. After authentication, it will generate the token which could be used further to make API calls.
Graph API call:
The call to the Graph should have the bearer token on the Authorization tab or on the Headers tab
Summary: On this post we have seen how to use tools like Graph explorer & Postman to test different MS graph API endpoints. You can make requests like GET, POST, PUT, PATCH, DELETE based on its availability. Refer to the Microsoft documentation for v1.0 and beta endpoints. Once you have explored & tested the API, you are ready to use on applications using the available SDK’s for different programming languages. Let me know any feedback or comments on the comment section below
This post is in response to a comment in one of the most viewed article from my blogsite to post an Adaptive card to an user in Teams using PowerAutomate. Assume we have a use case for using Adaptive card for collecting response from n number of users based on the data from an Excel, SQL database etc. The response must be unique for users so there has to be separate instance of Adaptive card flow to each user since the flow has to wait till it gets response from the user.
To handle this scenario, we are going to create two flows
Flow 1 – Send Adaptive card to collect response: This flow creates an adaptive card to collect response from each user
Flow 2 – Microsoft Teams User Details: The main flow which has the user details
For this example, I will be storing the user details on an Array variable but you can dynamically generate user details or based on the data from various datasources like Excel, Database etc. Let us go ahead and create the flows
Flow 1 – Send Adaptive card to collect response
This flow will be called from flow 2 to create the Adaptive card for the team user to collect response.
Step 1: Create an Instant flow with trigger type “When a HTTP request is received” and select the method type to Post by clicking Show advanced options. Now click Use sample payload to generate schema under the section Request Body JSON Schema and the enter the following data for the team user email address and click Done to generate the schema
{
“Email”:”user@domain.onmicrosoft.com”
}
The email address of the Teams user will be passed from Flow 2 on the request body.
Step 2: Add the action Post an Adaptive card to a Teams user and wait for a response. The only change is for the field Recipient which should be Email (request body json schema) from the dynamic content of the trigger When a HTTP request is received.
Step 4: Saving the flow automatically generates the HTTP POST URL, the URL will be used in the Flow 2. The complete flow should be looking like the below
We are now good to create the second flow from where the Adaptive card collect response flow will be triggered from.
Flow 2 – Microsoft Teams User Details:
This flow is the primary flow which triggers the Flow 1 for the posting the adaptive card to multiple team users.
Step 1: Create an Instant flow with the trigger type “Manually trigger a flow” and add a Array variable to store the user email address for sending the Adaptive card to collect response from multiple users.
Step 2: Add the Parse JSON action to parse the email address from the array variable and then click Generate from sample
Paste the array data as given below and click Done to automatically generate the schema for us. Then for the Content parameter in the action, select Teams Users (array variable) from the dynamic content.
Step 3: Add a compose action and the select the email attribute from the Parse JSON output to automatically generate a Apply to each loop as below
Step 4: Add the HTTP action to make a Post request to the HTTP url created from the first flow to post an Adaptive Card to the teams user. Find the parameters below
Method: Post
URI: HTTP Request flow URL (when a HTTP request is received) copied from the Flow 1
“Email”: Output of JSON Parse action (Email)-to be replaced
}
Authentication: None
This should now create Adaptive card to collect responses from multiple users irrespective of the users response to the Adaptive card.
Summary: On this post we have seen how to send adaptive card to multiple teams users using Power automate. There should be a question? Why cannot we use a Child flow concept to call the Adaptive card from the parent flow using the action Run a Child Flow available in Power platform solutions. Since we are using a For Each loop in Flow 2 Step 3 it will go to the next loop only if the first user responds to the adaptive card since there will be an action Respond to a PowerApp or flow at the end of a child flow (must have in child flow). We will have to keep in mind about the action (HTTP) and triggers (When a HTTP request is received) used in this flow are Premium. Let me know any feedback or comments on the comment section below
If a guest user has to access a PowerApp, they will not able to access it unless they have a license. On this blog post lets see how a M365 license can be assigned to a Guest user on your tenant. Before getting there, lets see some information about guest accounts. Microsoft 365 allows guest access which lets you to add users outside your organization for B2B collaboration on your organizations SharePoint site, Teams, Planner, OneDrive for Business, Microsoft 365 groups, Yammer & Azure applications. You can even invite guest users to use your paid Azure services. With B2B collaboration the application & services are securely shared while keeping the control over the data. This setting is turned on by default. The invited guest users should own an Azure Active Directory account (Work or School) or a Microsoft Account (created through hotmail, google, yahoo etc) to sign in. For more information on External Sharing, go through the following documentation links from Microsoft
As of now this feature is in preview which allows External users to sign up for specific application themselves. i.e providing options to signup with identity providers like Azure AD or Google, Facebook and collect information about the user during the sign up process. This can’t be enabled for SharePoint & Teams
OneDrive/SharePoint Online has a separate invitation manager. The support for external sharing in OneDrive/SharePoint Online has started before Azure AD. OneDrive/SharePoint Online adds users to the directory after users have accepted their invitation. There will not be a user account in Azure AD portal before the user acceptance & user sign-in. SharePoint Online external sharing settings can be controlled at
Organization Level
Site level
On the SharePoint Tenant admin center, for a SharePoint site you have 4 options to select when it comes to external sharing:
Azure AD access reviews can ensure that guest users have appropriate access. You can ask the guests themselves or a decision maker to participate in an access review and recertify to the guests’ access. For more information, go through this documentation link from Microsoft.
An UPN with #EXT# means the account is using Domain suffixes not associated with your Azure AD tenant i.e. guest account.
Assigning License to Guest account through active directory group:
The guest users can access services like SharePoint, Teams, Yammer without having a license but they can’t access PowerApps. To access PowerApp the guest user should have license from their organization or should have one from the tenant being invited. Microsoft documentation for Sharing a Canvas app to a guest user in Power Apps.
Step 1:
Create a Security group in Azure Active directory
Step 2:
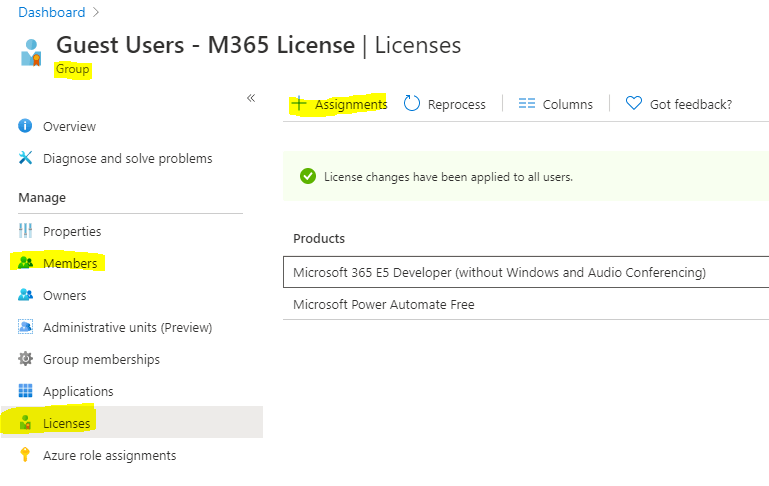
Assign license to the security group by clicking the Licenses section in the Manage blade. Then click Assignments as shown below to assign a license
Step 3:
Now the group is ready to add members. Add the guest user to the group who needs a license. After assignment it should look like below from the Admin center for the guest user
I have assigned a E5 license but as per need the guest user can be assigned different licenses.
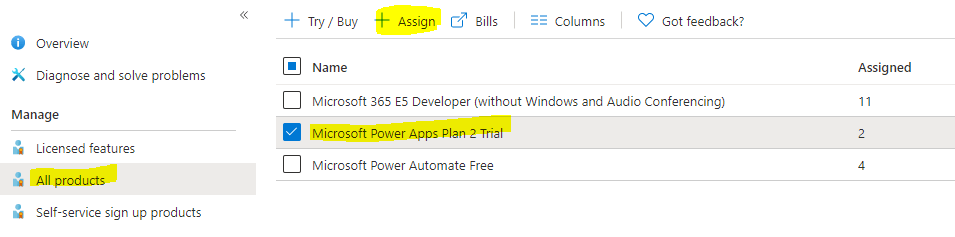
Assigning License to Guest account from Azure active directory Licenses blade:
Go to Azure Active directory Admin interface and then click Licenses under manage blade. Click All products, select the license and then click Assign as below
Now select the guest user and then click Assign
Hope you have found this informational & helpful. Let me know any feedback or comments on the comment section below
Azure websites also known as app service can be easily created through multiple interfaces like Azure Power shell, CLI, Azure portal etc. While creating the website or App Service you will have to select the operating system, default choice is Windows. OS selection also depends on the runtime version you select (.NET framework, .Net core, Java etc). If you have an existing website connected to an App service plan, by the time I write this post you can’t find the OS information on the Overview or configuration section of the App service or App service plan. Let us see how we can find it
Option 1:
In the Azure portal, select the App service plan of the Azure Website. In the app service plan left menu, select App under settings blade. For Windows OS, it will be as app for type
For Linux website, it will be as app, linux for type
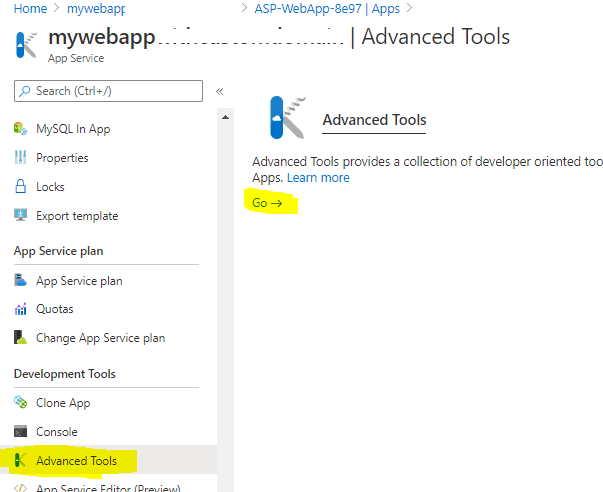
Option 2:
In the Azure portal, select the App service. In the left menu, select Advanced Tools under Development Tools blade. Click go
Once the Advanced Tools is opened, click Environment on the Top Left corner. You can find the OS under System Info. For Windows App service
For Linux App service:
To know the runtime stack, In the Azure portal, select the App service. In the left menu, select Configuration under Settings blade. Click General Settings
Hope you have found this informational. Sharing is caring
The SharePoint Online experience which you get by default for all the sites you create in the tenant is modern by default. The site pages you create in the modern experience are fast, easy to author and support rich multimedia content. The pages look great on any experience i.e. mobiles, browser, SharePoint App. If you wanted to host static HTML content with JavaScript, CSS, BootStrap on a SharePoint Online site it is not feasible though it was easily doable with Classic SharePoint site. The reason is by default you are not allowed to run custom scripts to change the look & feel & behaviour of the sites for security reason in a Modern SharePoint Online site. But we have control to manage this setting at different levels
Organizational Level
Site Level
On this blog post let’s see how to host static content (HTML, JS, CSS, Images et) by updating the site scripts settings at the site level. At the end I write some options to host Static content in Azure.
Pre-requisite:
Modern SharePoint Communication Site
SharePoint Online Tenant Admin access for executing few PowerShell commands
HTML Content
Access to Azure Subscription as a Contributor to test static content hosting in Azure
Hosting Static content on a SharePoint Online Site:
For sample HTML content I’ve downloaded from the following Azure Sample GitHub repo
If there is any file with HTML extension, rename the extension to .aspx. On this sample there was 1 HTML file by the name index.html, I’ve renamed the file index.html to index.aspx
Step 5:
Open the SharePoint Online Communication site in the browser & navigate to the Document library. I’ve chosen the default document library (Shared Documents) for the storing the HTML, you can also create a custom document library, site assets library.
Upload the folder which has the .HTML file renamed to .aspx and the supporting files (JS, Images, CSS etc)
After the upload
Click the index.aspx file, it should render the file with HTML, CSS, JS etc as shown below
The URL of the HTML page will be in the following structure for the index.aspx file
In the document library if you have a HTML file converted to ASPX before executing the command, it may not work. To make it work delete the ASPX file and upload it again to the document library
Tip
Step 6:
You can now Enable the property DenyAddAndCustomizePages by executing the following SharePoint Online PowerShell cmdlet
If you wanted to add another HTML file after the above command, you will have to disable the property DenyAddAndCustomizePages before adding the HTML file. I’ve shown you how to host static HTML on SharePoint Online site which will not cost you anything provided there is Microsoft 365 license. If you need additional features like Custom domain, anonymous access, deployments etc you can do so with Azure.
Embed the Static HTML Page in a SharePoint page:
To embed this on a SharePoint Page, add the Embed webpart on the page and paste the above link on the Webpart property pane for Website address or embed code as shown below
Static Content in Azure:
There are couple of options in Azure to host your HTML as shown below
Azure App service
You can create an App service in Azure to host your static HTML. There is Microsoft documentation with detailed instruction to set this up. You can lot of options with App service like Auto scaling, Custom domain, Anonymous access, auto deployments etc. There is also a Free pricing tier F1 for hosting your content.
As of now the service is in Preview mode which automatically builds and deploys full stack webapps to Azure from Github repository. During preview, its free of cost. I’ve recently tested this, if you wanted to try go through this documentation.
This service also has capability to serve static content (HTML, CSS, JS & image) from the blob container. To know more, check this documentation from Microsoft.
Summary: On this post we have seen options to host static content in SharePoint Online site & Azure. Based on your requirement (Anonymous access, custom domain, cost etc) you can choose one from the options given above. Hope you have found this informational & helpful in some way. If there is some other option to host static content, please let me know on the comment section below
If you are PowerApps developer and wanted to extend the capabilities by bringing in third party or community driven PCF (Power Apps Component Framework) components, you can find lot of samples from the Power Apps community website PCF.gallery, Power Apps Community and from Microsoft for Model driven and Canvas apps.
Sample components from Microsoft
If you are new to component framework, I recommend going through the documentation from the following link:
The PowerApps component framework enables the developers to create code components for model-driven and canvas apps. I have recently used a control from the PCF gallery community site, let’s see how to package and deploy a sample control to the Power Apps environment and then consume it on your Canvas app. There are two methods to deploy a code component:
Import the solution in to CDS
Power Apps CLI
To follow along the blog post, have the following available and installed on your environment
For this post, I have chosen the React Face pile component from Microsoft Power Apps samples github repo. Follow the steps to create the solution ZIP file to be imported on the solutions gallery. If you already have the solution package, directly proceed to the Step 10.
Step 1: Download as a ZIP package and extract to a folder on your computer or git clone from the Microsoft Github repository. I have downloaded on C:\ PCF\Controls\sample-controls
Step 2: Open the Developer command prompt and navigate to the folder on the computer where you have downloaded the React Face pile component using the cd folder-path-react-facepile-component command e.g folder-path: C:\ PCF\Controls\sample-controls\PowerApps-Samples\component-framework\TS_ReactStandardControl
Step 3: Install all the required dependencies by running the command
npm install
Step 4: Create a folder (e.g ReactStandardControlSolution) on the root of the React face pile component project (e.g C:\ PCF\Controls\sample-controls\PowerApps-Samples\component-framework\TS_ReactStandardControl) either manually or using the command mkdir ReactStandardControlSolution
Step 5: Navigate to the created folder by using the command cd ReactStandardControlSolution
On your command prompt, you should now be on e.g C:\ PCF\Controls\sample-controls\PowerApps-Samples\component-framework\TS_ReactStandardControl\ ReactStandardControlSolution
Step 6: Create a new solution project using the following command. The solution project is used for bundling the code component into a solution zip file that is used for importing into Common Data Service.
pac solution init --publisher-name developer --publisher-prefix dev
The Published-name and publisher-prefix values should be unique to your environment
Step 7: Add the reference using the command shown below. This reference informs the solution project about which code components should be added during the build. The path should to the root of the downloaded react face pile component and not to the newly created solution folder
Step 10: Now it’s time to import the solution to the solutions gallery by signing into Power Apps and select Solutions from the left navigation. On the command bar, select import and then browse to the Zip file solution created from the above steps. After the solution is imported successfully, the solution is available to use in Power Apps canvas and Model driven apps.
Let’s see the next method to deploy the code component
Method 2: Power Apps CLI:
In the previous method Power Apps CLI was used to generate the solution package and then the solution was imported to the gallery, on this method the code component will be directly pushed to the CDS service instance using the CLI push command.
Step 1: Create an authentication profile to the CDS instance by executing the following command on a command prompt, it’s not necessary to open a VS command prompt.
To get the url sign into Power Apps and select your environment which has CDS in the top right corner and the environment you are planning to deploy the code component. Select the settings button in the top right corner and select Advanced settings. Now copy the URL from the webbrowser which should look like below
Once your profile is successfully created, you should see the following message on your command prompt
Step 2: Navigate to the root folder of the custom component project using the cd folderpath command which has the .pcfproj file (e.g C:\ PCF\Controls\sample-controls\PowerApps-Samples\component-framework\TS_ReactStandardControl)
Step 3: Install all the required dependencies by running the command
npm install
Step 4: Run the following command to push the code components to the CDS instance
pac pcf push --publisher-prefix contoso
Note: The publisher prefix that you use with the push command should match the publisher prefix of your solution in which the components will be included.
Summary: You can also create a custom component from scratch or extend the functionality from the available samples based on your needs. Hope you have found this informational & helpful in some way. Let me know any feedbacks or comments on the comment section below
I have recently received a request from a customer to break the inherited permissions of a SharePoint document library folder, as of now there is no Power Automate action to break the permission of a folder but with the action Send an HTTP request to SharePoint you can call any SP REST API endpoint. Then I started exploring the Rest API endpoint to break the permission, have found the API endpoint
I was trying to understand the method breakroleinheritance() in the endpoint and its parameters. This method passes two Boolean parameters, copyRoleAssignments and clearSubScopes.
copyRoleAssignments parameter specifies whether to maintain the current role assignments already inherited from the parent site collection or Web site or List/Library,
clearSubScopes parameter specifies whether to clear unique permissions of child objects so that they will subsequently inherit permissions from the parent Web site or list
So how to know that the method breakroleinheritance() accepts two parameters
Documentation from Microsoft
API Metadata document
The metadata document ($metadata) is published at the service root for SharePoint & Graph API (v1.0 & beta versions). It describes about endpoints, methods, parameters, properties, associations etc
SharePoint Online API Metadata:
To access the metadata document for SharePoint REST service, hit the following URL from the browser after authentication
The response to the request will be an XML document. If I search on the XML file for breakroleinheritance, I found the following information
It will not give you information about the HTTP method [GET, POST, PUT etc] to use but it will provide you some insights on the API metadata. I understand it is difficult to search the XML document, a big shout out to Sergei Sergeev who has created an excellent project SharePoint REST API Metadata Explorer to handle the difficulty. Find the link below to access the project
As per the information on the project, the metadata is getting updated daily.
MS Graph API Metadata:
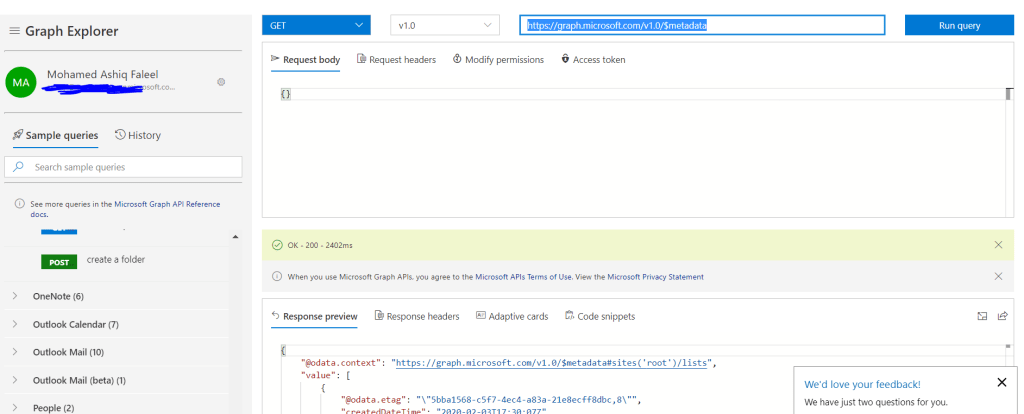
To access the metadata document for MS Graph service, make a GET request in MS Graph Explorer to the following URL based on the versions you would like to get the metadata
In Modern SharePoint lists you can display list item content in a more modern way using the Tiles view layout. If you have very big list with multiple columns along with picture columns you get a horizontal scroll bar on the list view, the Tiles view can solve this issue since the content will be displayed on the tile card where you can design the layout of the tile card to display the different list column values.
There are many blog posts & PnP Samples which will help you to create a Tiles view using JSON row formatting. If you are new to JSON row formatting, I recommend you to go through this link from Microsoft. Microsoft has recently brought in interface to format the list item row & do conditional formatting by creating rules based on column values
On this blog post, lets see how to create Tiles view as shown above for the Images stored as attachments in the list item. If you add an attachment to list item in SharePoint list, the attachments are stored in the following path
Power Automate Flow: To get the path of the attached file (Image file in this case), we will be creating an automated Flow which gets triggered on List item creation to get the path of the image & update it to the custom hyperlink list column (ProductPhotoHL).
JSON: To create a Tile view layout using list row view formatting.
Pre-Requisites:
Create a SP List by the name ProductInformation with the following columns
Title: Single line of text
ProductPhotoHL: Hyperlink (to the image)
ProductPhotoPic: Picture (to the image)
ProductPrice: Number
Features: Multiple lines of text
Couple of list items with Images as attachments after the Power automate flow is created
Only images as attachments
Not more than one image as an attachment
Power Automate to get the path of the Image attachment URL:
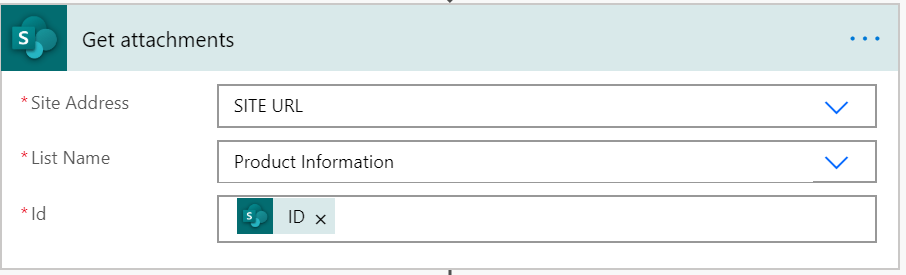
Create an automated flow with Trigger When an item is created and configure the trigger to the ProductInformation list. Add the Get Attachments action connected to the Product Information list & for Id parameter it should the List item Id (ID) selected using the dynamic content from the trigger When an item is created.
Now with the above action we have the attachment URL of the image, this must be updated to the list column ProductPhotoHL & ProductPhotoPic of the ProductInformation list in order to be displayed in the Tile view. To create the above shown Tile view ProductPhotoPic (Picture) is not required but I’ve used it show you that we can create a Thumnail of the image on the default list view using the Picture column ProductPhotoPic. By the time I am writing this post the Power Automate action Update item is not capable to update a column with Picture as a DataType but it can update a HyperLink column. Action Send an HTTP request to SharePoint to make HTTP requests to any SharePoint Rest endpoints, I’ve used this action to update the ProductPhotoPic (Picture) column as below
I’ve said this on the pre-requisite section that there should not be more than one attachment. In the Body of the HTTP request, the Url parameter for the ProductPhotoHL & ProductPhotoPic gets only the first attachment URL from the previous action “Get attachments” AbsoluteUri as dynamic content. To get the first attachment URL you can use any of the following formula from the expression
first(body(‘Get_attachments’))?[‘AbsoluteUri’]
body(‘Get_attachments’)?[0]?[‘AbsoluteUri’]
I’ve used the function first() to get the first item from the array. The flow is ready, add couple of items to the list by filling in information only for Title, ProductPrice, Features & a Image as an attachment. The flow gets triggered which will update the ProductPhotoHL & ProductPhotoPic with the image attachment url. You can download the flow template from the following GitHub repo link.
Create Tiles View layout using JSON:
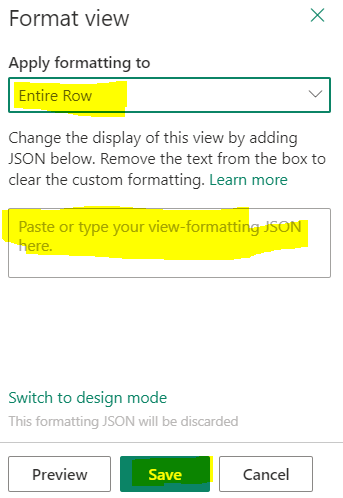
I’ve used the sample from PnP List view formatting samples to create items in tile layout for images. On the sample JSON I’ve updated the column ProductPhoto to ProductPhotoHL. The updated JSON is available here for download. Now copy the JSON & go to the List view & click on the down arrow (All Items)>Format current view>Advanced mode as shown below
The Apply formatting to should be set to Entire Row & paste the JSON to box as shown on the picture and then Save it.
Now you will have another layout by the name Tiles added to the existing layouts List & Compact List as shown below, select it
Now its time to see the need for the column ProductPhotoPic of datatype Picture, with the default layout you can see the thumbnail of the image added as an attachment
Summary: There are many samples available in PnP Github repo for List Row View & Column view formatting. In document & picture libraries the Tiles view layout are added by default, there is also a Column by the name Thumbnail in a Picture library. You can display a Thumbnail view of Images in PowerApps gallery for the Images stored in Document library, go through this link for more information. If you are storing images on a seperate document library & not as an attachment, the url of the image can be added on the HyperLink column. Hope you find this interesting & helpful.