The Attachment control in Power Apps is a useful feature that allows users to upload and delete files, but it can only be used with data sources such as SharePoint List or Dataverse table. However, if you need to upload and delete files without using these data sources, you can create a custom component using the Attachment control or you can directly use this control in the app. I have followed the tip from Shane Young in this YouTube video to add the Attachment control to a component library.
By creating a custom component Library for the attachment control, you can upload and delete files similar to a Picture control but with the ability to handle any file type across any apps within an environment. This blog post is not a tutorial on how to create the component, but rather
How to use it
To Save the file in SharePoint Document Library using Power Automate Flow
How to customize the component to fit your needs.
How to use it – Add the Component to the Power Apps:
To incorporate this component into your app, you need to first import it into your environment. Please find below the steps to follow
Step 1: Download the component library from my github repo.
Step 2: Create a Blank Canvas App with a temporary name, on the studio command bar, click on the ellipsis > Click ‘Open’, browse to select the downloaded .msapp package. Save the App and then publish it. You would now be able to see the component from the Component Libraries.
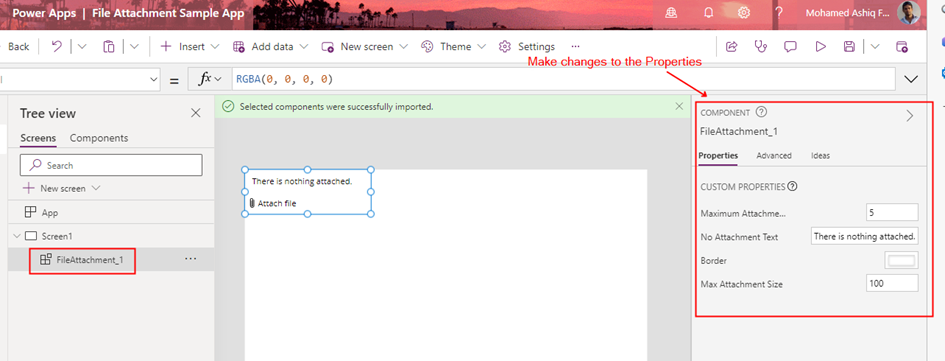
Step 3: After following the instructions outlined in this documentation to import the Published component into your app, the component will be available for use in any app within the environment as shown below.
Step 4: Modify the input parameters of the component to adjust settings such as maximum number of attachments, border colour, attachment size, and other defined parameters of the component.
Step 5: To display the uploaded file content within the app or to send the file to a Power Automate flow, you can incorporate any of the following controls based on the file type:
The file content will be uploaded to the app as binary data with the URL appres://blobmanager/ for each file uploaded from the attachment control. To get the file Name:
Note: In the above screenshot, I have set the Max Attachments Component property to 1 in the Step 4
Send the File to Power Automate:
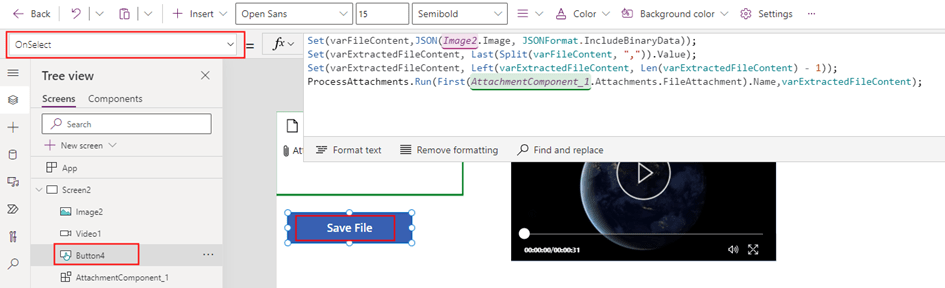
In order to send or store a file using a Power Automate flow, I needed to convert the file content to Base64 format. To accomplish this, I used a image control to capture the file content in binary format. Here is how I configured the image control:
This control works with any types of files to get the binary content.
After obtaining the binary content of the file using the JSON function, I performed some string manipulations to extract the binary content while excluding the Content-Type. Specifically, I used a combination of Split(), Left() and Last() functions to separate the content into an variable varExtractedFileContent.
By performing these manipulations, I was able to extract the binary content of the file in a format that could be easily passed to a Power Automate flow or other API or action.
This allowed me to send the file to a Power Automate flow, which could then save the file in a SharePoint library or call some other API or action that required the data to be in Base64 format.
The Power Automate flow used to save the file to a SharePoint Document Library is simple. The flow consists of a Power Apps trigger and a SharePoint action Create File, which takes two input parameters: File Name and File Content.
I have used the base64toBinary() expression to convert the base64-encoded string to binary data. This expression is a prerequisite for the SharePoint create file action and ensures that the file is saved correctly to the SharePoint Document Library.
If you need to upload multiple files to a library using the Attachment control, you can use Gallery control with the Image control, Collections, ForAll function, and the OnAddFile property from the Attachment control. First, create a collection to store the files that are uploaded using the Attachment control using the OnAddFile property. Then, use the Gallery control to load the binary of the uploaded files in the Image control. Next, use the ForAll function to iterate through each file in the gallery and call the Power Automate flow on a button click.
Customizing the Component:
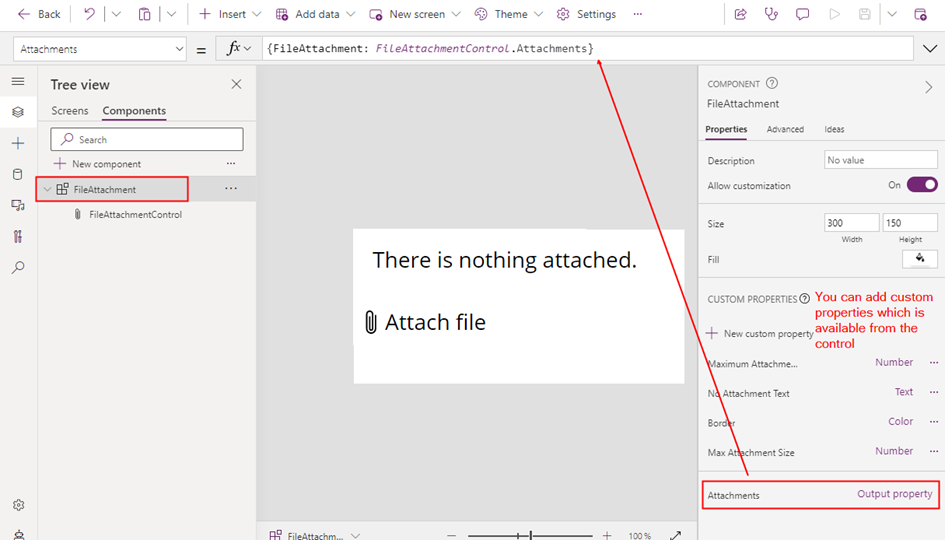
The component I’ve created is a simple one for handling file attachments, but it does not have all the properties from the Attachment control. If you need more customization, you can easily modify it to suit your specific needs by adding additional input or output properties.
To add a new property, you can simply edit the component code and include the new property as an input or output parameter.
By customizing the component in this way, you can tailor it to your specific requirements and ensure that it meets all of your file attachment needs
Summary:
In summary, the Attachment control in Power Apps is a useful feature for uploading and deleting files, but it is limited to certain data sources. To work around this limitation, you can create a custom component using the Attachment control, which allows you to handle any file type and bypass the use of data sources like SharePoint or Dataverse tables. Hope you have found this informational & thanks for reading. If you are visiting my blog for the first time, please do look at my other blogposts.
Do you like this article?
Subscribe to my blog with your email address using the widget on the right side or on the bottom of this page to have new articles sent directly to your inbox the moment I publish them.
The Power Automate action Send an HTTP request to SharePoint could come handy in many scenarios to execute SharePoint REST API queries but you will not able to use this action directly in Power Apps. In this blogpost, let us see how to call the SharePoint REST API in a custom connector which can be used either in Power Automate or Power Apps. There are many REST API endpoints available within SharePoint but the following use cases are not satisfied with a SharePoint standard connector in Power Platform
To execute a SharePoint REST API in Power Apps or Power Automate there must be an Azure AD app registered with appropriate SharePoint permission intended for the operations through a custom connector. For this example I have registered an AD application with the delegated permissions AllSites.Read.
Obtain the Client ID from the Overview section and create a secret from the Certificates & secrets under Manage blade. Once the secret is created, copy the value to be used in the custom connector. Add a Web Redirect URI https://global.consent.azure-apim.net/redirect as shown below
The Redirect URI is common and will be created while creating the custom connector.
Creation of Custom Connector:
Custom connector can be created from Power Apps maker portal or Power Automate portal. Custom connector created from any of the above-mentioned interfaces can be used in a Power App or Power Automate cloud flow. Let us see how to create a SharePoint communication site with the below permission using a custom connector. In the Power Automate portal, expand Data on the left panel > Custom connectors > + New custom connector > Create from blank
In Host field, enter tenantname.sharepoint.com and some description about the connector.
Along this article wherever you find the keyword tenantname, replace it with the name of the organizations Microsoft 365 tenant.
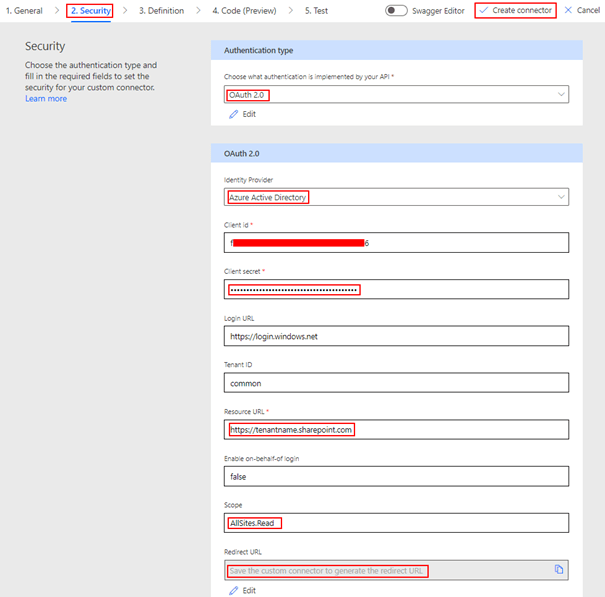
Now click Security on the right bottom corner to enter the Azure AD application information for the OAuth 2.0 authentication type. Under the section OAuth 2.0
Change the Identity provider to Azure Active Directory
Enter the Client id & Client secret of the Azure AD application
Enter the Scope as AllSites.Read based on the permissions you have added on the Azure AD app. If you have multiple permission, leave a space between each permission
After the above information is filled in, click Create connector which will autogenerate the Redirect URL https://global.consent.azure-apim.net/redirect. This is the URL we have added as a Redirect Web URI in the Azure AD application. The connector is now ready for the actions based on SharePoint API endpoint to
Create SharePoint Communication site:
Details about the REST API to create a communication site can be found here. Find below the HTTP request details
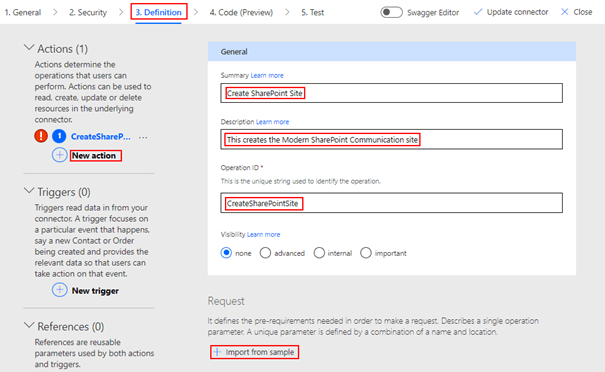
After the custom connector is created in the above step, now click the Definition tab of the Custom Connector > click + New action which will create the following screen to enter information about the action
After the Summary, Description and Operation ID is entered click + Import from sample under the Request section, enter the REST API details on the following screen per the information given above to create a site
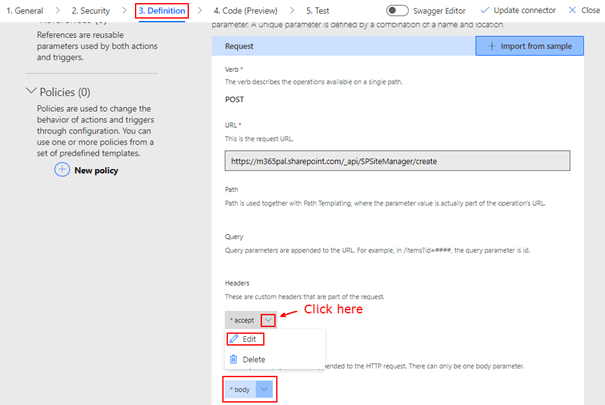
Click Import and then make changes to the Headers and Body section as shown below
Make the parameter required and add the default values as shown below
After the above changes are done, click Update connector. The custom connector action to create a new communication site is ready to be tested. Click the Test tab and enter the body information for various parameters or enter the JSON directly by toggling the Raw Body property to On
In the response, you get the Site Object id of the newly created site.
Summary:
Many of the SharePoint REST API’s are available in Microsoft Graph’s ecosystem but there are still a few which is not but this method can solve that problem. If you are interested to know on calling a SharePoint REST API as an daemon application in Power Automate, go through this blogpost. Hope you have found this informational & thanks for reading. If you are visiting my blog for the first time, please do look at my other blogposts.
Do you like this article?
Subscribe to my blog with your email address using the widget on the right side or on the bottom of this page to have new articles sent directly to your inbox the moment I publish them.
Microsoft Teams helps us bring together content from different Microsoft 365 services for easier collaboration. In Microsoft Teams connected SharePoint site, SharePoint News connector would help receive news updates from the site. In this post let us see how to create Notifications about new News post with deep link to the post from a communication site in an Adaptive card on a Teams channel using
Adaptive card
Stage View
Power Automate cloud flow
The users from a Teams channel would be able to read & engage on the News post by click of a button as shown below
Adaptive card:
Adaptive Cards are a platform-agnostic method of sharing and displaying blocks of information using JSON across various host applications like Teams, Outlook, Bots etc. The above adaptive card has following information from the News Post
Title
Description
Banner Image Url
Author Profile picture
Author Name
Published Date
Deep Link to the post
The card can be designed based on your requirements from the Adaptive Card Designer portal. The JSON content of the above adaptive card can be downloaded from here.
Stage View:
Stage View helps provide a seamless experience of viewing content in Teams. Users can view the content without leaving the context thus leading to have a higher engagement. For this post, I have used stage view through deep link for a SharePoint News post. Find the syntax below to deep link SharePoint News post
The Cloud flow is used to send an adaptive card to a Teams channel with the SharePoint News post deep link whenever there is a new News post published in a Communication site.
Step 1: Let us start with creating the Automated cloud flow with SharePoint trigger When an item is created or modified. In the trigger, the Site Address should be url of the communication site and the List Name as the Site Pages Library GUID as shown below
Step 2: In the trigger settings enter the following trigger condition to fire only on the first major version of the News Post
on another compose action Compose-StageViewURL-Encoded.
Step 4: Add the action Get user photo to display the picture of the author in the adaptive card. The User (UPN) property of the action can be provided from the trigger output Created By Email. The next step is to convert the output of the Get user photo action to Base64 encoded string using the following expression
Published Date: formatDateTime(triggerOutputs()?[‘body/Created’], ‘g’)
Deep Link to the post: outputs(‘Compose-StageViewURL-Encoded’)
The export version of the flow can be downloaded from this GitHub link.
Summary:
The adaptive card with stage view to a SharePoint News post allows the users to open and view the content without leaving the context. The user can also Like or Comment on the News post. Hope you have found this informational & thanks for reading. If you are visiting my blog for the first time, please do look at my other blogposts.
Do you like this article?
Subscribe to my blog with your email address using the widget on the right side or on the bottom of this page to have new articles sent directly to your inbox the moment I publish them.
The deleted sites are retained for 93 days and an Admin can restore them. In this blog post let us see how to get the deleted SharePoint site details using Microsoft Graph API application permission.
Step 1: Register an application in Azure AD and obtain the client id, client secret & tenant id for the registered application. Add Sites.Read.All Microsoft Graph application permission
Step 2: Find the list GUID of the Hidden List DO_NOT_DELETE_SPLIST_TENANTADMIN_ALL_SITES_AGGREGA which has all the deleted site information from the tenant.
Make a GET request to the following Graph API endpoint with the token generated from the above AD app using PostMan or using Graph Explorer if you are an Global or SharePoint administrator
There are activity alerts which you can setup from Security center for Deleted Site but it will send you information on the Site URL and the name of the user deleted the site, as of now it does not provide the Title, Site ID etc. So this API can provide you additional details. Hope you have found this informational & thanks for reading. If you are visiting my blog for the first time, please do look at my other blogposts.
In SharePoint Online sites, Audience targeting feature enables you to target relevant content to specific audiences enabling personalization through Microsoft 365 group, Azure AD Security group, Mail Enabled Security group or any combinations of these. The Membership type of the groups can be both Assigned and Dynamic. Target audience(s) can be defined on modern SharePoint pages, News post, Navigation links and as well as items on document libraries. I have used this feature for my customers on many instances to target News articles to specific audiences, but the challenging part is the content creator or Author of the News post should remember the name of the groups. In this post, let us see how to make the audience targeting for SharePoint online News post easier using
Term Store
Power Automate Cloud Flow
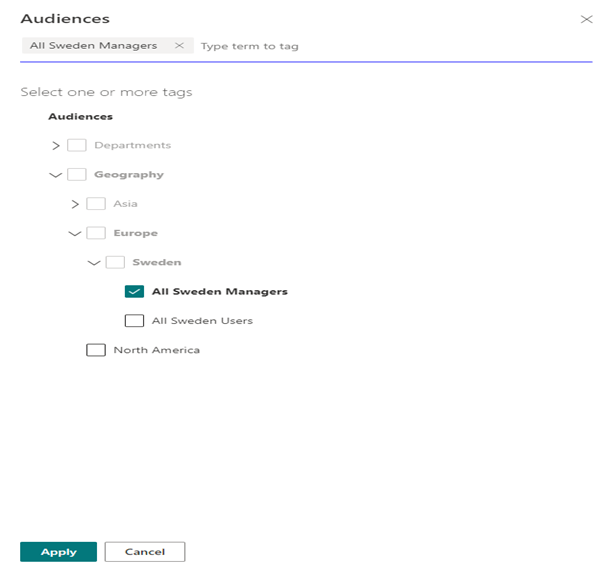
Find below the snapshot from the Page Details section of the News page
Isn’t the above easier than remembering name of the groups to target content?
Pre-requisite:
Access to create Power Automate cloud flow
SharePoint
A SharePoint site with Audience Targeting enabled
Site Owner or Administrator access
Access to Create terms @ tenant level or site collection level
Azure AD Groups
Service account with the permission level Full Control or Contribute on the SharePoint site with the Audience Targeting enabled
Term Set Creation & Group Mapping:
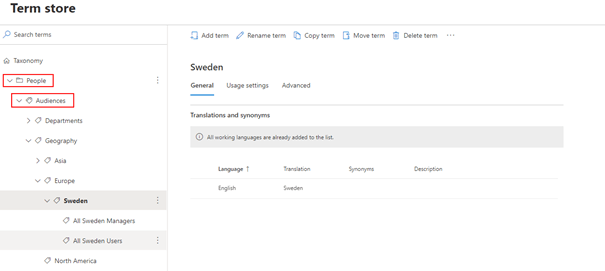
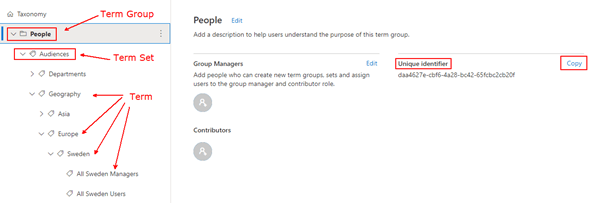
The first step is to create a Term set at tenant level or local (Site Collection) level for storing the group information based on your organizational hierarchy. The term set will be used to target content in SharePoint News post. Find below the term set Audiences I have created at tenant level under the term group People
Based on the hierarchy or needs, you can enable or disable tagging at any term level
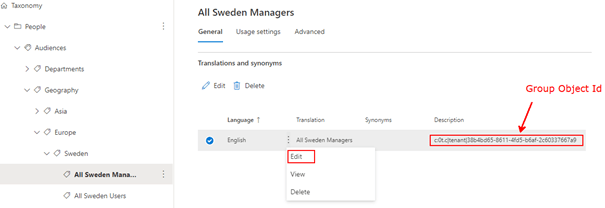
After you identify the Azure AD groups to be mapped against each term, have the group object id in the below format
Select the appropriate term which is available for tagging, click Edit to add the group object id in the above format in the description field as shown below
After the mapping of term set & groups are done in the Term Store Management interface, copy the Unique Identifier (GUID) of the Term Group (People) and Term Set (Audiences) and keep it handy which will used in the Power Automate flow later
Settings in SharePoint Online site for Audience Targeting:
In the SharePoint online communication or Teams site
Step 1: Enable the audience targeting feature on the page library as per the instructions in this article. As soon as the feature is Enabled, there will be a column Audience added to the Site Page content type at the Page Library level. There can be a maximum of 50 groups added to the audience field.
Step 2: Create a Managed Metadata site column by the name Audiences with the setting Multiple Value Field mapping to the termset Audiences created above from the Term Store management. The managed metadata column can also be created at a Term level instead of a Term set. Once the site column in created, add the site column to the content typeSite Page as shown below
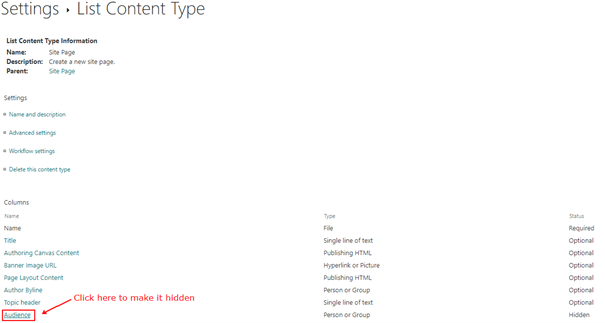
Step 3: Hide the default Site Column Audience from the Site Page content type at the Pages Library settings as shown below
Click the Audience field and make it hidden as shown below
Step 4: Grant the Service account access to the SharePoint site, either as a Site Administrator or Site Owner. The Service account will used in the Power Automate flow to update the Audience field from the values obtained from the Managed metadata column.
Automated Power Automate Cloud flow:
The Power Automate cloud flow will be used to get the claim information of the group stored in the description field of each Term in the Audiences Term set. This flow will be triggered after the News Post is published by the author.
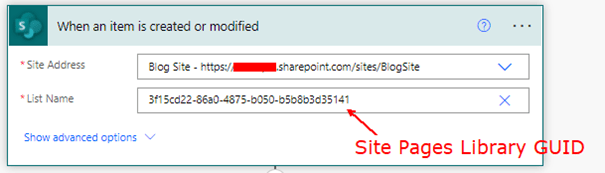
Step 1: Create an Automated flow with the SharePoint trigger When an item is created or modified. The trigger Created or Modified is to make sure it fires whenever there is a change in the Audiences managed metadata column information. Enter the site address of the SharePoint site in context and the Library Guid of the Site Pages Library.
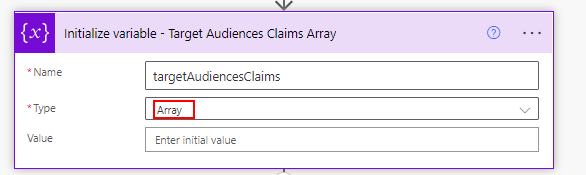
Step 2: Add the action Initialize variable of type Array as shown below
The Array variable will be used to create an array of group claim values selected from the Term description field.
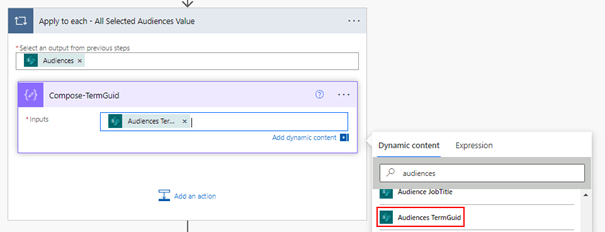
Step 3: This step is to create the array of group claims based on the users selection from the Managed metadata column.
Add a Compose Action and add the property Audiences TermGuid from the trigger When an item is created or modified. This step will automatically create the Apply to each control, since the Managed metadata column allows multiple selection
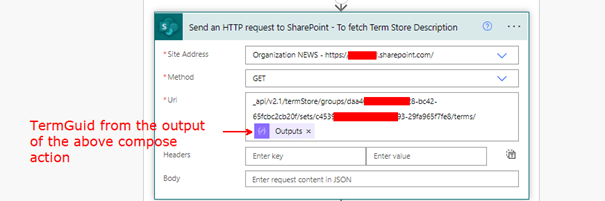
Add the action Send an HTTP request to SharePoint with the below parameters
Replace the term group and term set guid on the Uri based on the information copied earlier from the Term Set Management interface. In the Uri, after terms it is the output of the compose action added in Step 2. If your Term Set is at the Site collection level, the site address should be the site URL
For references on the API endpoints, refer to the Graph API documentation for Taxonomy
Add a compose action to store the term description (Group Claim) extracted from the Term set api response. To directly get the description value from the response, the following expression will work
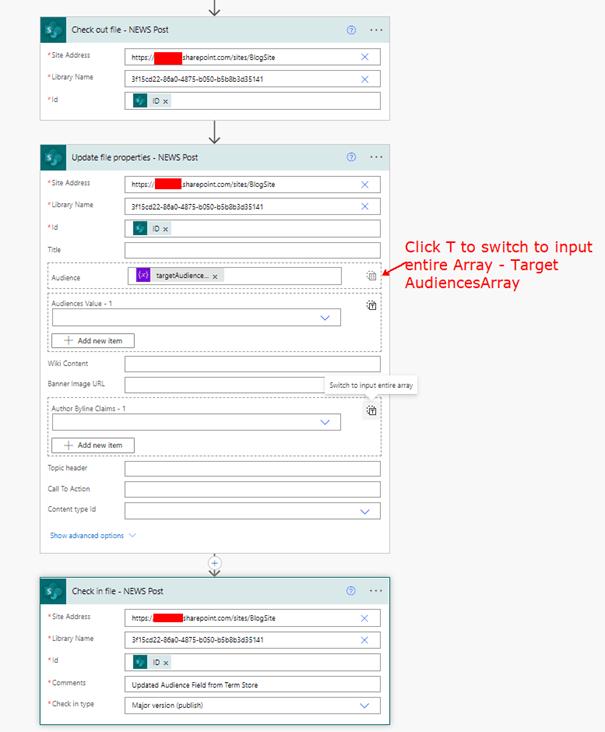
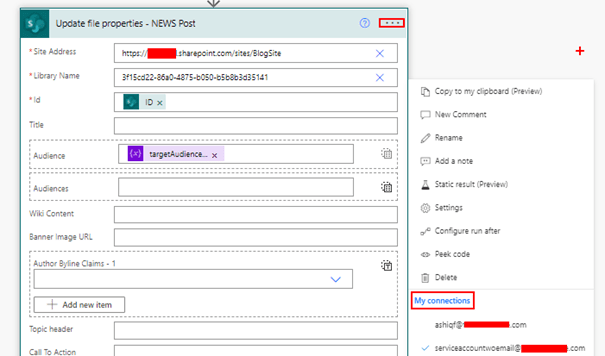
Step 4: The information to update the audience field is available in the array variable targetAudiencesClaims. So the next step is to update the Audience property in SharePoint News post, to do so add the action Check out file, Update file properties and Check in file as shown below
Enter the Site Address and Library Name information, the Id field should be from the dynamic content of the trigger When an item is created or modified. The Audience property in the action Update file properties should be the output of the Array variable targetAudiencesArray
Note: Click the button T on the property Audience to switch to input entire array from the variable.
Trigger Conditions:
There is an issue with the above update, the flow will result in infinite trigger loop due to the trigger type When an item is created or modified. To overcome this problem, the update must be done using a service account and Trigger conditions. Find below the connection setting using a service account for Update file properties action, replicate the same setting for the Check out file and Check in file
Add the following Trigger Conditions from the settings of the trigger When an item is created or modified for
To trigger only when a News post with major version is published
Target audience feature is SharePoint is one of the most useful feature in setting up intranet leveraging Microsoft 365 services and I hope this can complement the rich features Microsoft 365 already has. I will write in future how to deploy this flow automatically to different SharePoint sites. Hope you have found this informational & thanks for reading. If you are visiting my blog for the first time, please do look at my other blogposts.
Do you like this article?
Subscribe to my blog with your email address using the widget on the right side or on the bottom of this page to have new articles sent directly to your inbox the moment I publish them.
SharePoint Online Pages library is a container for different type of pages (News post, Page, Space, News Link) created in a Communication or Team site. There can be various scenarios to have a Power Automate Flow associated to a SharePoint Site pages library to handle additional processes after a Page or a News post is published. In this blog post, let us see how to
Trigger the flow if a News post is published
Trigger the flow only for Major versions
Trigger the flow for a specific Content Type
Avoid infinite trigger loop on an Item Created/Modified trigger if a page/list item is updated by the flow
using Trigger Conditions. Trigger conditions can be used on a trigger to stop your Automated Flow from running if the conditions are not met. Unnecessary flow runs can spend your quota limits based on the license types without providing any value. To begin with, create an automated cloud flow with the SharePoint trigger When an item is created or modified and configurations for the Site Pages Library. Once you provide the Site URL where your Site Pages library exists, you will notice the Site Pages library doesn’t show in the drop-down. In the List Name property, just provide the guid of the library instead.
To get the guid, browse to the Site Pages library on the SharePoint site, go to Library settings and select the value after the List= parameter on the URL after decoding.
Trigger the flow if a News post is published
There can be scenarios to trigger the Flow when a News post is created or modified. A SharePoint property PromotedState can help identify if the SharePoint page is a News post or a normal page since all the different types of pages are stored in the same library.
Label
Value
What it means
NotPromoted
0
Regular Page
PromoteOnPublish
1
News post in draft mode
Promoted
2
Published News post
The trigger condition will make sure the trigger is fired only when ever there is a News Post is published or Saved as draft (All Major and Minor versions).
The following trigger condition will make sure to fire only for Major versions (1.0, 2.0, 3.0 etc) and not for minor versions aka draft version (0.1, 0.2 etc)
@contains(triggerBody()?['{VersionNumber}'],'.0')
Trigger the flow for a specific Content Type
Content types in SharePoint are a set of columns that are grouped together to serve a specific type of content (Crisis News, Marketing News etc). A Page or a News post in a SharePoint site can be associated with content types. The trigger condition for the flow to be triggered only for a specific content type is
@equals(triggerOutputs()?['body/{ContentType}/Name'], 'Name of the Content Type')
Avoid infinite trigger loop on an Item Created/Modified trigger if a page/list item is updated by the flow
In your Automated cloud flow, if you have the Created or Modified trigger with an action to update the same item then there will be an infinite trigger loop.
The Flow checker will provide you a warning Actions in this flow may result in an infinite trigger loop. To overcome the above warning, trigger condition to the rescue.
How it will be done
The update item action on the flow should use a different connection (Service Account) in the flow, other than the user who will be using the site to create or update pages. The trigger condition will make sure the flow run will not happen if the update to the Page or News post is done by the service account using the Update item action. SharePoint Library and List has the out of the box column Modified By which holds the information on who has recently updated the item be it from the SharePoint UI or through program. The trigger condition will be written based on this column Modified By, if the column value has a different value other than the service account then the flow will be triggered.
Step 1: Create a service account with password never set to expire. Licenses are not required for this account if the flow connection is going to be used only on SharePoint connectors. Password setting Never Expires will make sure the connection is not invalidated due to a password change on the account.
Step 2: Grant edit access for the service account to the SharePoint site. This step allows the account to updates to the List or Library item.Step 3: Add a new connection to the service account
Step 4: Add the following trigger condition to the SharePoint trigger if the service account does not have an Exchange Email License
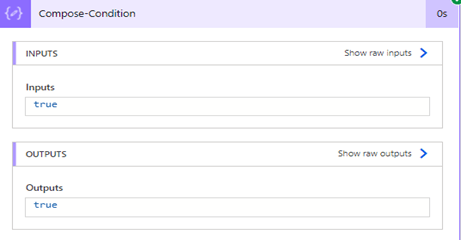
Before adding the condition to the trigger, evaluate the condition on a compose action using expressions and data fields selected from Dynamic content.
After the condition is added on the compose action, click Peek code
Copy the expression from the inputs parameter
The condition to be added on the trigger must be True for the trigger to fire.
Summary:
Trigger conditions are powerful if used wisely to avoid unnecessary runs. I’ve shown some examples from the SharePoint pages library but it can be used on List trigger as well. The trigger can be written based on any data available on the trigger output. Hope you have found this informational & thanks for reading. If you are visiting my blog for the first time, please do look at my other blogposts.
Do you like this article?
Subscribe to my blog with your email address using the widget on the right side or on the bottom of this page to have new articles sent directly to your inbox the moment I publish them.
SharePoint connector in Power Automate is very rich with various actions that can make the developers or makers life simple when it comes to interacting with SharePoint data. There might be some actions like
Breaking permission to a list item
Creating a site
Adding user to a SharePoint group etc
which is not possible through the SharePoint standard connector or MS Graph API as of the time I am writing this article, SharePoint REST API to rescue. The SharePoint online REST API enables developers to remotely interact with SharePoint data. There is an action Send an HTTP request to SharePoint which could come handy in many scenarios, the point to note here is the action uses the context of user aka flow creator while executing the API. In this blogpost, let us see how to call a SharePoint REST API to create a Modern SharePoint communication site as an application in a Power Automate cloud flow using the HTTP connector with the help of a Self-Signed certificate. Find below the list of steps to enable calling the SharePoint REST API using certificate credentials
Creation of Self-Signed certificate
Application Registration in Azure AD Portal
Creation of Power Automate cloud flow with the HTTP Connector
Method 1: Without using Azure Key Vault
Method 2: Azure Key Vault to store Certificate
Pre-Requisites:
Access to HTTP Premium Connector in Power Automate
Register an application in Azure AD and obtain the client id & tenant id for the registered application. In this example I have added the Sites.Read.All Application permission with Admin Consent to create the SharePoint communication site, this permission is more than enough to create the site as an Application. Grant appropriate permission based on the requirements, for e.g to break permission on list items grant Sites.Manage.All. Find below screenshot for your reference for granting permissions
To add the above created self-signed certificate, click Certificates & secrets under the Manage blade. Click Upload certificate > Select the certificate file MSFlow.cer > Add
Creation of Power Automate cloud flow with the HTTP Connector:
Let us see below how to access the SharePoint REST API to create a SharePoint site with & without using the Azure Key Vault.
Method 1: Without using Azure Key Vault
Method 2: Azure Key Vault to store Certificate
Method 1: Without using Azure Key Vault
In the cloud flow, add a Compose action to store the PfxBase64 value copied during the creation of the certificate. Now add the HTTP action to create a Modern Communication site
Password: Certificate password given during the creation
Find below screenshot for your reference
Run the flow, it should be able to create the Site. Find below screenshot of the flow run
Method 2: Azure Key Vault to store Certificate
Azure Key Vault is a cloud service for storing and accessing secrets enabling your applications accessing it in a secure manner. Follow my blog article which I have written to call a Microsoft Graph API with Certificate using a Azure Key Vault to store the certificate
Custom Connector can be used to call a SharePoint REST api in the context of the user. If you are visiting my blog for the first time, please do look at my other blogposts.
Do you like this article?
Subscribe to my blog with your email address using the widget on the right side or on the bottom of this page to have new articles sent directly to your inbox the moment I publish them.
There is a possibility to change the SharePoint online site address of an existing site by a SharePoint admin or Global admin. There are different options to change the site URL from
Couldn’t create the site, please go back and try again.
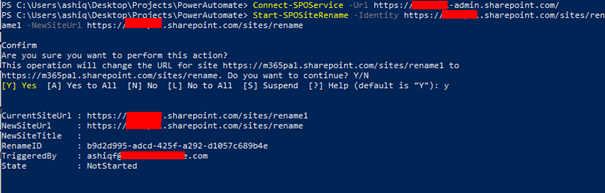
SharePoint Online PowerShell to the rescue, run the following command as an Administrator after creating a site with some address from the start page or admin center to rename the URL
Philips Hue is a smart lighting solution provider with range of smart lights that can be controlled with your smart devices like your mobile phone, Google Home, Alexa etc through the applications developed by Philips. On top of applications from Philips, the Hue system also enables OAuth 2.0 to allow third party integrations to connect to Hue system resources. In this blog post, let us see how to use the Philips Hue OAuth 2.0 remote API to integrate with the Power Platform for controlling the lights.
Pre-Requisites:
Lights connected to the Hue Bridge. Hue bridge is a device which is the brain of the Philips hue smart lighting system that links the lights to the internet.
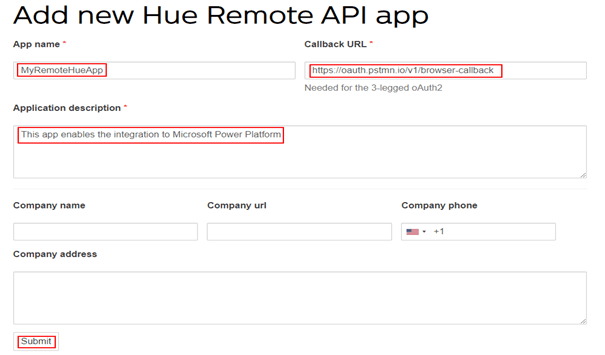
After entering the App name, Callback URL and the description, click the Submit button. For the callback URL I have provided the Postman browser call back url https://oauth.pstmn.io/v1/browser-callback facilitating OAuth 2.0 token generation from Postman. You can also enter http://localhost/ as the callback url. Find below screenshot of the newly registered Remote Hue API app
Copy the ClientId & ClientSecret which will be required to generate access token for controlling the Hue lights. The next step is to generate the access token.
Access Token Generation:
To access a Philips Hue API endpoint to turn on/off or change colours of light, an access token is required. To generate an access token, the first step is to generate an authorization code. Construct the following URL
GET https://api.meethue.com/oauth2/auth?clientid=<clientid>&appid=<appid>&deviceid=<deviceid>&devicename=<devicename>&state=<state>&response_type=code
ClientId: From the app registration.
ClientSecret: From the app registration.
AppId: From the app registration, the name of the app. Per the above screenshot, it is myremotehueapp
DeviceId: The device identifier must be a unique identifier in a string format for the app or device accessing the Hue Remote API.
DeviceName: The name of the app accessing the remote api.
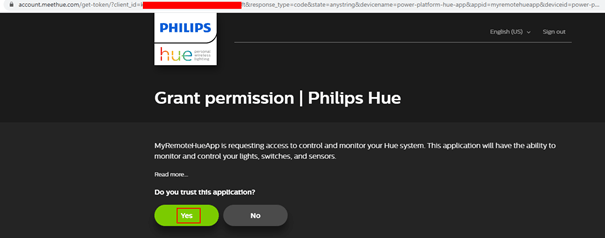
Access the URL in a browser, you will be prompted to accept or decline the permission grant to the created app.
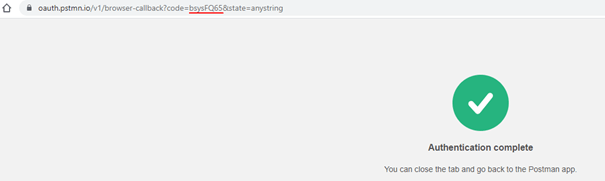
Once the app is trusted, there will be an authorization code automatically generated on the browser address bar as shown below
Make a note of the code which will be used to generate access token. To Deactivate an existing App or see all the list of existing apps, login to https://account.meethue.com/apps.
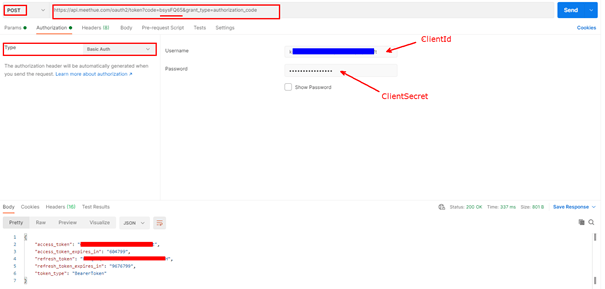
To generate an access token using Basic Authentication, make the following HTTP request using Postman or any other tool
Replace the code value with yours generated from the authorization grant request.
Authorization Type: Basic Auth. Username should be ClientId of the App and Password should be ClientSecret
Find below screenshot from Postman with the above HTTP POST request, make a note of the access token and refresh token from the response section of the request.
The Access token is approximately valid for 7 days and the refresh token for 100 days. Let us now see, how to refresh the access token.
Refresh Access token:
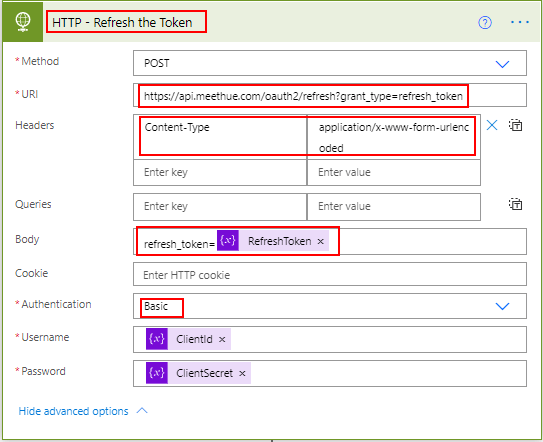
The access token is valid only for 7 days, to use it beyond 7 days there must be a new access token generated using the Refresh token. Find below the request details using Basic Authentication
Control the Hue Lights using the generated Access token:
Till now we have seen how to register a remote API app, generate access token and to refresh it before it expires. Let us now see how to use the access token to turn on/off, change colours etc with the remote API endpoints. To enable this experience, there must be a username created first.
User Name Creation:
Find the HTTP request details to enable the Link button
The devicetype is the appid or the name of the remote app
Headers:
Content-Type: application/json
Authorization: Bearer access_token
Copy the username from the above request response.
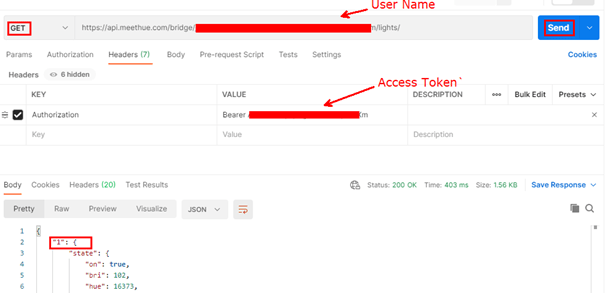
Turn On/Off Hue Lights:
To turn On/Off the light, the first step is to get the Light no you are trying to control. To get the list of lights, make the following request with the user name generated above
The Philips Hue system uses Chromaticity to set the colour of the light. Chromaticity consists of two independent parameters, often specified as hue (h) and colourfulness, where the latter is alternatively called saturation, chroma. Find below diagram which will help you to set the colour of the light
Find below HTTP request details for setting the colour to RED
Change the XY values for different colours. To increase/decrease brightness update the bri attribute. With the help of the above diagram, for colour GREEN the XY value is 0.350000, 0.550000
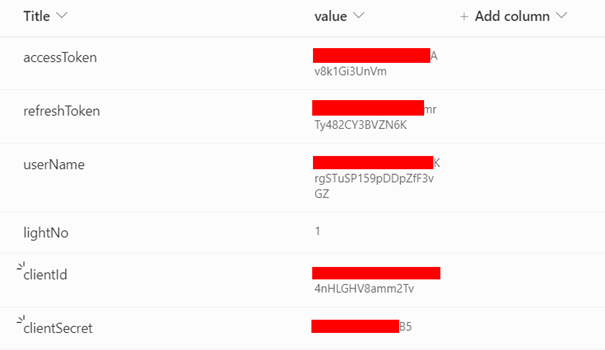
As you have seen above, to control the lights an access token and username is required. Store the information in a SharePoint list which will make it easier to get the Client Id, Client Secret, light no, refresh token etc. Find below the list schema I have created to manage the Light configuration.
Refresh the Access Token:
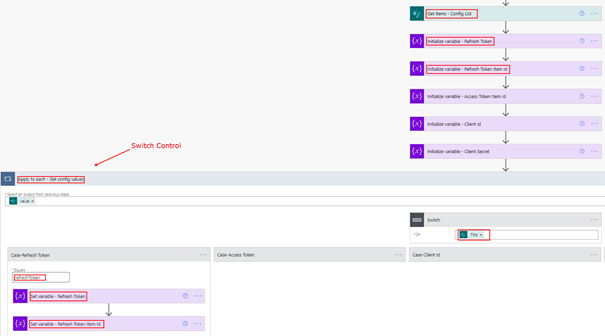
As the token is valid only for 7 days, create a scheduled Power Automate cloud flow which can run once in 6 days to create a new token using the Refresh token. Refer to the earlier section for the API endpoint details to refresh the token.
After the trigger is added, add the SharePoint connector to get values of the Refresh Token, Client Id, Client Sercret etc
Initialize variables to store the values retrieved from the SharePoint list
Add a Switch control to store the values on the variable.
Add a HTTP action to refresh the token as shown below
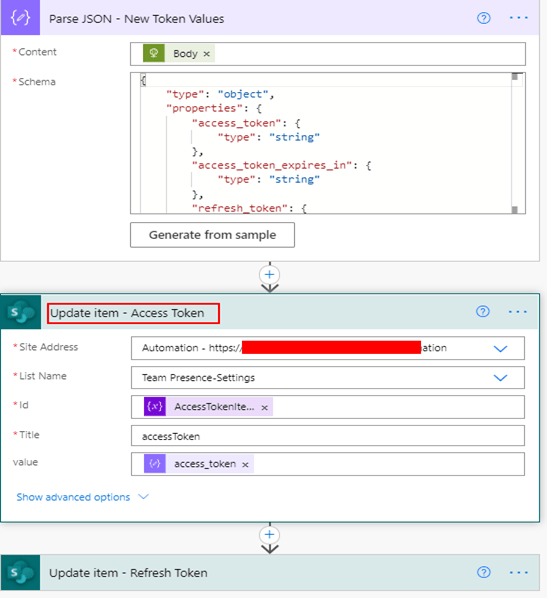
Add the JSON parse action to get the new token values including the new Refresh Token. Once the refresh token is used, it cannot be used again.
After getting the new values, update the access token & Refresh token in the SharePoint list.
To turn on/off or set different colours of the light from Power Automate or Power Apps, create a Flow with HTTP action & call the API given in the above section. To call the flow in Power Apps, use the Power Apps trigger or use a custom connector.
Control Lights from a .Net application:
Find code below to turn on/off light from a .NET application
private static async Task<string> TurnOnPhilipsHue(string accessTokenPhilipsHue, string userNamePhilipsHue, string lightNoPhilipsHue)
{
	string requestUrl = "https://api.meethue.com/bridge/" + userNamePhilipsHue + "/lights/"+ lightNoPhilipsHue + "/state";
	using var client = new HttpClient();

	var payload = "{\"on\": true,\"bri\": 102}";
	client.DefaultRequestHeaders.Authorization = new AuthenticationHeaderValue("Bearer", accessTokenPhilipsHue);
	var requestData = new StringContent(payload, Encoding.UTF8, "application/json");
	var response = await client.PutAsync(String.Format(requestUrl), requestData);
	var result = await response.Content.ReadAsStringAsync();
	return result;
}
I have used this light to build a Microsoft Teams status light, will post the link as soon as it is available. Hope you have found this informational & thanks for reading. If you are visiting my blog for the first time, please do look at my other blogposts.
SharePoint and Microsoft teams services in Microsoft 365 makes it easier to share content or collaborate with external users who is outside your organization. A guest or external user is someone who do not have a school or work account with your organization, they can be your partner, vendor, customer etc. In this article let us see how to build a self-registration experience for external users with the help of Microsoft Forms & Power Automate to onboard them to a
SharePoint online site
Microsoft Team
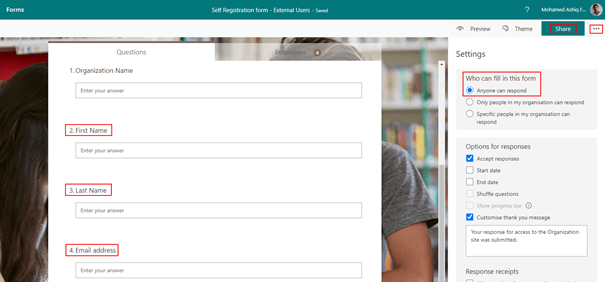
Microsoft Form to collect details from External User:
To start building this experience, create a Microsoft form with the setting Anyone can respond and with fields (Name, Email address etc) to collect information from the external user to send invitation.
Azure Active Directory Application registration:
The next step after creating the form is to register an application in Azure AD with Microsoft graph API permission to send invitation to external user. After the app is registered obtain the client id, client secret & tenant id to be used in the Power Automate flow further down this article to generate the JSON webtoken to access Microsoft Graph API for sending invitation. Find below screenshot with the permission User.Invite.All added to the app. Keep in mind the permission requires Admin consent.
There is also delegated permission available for User.Invite.All.
Onboard External users to a SharePoint online site:
Once the Microsoft form is ready, we can start building the Power Automate flow which can send the email invitation to the external user and for granting access to the SharePoint site. The external sharing features of SharePoint Online enables users in your organization share content with people outside the organization. There is no limit to the number of guests you can invite to SharePoint sites as per this SharePoint online limits documentation. Find below steps to create the Power Automate flow with a custom approval on a Microsoft Team
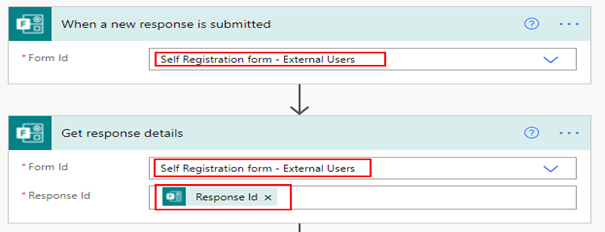
Power Automate Flow:
Create an Automated flow with the trigger When a new response is submitted with the above form name selected on the dropdown and then add the action Get response details with the Response Id selected from the dynamic content for the trigger to get the form details submitted in the Microsoft form by the external user. Find screenshot below
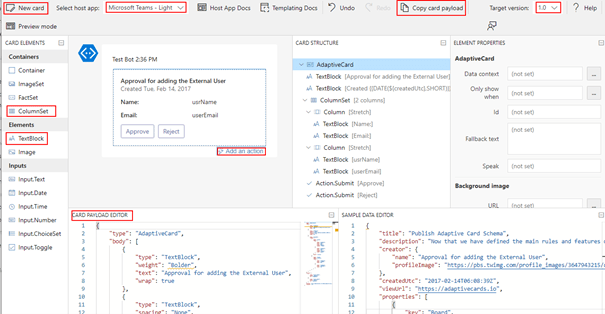
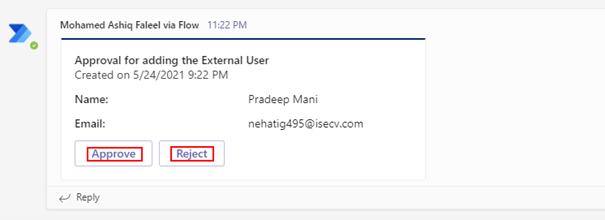
Adaptive card for Teams Approval:
For the Approval in Microsoft Teams, I have used a custom card created from the Adaptive card designer with elements ColumnSet, TextBlock to display information submitted in the form & action button Approve and Reject to take further action by a Microsoft teams user to proceed with Invitation for the Guest account creation. Find screenshot below from the adaptive card designer
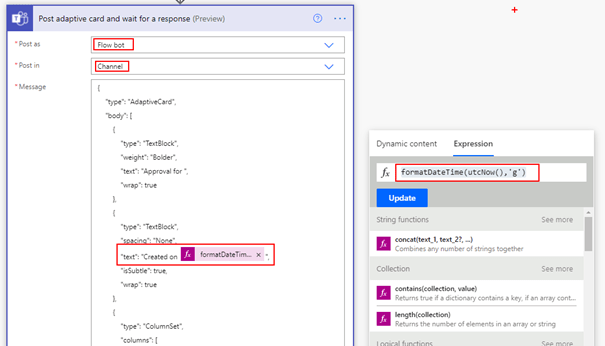
After the card is designed, copy the card payload from the designer and go to the flow and then add the action Post adaptive card and wait for a response and make appropriate selection on the available fields as shown below
Post as: Flow bot
Post in: Channel
Message: Payload copied from designer. Replace the fields for usrName & userEmail selected from the dynamic content from the outputs of the action Get response details. The created on textBlock element has the flow expression formatDateTime(utcNow(),’g’) to display the current datetime information on the card.
Update Message: Custom message which appear after an action taken in Microsoft Teams
Team: Select the Team where you would like to post the card
Channel: Select the channel from the Microsoft Team where you would like to have the approval adaptive card posted
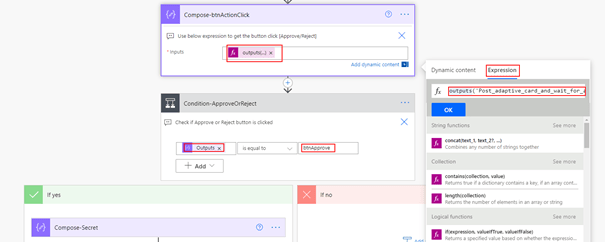
The above adaptive card is used to get approval from the Organization teams user based on the information submitted by the external user in the Microsoft form to proceed with the next steps for sending the guest account invite. Now we will have to identify if the user has clicked the button Approve or Reject. This information can be easily obtained from the Outputs of the action.
Note: Adaptive card can also be sent using a Microsoft Graph API with the card payload in Attachments field
Adaptive card for Teams – Dynamic content Missing:
As of the time I am writing this article there is an issue in getting the output as dynamic content for the Post adaptive card and wait for a response action if there is dynamic content added on the JSON Payload (Name, Email from Forms). The fix is to run the flow till the post adaptive card action and take an action on Microsoft teams by clicking either Approve or Reject and then go to the Flow run from the history as shown below
From the above screenshot, we can see if the user has clicked the Approve or Reject button from the field submitActionId. To get this value in Flow, use the expression
To get the submitActionId, enter the expression outputs(‘Post_adaptive_card_and_wait_for_a_response’).body.submitActionId in the compose action, then add a condition control to decide action based on users approval
I have observed this issue occurs in other team’s adaptive card actions as well, the above fix should work. Now we can implement the logic to send the Guest Invitation using Microsoft Graph API. To send the invite, we will use the Azure AD application registered above.
Generate JSON Web token to Access Graph API:
Be ready with the ClientId, Client Secret and Tenant Id collected from the AD app registration you have done initially. The only authentication flow to generate a access token for application permissions is Client credentials.
To generate a token
Store the Client Secret on a String variable or a compose action
Make a HTTP request using the HTTP connector with the following details. Make sure to replace the string for tenantId, azureAdAppclientId and azureAdAppclientSecret
Add a HTTP connector action to the flow for making a POST request per the following information
For the client secret make sure to URL encode using the expression encodeUriComponent(variables(‘clientSecret’)) else the request may fail due to the presence of special characters.
In the above screen, I have added a compose action to store the SharePoint site address to be used for granting the external user access to. To extract the token from the above request, add the parse JSON action with Content from the HTTP request body and the following schema
Include the access token when calling the Microsoft Graph API in the Headers section or raw as shown in the next section.
Send Invitation using Microsoft Graph API:
Before sending the invitation, validate if the user already exists in your organization AD tenant by using the email address of the external user with the help of the action Search for users as shown below
If there is null response for the action Search for users, then the user does not exist. This can be calculated using the expression length and by passing the value as a parameter, if it is equals zero then the external user does not exist. If the user already exists, we can directly proceed to granting the external user access to SharePoint.
Graph API to check if a guest user already exists:
{
  "invitedUserDisplayName": "External User Name",
  "invitedUserEmailAddress": "External User Email Address",
  "sendInvitationMessage": true,
  "inviteRedirectUrl": "SharePoint site URL or any URL",
  "invitedUserMessageInfo": {
    "messageLanguage": "en-US",
    "customizedMessageBody": "Welcome to the M365PAL SharePoint site! Click the link below and sign in."
  }
}
In HTTP request body, use the dynamic content of the form to populate the fields invitedUserDisplayName & Emailaddress. The invite redirectUri is the output of the compose action which has the SharePoint site url. I have added a delay of one minute before granting access to SharePoint site for the external user, this step is to make sure there is an entry in Azure AD for the external user/guest account.
Grant Access to SharePoint site for the external user:
As soon as the guest account invite is sent from the above Microsoft graph API request HTTP action, it is time to grant access to the SharePoint site for the external user. There is a SharePoint REST API endpoint to add a user to a SharePoint group (Owners, Member, Visitors), find below the request details
For the external user, the email address used to send the invite works.
Go back to the flow and add the action Send an HTTP request to SharePoint to call the above REST api. Find below the screenshot of the action
The above action uses delegated permission, the user of the connection should have access to the SharePoint site. As of now, there is no Graph API for adding the user to a SharePoint group but you can register an app in Active directory and add permission for SharePoint to call the above REST API. Refer to the documentation Granting access via Azure AD App-Only for calling the REST API using the registered AD app.
Testing the flow:
The whole flow can now be tested by submitting the form which sends the adaptive card on Teams first as shown below
After the card is approved, the invite is sent to the external user. After the external user accepts the invite, the user should be automatically redirected to the SharePoint site with the appropriate access. The access to the SharePoint site for the external user can be validated by the checking the membership of the SharePoint group in the site even before the user accepts the invitation. The site members can also be validated by accessing the URL for All users list:
This approach of granting access to SharePoint site for external user can be applied to internal users by turning off the access requests.
Limit External Sharing by domain:
The external sharing on SharePoint can be restricted based on domain of the external user. To enable the setting login into the SharePoint admin center > Policies > Sharing > Enable the checkbox Limit external sharing by domain > Add domain
Onboard External users to a Microsoft Team:
To onboard the external user to a Microsoft Team, the only change to the above flow is, instead of adding the user to the SharePoint group the user must be added as a Member to the Microsoft 365 group connected to the Microsoft Teams. The graph API to add a member to a Microsoft Team is
The expression to get the user object Id of the external user as per the below screenshot is
outputs(‘HTTP-SendGuestInvitation’).body.invitedUser.Id The expression can be used in a compose action to get the Object Id of the external user which can be used in the Graph API request to add the member to a Team. HTTP-SendGuestInvitation is the name of the HTTP Action.
Permission for the Azure AD App to add a member to a Microsoft Team:
The application permission Group.ReadWrite.All has to be added on the Azure AD app, if you are going to be using the same JSON webtoken generated above. There is delegated permission as well for adding members.
Summary: With this, the Power Automate flow should send the invitation as shown below to the external user.
If it is for a Microsoft Team, the external user should be licensed for teams service to open it on their teams client. The same flow can be also configured for Microsoft 365 group. If you are visiting my blog for the first time, please do look at my other blogposts.