Power Platform already gives you a rich set of out-of-the-box triggers across connectors, from Outlook, Teams, SharePoint to Dataverse. For many scenarios, these built-in triggers are more than enough to automate workflows.
But what if you need finer control, broader coverage, or access to events not yet exposed as triggers?
That’s where Microsoft Graph change notifications (webhooks) come in. Graph unlocks an even wider universe of events across Microsoft 365 – often going beyond what’s available out of the box and lets you subscribe to them in a scalable, event-driven way. Combine that with Copilot Studio, and your agent can wake up and act on its own, triggered by real-time events happening across Microsoft 365 without any user interaction.
Idea:
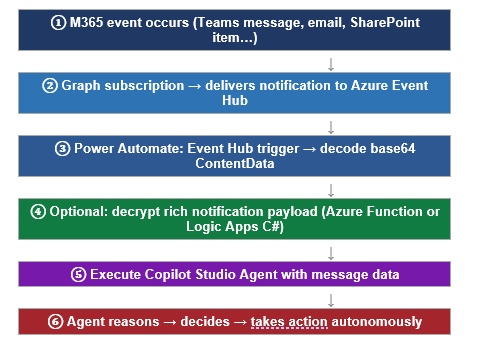
Microsoft Graph detects a change → Azure Event Hub receives it → Power Automate processes it → Copilot Studio Agent acts
Instead of polling APIs, we let events drive execution. Graph sends a notification whenever a subscribed resource changes and your Power Automate flow processes it automatically.
Why this approach matters
Polling is expensive, inefficient, and outdated. With Graph change notifications:
- Near real-time triggers – no delay waiting for the next poll cycle
- No constant API calls – notifications are push-based
- Lower cost and better performance at scale
- Perfect for autonomous agents that need to react without being asked
Using Azure Event Hub as the notification endpoint
The architecture routes notifications through Azure Event Hub first, decoupling delivery from processing, handling scale automatically, and removing the need to manage the Graph validation token handshake in your flow.
Why Event Hub? Event Hub acts as a reliable buffer between Graph and Power Automate. Graph delivers notifications to it at scale; Power Automate consumes from it at its own pace. This pattern also makes it easy to fan out to multiple consumers or replay missed notifications
Step 1: create a Graph subscription pointing to Event Hub
When creating your Graph subscription as shown below for getting notification on Teams channel message creation as an example, set the notificationUrl to your Event Hub using this format:
POST https://graph.microsoft.com/v1.0/subscriptions{ "changeType": "created", "notificationUrl": "EventHub:https://{namespace}.servicebus.windows.net/{hub-name}?tenantId={tenant-id}", "lifecycleNotificationUrl": "EventHub:https://{namespace}.servicebus.windows.net/{hub-name}?tenantId={tenant-id}", "resource": "/teams/{team-id}/channels/{channel-id}/messages", "expirationDateTime": "2026-05-04T10:00:00Z"}
Key requirements for Event Hub delivery:
- Grant the Microsoft Graph Change Tracking service principal the Azure Event Hubs Data Sender role on your Event Hub instance (not just the namespace)
- Subscriptions expire — Subscriptions after just after a certain period of time. Schedule a renewal flow to PATCH /subscriptions/{id} regularly depending on the expiration period
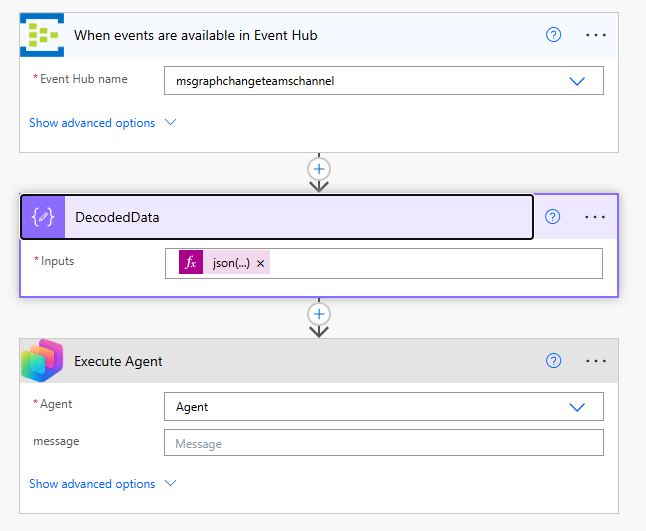
Step 2: Power Automate consumes from Event Hub
In Power Automate, use the Event Hubs connector with the trigger When events are available in Event Hub. Use Microsoft Entra ID Integrated authentication, your account or managed identity needs the Azure Event Hubs Data Receiver role on the hub instance.
The trigger delivers a base64-encoded body in the ContentData field. Decode it using a Compose action:
// Compose action — Inputs expression:json(base64ToString(triggerBody()?['ContentData']))// Extract the message ID from the decoded payload:outputs('Decode_ContentData')?['value'][0]?['resourceData']?['id']
Avoiding an extra Graph API call: rich notifications with resource data
By default, Graph change notifications depending on the data you are after include only the resource ID – not the full message content. To read the actual Teams message body you would need to make a second HTTP call to the Graph API to fetch it by ID.
You can avoid this extra call entirely by enabling rich notifications with resource data. When enabled, Graph encrypts the complete resource payload, the full chatMessage object including body content, sender details, and timestamps and delivers it inline inside the notification itself but the data will be encrypted.
Reference Microsoft documentation: https://learn.microsoft.com/en-us/graph/change-notifications-with-resource-data?tabs=csharp
Decrypting the notification payload
Power Automate has no native RSA or AES decryption actions, so decryption requires a small piece of code. There are two clean options neither requires building a custom connector or a full API service:
Option A: Azure Function (C# or Python)
Option B: Logic Apps Standard: inline C# script action
Step 3: execute the Copilot Studio agent
Once the notification is decoded and decrypted if you are using rich notifications – pass the relevant data to your agent using the Copilot Studio connector → Execute Agent action:
- MessageBody – the full Teams message content
- SenderName – the display name of who sent the message
- MessageId – for deduplication and reply threading
- ChangeType – created, updated, or deleted
The agent receives these as input variables and uses them to reason autonomously. For example: checking whether the message body contains the word “urgent”, assessing sentiment, and escalating to a support queue — all without any user interaction.
End-to-end flow summary
| Step | Action | Key point |
| 1 | Create Graph subscription → Event Hub | Requires Data Sender RBAC on Event Hub |
| 2 | Power Automate Event Hub trigger | Use Entra ID auth + Data Receiver role |
| 3 | Decode base64 ContentData | json(base64ToString(triggerBody()?[‘ContentData’])) |
| 4 | Decrypt rich notification (optional) | Azure Function or Logic Apps C# inline script |
| 5 | Execute Copilot Studio Agent | Pass MessageBody, SenderName, MessageId |
| 6 | Agent reasons and acts autonomously | No user interaction required |
Why this pattern is powerful
This approach unlocks a new design pattern: Copilot as an event-driven micro-orchestrator.
Instead of the traditional:
User → App → Flow → Action
You now have:
Event → Agent → Decision → Action
This is closer to how intelligent, autonomous systems should behave – reacting to the world in real time rather than waiting to be invoked by a user.
Final thoughts
We often think of Copilot Studio as something users interact with directly. But the real power is agents that act without being asked.
By combining Microsoft Graph change notifications, Azure Event Hub, Power Automate, and the Execute Agent action, with optional rich notification encryption to eliminate extra API calls, you move from reactive automations to autonomous, event-driven intelligent systems that monitor, reason, and act across your Microsoft 365 environment in real time.
If you are already working with Power Platform, this pattern is well worth adding to your toolbox.
Further reading
- Microsoft Graph change notifications overview
- Change notifications with resource data (rich notifications)
- Azure Event Hubs as a notification endpoint
- Copilot Studio autonomous agent actions
Do you like this article?
Subscribe to my blog with your email address using the widget on the right side or on the bottom of this page to have new articles sent directly to your inbox the moment I publish them.