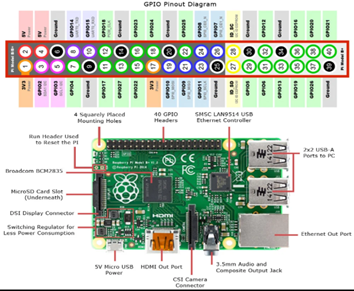
I have recently purchased a Raspberry Pi 4 to explore IoT with Microsoft 365 platform. The Raspberry Pi is a low-cost credit-card sized computer which can be connected to a monitor, keyboard, mouse and to Internet via Wi-Fi or ethernet port. In addition, the Raspberry Pi has a 40 pin GPIO (General Purpose I/O) connector for us to connect sensors (Input) and to control devices (Output) through a relay. It enables people of all ages to explore computing and to learn how to program in languages like Scratch, Python, .NET core etc. One of the most popular operating system for the Raspberry Pi is Raspbian which is also the official one but there are also other operating systems like Ubuntu, Windows 10 IoT core (Not supported for Raspberry Pi 4). On this blog post, I will cover the different components used to integrate Raspberry Pi with Microsoft 365 service PowerApps & Azure services like Azure functions & Azure IoT hub to control devices. Find below the design and the different components used

- Environment Setup
- Raspberry Pi setup for IoT with .NET Core
- Visual Studio Code setup for remote development
- Azure IoT hub
- .NET Core Console Application
- Azure Function – HTTP Trigger
- Power Apps
- Custom Connector
- Canvas Apps
Environment Setup:
Raspbian OS is based on the Debain Operating System which has been optimized for Raspberry Pi hardware and it is the official one. You can find here some instructional videos on the following link to the install the OS on your Raspberry Pi
https://www.raspberrypi.org/help/noobs-setup/
If you have ordered a Raspberry Pi with a starter kit, most of the sellers would have loaded the Raspbian OS image on the SD card as a part of the kit. Once the OS is installed & configured, it is ready for use with the default username pi and the password is raspberry. Find below the schematic and the GPIO pin out diagram. On the sample code I have used Pin 17 and Pin 18 to control devices
Remote Tools:
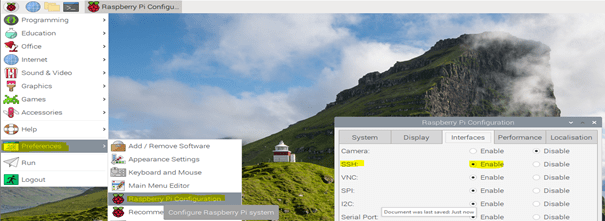
There are tools to connect raspberry Pi remotely from your Windows client. Software xrdp provides a graphical interface for the users to remotely connect Raspberry Pi using Microsoft’s RDP mstsc.exe. Follow along this blogpost to set this up on the Raspberry Pi to enable remote connectivity. You can also use PuTTY a SSH tool to remotely connect with Raspberry Pi device. To know the IP address of the device, login to the Router to which the raspberry pi is connected or through the command hostname -I on the command line. To use PuTTY client & VS Code remote development plugin, SSH must be enabled on the Raspberry Pi OS. By default, it is disabled to enable follow the below steps
- Launch Raspberry Pi Configuration from the Preferences menu.
- Navigate to the Interfaces tab.
- Select Enabled next to SSH.
- Click OK
Raspberry Pi Setup for IoT with .NET Core:
.NET core is an open source development platform maintained by Microsoft and .NET community on Github. I have chosen .Net core and the programming language C# in which I am comfortable with. There are also python libraries to control GPIO pins in Raspberry Pi. To use .NET core IoT libraries install .NET core 3.1 on Raspberry Pi. Follow the instructions below to install .NET core
- Copy the Direct link of the .NET core SDK from the link for Linux ARM32. Based on information gathered from few blogposts .NET core is supported for ARM64 though Raspberry Pi is 64 bit. Get the latest link from https://dotnet.microsoft.com/download/dotnet-core/3.1
- Open a Terminal window in Raspberry Pi. Enter the following command to download the .Net core sdk binary
- Update the Raspbian OS by entering the following command
sudo apt-get update
sudo apt-get upgrade
- Run the following command to make the .NET SDK commands available for the terminal session
mkdir -p $HOME/dotnet && tar zxf dotnet-sdk-3.1.403-linux-arm.tar.gz -C $HOME/dotnet
export DOTNET_ROOT=$HOME/dotnet
export PATH=$PATH:$HOME/dotnet
- To make it available permanently on all the sessions. Run the following command to open the .profile file to save the information
sudo nano .profile
- Add the following lines at the end of the file by scrolling and then save it (CTRL+S) and then exit using (CTRL+X)
# set .NET Core SDK and Runtime path
export DOTNET_ROOT=$HOME/dotnet
export PATH=$PATH:$HOME/dotnet
- Run the command dotnet –info to know the version of the .Net core
Visual Studio Code setup for remote development:
You can develop applications remotely on a Raspberry Pi device using VS Code with the help of a plugin Remote Development which uses SSH to connect. After the plugin in installed, perform the following steps to remotely connect the Raspberry Pi device
- Have the IP address of the Raspberry Device ready which will be used to add a SSH host. Use the command hostname -I on the Raspberry Pi’s terminal window will reveal the IP address
- Go to the VS code and press CTRL+SHIFT+P together and type Remote-SSH: Connect to Host & select

- Click Add New SSH Host
- Type ssh pi@x.x.x.x -A and then press Enter. X.X.X.X is the IP address of your raspberry device and pi is the username (Default)
- Select the configuration file. I have used default, %USERPROFILE%\.ssh\config on Windows 10

- Host will be added. You are now ready to connect remotely provided the SSH is enabled on the Raspberry Pi.
Azure IoT Hub:
IoT hub is a managed service hosted in cloud that acts as a central message hub for bi-directional communication from the device to the cloud and the cloud to the device. There is a also a Free-Tier limited to one per subscription which can add up to 500 devices and 8000 msgs/day as of today based on the Pricing calculator. Go through the Microsoft documentation about IoT hub. Create a IoT Hub for us to send a message to the Raspberry Pi device for us control the device as per the instruction given in this article. After the IoT hub is created
- A device must be registered with your IoT hub before it can connect. There are different ways to register a device like using Azure Cloud shell, in this case we will use portal. Click IoT Devices under the Explorers blade on the IoT hub and click on + New, enter the Device ID and click save.

- Copy the Primary key of the registered device
- Copy the Hostname from the IoT Hub Overview blade
- These values will be used later in the .NET console application
Device Explorer:
It is a tool which helps you to manage devices by connecting to the IoT hub you have just created, it can be also done from the Azure portal, Azure Cli etc. It is very easy to connect to the IoT hub using the connection string. Download the device explorer from the https://aka.ms/aziotdevexp
To get the connection string, click Shared access policies under Settings blade and click iothubowner policy. Copy the Connection string-primary key and paste it on the Configuration section of the Device explorer and click Update as shown below

To send a message to the device click the tab Messages to Device and for registering new devices click Management.
.NET Core Console Application:
The Microsoft .NET core team also has a .NET core IoT library. The package System.Device.Gpio supports GPIO pins to control sensors (Pin Mode: Input) and devices like relay, LED’s (Pin Mode: Output). In this case we will be using the Pin no 17 & 18 to turn on or off a LED with Pin mode set as Output.
Setup for controlling devices:
To control a LED, connect a 220 ohm resistor to the long lead and the other end to a GPIO Pin (17 & 18) & the short LED lead to any one of the GPIO Ground.
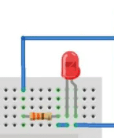
In my setup I have used a Breadboard, GPIO Extension board & GPIO extension cable. GPIO Pin’s 17 & 18 are used, there are many other pins for us to use. Look at the GPIO pin schematics for more details on the pins. There are also relays designed for Raspberry Pi which helps controlling real devices, there are different relays module (4 channel, 8 channel, 10 channel etc) available in the market.
Connect Remotely to Raspberry Pi using VS code:
Connect the VS code to the Raspberry Pi using SSH by using keyboard shortcut CTRL+SHIFT+P and click Remote-SSH: Connect to Host and click the IP of the raspberry PI or the hostname based on the VS code setup (SSH Host) we have done earlier

After the password (Default: raspberry) is entered. If you see on the left bottom corner of the VS code with SSH: IP Address or host name, it is then successfully connected
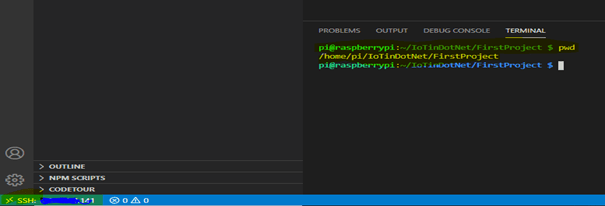
In the terminal window you can enter all bash commands in context of Raspberry Pi.
VS Code Plugin:
To add a package from VS code to the Console app project install a plugin Nuget Packet manager. You can also use the CLI command on the terminal window to add the package but the plugin will help us to add different packages using the UI. All the packages will be installed on Raspberry Pi device as shown below

I also recommend you install to C# and CodeTour extensions (code walkthrough for the code I’ve used for this sample project).
Create the first Console Application to control a LED:
Follow the below steps to control a LED connected to GPIO PIN 22 using the .NET IoT package System.Device.Gpio
- On the VS Code terminal window, enter the command dotnet new console to create a new console application
- Add the package System.Device.Gpio using the nuget package manager plugin by CTRL+SHIFT+P > NuGet Package Manager: Add Package
- Add the following code to the Program.cs file
using System;
using System.Device.Gpio;

namespace DemoProject-GPIOControl
{
    class Program
    {
        static void Main(string[] args)
        {
            Console.WriteLine("Turning on Light from Pin 22");
            using var controller = new GpioController();
            controller.OpenPin(22, PinMode.Output);
            controller.Write(22, PinValue.High);
            Console.ReadKey();

        }
    }
}
- Run the command on the Terminal window dotnet run. There will be an unauthorized exception as below
Unhandled exception. System.UnauthorizedAccessException: Setting a mode to a pin requires root permissions.
 ---> System.UnauthorizedAccessException: Access to the path '/sys/class/gpio/gpio17/direction' is denied.
 ---> System.IO.IOException: Permission denied
- Enter the following command on the terminal window to provide root permission for Pin no 22: /usr/bin/gpio export 22 out. This command has to be executed everytime you restart the Raspberry Pi unless you provide root permissions to the account which could be done by setting a value on the root configuration file.
- Now run the dotnet console app using the command dotnet run which will turn on the LED light connected to PIN 22. The output voltage on PIN will be 3.2 volt if the pinvalue is set to High and will be Zero if its set to Low.
- Code controller.Write(22, PinValue.Low); will turn off the light
- To remotely debug on the Linux Arm, follow the instruction on this article.
- To disconnect in VS code, click File > Close Remote Connection
Console application connected to Azure IoT hub:
There is a .NET SDK for Microsoft Azure IoT to enable development using .NET and we will be using the package Microsoft.Azure.Devices.Client to connect client devices to Azure IoT hub. The other package used in this project is System.Devices.Gpio.
Use the Hostname of Azure IoT Hub, Device ID, Primary key of the Device copied earlier during the setup and the GPIO pins as shown below
private const string IotHubUri = “YourIoTHub.azure-devices.net”;
private const string deviceKey = “Your Key”;
private const string deviceId = “Your device ID”;
private const int Pin1 = 17;
private const int Pin2 = 18;
In the code the
- Method deviceClient.ReceiveAsync() receives a message from the IoT hub queue
- Method Encoding.ASCII.GetString(receivedMessage.GetBytes()) reads the message
- Method deviceClient.CompleteAsync(receivedMessage, _ct) deletes the message from the queue
Do not forget to run the commands /usr/bin/gpio export 17 out and /usr/bin/gpio export 18 out based on the pins you are controlling. Then run the dotnet application using the command dotnet run. Now send a message from the Device explorer or from Azure portal IoT device explorer ON1 or Off1 to turn On/Off the LED connected to PIN 17 and ON2 or Off2 to turn On/Off the LED connected to PIN 18.

On this example we have used Cloud to device messages which sends a one way notification but you can also use Direct Methods & Device Twin to control devices, go through the following documentation from Microsoft with guidance to send cloud to device communications using different methods
https://docs.microsoft.com/en-us/azure/iot-hub/iot-hub-devguide-c2d-guidance
Find here the sample of the console application from GitHub. Now the console application is ready, let us create the Azure Function app to use it in the PowerApps.
Azure Function App – HTTP Trigger:
I’ve used a Consumption plan Function app which gets triggered on a HTTP request to send a message to IoT hub registered device using the method ServiceClient.SendAsync from the package Microsoft.Azure.Devices to send a one way notification to the registered Raspberry Pi device. The message will be sent to the device on the HTTP request as query string (Parameter name: name)
- Create a Function App from the Visual Studio 2019, I’ve used VS 2019 but you can also use VS Code
- Add the HTTP trigger with authorization Level of the Function App as Function
- Add the Nuget Package Microsoft.Azure.Devices
- Have the connection string handy for the iothubowner policy used on the device explorer.
- Copy the following Code:
 using System;
 using System.IO;
 using System.Threading.Tasks;
 using Microsoft.AspNetCore.Mvc;
 using Microsoft.Azure.WebJobs;
 using Microsoft.Azure.WebJobs.Extensions.Http;
 using Microsoft.AspNetCore.Http;
 using Microsoft.Extensions.Logging;
 using Newtonsoft.Json;
 using Microsoft.Azure.Devices;
 using System.Text;
 using System.Net;

 namespace FunctionApp_IoT
 {
     public static class Function1
     {
         static ServiceClient serviceClient;
         static string connectionString = "HostName=YourIoTHub-env.azure-devices.net;SharedAccessKeyName=iothubowner;SharedAccessKey=Yourkey";
         static string targetDevice = "Your Device ID";
         [FunctionName("Function1")]
         public static IActionResult Run(
             [HttpTrigger(AuthorizationLevel.Function, "get", "post", Route = null)] HttpRequest req,
             ILogger log)
         {
             log.LogInformation("C# HTTP trigger function processed a request.");

             string name = req.Query["name"];

             serviceClient = ServiceClient.CreateFromConnectionString(connectionString);

             SendCloudToDeviceMessageAsync(name).Wait();

             return new OkObjectResult(new { status = "Light turned On or Off" });

         }
         private async static Task SendCloudToDeviceMessageAsync(string condition)
         {
             var commandMessage = new
              Message(Encoding.ASCII.GetBytes(condition));
             await serviceClient.SendAsync(targetDevice, commandMessage);
         }
     }

} - Publish the function app to Azure. Test it by sending HTTP requests using Postman tool or browser. The function API is ready, we are now ready to call the function in PowerApps
- Function app URL will be https://yourfunctionappsubdomain.azurewebsites.net/api/Function1?code=authorizationcode. Since I’ve chosen authorization level as function there will be a code
PowerApps:
So far we have progressed till a HTTP API endpoint using serverless which sends a message to the Raspberry Pi through the IoT hub, if we have to call this API on PowerApps we will have to create a custom connector which allows you to connect to any RESTful API endpoint. Bear in mind that to use a PowerApp which has a custom connector, the users should have a premium license.
Custom Connector:
Let us go ahead and create the custom connector, you can find here on the GitHub repo for the swagger definition file for creating the custom connector. Download the file and go to your Power Platform environment and click to the Custom Connectors link under Data.

Click the Import an OpenAPI file under New custom connector and import the Swagger definition file you have downloaded from the repo

Once it is imported, change the host on the General tab based on the function app URL and the Security will have authentication type as API Key and on the Definition tab there will be one action which be called from the PowerApps to control devices. After the settings are configured you can create the connector by clicking the link Create connector. You can test the connector by creating the connection by passing in the Code parameter of the function app and pass the message to test the operation. Make sure the console app is running in order to receive the message & to turn on/off the device.

PowerApps Canvas App:
Once the custom connector is created you can use it on the PowerApps canvas app by creating a connection to the connector like below

After the connection is created and added on the app, you can use on the PowerApps controls like Toggle, button etc to turn on/off the devices using the code ‘IOT-ControlDevice’.ControlDevice({name: “on1”}) / ‘IOT-ControlDevice’.ControlDevice({name: “off1”}). If a toggle control is used, the code will be something like this
If(
    ToggleL1.Value = true,
    'IOT-ControlDevice'.ControlDevice({name: "on1"}),
    'IOT-ControlDevice'.ControlDevice({name: "off1"})
)
Voila, now you were able to control devices from PowerApps.
Summary: On this post we have seen how to integrate Azure IoT with PowerApps and to control devices through a PowerApps. This is just a sample, you can extend this example based on your needs. Hope you have found this informational & interesting. Let me know any feedback or comments on the comment section below
Reference:
https://edi.wang/post/2019/10/6/azure-remote-controlled-light-with-net-core-30-on-raspberry-pi
https://docs.microsoft.com/en-us/azure/iot-hub/iot-hub-csharp-csharp-c2d
https://github.com/Microsoft/vscode-azure-iot-toolkit/wiki/Quickstart-.NET
https://docs.microsoft.com/en-us/connectors/custom-connectors/define-blank

Hi Mohamed, thanks for this blog post. im stuck in this below in Creating azure function. Do you have a detailed steps? Would you be able to help. thanks
LikeLike