
In SharePoint Online sites, Audience targeting feature enables you to target relevant content to specific audiences enabling personalization through Microsoft 365 group, Azure AD Security group, Mail Enabled Security group or any combinations of these. The Membership type of the groups can be both Assigned and Dynamic. Target audience(s) can be defined on modern SharePoint pages, News post, Navigation links and as well as items on document libraries. I have used this feature for my customers on many instances to target News articles to specific audiences, but the challenging part is the content creator or Author of the News post should remember the name of the groups. In this post, let us see how to make the audience targeting for SharePoint online News post easier using
- Term Store
- Power Automate Cloud Flow
Find below the snapshot from the Page Details section of the News page
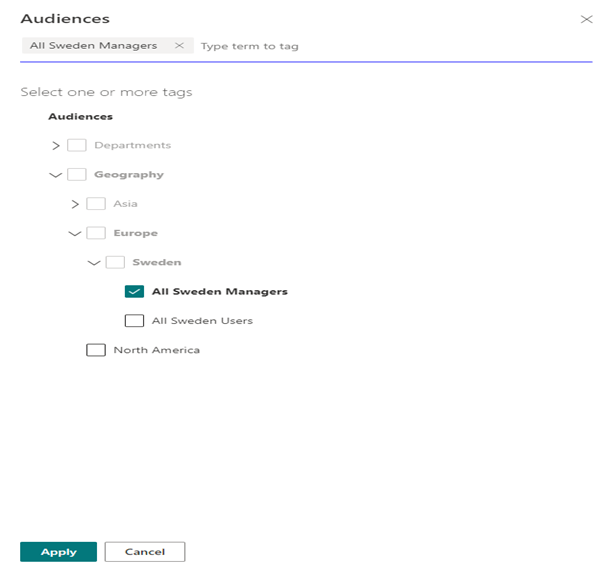
Isn’t the above easier than remembering name of the groups to target content?
Pre-requisite:
- Access to create Power Automate cloud flow
- SharePoint
- A SharePoint site with Audience Targeting enabled
- Site Owner or Administrator access
- Access to Create terms @ tenant level or site collection level
- Azure AD Groups
- Service account with the permission level Full Control or Contribute on the SharePoint site with the Audience Targeting enabled
Term Set Creation & Group Mapping:
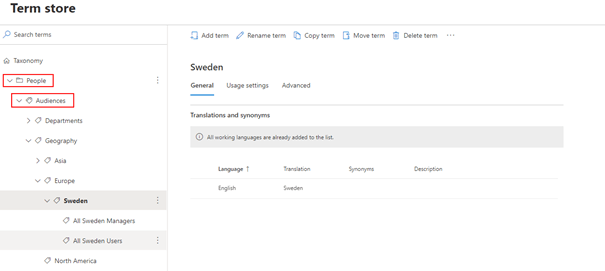
The first step is to create a Term set at tenant level or local (Site Collection) level for storing the group information based on your organizational hierarchy. The term set will be used to target content in SharePoint News post. Find below the term set Audiences I have created at tenant level under the term group People
Based on the hierarchy or needs, you can enable or disable tagging at any term level

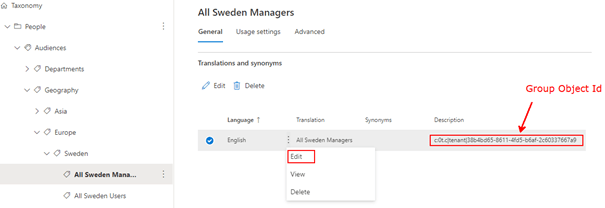
After you identify the Azure AD groups to be mapped against each term, have the group object id in the below format
Microsoft 365 Group Claim
c:0o.c|federateddirectoryclaimprovider|m365-group-object- id-guid-xx-xxxxAzure AD Security group Claim
c:0t.c|tenant|security-group-object- id-guid-xx-xxxxSelect the appropriate term which is available for tagging, click Edit to add the group object id in the above format in the description field as shown below
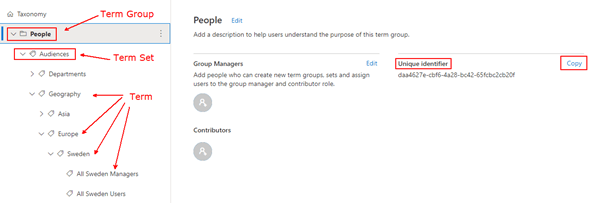
After the mapping of term set & groups are done in the Term Store Management interface, copy the Unique Identifier (GUID) of the Term Group (People) and Term Set (Audiences) and keep it handy which will used in the Power Automate flow later
Settings in SharePoint Online site for Audience Targeting:
In the SharePoint online communication or Teams site
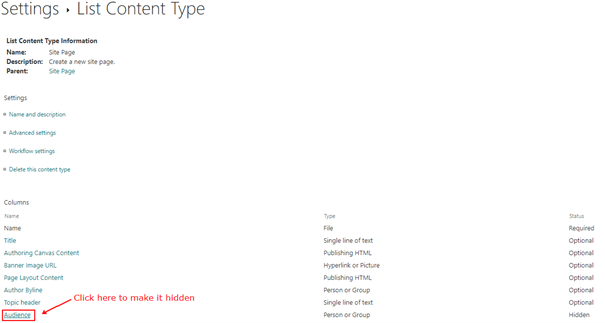
Step 1: Enable the audience targeting feature on the page library as per the instructions in this article. As soon as the feature is Enabled, there will be a column Audience added to the Site Page content type at the Page Library level. There can be a maximum of 50 groups added to the audience field.
Step 2: Create a Managed Metadata site column by the name Audiences with the setting Multiple Value Field mapping to the termset Audiences created above from the Term Store management. The managed metadata column can also be created at a Term level instead of a Term set. Once the site column in created, add the site column to the content type Site Page as shown below

Step 3: Hide the default Site Column Audience from the Site Page content type at the Pages Library settings as shown below

Click the Audience field and make it hidden as shown below
Step 4: Grant the Service account access to the SharePoint site, either as a Site Administrator or Site Owner. The Service account will used in the Power Automate flow to update the Audience field from the values obtained from the Managed metadata column.
Automated Power Automate Cloud flow:
The Power Automate cloud flow will be used to get the claim information of the group stored in the description field of each Term in the Audiences Term set. This flow will be triggered after the News Post is published by the author.
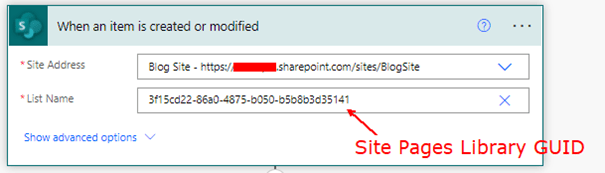
Step 1: Create an Automated flow with the SharePoint trigger When an item is created or modified. The trigger Created or Modified is to make sure it fires whenever there is a change in the Audiences managed metadata column information. Enter the site address of the SharePoint site in context and the Library Guid of the Site Pages Library.
Step 2: Add the action Initialize variable of type Array as shown below
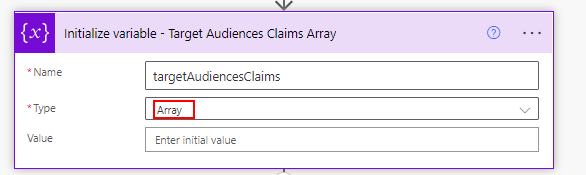
The Array variable will be used to create an array of group claim values selected from the Term description field.
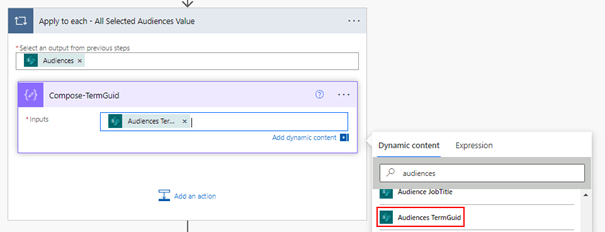
Step 3: This step is to create the array of group claims based on the users selection from the Managed metadata column.
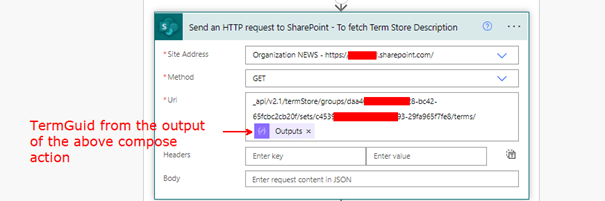
- Add a Compose Action and add the property Audiences TermGuid from the trigger When an item is created or modified. This step will automatically create the Apply to each control, since the Managed metadata column allows multiple selection
- Add the action Send an HTTP request to SharePoint with the below parameters
Site Address: https://yourTenant.sharepoint.com/
Method: GET
Uri: _api/v2.1/termStore/groups/term-group-guid-xxxx-xxxxxxxx/sets/term-set-guid-xxxx-xxxxxxxx /terms/@{outputs(‘Compose_store_audience_GUID’)}
Replace the term group and term set guid on the Uri based on the information copied earlier from the Term Set Management interface. In the Uri, after terms it is the output of the compose action added in Step 2. If your Term Set is at the Site collection level, the site address should be the site URL
For references on the API endpoints, refer to the Graph API documentation for Taxonomy
https://docs.microsoft.com/en-us/graph/api/resources/termstore-store?view=graph-rest-1.0
It supports only Delegated permission.
- Add a compose action to store the term description (Group Claim) extracted from the Term set api response. To directly get the description value from the response, the following expression will work
body('Send_an_HTTP_request_to_SharePoint_-_To_fetch_Term_Store_Description')?['descriptions'][0]?['description']In the above expression, the text inside the body depends on how you have named the Send an HTTP request to SharePoint action

{
  "Claims": @{outputs('Compose-TermStoreDescription')}
}
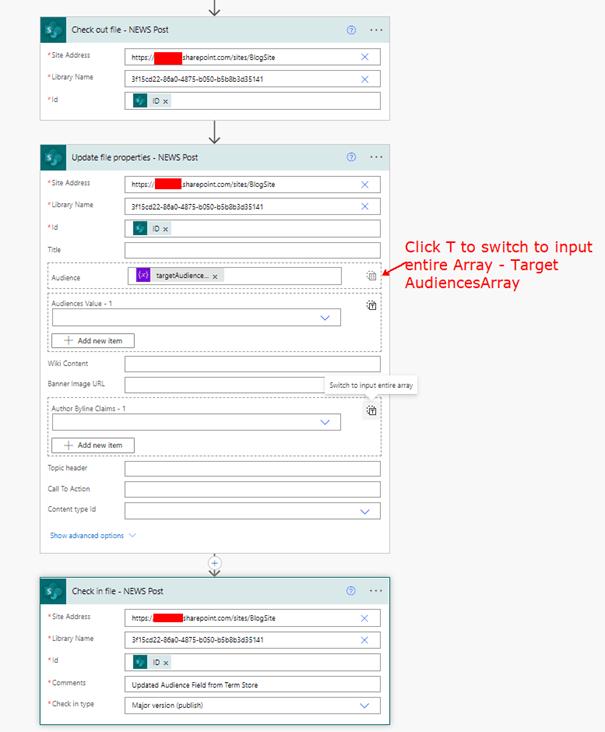
Step 4: The information to update the audience field is available in the array variable targetAudiencesClaims. So the next step is to update the Audience property in SharePoint News post, to do so add the action Check out file, Update file properties and Check in file as shown below
Enter the Site Address and Library Name information, the Id field should be from the dynamic content of the trigger When an item is created or modified. The Audience property in the action Update file properties should be the output of the Array variable targetAudiencesArray
Note: Click the button T on the property Audience to switch to input entire array from the variable.
Trigger Conditions:
There is an issue with the above update, the flow will result in infinite trigger loop due to the trigger type When an item is created or modified. To overcome this problem, the update must be done using a service account and Trigger conditions. Find below the connection setting using a service account for Update file properties action, replicate the same setting for the Check out file and Check in file
Add the following Trigger Conditions from the settings of the trigger When an item is created or modified for
- To trigger only when a News post with major version is published
@and(equals(triggerOutputs()?['body/PromotedState'],2),contains(triggerOutputs()?['body/{VersionNumber}'],'.0'))- To avoid infinite trigger loop
@not(equals(triggerOutputs()?['body/Editor/Claims'],'i:0#.f|membership|serviceaccountupn@domain.com'))For more information, go through this blog post
Summary:
Target audience feature is SharePoint is one of the most useful feature in setting up intranet leveraging Microsoft 365 services and I hope this can complement the rich features Microsoft 365 already has. I will write in future how to deploy this flow automatically to different SharePoint sites. Hope you have found this informational & thanks for reading. If you are visiting my blog for the first time, please do look at my other blogposts.
Do you like this article?
Subscribe to my blog with your email address using the widget on the right side or on the bottom of this page to have new articles sent directly to your inbox the moment I publish them.
