How to use Microsoft graph SharePoint Sites.Selected application permission in a Azure AD application for more granular control

As per this announcement made on Feb 2021, Microsoft graph now provides option to have granular permissions level using Sites.Selected application permission for the AD application instead of granting permission for all the sites in the tenant. The permission Sites.Selected does not provide access to any SharePoint site collections for the application unless the AD application has been assigned with permission roles read or write by an Admin. On this post let us see how to grant a site permission (Read or Write) to an AD Application with Sites.Selected permission by using postman client. As of the time I am writing this post there is no user interface to assign permissions to specific site collections for the application.

Pre-Requisite:

  1. Register Azure AD Application (APP 1) in Azure AD Portal with the following permissions
    • Sites.Selected (Admin Consented)
  2. Another AD Application (APP 2) with following permission only for the admins to assign selected roles to the above App
    • Sites.FullControl.All (Admin Consented)

App Registration:

Start with registering the above said two Azure AD applications

APP 1:

Register an Azure AD application with the following permission

APP 2 (Admin App):

Another app for admins for granting roles to APP 1

Grant permission role to the SharePoint site for the Azure AD Application:

This step is grant permission for the Azure AD application with Sites.Selected application permission to a given site collection. Perform the following steps to grant the role (Read/Write or Read and Write) to the AD app (APP 1)

  1. Gather the Client ID, Tenant ID and Client secret of the admin app
  2. In PostMan, make a HTTP request to generate the access token for the admin app – APP 2

Request Method: POST

Request URL: https://login.microsoftonline.com/yourtenantID/oauth2/v2.0/token

Request Header:

Key: Content-Type

Value: application/x-www-form-urlencoded

Request Body:

grant_type: client_credentials

scope: https://graph.microsoft.com/.default

client_id: adminappclientid

client_secret: adminappclientsecret

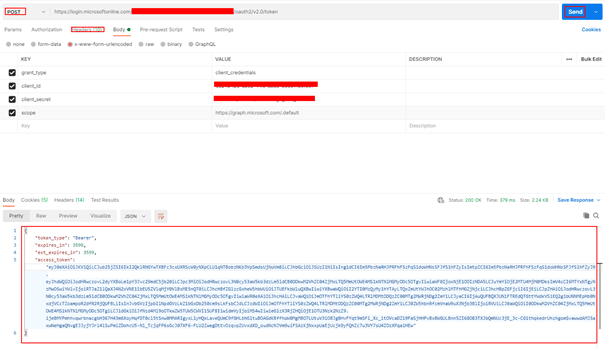
  1. Copy the access_token to be used for granting roles.
  2. Get the Client ID of the Azure AD Application – APP 1 with Sites.Selected permission
  3. Decide on the Role (Read or Write) for the granting the Site specific role for the APP 1 with Sites.Selected permission.
  4. Get the SiteId of the SharePoint site to be assigned permissions for the application (App 1). An easy way to get the siteId is by viewing the page source from the browser with the site open.
  5. In PostMan, make a HTTP request to grant the site role to the APP 1. Replace the siteId with the actual siteId which will be a guid

Request Method: POST

Request URL: https://graph.microsoft.com/v1.0/sites/siteId/permissions

Request Header:

Key: Content-Type

Value: application/json

Request Body: raw

Replace the id with APP 1 client id and the display name of the APP 1

{

  "roles": ["write"],

  "grantedToIdentities": [{

    "application": {

      "id": "xxxxxx-APP1GUID-4ad9-xxxx-4d36e68b0454",

      "displayName": "AppNamewithSelectedPermissions-App1"

    }

  }]

}
  1. Paste the access token on the token box as shown below with Authorization type selected as Bearer Token
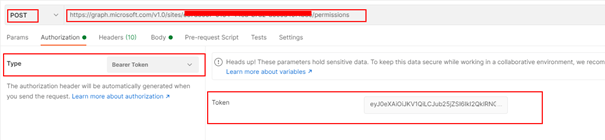
  1. Send the request for granting the role for APP 1. After the request is made the APP 1 with the Sites.Selected permission has access to the site with write role we have granted to. The same way you can assign app access to multiple SharePoint sites.

Grant the Role using PnP PowerShell:

There is a PnP PowerShell cmdlet to grant access to SharePoint site for the registered AD application with Sites.Selected permission. The command to grant permission can be executed by the Site Collection administrator after creating a connection to the site

Connect-PnPOnline https://tenantname.sharepoint.com/sites/siteName -Interactive

You will be prompted to enter credentials including the second factor. After the connection is created, enter the following command to grant Write permission to the AD App

Grant-PnPAzureADAppSitePermission -AppId 'AzureAppIdwithSitesdotselectedpermission' -DisplayName 'App Name here' -Site 'https://tenantname.sharepoint.com/sites/sitename' -Permissions Write

To install PnP PowerShell module on the local workstation, enter the following command

Install-Module -Name PnP.PowerShell

There is also a PnP cmdlet to register an AD app in the Azure Active directory.

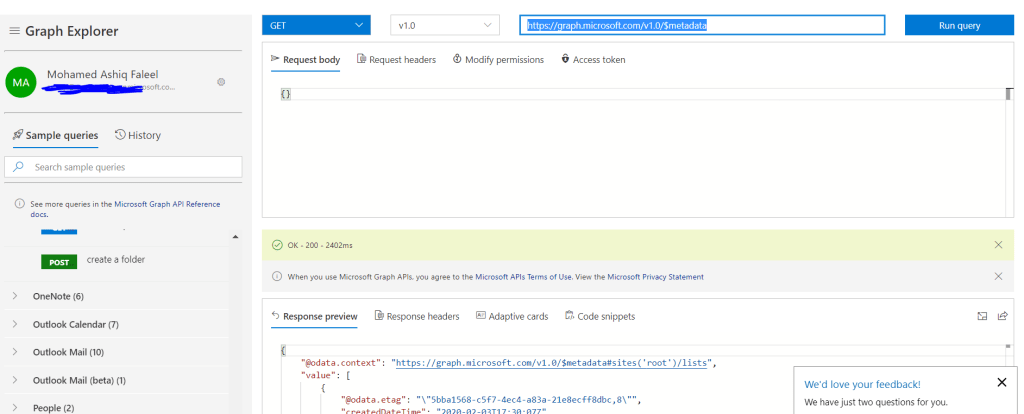
Grant the Role by an Admin using the Graph Explorer tool:

Role can also be assigned by an admin with out having the admin AD app (APP 2) using the graph explorer tool. This can be done only by an Admin

If there is any error related to permissions, make sure the admin consents to Sites.FullControl.All for the Graph tool. There is also an SPFx community webpart developed by a community member with User Interface for this operation

https://github.com/pnp/sp-dev-fx-webparts/tree/master/samples/react-sites-selected-admin

Reference:

Assign permission role programmatically: https://docs.microsoft.com/en-us/graph/api/site-post-permissions?view=graph-rest-1.0&tabs=csharp

Summary:

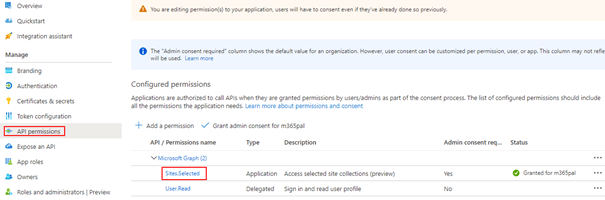
On this post we have seen how to grant access to Azure AD which has the Sites.Selected permission. You can also grant permission/role to an app with sites.selected permission programmatically. If you are using SharePoint API instead of Graph API in the Azure AD app registration, Sites.Selected is available on Application Permission as shown below

Hope you have found this informational & thanks for reading. If you are visiting my blog for the first time, please do look at my other blogposts.

Do you like this article?

Subscribe to my blog with your email address using the widget on the right side or on the bottom of this page to have new articles sent directly to your inbox the moment I publish them.

Advertisement

Hosting static HTML content in SharePoint Online site & Azure

The SharePoint Online experience which you get by default for all the sites you create in the tenant is modern by default. The site pages you create in the modern experience are fast, easy to author and support rich multimedia content. The pages look great on any experience i.e. mobiles, browser, SharePoint App. If you wanted to host static HTML content with JavaScript, CSS, BootStrap on a SharePoint Online site it is not feasible though it was easily doable with Classic SharePoint site. The reason is by default you are not allowed to run custom scripts to change the look & feel & behaviour of the sites for security reason in a Modern SharePoint Online site. But we have control to manage this setting at different levels

  1. Organizational Level
  2. Site Level

On this blog post let’s see how to host static content (HTML, JS, CSS, Images et) by updating the site scripts settings at the site level. At the end I write some options to host Static content in Azure.

Pre-requisite:

  1. Modern SharePoint Communication Site
  2. SharePoint Online Tenant Admin access for executing few PowerShell commands
  3. HTML Content
  4. Access to Azure Subscription as a Contributor to test static content hosting in Azure

Hosting Static content on a SharePoint Online Site:

For sample HTML content I’ve downloaded from the following Azure Sample GitHub repo

https://github.com/Azure-Samples/app-service-web-html-get-started

Step 1:

Connect a SharePoint Online administrator to a SharePoint Online connection. This cmdlet must run before any other SharePoint Online cmdlets can run

Connect-SPOService -Url https://domain-admin.sharepoint.com

Step 2:

Run a Power shell command to disable the property DenyAddAndCustomizePages at the site level by running the following command

Set-SPOsite https://domain.sharepoint.com/sites/sitename -DenyAddAndCustomizePages 0

Step 3:

Verify if DenyAddAndCustomizePages is Disabled. To check this the property value run the following command

Get-SPOSite -Identity https://domain.sharepoint.com/sites/sitename -Detailed | select DenyAddAndCustomizePages

Step 4:

Be ready with the HTML sample. I’ve downloaded static content from the Azure HTML Sample github repo which has

  • HTML
  • CSS
  • JavaScript

If there is any file with HTML extension, rename the extension to .aspx. On this sample there was 1 HTML file by the name index.html, I’ve renamed the file index.html to index.aspx

Step 5:

Open the SharePoint Online Communication site in the browser & navigate to the Document library. I’ve chosen the default document library (Shared Documents) for the storing the HTML, you can also create a custom document library, site assets library.

Upload the folder which has the .HTML file renamed to .aspx and the supporting files (JS, Images, CSS etc)

After the upload

Click the index.aspx file, it should render the file with HTML, CSS, JS etc as shown below

The URL of the HTML page will be in the following structure for the index.aspx file

https://domain.sharepoint.com/sites/sitename/Shared Documents/HTML_sample_for_Azure_App_Service/index.aspx

In the document library if you have a HTML file converted to ASPX before executing the command, it may not work. To make it work delete the ASPX file and upload it again to the document library

Tip

Step 6:

You can now Enable the property DenyAddAndCustomizePages by executing the following SharePoint Online PowerShell cmdlet

Set-SPOsite https://domain.sharepoint.com/sites/sitename -DenyAddAndCustomizePages 1

If you wanted to add another HTML file after the above command, you will have to disable the property DenyAddAndCustomizePages before adding the HTML file. I’ve shown you how to host static HTML on SharePoint Online site which will not cost you anything provided there is Microsoft 365 license. If you need additional features like Custom domain, anonymous access, deployments etc you can do so with Azure.

Embed the Static HTML Page in a SharePoint page:

To embed this on a SharePoint Page, add the Embed webpart on the page and paste the above link on the Webpart property pane for Website address or embed code as shown below

Static Content in Azure:

There are couple of options in Azure to host your HTML as shown below

  1. Azure App service
    • You can create an App service in Azure to host your static HTML. There is Microsoft documentation with detailed instruction to set this up. You can lot of options with App service like Auto scaling, Custom domain, Anonymous access, auto deployments etc. There is also a Free pricing tier F1 for hosting your content.
  2. Azure Static Webapps
    • As of now the service is in Preview mode which automatically builds and deploys full stack webapps to Azure from Github repository. During preview, its free of cost. I’ve recently tested this, if you wanted to try go through this documentation.
    • VS Code extension for Static Webapps
    • You can also serve dynamic content with Azure functions integration.
  3. Azure Storage
    • This service also has capability to serve static content (HTML, CSS, JS & image) from the blob container. To know more, check this documentation from Microsoft.

Summary: On this post we have seen options to host static content in SharePoint Online site & Azure. Based on your requirement (Anonymous access, custom domain, cost etc) you can choose one from the options given above. Hope you have found this informational & helpful in some way. If there is some other option to host static content, please let me know on the comment section below

Create Tile view card for custom List item image attachments using PowerAutomate & JSON row view formatting

In Modern SharePoint lists you can display list item content in a more modern way using the Tiles view layout. If you have very big list with multiple columns along with picture columns you get a horizontal scroll bar on the list view, the Tiles view can solve this issue since the content will be displayed on the tile card where you can design the layout of the tile card to display the different list column values.

There are many blog posts & PnP Samples which will help you to create a Tiles view using JSON row formatting. If you are new to JSON row formatting, I recommend you to go through this link from Microsoft. Microsoft has recently brought in interface to format the list item row & do conditional formatting by creating rules based on column values

On this blog post, lets see how to create Tiles view as shown above for the Images stored as attachments in the list item. If you add an attachment to list item in SharePoint list, the attachments are stored in the following path

https://domain.sharepoint.com/sites/SiteName/Lists/ListName/Attachments/ItemID/attachmentName.extension

Components used in this blog post

  1. Power Automate Flow: To get the path of the attached file (Image file in this case), we will be creating an automated Flow which gets triggered on List item creation to get the path of the image & update it to the custom hyperlink list column (ProductPhotoHL).
  2. JSON: To create a Tile view layout using list row view formatting.

Pre-Requisites:

  • Create a SP List by the name ProductInformation with the following columns
    1. Title: Single line of text
    2. ProductPhotoHL: Hyperlink (to the image)
    3. ProductPhotoPic: Picture (to the image)
    4. ProductPrice: Number
    5. Features: Multiple lines of text
  • Couple of list items with Images as attachments after the Power automate flow is created
    1. Only images as attachments
    2. Not more than one image as an attachment

Power Automate to get the path of the Image attachment URL:

Create an automated flow with Trigger When an item is created and configure the trigger to the ProductInformation list. Add the Get Attachments action connected to the Product Information list & for Id parameter it should the List item Id (ID) selected using the dynamic content from the trigger When an item is created.

Now with the above action we have the attachment URL of the image, this must be updated to the list column ProductPhotoHL & ProductPhotoPic of the ProductInformation list in order to be displayed in the Tile view. To create the above shown Tile view ProductPhotoPic (Picture) is not required but I’ve used it show you that we can create a Thumnail of the image on the default list view using the Picture column ProductPhotoPic. By the time I am writing this post the Power Automate action Update item is not capable to update a column with Picture as a DataType but it can update a HyperLink column. Action Send an HTTP request to SharePoint to make HTTP requests to any SharePoint Rest endpoints, I’ve used this action to update the ProductPhotoPic (Picture) column as below

I’ve said this on the pre-requisite section that there should not be more than one attachment. In the Body of the HTTP request, the Url parameter for the ProductPhotoHL & ProductPhotoPic gets only the first attachment URL from the previous action “Get attachments” AbsoluteUri as dynamic content. To get the first attachment URL you can use any of the following formula from the expression

  • first(body(‘Get_attachments’))?[‘AbsoluteUri’]
  • body(‘Get_attachments’)?[0]?[‘AbsoluteUri’]

I’ve used the function first() to get the first item from the array. The flow is ready, add couple of items to the list by filling in information only for Title, ProductPrice, Features & a Image as an attachment. The flow gets triggered which will update the ProductPhotoHL & ProductPhotoPic with the image attachment url. You can download the flow template from the following GitHub repo link.

Create Tiles View layout using JSON:

I’ve used the sample from PnP List view formatting samples to create items in tile layout for images. On the sample JSON I’ve updated the column ProductPhoto to ProductPhotoHL. The updated JSON is available here for download. Now copy the JSON & go to the List view & click on the down arrow (All Items)>Format current view>Advanced mode as shown below

The Apply formatting to should be set to Entire Row & paste the JSON to box as shown on the picture and then Save it.

Now you will have another layout by the name Tiles added to the existing layouts List & Compact List as shown below, select it

Now its time to see the need for the column ProductPhotoPic of datatype Picture, with the default layout you can see the thumbnail of the image added as an attachment

Summary: There are many samples available in PnP Github repo for List Row View & Column view formatting. In document & picture libraries the Tiles view layout are added by default, there is also a Column by the name Thumbnail in a Picture library. You can display a Thumbnail view of Images in PowerApps gallery for the Images stored in Document library, go through this link for more information. If you are storing images on a seperate document library & not as an attachment, the url of the image can be added on the HyperLink column. Hope you find this interesting & helpful.

Batch SharePoint requests [GET, POST, PATCH, DELETE] in PowerAutomate and MS Graph

Batching helps you in optimizing the performance of your application by combining multiple requests into a single request. SharePoint Online & MS Graph APIs supports the OData batch query option. Batch requests MUST be submitted as a single HTTP POST request to the batch endpoint of a service as below for

The request body of the above POST request must be made up of an ordered series of query operations [GET] and/or ChangeSets [POST or PATCH or DELETE]. You can have different combination of change sets.

In this blog post, I am going to show you how to batch multiple SharePoint requests for Creating, Reading, Updating & Deleting List items in

  1. PowerAutomate
  2. MS Graph

Pre-Requisites:

Have the following items ready to follow along this post

  1. SharePoint Site
    1. Site Id [GUID of the Site]
    2. Create a SharePoint List by the Name EmployeeInformation with the schema
      1. Title [Default]
      2. Location [Custom: Single Line of Text]
    3. List Id [GUID of the above list]
  2. Graph Explorer to test the Graph batching

Batch SharePoint requests in PowerAutomate:

If there is a requirement for multiple requests to be performed in SharePoint from your flow, the batch request with SharePoint Online REST API helps in reducing the execution time of your flow by combining many operations into a single request to SharePoint. Create an Instant Flow with trigger “Manually trigger a Flow” and the action Send an HTTP request to SharePoint to send the batch requests.

Lets now prepare the parameters to be passed for the Send an HTTP request to SharePoint action:

Site Address: https://mydevashiq.sharepoint.com/sites/test77

Method: POST

Headers:

  • Key: accept Value: application/json;odata=verbose
  • Key: content-type Value: multipart/mixed; boundary=batch_cd329ee8-ca72-4acf-b3bf-6699986af544

The boundary specification with batch_guid used on the content type header can be any random guid. In the request body the batch_guid will be used. To understand more about the OData batch operation, go through this documentation.

Body:

The request body given below is for reading all the items [GET], creating a list item, deleting an existing item & updating an existing item on the EmployeeInformation List using REST API endpoints. A ChangeSet (random guid) is used to group one or more of the insert/update/delete operations and MUST NOT contain query operations [GET]. For the query operation there must be separate batch as per the example below

--batch_cd329ee8-ca72-4acf-b3bf-6699986af544
Content-Type: application/http
Content-Transfer-Encoding: binary

GET https://domain.sharepoint.com/sites/sitename/_api/web/lists/GetByTitle('EmployeeInformation')/items?$select=Title,Location HTTP/1.1
Accept: application/json;odata=nometadata

--batch_cd329ee8-ca72-4acf-b3bf-6699986af544
Content-Type: multipart/mixed; boundary="changeset_64c72699-6e7c-49c4-8d9b-6b16be92f7fc"
Content-Transfer-Encoding: binary

--changeset_64c72699-6e7c-49c4-8d9b-6b16be92f7fc
Content-Type: application/http
Content-Transfer-Encoding: binary

POST https://domain.sharepoint.com/sites/sitename/_api/web/lists/GetByTitle('EmployeeInformation')/items HTTP/1.1
Content-Type: application/json;odata=verbose

{
    "__metadata": {
      "type": "SP.Data.EmployeeInformationListItem"
    },
    "Title": "Mohamed Shaahid Faleel",
    "Location": "England"
}

--changeset_64c72699-6e7c-49c4-8d9b-6b16be92f7fc
Content-Type: application/http
Content-Transfer-Encoding: binary

DELETE https://domain.sharepoint.com/sites/sitename/_api/web/lists/GetByTitle('EmployeeInformation')/items(37) HTTP/1.1
If-Match: *

--changeset_64c72699-6e7c-49c4-8d9b-6b16be92f7fc
Content-Type: application/http
Content-Transfer-Encoding: binary

PATCH https://domain.sharepoint.com/sites/sitename/_api/web/lists/GetByTitle('EmployeeInformation')/items(30) HTTP/1.1
Content-Type: application/json;odata=nometadata
If-Match: *

{
    "Title": "Mohamed Faleel",
    "Location": "USA
}

--changeset_64c72699-6e7c-49c4-8d9b-6b16be92f7fc--

--batch_cd329ee8-ca72-4acf-b3bf-6699986af544--

Once the above action is executed the response can be parsed to get the required information if you’ve used a GET request as per this documentation from Microsoft. PFB the screenshot of the action

The request body can be generated dynamically based on the requirement.

Batch SharePoint requests in MS Graph:

As we have done batching using the SharePoint REST APIs, in a similar manner you can combine multiple requests in one HTTP call using JSON batching for MS Graph. Here I will use the MS Graph explorer to test the batch request. Find the request parameters

Endpoint URL: https://graph.microsoft.com/v1.0/$batch

Method: POST

Body:

I’ve used the Site Id and List Id for the EmployeeInformation list to construct the SP endpoint URL’s as per the documentation for Creating, Reading, Updating & Deleting SP list items.

{
    "requests": [
      {
        "id": "1",
        "method": "POST",
        "url": "/sites/{77b3a8c8-549f-4848-b82c-8bb6f4864918}/lists/{2f923934-d474-4473-8fc0-3486bd0c15c5}/items",
         "body": {
          "fields":{"Title":"Test from Graph","Location":"Oslo"}
        },
        "headers": {
          "Content-Type": "application/json"
        }
      },
      {
        "id": "2",
        "method": "GET",
        "url": "/sites/{77b3a8c8-549f-4848-b82c-8bb6f4864918}/lists/{2f923934-d474-4473-8fc0-3486bd0c15c5}/items"
      },
      {
        "id": "3",
        "url": "/sites/{77b3a8c8-549f-4848-b82c-8bb6f4864918}/lists/{2f923934-d474-4473-8fc0-3486bd0c15c5}/items/44",
        "method": "PATCH",
        "body": {
            "fields":{"Title":"Mohamed Ashiq Faleel","Location":"Stockholm"}
        },
        "headers": {
          "Content-Type": "application/json"
        }
      },
      {
        "id": "4",
        "url": "/sites/{77b3a8c8-549f-4848-b82c-8bb6f4864918}/lists/{2f923934-d474-4473-8fc0-3486bd0c15c5}/items/50",
        "method": "DELETE"
      }
    ]
  }

On a same way you can batch different APIs endpoint from MS Graph. JSON batching also allows you to sequence the requests. Find below the screenshot from Graph explorer

Graph explorer also generates code snippets for the different programming languages

JavaScript Code snippet

Summary: On this post we have seen how to batch SharePoint requests using PowerAutomate & MS Graph. Microsoft has used request batching on many first party features. Hope you have found this informational & helpful in some way. Let me know any feedback or comments on the comment section below

Create/Delete a SharePoint custom theme using PowerAutomate

In a modern SharePoint site you can create custom themes using PowerShell, REST API & CSOM. In this blogpost I will show you how to create themes using PowerAutomate. The following REST endpoints are available

There is an online Theme Generator tool that you can use to define new custom themes. At the time of writing this post, the endpoints are open to everybody & not just to the SharePoint tenant admins which seems to be quite buggy. Laura Kokkarinen has written a very detailed blog post about this topic. I’ve got the inspiration to write about this topic from John Liu who has recently recorded a video about this. Find screenshot from the Theme generator tool:

Once you have defined the theme from the tool, click on the Export theme button on the Right top corner of the tool to export the theme as a code block in JS, JSON & PowerShell. In this case, click JSON & Copy the generated block

{
  "themePrimary": "#50AFC6",
  "themeLighterAlt": "#f7fcfd",
  "themeLighter": "#def1f6",
  "themeLight": "#c3e6ee",
  "themeTertiary": "#8ecddd",
  "themeSecondary": "#61b8ce",
  "themeDarkAlt": "#489eb3",
  "themeDark": "#3c8597",
  "themeDarker": "#2d626f",
  "neutralLighterAlt": "#faf9f8",
  "neutralLighter": "#f3f2f1",
  "neutralLight": "#edebe9",
  "neutralQuaternaryAlt": "#e1dfdd",
  "neutralQuaternary": "#d0d0d0",
  "neutralTertiaryAlt": "#c8c6c4",
  "neutralTertiary": "#d9d9d9",
  "neutralSecondary": "#b3b3b3",
  "neutralPrimaryAlt": "#8f8f8f",
  "neutralPrimary": "gray",
  "neutralDark": "#616161",
  "black": "#474747",
  "white": "#ffffff"
}

Flow for Creating or adding the Theme to the tenant:

Let’s create an instant flow with trigger Manually trigger a flow to add a theme to the tenant. Add two Compose actions as shown below

The first compose action is the actual definition copied from the theme generator tool

{
  "palette" : 
JSON block copied from the Theme generator tool
}

The second compose action has the name of the theme & its stringified JSON from the output of the previous compose action. To convert the JSON to string add a string expression on the dynamic content pane

{
"name":"My first Custom theme created using FLOW", 
"themeJson": @{string(outputs('Compose_-_Custom_Theme_Pallete'))}
}

Now add the action Send an HTTP request to SharePoint with the following parameters

Site Address: https://domain.sharepoint.com/sites/sitename

Method: POST

URI: /_api/thememanager/AddTenantTheme

Headers:

Key: Accept

Value: application/json;odata.metadata=minimal

Body: Output of the Second compose action (Compose – Theme Name)

Now you are ready to test the flow. Once its successful you can apply the custom theme to the site

Click cog wheel on the site to select the theme by selecting the Change the look link

For deleting the theme, add the action Send a HTTP request to SharePoint with the following parameters

Site Address: https://domain.sharepoint.com/sites/sitename

Method: POST

URI: /_api/thememanager/DeleteTenantTheme

Headers:

Key: Accept

Value: application/json;odata.metadata=minimal

Body: { “name”:”the name of your custom theme” }

Summary: Hope you find this post useful & informational. Let me know if there is any comments or feedback below.

Multiple ways to access your On-premise data in Microsoft 365 and Azure

If your organization is using a hybrid cloud environment, this post will shed some light to integrate on-premise resources with Microsoft 365 & Azure services. Hybrid integration platforms allows enterprises to better integrate services and applications in hybrid environments (on-premise and cloud). In this blog post, I will write about the different services & tools available with in Microsoft Cloud which allows you to connect or expose your On-premises data or application in Office 365. There are still many enterprise organizations on Hybrid mode due to various factors. It can be a challenging task to integrate your on-premises network but with right tools & services in Office 365 & Azure it can be easier. Find below the high-level overview & some references on how to

  1. Access your on-premise data in Power Platform & Azure Apps (Logic Apps, Analysis Services & Azure Data factory)
  2. Programmatically access your on-premise resources in your Azure Function app
  3. Access on-premise resources in Azure automation account
  4. Expose your on-premise Application or an existing WEB API in Office 365 cloud

Access on-premise data in Power Platform & Azure Apps (Logic Apps, Analysis Services & Azure Data factory):

The on-premises data gateway allows you to connect to your on-premises data (data that isn’t in the cloud) with several Microsoft cloud services like Power BI, Power Apps, Power Automate, Azure Analysis Services, and Azure Logic Apps. A single gateway can be used to connect multiple on premise applications with different Office 365 applications at the same time.

At the time of writing, with a gateway you can connect to the following on-premises data over these connections:

  • SharePoint
  • SQL Server
  • Oracle
  • Informix
  • Filesystem
  • DB2

To install a gateway, follow the steps outlined in MS documentation Install an on-premises data gateway. Install the gateway in standard mode because the on-premises data gateway (personal mode) is available only for Power BI.

Once the data gateway is installed & configured its ready to be used in the Power platform applications.

  1. PowerApps
  2. PowerAutomate
  3. PowerBI

The other catch the gateway is not available for the users with Power Automate/Apps use rights within Office 365 licenses as per the Licensing overview documentation for the Power Platform. Data gateways can be managed from the Power Platform Admin center.

Shane Young has recorded some excellent videos on this topic for PowerApps & PowerBI.

To use in

  1. Azure Logic Apps
  2. Azure Analysis service
  3. Azure Data Factory

create a Data Gateway resource in Azure.

High Availability data gateway setup:

You can use data gateway clusters (multiple gateway installations) using the standard mode of installation to setup a high availability environment, to avoid single points of failure and to load balance traffic across gateways in the group.

No need to worry about the security of the date since all the data which travels through the gateway is encrypted.

Data gateway architecture:

Find below the architecture diagram from Microsoft on how the gateway works

I recommend you to go through On-premises data gateway FAQ.

Integration Service Environment:

As per the definition from Microsoft an integration service environment is a fully isolated and dedicated environment for all enterprise-scale integration needs. When you create a new integration service environment, it’s injected into your Azure Virtual Network allowing you to deploy Logic Apps as a service in your VNET. The private instance uses dedicated resources such as storage and runs separately from the public global Logic Apps service. Once this logic apps instance is deployed on to your Azure VNET, you can access your On-premise data resources in the private instance of your Logic Apps using

  • HTTP action
  • ISE-labeled connector for that system
  • Custom connector

For the pricing of ISE, refer this link.

Programmatically access your on-premise resources in your Azure Function app

As you all know Azure Functions helps in building functions in the cloud using serverless architecture with the consumption-based plan. This model lets the developer focus on the functionality rather than on infrastructure provisioning and maintenance. Okay let’s not more talk about what a Function app can do but let us see on how to connect to your on-premise resources (SQL, Biztalk etc) within your function.

During the creation of a Function app in Azure, you can choose the hosting plan type to be

  • Consumption (Serverless)
  • Premium
  • App Service plan

Consumption based plan is not supported for the on-premise integration so while creating the app the hosting plan has to either premium or app service based plan & the Operating system has to to be Windows. On-premise resources can be accessed using

  1. Hybrid Connections
  2. VNet Integration

Hybrid Connections:

Hybrid Connections can be used to access application resources in private networks which can be on-premise. Once the Function app resource is created in Azure, go to Networking section of the App service to setup & configure. Go through the documentation from Microsoft for the detailed instructions to set this up.

How it works:

The Azure Hybrid Connection represents a connection between Azure App Service and TCP endpoint (host and port) of an on-premise system. On the diagram below Azure Service Bus Relay receives two encrypted outbound connections. One from the side of Azure App Service (Web App in our case) and another from the Hybrid Connection Manager (HCM). HCM is a program that must be installed on your on-premise system. It takes care of the integrations between the on-premise service (SQL in this case) with Azure Service Bus Relay.

Once the setup is done, you can create a connection string in Appsettings.json file or from Azure function app interface of your function app. After this you can access the data in your function app code.

I’ve found a couple of interesting blogs about this setup.

VNet Integration:

In the Networking features of the App service, you can add an existing VNET. An Azure Virtual Network (VNet) is a representation of your own network (private) in the cloud. It is a logical isolation of the Azure cloud dedicated to your subscription.

In Azure Vnet you can connect an on-premise network to a Microsoft VNet, this has been documented from Microsoft here. Once there is integration between your Azure Vnet & on-premise network and the VNet is setup on your function app you are set to access on-premise resources in your function app.

Access on-premise resources in Azure automation account:

Azure Automation is a service in Azure that allows you to automate your Azure management tasks and to orchestrate actions across external systems from right within Azure. Hybrid runbook worker feature allows you to access on-premise resources easily. The following diagram from Microsoft explains on how this feature works

I’ve written a blogpost recently about this feature for automating on-premise active directory.

Expose your on-premise Application or an existing WEB API in Office 365 cloud:

Azure Active Directory’s Application Proxy provides secure remote access to on-premises web applications (SharePoint, intranet website etc). Besides secure remote access, you have the option of configuring single sign-on. It allows the users to access on-premise applications the same way they access M365 applications like SharePoint Online, PowerApp, Outlook etc. To use Azure AD Application Proxy, you must have an Azure AD Premium P1 or P2 license.

How it works:

The following diagram from Microsoft documentation shows how Azure AD and Application Proxy works

Find below documentations on how to

  1. Add an on-premises application for remote access through Application Proxy in Azure Active Directory
  2. Secure access to on-premises APIs with Azure AD Application Proxy
  3. Use Azure AD Application Proxy to publish on-premises apps for remote users
  4. Deploy Azure AD Application Proxy for secure access to internal applications in an Azure AD Domain Services managed domain

Once the connector service is installed from your Azure AD application proxy, you can add an on-premise app as shown below

The above step will register an application with App registrations.

Summary: I’ve given some overview about the different services & tools to connect & integrate on-premise resources with Microsoft cloud. Hope you like this post & find it useful. Let me know any feedback or comments on the comment section below

Copy & Apply Site Template to a SharePoint site using Power Automate

If you have a requirement to copy a site template (Site Pages including images & webpart, site column, site content type, navigation etc) from an existing SharePoint site & apply it to a recently created SharePoint site, this blog post would be helpful.

Pre-requisites:

  • SharePoint site collection administrator
    • SharePoint site with a custom list associated to a Flow
  • Access to Premium connector (Azure Automation) in Power Automate
  • Azure subscription to create Azure Automation Runbook
Technical Diagram

SharePoint Patterns and Practices (PnP) community has developed a library of PowerShell commands (PnP PowerShell) that allows you to perform complex provisioning and artefact management actions towards SharePoint. On this example I will be using PnPProvisioningTemplate cmdlet’s to copy the pages including the assets & webparts to another site but you can do much more than this. Find the PnP cmdlets I will using

To generate a .pnp package (Site Template) from the source site

Get-PnPSiteTemplate -out template.pnp -Handlers PageContents -IncludeAllClientSidePages -PersistBrandingFiles

The parameter -PersistBrandingFiles saves all the asset files including the image files from the Site Assets library that makes up the composed look of page. Parameter -Handlers <Handlers> processes only the information passed to it. On the above example it processes only the Pages & its associated contents & not lists etc The PnP cmdlet Get-PnPSiteTemplate creates a package with extension .pnp which can be converted to a ZIP package by changing the extension to .ZIP from .pnp. Look at the Get-PnPSiteTemplate documentation for the various parameters it supports.

PnP package. Explore the Files folder

Once the package .pnp file is ready, the package can be applied to another site using the command Invoke-PnPSiteTemplate

To Apply the Template to a destination site (Apply template to site):

Invoke-PnPSiteTemplate .\template.pnp

If you want to test these commands in PowerShell console on your local computer, install the PnP module

Keep in mind before executing the PnPSiteTemplate commands, the site context must be created for both source & target site by creating a connection as shown below

Connect-PnPOnline -url "sourcesiteurl"
Get-PnPSiteTemplate -out template.pnp -Handlers PageContents -IncludeAllClientSidePages -PersistBrandingFiles
Connect-PnPOnline -url "targetsiteurl"
Invoke-PnPSiteTemplate .\template.pnp

For interactive login, use command

Connect-PnPOnline -url “sourcesiteurl” -UseWebLogin

or

Connect-PnPOnline -url “sourcesiteurl” -Interactive

Setup SharePoint List:

Till now you would have got some ideas about the PnP commands we will be using on the Azure Automation runbook, let’s now create the SharePoint list to collect the Source (Template to be copied from) & target URL (Template to be applied) for the SharePoint site. Find the list Schema for the List to be named as Site Template

Azure Automation Runbook:

The list is ready, let us now create the Azure automation runbook. I’ve written a post Execute SharePoint Online PowerShell scripts using Power Automate, it will help you with steps (Step 1 – Create automation account, Step 2 – Import SharePointPnPPowerShell Online PowerShell Module & Step 3 – Add user credentials) to create the automation account & runbook to execute the PnP PowerShell command for copying & applying the site template.

Step 4: Now we are good to create the Runbook, to create it click Runbooks under the section Process Automation and then click Create a runbook. Enter the Name of the Runbook ApplySiteTemplate, select the Runbook type to PowerShell and click Create.

Create Runbook in Azure Automation Account

Now let’s add the code by editing the runbook. The section Dynamic Parameters on the code will be passed from the flow. To connect to SharePoint Online site, we are using the SPO admin credentials created in Step 3. Find the code below

# Dynamic Parameters, will be passed from Flow
param(
  [parameter(Mandatory=$true)]
  [string]$SiteTemplateURL = "https://mydevashiq.sharepoint.com/sites/contosoportal",
  [parameter(Mandatory=$true)]
  [string]$ApplyTemplatetoURL = "https://mydevashiq.sharepoint.com/sites/contosositeportal"
)
# Credentials
$myCred = Get-AutomationPSCredential -Name "SPOAdminCred" 
# Connect to source site for creating the package or site template
Connect-PnPOnline -url $SiteTemplateURL -Credentials  $myCred
Get-PnPSiteTemplate -out template.pnp -Handlers PageContents -IncludeAllClientSidePages -PersistBrandingFiles
# Connect to destination site for applying the package or site template
Connect-PnPOnline -url $ApplyTemplatetoURL -Credentials  $myCred 
Invoke-PnPSiteTemplate .\template.pnp

The runbook is now created, you can test the script by clicking on Test Pane & pass parameters (Site URL etc) to test it. Click Publish button as shown below to publish so that it can be called from Power Automate.

You can also create the template (PnP Package) for a site & store it on a SP library. The PnP command to get the file

Connect-PnPOnline -url "siteurlwhichhasthePnPpackagefile" -Credentials  $myCred
Get-PnPFile -Url "/sites/sitenamewithPnPPackagefile/Shared Documents/template.pnp" -Filename "template.pnp" -AsFile

You can use a certificate instead of Username and Password to get a APP only access token to call PnP commandlet, for more details check the documentation for Connect-PnPOnline. It’s now time to create the flow to call the Runbook.

Power automate flow to call the Run Book:

You can now create a flow with automated trigger “When an item is created” from the SharePoint list created earlier to pass the Site Template URL & Apply to Site Template URL. Once the flow is created, add the action “Create Job” under the connector “Azure Automation” which is a premium connector.

Select the Azure Subscription which has the Automation account resource with runbook>Select Resource Group>Select Automation Account>Select the Runbook name which has the PS script. If there is a need to wait until the automation job completes then select Yes on the field “Wait for Job”. Enter the URL for SiteTemplateURL & ApplyTemplatetoURL

The flow is ready, run it to test now with parameters. I’ve used this sample to test a site (Template) which has

  • Customized home page with couple of standard webpart & images
  • 2 more pages with images & other standard webparts

has copied to another site. If there is a custom webpart on the source site which is added to a page, make sure to deploy it on the destination site.

Summary: Take a look at the SharePoint starter kit PnP package to explore more about the usage of different features in PnP provisioning. This example can also be extended with Site design & Site script which has the capability to call a flow. Hope you have enjoyed reading this post and find it useful. If you have any comments or feedback, please provide it on the comments section below.

Automated trigger recurrence frequency – Power Automate

Have you ever noticed on your Automated flow with trigger for e.g Item created or modified on a SharePoint list will not run immediately as & when there was an item either created or modified in the list? The reason is all the automated triggers has a recurrent frequency schedule which is set to 3 mins, it means it looks for the changes in the SharePoint list every 3 mins. To check this, go to Peek Code on the trigger to check the interval frequency

For the When an Item is created trigger

This setting cannot be changed in Power Automate but with Azure Logic Apps you can adjust this setting. For more details on the pricing, refer to this link

If there is further delay in the trigger to get fired, check your flow plan since it has a dependency. As per information gathered from the Flow community forum

The maximum flow frequency for User based or App based plans is 1 minute, however if you are using Free plan it will be 15 minutes. And if it is Flow for Office 365 (Plan from your Enterprise license E3, E5 etc) and Flow for Dynamics 365 it will be 5 minutes.

From the FAQ page in the Microsoft site for Flow, it says

Your plan determines how often your flows run. For example, your flows may run every 15 minutes if you’re on the free plan. If a flow is triggered less than 15 minutes after its last run, it’s queued until 15 minutes have elapsed.

The same trigger with Logic apps which has options to update the recurrent frequency interval

If you are new to Logic Apps, follow this article from Microsoft to get started. The other advantage with Logic apps is there is a code view to update & Save which is not the case with Power Automate. In Power Automate, you can only view the code & not update

Hope this information was useful in some way. If you have any comments, let me know on the comments section.

Automate the provision of Azure AD Account & License assignment – Part 1

A decade back I was part of a team to automate the On & Offboarding process of employees for a customer using .NET framework, it had a module to provision user accounts in an on-premise environment. I still remember having used couple of dll’s for Active directory 2003 & exchange 2007 to create AD & Email account. It was not easy but nowadays with the Office 365 in place its so easy to create account & enable different Office 365 services (Exchange, SharePoint, Yammer etc) for a user in Azure Active directory. This example will be applicable for the Organization which does not have On-premise Active directory. Organizations having On-premise active directory, the user account’s will be synchronized from On-premise AD to Azure AD. On this post I am going show you how to

  1. Create Azure AD account & assign license using Power Automate
  2. Assign License using Graph Endpoint

Create Azure AD account & assign license using Power Automate:

There is a Power Automate action Create user under the connector Azure AD which helps us to create account in Azure AD but there is no action as of now to assign individual license to a user but we can overcome this by adding the user to the AD security group which has a license assigned to it.

There is a flow action Add user to group under the same connector for adding the user to the security group, all the members of the group will get the license assigned on that group. The Azure AD connector does not return custom attributes of Azure AD. For e.g you can’t assign a value to a custom AD attribute with the Create user action, if you want to assign a custom attribute or an attribute which is not exposed in the Create User action then the account has to be created using PowerShell. There are ways to call a PowerShell script from Azure Automation Runbooks with the help of a flow action.

Other Azure AD actions apart from the above screenshot which could be of use are

  • Create group
  • Get group members
  • Get groups of a user
  • Get user
  • Remove Member from Group
  • Update user

There are templates available in Power automate template section which helps you create account based on the information from the SharePoint List, based on HTTP request etc

Prerequisite:

  • Permissions on Azure AD:
    • Group.ReadWrite.All
    • User.ReadWrite.All
    • Directory.ReadWrite.All
  • Security group with license assigned

For assigning a license to Security group, go to Azure AD Admin center. Follow this documentation from Microsoft to assign license to a group.

You can also turn off certain services from the license to the group, for e.g Turning off the Power App service for the user

You can also use dynamic groups for assigning license to a user, if you have dynamic group based license assignment to a user then you could ignore the step on the flow to add user to the security group. Dynamic groups works based on rules to determine group membership, for e.g if a user has an AD attribute set for Department. In this case the AD user created with certain department will get automatically added to the group which will in turn assign a license to the user.

Let’s now create the flow, I have used an Instant flow with trigger Manually Trigger a flow. Add the action Create user from the connector Azure AD

Now add the action Add user to group, the Group Id should be for the Security group which has a license assigned to it. The User Id field should be dynamic value Id from the previous action Create user.

To get the group Id, go to Azure AD

Run the flow. Once the flow runs successful the user account will be provisioned on Azure Ad with a license.

Assign License using Graph Endpoint:

There is a beta graph endpoint to assign license to a user. Find the Microsoft documentation for more information

All types of license (E5, E3, PowerApps, Power etc) has a Service Plan id also called as SKU id. Find the list of SKU id’s on this link if your tenant has procured the license for the service

 To get the available service plan or SKU ID, make a GET call to the endpoint https://graph.microsoft.com/v1.0/subscribedSkus & also from the beta endpoint of the user https://graph.microsoft.com/beta/me

Once the sku id are available based on the type of license to be assigned, you will have to make a POST call to

Endpoint URL: https://graph.microsoft.com/beta /users/testuser10@mydevashiq.onmicrosoft.com/assignLicense

Request Body:

{
  "addLicenses": [
        {
            "disabledPlans": [],
            "skuId": "b05e124f-c7cc-45a0-a6aa-8cf78c946968"
        },
        {
            "disabledPlans": [],
            "skuId": "a403ebcc-fae0-4ca2-8c8c-7a907fd6c235"
        }
  ],
  "removeLicenses": []
}

The first SKU id is for Enterprise Mobility & Power BI (Free)

To remove the license for a user, use the collection removeLicenses. This graph endpoint to assign license can also be called from a Flow.

Summary: You can also use a HTTP request trigger in the Flow for integrating with other applications. On next post I will write about creating account in On-premise Active Directory. Hope you find this post useful & informational. Let me know if there is any comments or feedback below.