Microsoft recently announced a long awaited feature: support for Service Principals in Custom connectors which is currently in Public Preview. This empowers you to authenticate as a service principal instead of relying on user accounts. It’s a game-changer that paves the way for a multitude of scenarios, especially those requiring seamless, uninterrupted access for automated processes, free from the constraints of user involvement.
In one of my earlier posts, I discussed how to harness the power of Microsoft GRAPH API within custom connectors through delegated permission. In this article, I’ll delve into the step-by-step process of configuring service principal authentication in a custom connector for the Graph API with Application permissions to send emails. While I’ve chosen to focus on email communication, remember that you have the flexibility to opt for any of the supported Graph application permissions.
Setting up the Service Principal:
Let’s headover to the Microsoft Entra Admin center to register an AD App and grant the application permissions to send emails using the Graph API. Register an AD application with the following Application permission
Mail.Send: Send Mail as any user
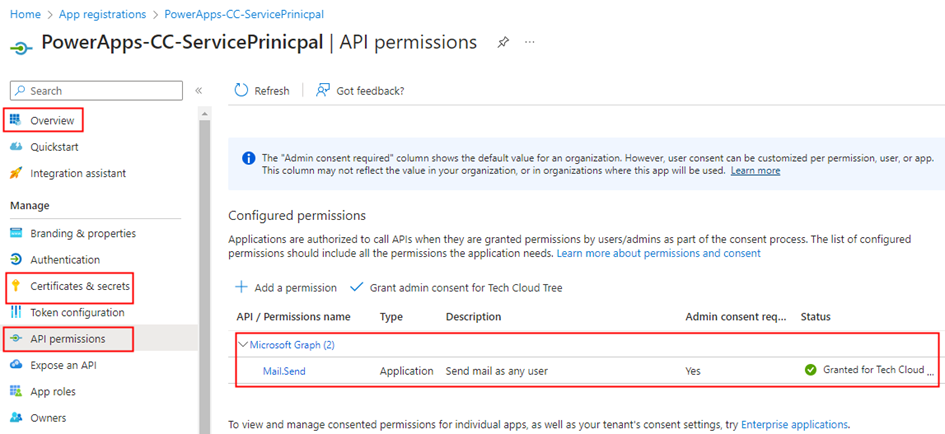
Retrieve the Client ID & Tenant ID from the Overview section of the Azure AD app, and then proceed to generate a secret within the Certificates & secrets section under the Manage blade. Once the secret is generated, copy its value for use within the custom connector configuration. Add a Web Redirect URI https://global.consent.azure-apim.net/redirect as shown below
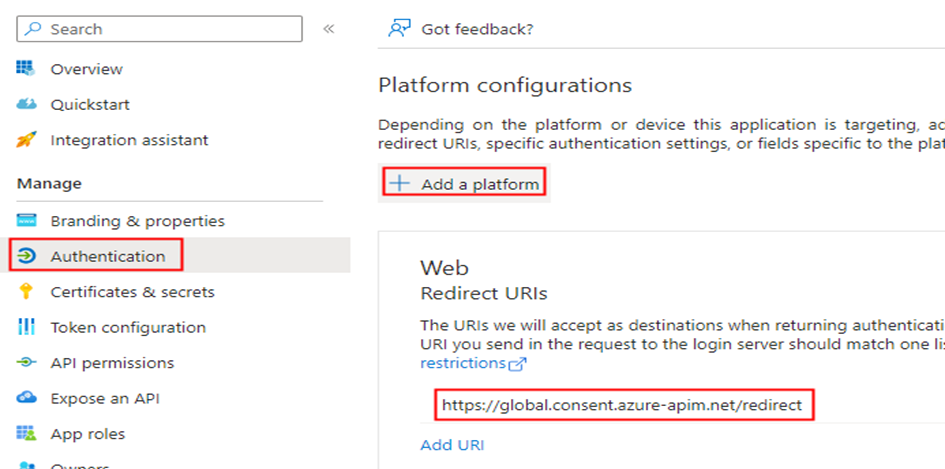
The Redirect URI is common and will be created while creating the custom connector.
Create Custom Connector:
With the service principal now created, let’s proceed to create the custom connector from the Power Apps maker portal. Choose the environment where you intend to create the custom connector. Navigate to Custom connectors on the left navigation menu, then click on + New custom connector and select Create from blank.
Once you’ve provided the connector name, you’ll be presented with the following screen. Enter graph.microsoft.com in the Host field and provide a brief description of the connector. Additionally, you have the option to customize the connector’s logo to your preference.
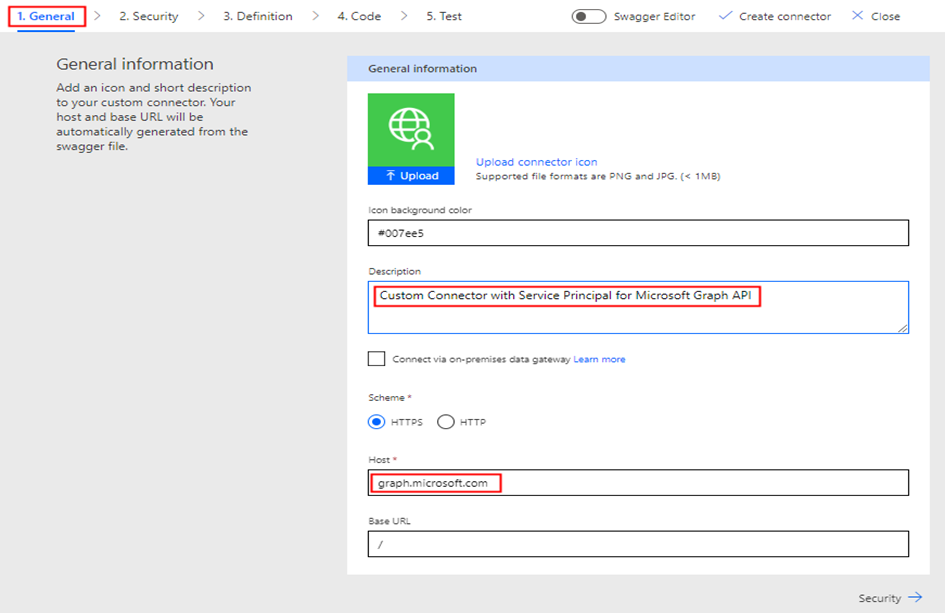
Now click Security at the lower-right corner of the above screen, which allows you to input the Azure AD application information for the service principal/App registration created earlier in the Entra Admin portal.
Here’s the step-by-step configuration:
- Choose Authentication type as OAuth 2.0.
- Change the Identity provider to Azure Active Directory.
- Check the box Enable Service Principal support
- Enter the Client ID and Client Secret from the Azure AD application.
- Keep the Authorization URL as https://login.microsoftonline.com and Tenant ID as common.
- Enter the Resource URL as https://graph.microsoft.com
- For the Scope, specify Mail.Send based on the permissions you have added to the Azure AD app. If you have multiple permissions, separate them with spaces.

Once you’ve filled in this information, click Create connector. This action will automatically generate the Redirect URL as https://global.consent.azure-apim.net/redirect This URL should match the Redirect Web URI you previously added in the Azure AD application. With this configuration, your connector is now ready for the adding the actions based on the Graph API endpoints for sending emails.
Create Action to Send email:
With the connector successfully created, it’s time to create the action for sending emails. This action can be utilized in both Power Apps and Power Automate. The Graph API endpoint for sending emails is:
Http Request Mode: POST
Request URI: https://graph.microsoft.com/v1.0/users/{fromEmailAddress}/sendMail
The request parameter fromEmailAddress is to collect the information from the user while using the action
Request Body:
{
  "message": {
    "subject": "Mail sent using Custom Connector",
    "body": {
      "contentType": "Text",
      "content": "This is a sample email sent using Custom Connector which uses Service prinicipal"
    },
    "toRecipients": [
      {
        "emailAddress": {
          "address": "mailboxaddress@domain.com"
        }
      }
    ]
}
}
Proceed to the Definition tab of the Custom Connector. Here, select + New action, which will generate the following screen for you to enter information about the action.
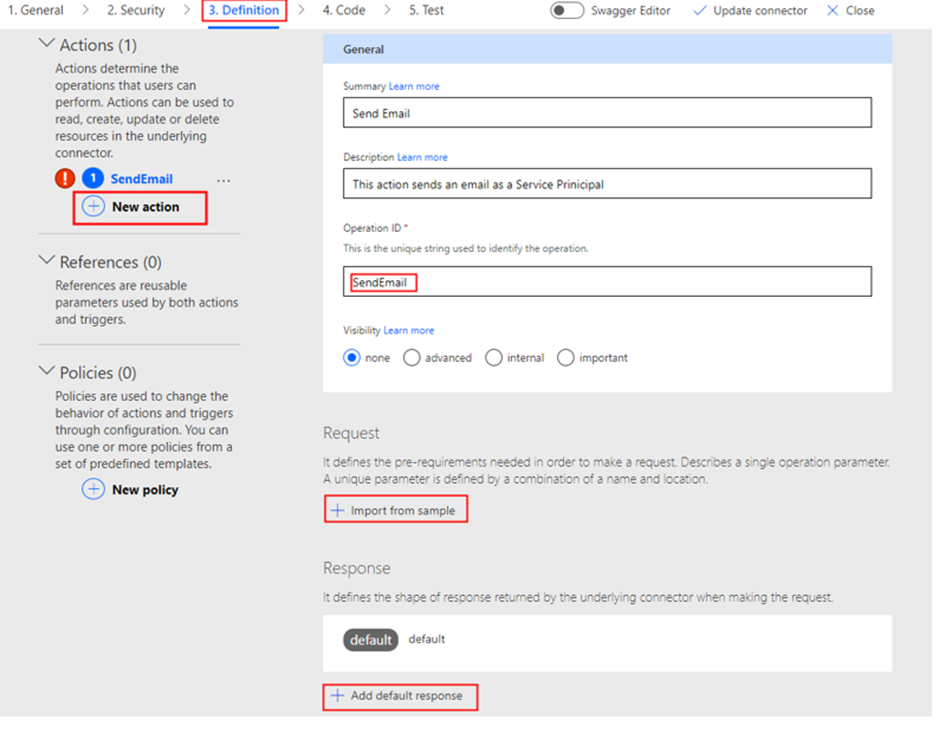
After the Summary, Description and Operation ID is entered. Click + Import from sample under the Request section to the enter the Graph API endpoint request details as shown below

Click Import on the screen above. You can optionally provide a sample response by entering details in the default response section in the Add Action interface which will help you identify objects in Power Apps if the request has a response. For more information, please refer to my earlier blog post, which I have referenced in the introduction section. Don’t forget to update the connector.
Create Connection:
Once the connector with the Send Email action is set up, you can now proceed to test the action for sending emails. The first step is to create the connection, navigate to the below interface and click on + New connection under the section Test and then on the following popup select the Authentication Type as Service Principal Connection.
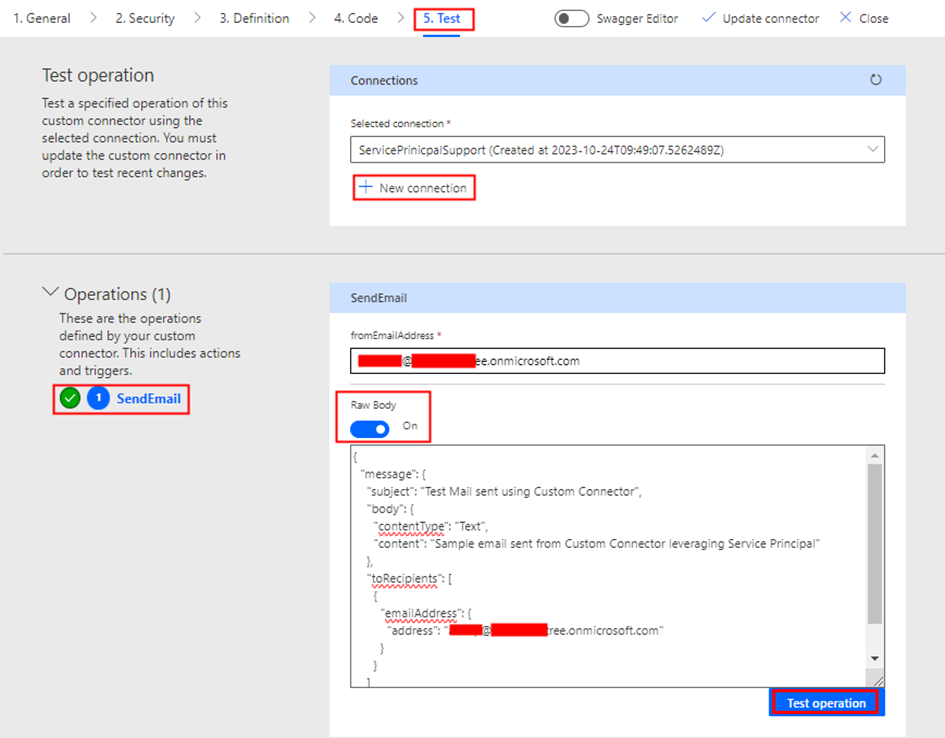
Enter the Client ID, Secret, and the Tenant ID you copied earlier to create the connection. You would now be able to test the action.
To use this in the Power Apps, after adding the connector, you would be able to call the action using the below code:
ServicePrinicpalSupport.SendEmail("fromEmailAddress@domain.com", {
        'message': {
            'subject': "Mail sent using Custom Connector from Power Apps",
            'body': {
                'contentType': "Text",
                'content': "Sample email sent from Custom Connector leveraging Service Principal"
            },
            'toRecipients': [
                {
                    'emailAddress': {
                        'address': "toUseraddrees@domain.com"
                    }
                }
            ]
        }
    });
The connections created uses the Authentication Type Explicit Authentication.
Sharing Connector:
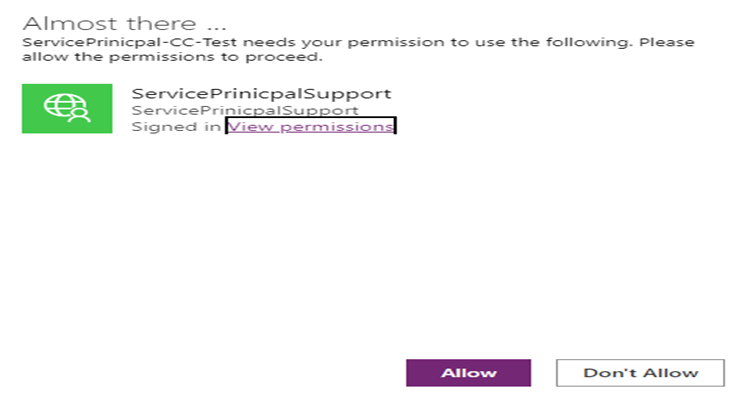
When the app is shared with the user, the user will not be prompted to create a connection; instead, the consent window below will appear to allow the connection. You can use the PowerShell command Set-AdminPowerAppsApiToBypassConsent if you want to bypass consent for the app users. The connection is shareable, allowing you to share it for editing, using, sharing, etc., with other users.
Authentication Flow:
The authentication flow for custom connectors enabled with Service Principal uses the OAuth 2.0 client credentials flow, while for the custom connectors without Service Principal authentication, the OAuth 2.0 Authorization code flow is used. Below, you’ll find the Swagger details for the custom connector, showing both scenarios for connecting to Microsoft Graph using OAuth2 with Azure Active Directory
| Swagger definition for Service Principal Authentication | Swagger definition for Non Service Principal Authentication |
| securityDefinitions: oauth2-auth: type: oauth2 flow: accessCode tokenUrl: https://login.windows.net/common/oauth2/authorize scopes: Mail.Send: Mail.Send authorizationUrl: https://login.microsoftonline.com/common/oauth2/authorize oAuthClientCredentials: type: oauth2 flow: application tokenUrl: https://login.windows.net/common/oauth2/authorize scopes: Mail.Send: Mail.Send security: – oauth2-auth: – Mail.Send – oAuthClientCredentials: – Mail.Send | securityDefinitions: oauth2-auth: type: oauth2 flow: accessCode tokenUrl: https://login.windows.net/common/oauth2/authorize scopes: Mail.Send: Mail.Send authorizationUrl: https://login.microsoftonline.com/common/oauth2/authorize security: – oauth2-auth: – Mail.Send |
Summary:
In this blog post, I have shown you how to use Service principal authentication in custom connector with application permissions to send an email through the Graph API. You can apply this feature for any supported Microsoft Graph Application permission such as SharePoint, Exchange, Teams, Azure AD, and more. It’s a game-changer, making automated processes smooth and user-free. Hope you have found this informational & thanks for reading. If you are visiting my blog for the first time, please do look at my other blogposts.
Do you like this article?
Subscribe to my blog with your email address using the widget on the right side or on the bottom of this page to have new articles sent directly to your inbox the moment I publish them.