In the ever-evolving landscape of business processes and data management, efficient integration is the key to success. Securing and managing connections in Power Apps and Power Automate is a critical aspect of integration. This blog post delves into how to use Service Principal authentication to create a connection for Azure SQL Server database with the SQL Server connector in Power Apps and Power Automate. The other supporting authentication types for the SQL Server connector are Azure AD Integrated, SQL Server Authentication, and Windows Authentication.
Prerequisites:
- An existing Azure SQL Database deployment with Owner role.
- Access to an existing Microsoft Enterprise tenant for creating an Azure AD App registration.
Setting up the Service Principal:
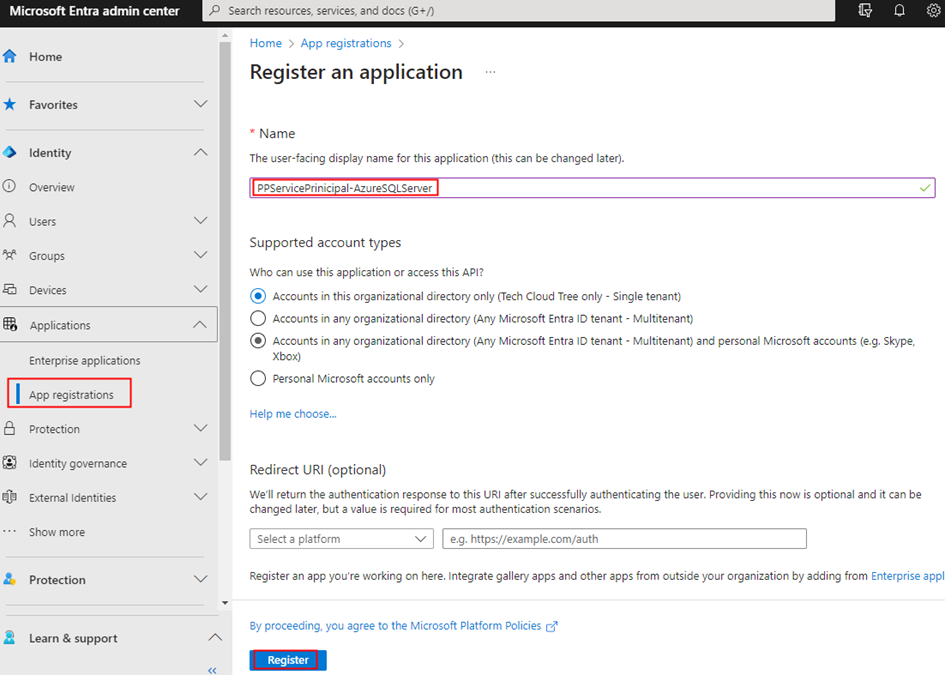
Let’s headover to the Microsoft Entra Admin center to register an AD application. To register an app, you need to either be a Microsoft Entra admin or a user assigned the Microsoft Entra ID Application Developer role.
To register your application:
In the Azure portal, select Microsoft Entra ID > App registrations > New registration (Microsoft only – Single Tenant)
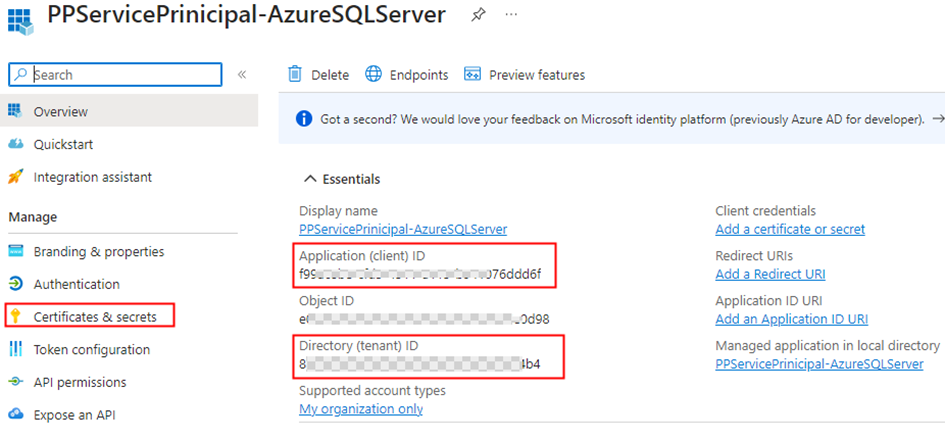
Retrieve the Client ID, Tenant ID, Display name from the Overview section of the Azure AD app, and then proceed to generate a Secret within the Certificates & secrets section under the Manage blade. Once the secret is generated, copy its value
Granting SQL Roles to Service Principal in Azure SQL Database:
Now that the service principal is created, you can grant an SQL role either from SQL Management Studio or the Azure Portal. In this post, I have used the Azure portal. Follow these steps:
- In the Azure portal, navigate to your SQL database’s Overview page.
- From the left menu, select “Query editor (preview).”
- Connect to the database using either SQL Server Authentication or Microsoft Enterprise Authentication.
- In the query window, execute the following script to create a new user in the SQL Server database authenticated with the Azure AD provider.
- Run a second query to add the newly created user to the “db_owner” database role. You can assign the role based on your specific requirements.
CREATE USER [PPServicePrinicipal-AzureSQLServer-DisplayNameoftheServicePrincipal] FROM EXTERNAL PROVIDER
GO
EXEC sp_addrolemember 'db_owner', [PPServicePrinicipal-AzureSQLServer- DisplayNameoftheServicePrincipal]
GO
Create Connection:
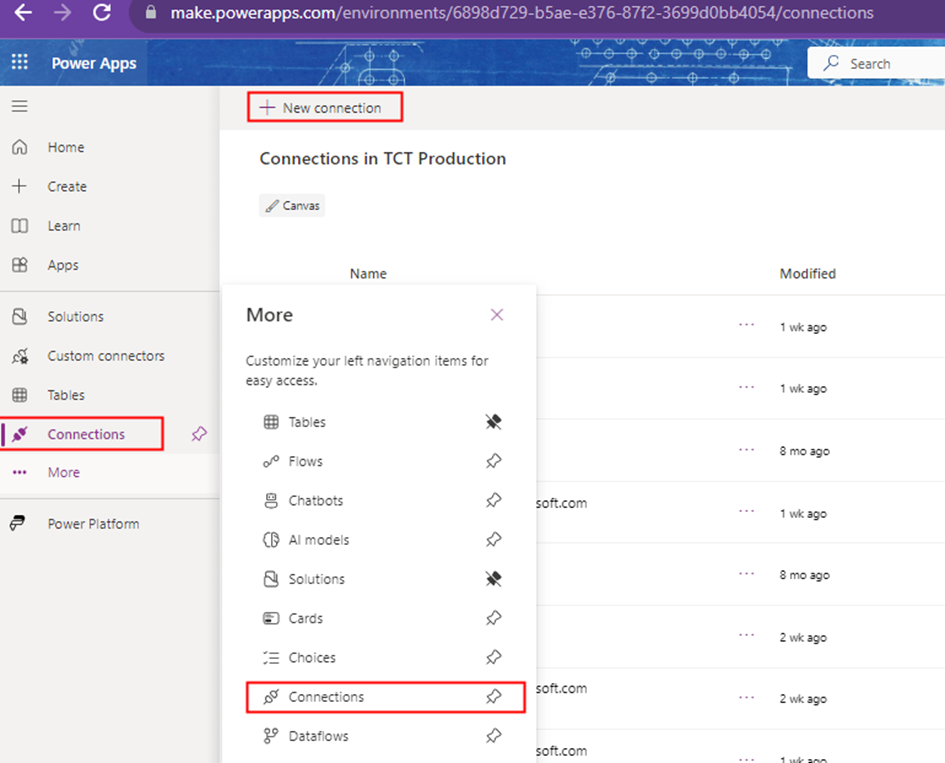
The service principal has access to the Azure SQL database, let’s proceed to create the connection using the SQL Server connector. In the Power Apps maker portal, navigate to Connections and click on + New Connection as shown below:
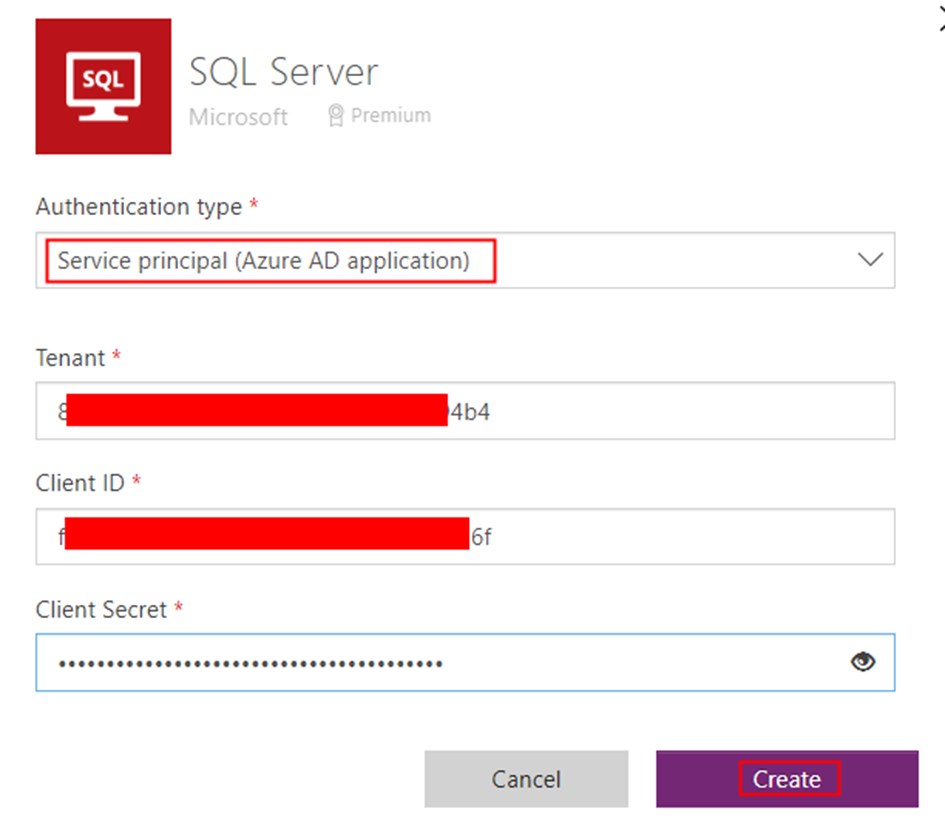
From the connectors list, choose SQL Server, and then select the Authentication type as Service Principal (Azure AD application). Enter the Tenant ID, Client ID, and the secret that you copied earlier for the service principal. Finally, click Create, as shown below:
The connection has now been successfully created and is ready for use in Power Apps and Power Automate.

Use the connection in Power Automate Flow:
In the Power Automate Portal, begin by creating an Instant flow. Add the Get Rows action from the SQL Connector and ensure that you’ve selected the connection associated with the Service Principal created earlier.
For the Server name, choose Enter custom value, and enter the Azure Server name in the format serverName.database.windows.net. For the Database name, select ‘Enter custom value’ and enter the Database Name. As for the Table, it may automatically load, or you can select ‘Enter custom value’ and specify it as [dbo].[TableName].
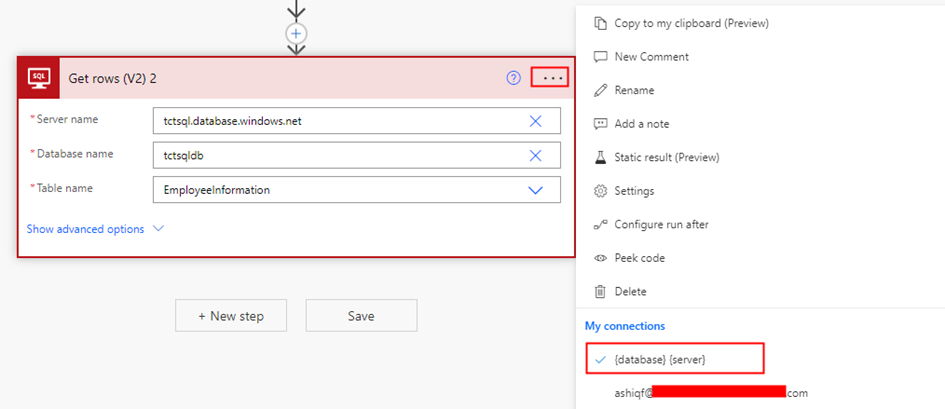
Execute the flow, and it should run successfully. While I’ve tested it with a Trigger (When and item is created etc) and it didn’t work, I will provide an update here as soon as I gather more information.
Use the connection in Power Apps:
Begin by creating a blank Power App from the Power Apps maker portal. Add the SQL connector from the Data section in the left navigation bar, and select the SQL connection you have created earlier. Provide the SQL server name and the database name, then click Connect. This will allow you to select tables and create the data source connection.
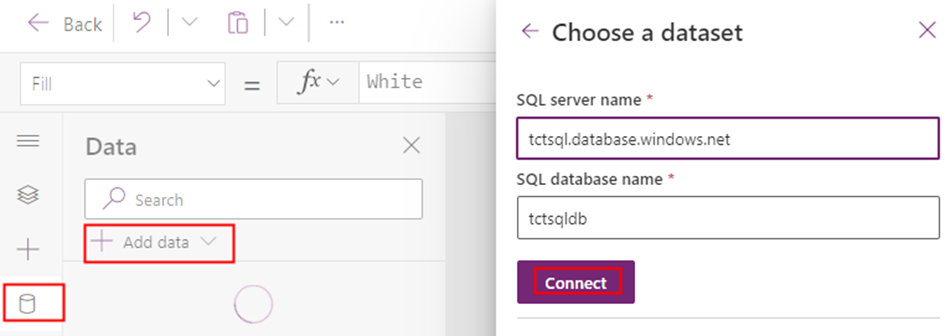
Add a Gallery control and then test it.
Caveats:
- Non-Shareable Connection: Please note that the connection created using a service principal is not shareable. If you share your Power App with another user, that user will be required to create a new connection explicitly.
- Connector Limitations: In the limitation section of the SQL Connector, the documentation indicates that “Only Azure Logic Apps supports using a service principal to connect to SQL Server,” the Service Principal authentication works in both Power Apps and Power Automate. In another section of the documentation it states, “Currently, Power Automate supports service principal authentication for the SQL Server connector; however, this is not supported in Power Apps.”
- Trigger Compatibility: It’s essential to be aware that triggers in Power Automate for the SQL connector may not work seamlessly with service principal authentication.
- Service Principal Secret: Be sure to renew the secret before it expires
References:
https://learn.microsoft.com/en-us/connectors/sql/#service-principal-azure-ad-application
Summary:
In this blog post, I’ve shown how to utilize Service Principal authentication with the SQL Server connector in Power Automate and Power Apps. While there are still some limitations, it’s encouraging to see that Microsoft is actively working to expand the capabilities of Service Principal authentication. If you found this post helpful, you might also be interested in my previous article, where I discuss the use of Service Principal authentication with custom connectors via the Graph API. Hope you have found this informational & thanks for reading. If you are visiting my blog for the first time, please do look at my other blogposts.
Do you like this article?
Subscribe to my blog with your email address using the widget on the right side or on the bottom of this page to have new articles sent directly to your inbox the moment I publish them.
Hello,
I was looking for connecting to Azure managed instance of SQL database from Power Platform cloud flow using service principal.
I tried to follow your steps but it throws the timeout error though I am able to connect to the database from SSMS.
Can you suggest any reasons for that?
Happy to share more details if you want.
LikeLike