The deleted sites are retained for 93 days and an Admin can restore them. In this blog post let us see how to get the deleted SharePoint site details using Microsoft Graph API application permission.
Step 1: Register an application in Azure AD and obtain the client id, client secret & tenant id for the registered application. Add Sites.Read.All Microsoft Graph application permission
Step 2: Find the list GUID of the Hidden List DO_NOT_DELETE_SPLIST_TENANTADMIN_ALL_SITES_AGGREGA which has all the deleted site information from the tenant.
Make a GET request to the following Graph API endpoint with the token generated from the above AD app using PostMan or using Graph Explorer if you are an Global or SharePoint administrator
There are activity alerts which you can setup from Security center for Deleted Site but it will send you information on the Site URL and the name of the user deleted the site, as of now it does not provide the Title, Site ID etc. So this API can provide you additional details. Hope you have found this informational & thanks for reading. If you are visiting my blog for the first time, please do look at my other blogposts.
In Power Automate cloud flow, Parse JSON action is used to access properties in JSON content enabling you to select those properties from the dynamic content list on your subsequent actions. Typically the JSON content will be from a response to an API call. The first step after adding the action is to select the source of the JSON content and to add the schema, you can either provide a JSON schema from your request payload or the action can generate based on a sample content. If you chose to generate the schema from a sample, the schema is generated based on the first object from the sample JSON content.
For the following sample JSON content, the property
Name in the first element is of type string and in the second element is of type null
EmpNo in the first element is of type integer and in the second element is of type string
Country in the first element is of type string and in the second element it does not exist
The Type of the properties in the above schema is based on the property values from the first element [Name – String, EmpNo – Integer & Location – String]
The required property only Name and EmpNo since Country is not available in the second element
In this blog post, let us see how to handle the following in Parse JSON action
Null and Multi value type property
Non Existent property
I have added the above sample content in an Array variable and the above generated schema in the Parse JSON action as shown below
Null and Multi value type property:
The sample content had elements with null property value [Name – second element] and the type of the property is different on each element [EmpNo – Integer and String]. If you run the flow, it will fail with the message ValidationFailed. The schema validation failed for the Parse JSON action and the output should have the following error in the output
Invalid type. Expected String but got Null.
Reason – Property Name in the second element null and not string as defined in the schema
Invalid type. Expected Integer but got String
Reason – Property EmpNo in the second element had string value and not integer as defined in the schema
There are two methods to solve this problem.
Method 1:
Add additional data types to the property Name [null] and EmpNo [string] as shown below
This way you will not loose the selection of properties from the dynamic content
Non Existent property:
The sample content did not have the property Country in the second element. The first check is to validate the required property from the schema
"required": [
            "Name",
            "EmpNo"
        ]
If you look above which is taken from the schema, Country is not there so all is good. The expression to get the value is
items('Apply_to_each')?['Country']
Find below screenshot of the run for the property Country from the second element
To have a meaningful output, you can write an expression to show some default text (Not Available) if the property is non existent else the actual value. Find below the expression
You can use the above condition to show some default text for null values.
Summary:
The parse JSON action makes your flow cleaner with the availability of the properties from the dynamic content panel. It is always recommended to go through the generated schema of the action and do some clean up on unwanted or not going to be used properties and do updates to the different properties based on all scenarios of the expected content. Hope you have found this informational & thanks for reading. If you are visiting my blog for the first time, please do look at my other blogposts.
Do you like this article?
Subscribe to my blog with your email address using the widget on the right side or on the bottom of this page to have new articles sent directly to your inbox the moment I publish them.
Add a Apply to each control with output selected from the array variable EmployeeArray as shown below
Add the compose action inside the Apply to each control loop to access the property Name from the array. In the compose action add the following expression to get the Name value
item()?['Name']
Find below the screenshot with the expression
For country it should be
item()?[‘Country’]
The generic expression is
item()?['Property-Name']
Hope you have found this informational & thanks for reading. If you are visiting my blog for the first time, please do look at my other blogposts.
In SharePoint Online sites, Audience targeting feature enables you to target relevant content to specific audiences enabling personalization through Microsoft 365 group, Azure AD Security group, Mail Enabled Security group or any combinations of these. The Membership type of the groups can be both Assigned and Dynamic. Target audience(s) can be defined on modern SharePoint pages, News post, Navigation links and as well as items on document libraries. I have used this feature for my customers on many instances to target News articles to specific audiences, but the challenging part is the content creator or Author of the News post should remember the name of the groups. In this post, let us see how to make the audience targeting for SharePoint online News post easier using
Term Store
Power Automate Cloud Flow
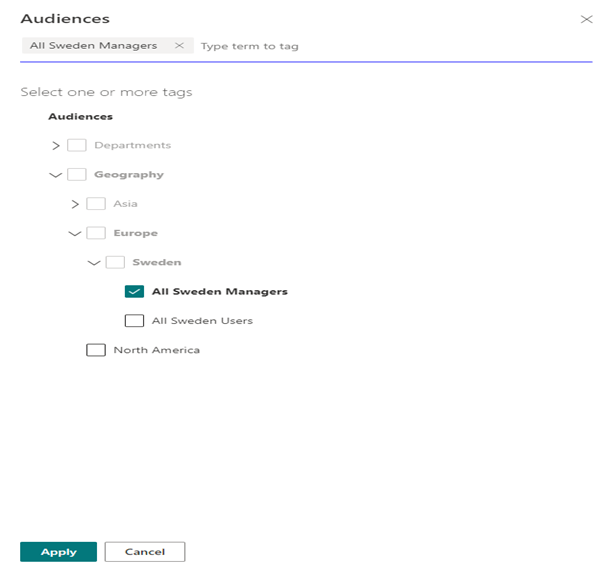
Find below the snapshot from the Page Details section of the News page
Isn’t the above easier than remembering name of the groups to target content?
Pre-requisite:
Access to create Power Automate cloud flow
SharePoint
A SharePoint site with Audience Targeting enabled
Site Owner or Administrator access
Access to Create terms @ tenant level or site collection level
Azure AD Groups
Service account with the permission level Full Control or Contribute on the SharePoint site with the Audience Targeting enabled
Term Set Creation & Group Mapping:
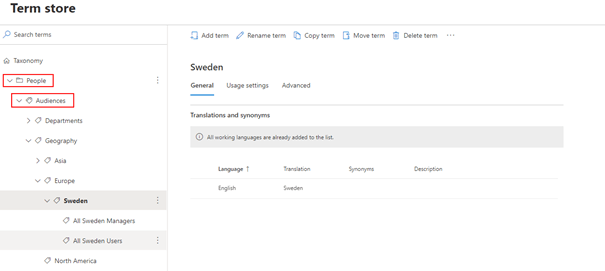
The first step is to create a Term set at tenant level or local (Site Collection) level for storing the group information based on your organizational hierarchy. The term set will be used to target content in SharePoint News post. Find below the term set Audiences I have created at tenant level under the term group People
Based on the hierarchy or needs, you can enable or disable tagging at any term level
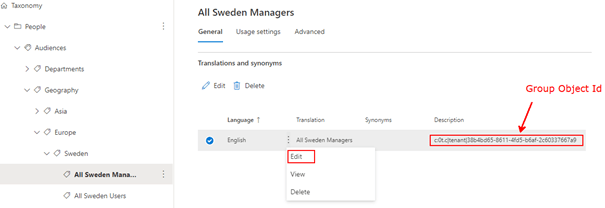
After you identify the Azure AD groups to be mapped against each term, have the group object id in the below format
Select the appropriate term which is available for tagging, click Edit to add the group object id in the above format in the description field as shown below
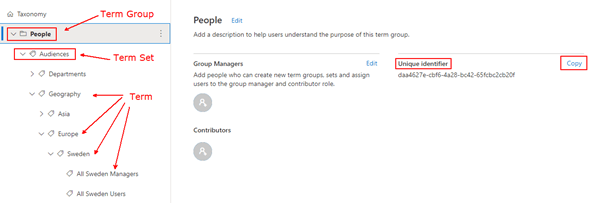
After the mapping of term set & groups are done in the Term Store Management interface, copy the Unique Identifier (GUID) of the Term Group (People) and Term Set (Audiences) and keep it handy which will used in the Power Automate flow later
Settings in SharePoint Online site for Audience Targeting:
In the SharePoint online communication or Teams site
Step 1: Enable the audience targeting feature on the page library as per the instructions in this article. As soon as the feature is Enabled, there will be a column Audience added to the Site Page content type at the Page Library level. There can be a maximum of 50 groups added to the audience field.
Step 2: Create a Managed Metadata site column by the name Audiences with the setting Multiple Value Field mapping to the termset Audiences created above from the Term Store management. The managed metadata column can also be created at a Term level instead of a Term set. Once the site column in created, add the site column to the content typeSite Page as shown below
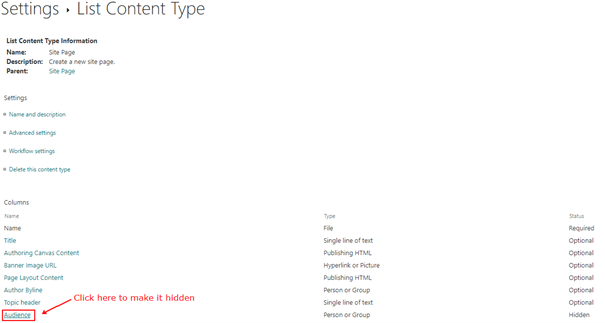
Step 3: Hide the default Site Column Audience from the Site Page content type at the Pages Library settings as shown below
Click the Audience field and make it hidden as shown below
Step 4: Grant the Service account access to the SharePoint site, either as a Site Administrator or Site Owner. The Service account will used in the Power Automate flow to update the Audience field from the values obtained from the Managed metadata column.
Automated Power Automate Cloud flow:
The Power Automate cloud flow will be used to get the claim information of the group stored in the description field of each Term in the Audiences Term set. This flow will be triggered after the News Post is published by the author.
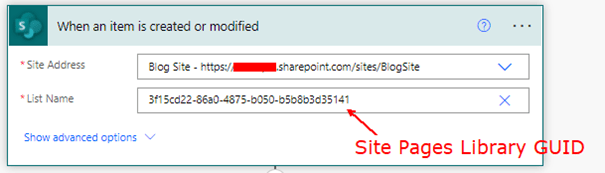
Step 1: Create an Automated flow with the SharePoint trigger When an item is created or modified. The trigger Created or Modified is to make sure it fires whenever there is a change in the Audiences managed metadata column information. Enter the site address of the SharePoint site in context and the Library Guid of the Site Pages Library.
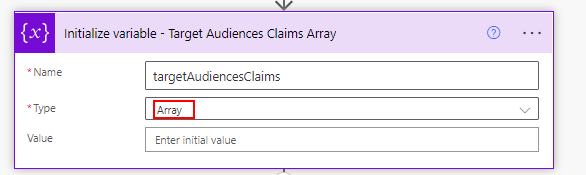
Step 2: Add the action Initialize variable of type Array as shown below
The Array variable will be used to create an array of group claim values selected from the Term description field.
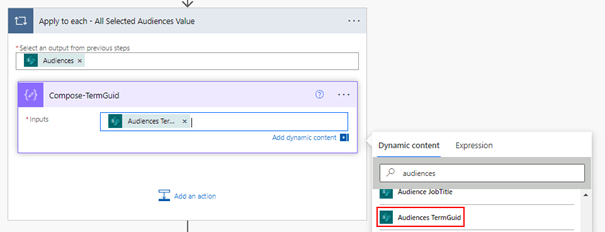
Step 3: This step is to create the array of group claims based on the users selection from the Managed metadata column.
Add a Compose Action and add the property Audiences TermGuid from the trigger When an item is created or modified. This step will automatically create the Apply to each control, since the Managed metadata column allows multiple selection
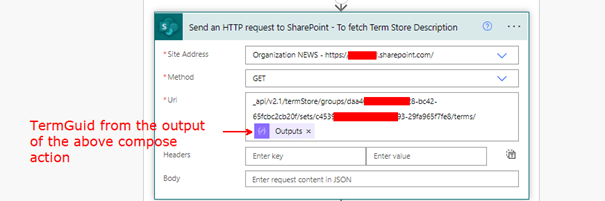
Add the action Send an HTTP request to SharePoint with the below parameters
Replace the term group and term set guid on the Uri based on the information copied earlier from the Term Set Management interface. In the Uri, after terms it is the output of the compose action added in Step 2. If your Term Set is at the Site collection level, the site address should be the site URL
For references on the API endpoints, refer to the Graph API documentation for Taxonomy
Add a compose action to store the term description (Group Claim) extracted from the Term set api response. To directly get the description value from the response, the following expression will work
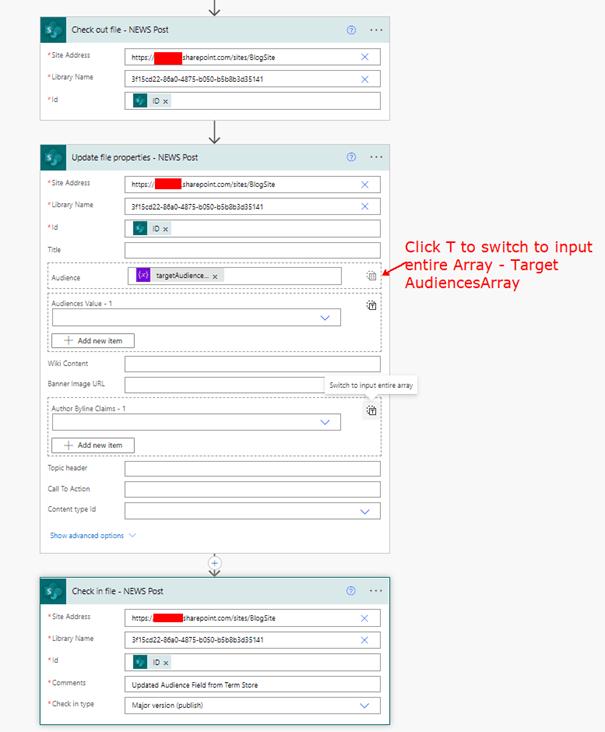
Step 4: The information to update the audience field is available in the array variable targetAudiencesClaims. So the next step is to update the Audience property in SharePoint News post, to do so add the action Check out file, Update file properties and Check in file as shown below
Enter the Site Address and Library Name information, the Id field should be from the dynamic content of the trigger When an item is created or modified. The Audience property in the action Update file properties should be the output of the Array variable targetAudiencesArray
Note: Click the button T on the property Audience to switch to input entire array from the variable.
Trigger Conditions:
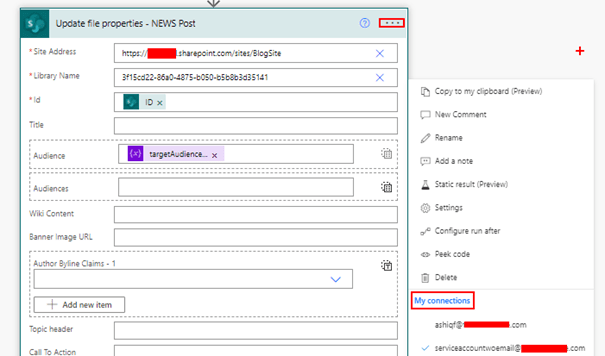
There is an issue with the above update, the flow will result in infinite trigger loop due to the trigger type When an item is created or modified. To overcome this problem, the update must be done using a service account and Trigger conditions. Find below the connection setting using a service account for Update file properties action, replicate the same setting for the Check out file and Check in file
Add the following Trigger Conditions from the settings of the trigger When an item is created or modified for
To trigger only when a News post with major version is published
Target audience feature is SharePoint is one of the most useful feature in setting up intranet leveraging Microsoft 365 services and I hope this can complement the rich features Microsoft 365 already has. I will write in future how to deploy this flow automatically to different SharePoint sites. Hope you have found this informational & thanks for reading. If you are visiting my blog for the first time, please do look at my other blogposts.
Do you like this article?
Subscribe to my blog with your email address using the widget on the right side or on the bottom of this page to have new articles sent directly to your inbox the moment I publish them.
SharePoint Online Pages library is a container for different type of pages (News post, Page, Space, News Link) created in a Communication or Team site. There can be various scenarios to have a Power Automate Flow associated to a SharePoint Site pages library to handle additional processes after a Page or a News post is published. In this blog post, let us see how to
Trigger the flow if a News post is published
Trigger the flow only for Major versions
Trigger the flow for a specific Content Type
Avoid infinite trigger loop on an Item Created/Modified trigger if a page/list item is updated by the flow
using Trigger Conditions. Trigger conditions can be used on a trigger to stop your Automated Flow from running if the conditions are not met. Unnecessary flow runs can spend your quota limits based on the license types without providing any value. To begin with, create an automated cloud flow with the SharePoint trigger When an item is created or modified and configurations for the Site Pages Library. Once you provide the Site URL where your Site Pages library exists, you will notice the Site Pages library doesn’t show in the drop-down. In the List Name property, just provide the guid of the library instead.
To get the guid, browse to the Site Pages library on the SharePoint site, go to Library settings and select the value after the List= parameter on the URL after decoding.
Trigger the flow if a News post is published
There can be scenarios to trigger the Flow when a News post is created or modified. A SharePoint property PromotedState can help identify if the SharePoint page is a News post or a normal page since all the different types of pages are stored in the same library.
Label
Value
What it means
NotPromoted
0
Regular Page
PromoteOnPublish
1
News post in draft mode
Promoted
2
Published News post
The trigger condition will make sure the trigger is fired only when ever there is a News Post is published or Saved as draft (All Major and Minor versions).
The following trigger condition will make sure to fire only for Major versions (1.0, 2.0, 3.0 etc) and not for minor versions aka draft version (0.1, 0.2 etc)
@contains(triggerBody()?['{VersionNumber}'],'.0')
Trigger the flow for a specific Content Type
Content types in SharePoint are a set of columns that are grouped together to serve a specific type of content (Crisis News, Marketing News etc). A Page or a News post in a SharePoint site can be associated with content types. The trigger condition for the flow to be triggered only for a specific content type is
@equals(triggerOutputs()?['body/{ContentType}/Name'], 'Name of the Content Type')
Avoid infinite trigger loop on an Item Created/Modified trigger if a page/list item is updated by the flow
In your Automated cloud flow, if you have the Created or Modified trigger with an action to update the same item then there will be an infinite trigger loop.
The Flow checker will provide you a warning Actions in this flow may result in an infinite trigger loop. To overcome the above warning, trigger condition to the rescue.
How it will be done
The update item action on the flow should use a different connection (Service Account) in the flow, other than the user who will be using the site to create or update pages. The trigger condition will make sure the flow run will not happen if the update to the Page or News post is done by the service account using the Update item action. SharePoint Library and List has the out of the box column Modified By which holds the information on who has recently updated the item be it from the SharePoint UI or through program. The trigger condition will be written based on this column Modified By, if the column value has a different value other than the service account then the flow will be triggered.
Step 1: Create a service account with password never set to expire. Licenses are not required for this account if the flow connection is going to be used only on SharePoint connectors. Password setting Never Expires will make sure the connection is not invalidated due to a password change on the account.
Step 2: Grant edit access for the service account to the SharePoint site. This step allows the account to updates to the List or Library item.Step 3: Add a new connection to the service account
Step 4: Add the following trigger condition to the SharePoint trigger if the service account does not have an Exchange Email License
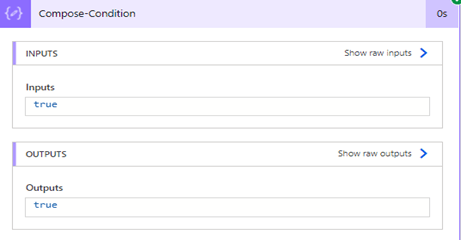
Before adding the condition to the trigger, evaluate the condition on a compose action using expressions and data fields selected from Dynamic content.
After the condition is added on the compose action, click Peek code
Copy the expression from the inputs parameter
The condition to be added on the trigger must be True for the trigger to fire.
Summary:
Trigger conditions are powerful if used wisely to avoid unnecessary runs. I’ve shown some examples from the SharePoint pages library but it can be used on List trigger as well. The trigger can be written based on any data available on the trigger output. Hope you have found this informational & thanks for reading. If you are visiting my blog for the first time, please do look at my other blogposts.
Do you like this article?
Subscribe to my blog with your email address using the widget on the right side or on the bottom of this page to have new articles sent directly to your inbox the moment I publish them.
Content type x-www-form-urlencoded is used generally to send text data in a query string in the form of name value pairs separated by ampersand. In this blog post, let us see how to use the content-type
x-www-form-urlencoded
in a Power Automate custom connector. Refer to this post, if you would like to find out how to use it in a HTTP connector. Find below the screenshot from postman with an API from Twilio (Sample) to send a WhatsApp message with content type x-www-form-urlencoded
x-www-form-urlencoded in a Custom Connector:
The x-www-form-urlencoded content type has its form data which is encoded and sent in a single block on the HTTP request body.
Custom Connector:
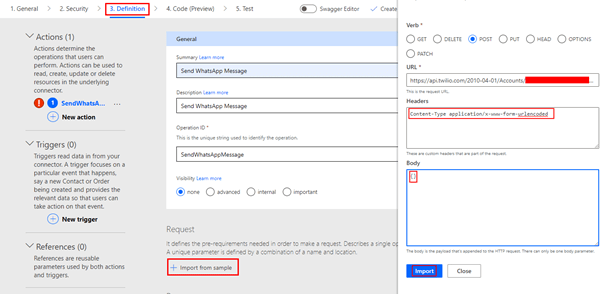
To call the above API with the content type x-www-form-urlencoded in a custom connector, the first step is to create a connector from blank with the authentication type filled in (Basic, API Key etc) on the security tab. Now Add a New action to the call the above API. Click + Import from sample to enter details of the API request like Verb, URL and Headers (Content-Type application/x-www-form-urlencoded) and Body. For Body, just add {}. The content on body will sent on the Power Automate cloud flow. PFB screen shot for the action definition
After the above details are entered, click Import.
In the Request section, click the Content-Type under Headers, enter the default value application/x-www-form-urlencoded and then make it required with the visibility set to Internal. This setting will hide the parameter from the cloud flow
Make the body required. Create the connector after all the details has been entered.
Custom Connector in Power Automate Cloud Flow:
The form values to be sent on the API request body with x-www-form-urlencoded implementation must be encoded & the values must be separated by ampersand. Expression encodeUriComponent can be used to encode the form values.
In the Cloud flow, add a compose action with all the values encoded and separated by ampersand (&). Now add the custom connector action which will prompt you to create a connection. In the body section, from the dynamic content select the Outputs of the compose action.
Hope you have found this informational & thanks for reading. If you are visiting my blog for the first time, please do look at my other blogposts.
Do you like this article?
Subscribe to my blog with your email address using the widget on the right side or on the bottom of this page to have new articles sent directly to your inbox the moment I publish them.
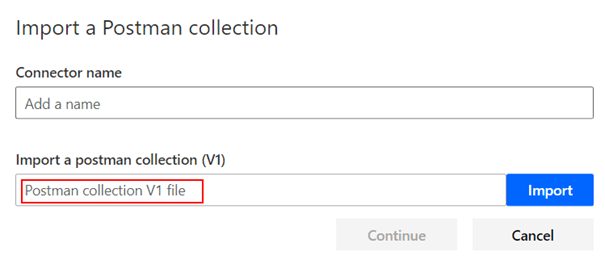
Postman collections makes the creation of custom connectors in Power Automate easier & quicker. As of time I am writing this article, to create a custom connector using Postman collection in Power Automate the version of Postman collection has to be V1. The current version of collections exported from Postman is V2. There is a NPM package by the name Postman Collection Transformer to rescue which helps converting the collection to V1 and vice versa.
Step 4: V1 Postman collection is ready, you can now proceed with the creation of custom connector in the flow portal.
As pointed out by Richard Wilson, there are third party portals (Requires Registration) available which helps in converting the format of the Postman collection.
Hope you have found this informational & thanks for reading. If you are visiting my blog for the first time, please do look at my other blogposts.
Do you like this article?
Subscribe to my blog with your email address using the widget on the right side or on the bottom of this page to have new articles sent directly to your inbox the moment I publish them.
Content type multipart/form-data is used to send both text and binary data to the server and x-www-form-urlencoded is used more generally used to send text data in a query string in the form of name value pairs separated by ampersand. In this blog post, let us see how to use the content-type
multipart/form-data
x-www-form-urlencoded
in a Power Automate or Logic apps HTTP action to post data with an API which has implemented the content-type. Find below the screenshot from postman with a sample API
multipart/form-data in HTTP Action:
From the above screenshot, the API is called using the content type multipart/form-data. The multipart refers to the data (in the above screenshot it is To, From & Body) which is divided into multiple parts and sent to server. For each key value pair aka part, you will have to construct something like
{
      "headers": {
        "Content-Disposition": "form-data; name=\"KEY\""
      },
      "VALUE": "what ever value you would like to send"
}
Backslash is used close the Content-Disposition header value else you will get Invalid-JSON.
To call the API displayed from the above screenshot on the HTTP Action, the body of the HTTP action should have the two attributes $content-type and $multipart as shown below
{
  "$content-type": "multipart/form-data",
  "$multipart": [
    {
      "headers": {
        "Content-Disposition": "form-data; name=\"To\""
      },
      "body": "whatsapp:+123456"
    },
    {
      "headers": {
        "Content-Disposition": "form-data; name=\"From\""
      },
      "body": "whatsapp:+178910"
    },
    {
      "headers": {
        "Content-Disposition": "form-data; name=\"Body\""
      },
      "body": "Your appointment is coming up on July 21 at 4PM"
    }
  ]
}
You can upload files using the form-data content type
The file content can be the output of the SharePoint or OneDrive connector.
x-www-form-urlencoded in HTTP Action:
The x-www-form-urlencoded content type has its form data which is encoded and sent in a single block on the HTTP request body. To call the sample API from the screenshot posted at the top of this post in the HTTP Action, the form values must be encoded & the values be separated by ampersand. Expression encodeUriComponent can be used to encode the form values
Headers:
Key: Content-Type
Value: application/x-www-form-urlencoded
Body (Separated by &):
Key=Value&Key=Value
Find below screenshot for your reference
Hope you have found this informational & thanks for reading. If you are visiting my blog for the first time, please do look at my other blogposts.
Do you like this article?
Subscribe to my blog with your email address using the widget on the right side or on the bottom of this page to have new articles sent directly to your inbox the moment I publish them.
SharePoint connector in Power Automate is very rich with various actions that can make the developers or makers life simple when it comes to interacting with SharePoint data. There might be some actions like
Breaking permission to a list item
Creating a site
Adding user to a SharePoint group etc
which is not possible through the SharePoint standard connector or MS Graph API as of the time I am writing this article, SharePoint REST API to rescue. The SharePoint online REST API enables developers to remotely interact with SharePoint data. There is an action Send an HTTP request to SharePoint which could come handy in many scenarios, the point to note here is the action uses the context of user aka flow creator while executing the API. In this blogpost, let us see how to call a SharePoint REST API to create a Modern SharePoint communication site as an application in a Power Automate cloud flow using the HTTP connector with the help of a Self-Signed certificate. Find below the list of steps to enable calling the SharePoint REST API using certificate credentials
Creation of Self-Signed certificate
Application Registration in Azure AD Portal
Creation of Power Automate cloud flow with the HTTP Connector
Method 1: Without using Azure Key Vault
Method 2: Azure Key Vault to store Certificate
Pre-Requisites:
Access to HTTP Premium Connector in Power Automate
Register an application in Azure AD and obtain the client id & tenant id for the registered application. In this example I have added the Sites.Read.All Application permission with Admin Consent to create the SharePoint communication site, this permission is more than enough to create the site as an Application. Grant appropriate permission based on the requirements, for e.g to break permission on list items grant Sites.Manage.All. Find below screenshot for your reference for granting permissions
To add the above created self-signed certificate, click Certificates & secrets under the Manage blade. Click Upload certificate > Select the certificate file MSFlow.cer > Add
Creation of Power Automate cloud flow with the HTTP Connector:
Let us see below how to access the SharePoint REST API to create a SharePoint site with & without using the Azure Key Vault.
Method 1: Without using Azure Key Vault
Method 2: Azure Key Vault to store Certificate
Method 1: Without using Azure Key Vault
In the cloud flow, add a Compose action to store the PfxBase64 value copied during the creation of the certificate. Now add the HTTP action to create a Modern Communication site
Password: Certificate password given during the creation
Find below screenshot for your reference
Run the flow, it should be able to create the Site. Find below screenshot of the flow run
Method 2: Azure Key Vault to store Certificate
Azure Key Vault is a cloud service for storing and accessing secrets enabling your applications accessing it in a secure manner. Follow my blog article which I have written to call a Microsoft Graph API with Certificate using a Azure Key Vault to store the certificate
Custom Connector can be used to call a SharePoint REST api in the context of the user. If you are visiting my blog for the first time, please do look at my other blogposts.
Do you like this article?
Subscribe to my blog with your email address using the widget on the right side or on the bottom of this page to have new articles sent directly to your inbox the moment I publish them.
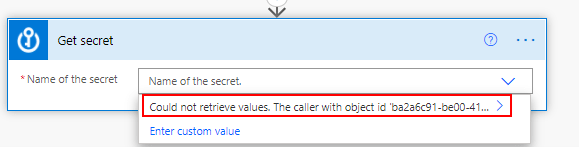
Recently I was trying to connect Azure key vault to retrieve certificate details using the action called Get Secret in a cloud flow, as of the time writing this article I am not able to successfully establish the connection. It gave me an error Could no retrieve values as shown below instead of prompting me to enter the credentials to create the connection successfully.
To create a successful connection, follow the steps outlined
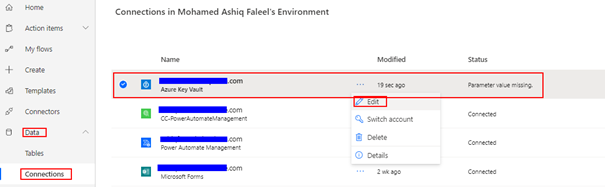
Step 1: Go to the Connection as shown below from the Left navigation bar > Select the Azure Key vault connection > Edit.
The first step of adding the Get Secret action in flow would have created the connection with the status Parameter value missing
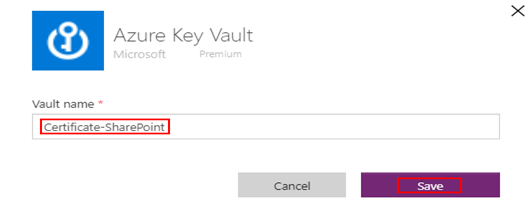
Step 2: Enter the name of the Azure Key vault and click Save
Step 3: Click Fix connection & sign in using the account which has access to the Azure Key Vault. After this step, the status will be connected.
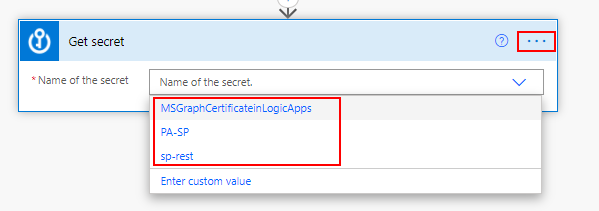
Step 4: Go back the cloud flow which has the action, the action would now be able to get the secrets from Key Vault as expected. To make sure the action has the correct connection, click the three dots and verify from the My connections list
Summary:
Hope Microsoft fixes this issue for the Azure Key vault connector. I have used Azure Key vault to store Secret & Certificates for authenticating against MS Graph to access its rich api endpoints. Hope you have found this informational & thanks for reading. If you are visiting my blog for the first time, please do look at my other blogposts.
Do you like this article?
Subscribe to my blog with your email address using the widget on the right side or on the bottom of this page to have new articles sent directly to your inbox the moment I publish them.