
Content type x-www-form-urlencoded is used generally to send text data in a query string in the form of name value pairs separated by ampersand. In this blog post, let us see how to use the content-type
- x-www-form-urlencoded
in a Power Automate custom connector. Refer to this post, if you would like to find out how to use it in a HTTP connector. Find below the screenshot from postman with an API from Twilio (Sample) to send a WhatsApp message with content type x-www-form-urlencoded

x-www-form-urlencoded in a Custom Connector:
The x-www-form-urlencoded content type has its form data which is encoded and sent in a single block on the HTTP request body.
Custom Connector:
To call the above API with the content type x-www-form-urlencoded in a custom connector, the first step is to create a connector from blank with the authentication type filled in (Basic, API Key etc) on the security tab. Now Add a New action to the call the above API. Click + Import from sample to enter details of the API request like Verb, URL and Headers (Content-Type application/x-www-form-urlencoded) and Body. For Body, just add {}. The content on body will sent on the Power Automate cloud flow. PFB screen shot for the action definition
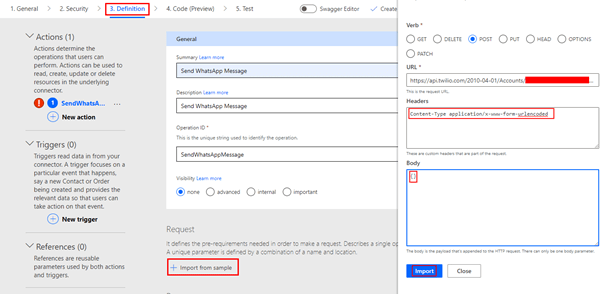
After the above details are entered, click Import.
In the Request section, click the Content-Type under Headers, enter the default value application/x-www-form-urlencoded and then make it required with the visibility set to Internal. This setting will hide the parameter from the cloud flow

Make the body required. Create the connector after all the details has been entered.
Custom Connector in Power Automate Cloud Flow:
The form values to be sent on the API request body with x-www-form-urlencoded implementation must be encoded & the values must be separated by ampersand. Expression encodeUriComponent can be used to encode the form values.
In the Cloud flow, add a compose action with all the values encoded and separated by ampersand (&). Now add the custom connector action which will prompt you to create a connection. In the body section, from the dynamic content select the Outputs of the compose action.

Hope you have found this informational & thanks for reading. If you are visiting my blog for the first time, please do look at my other blogposts.
Do you like this article?
Subscribe to my blog with your email address using the widget on the right side or on the bottom of this page to have new articles sent directly to your inbox the moment I publish them.
