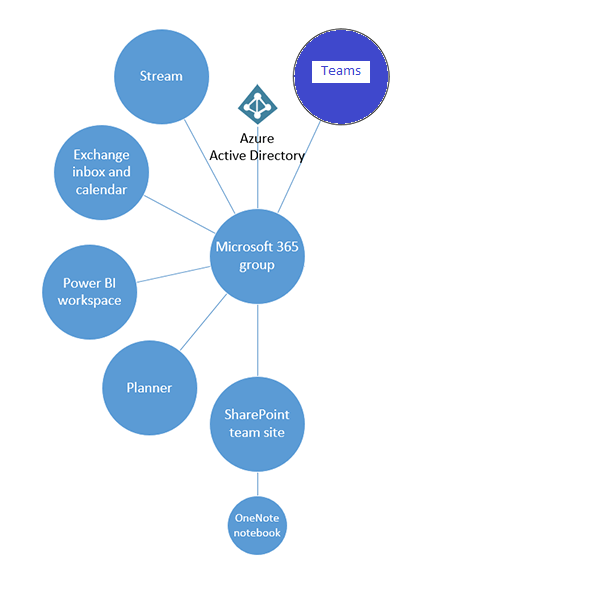
When you create a Microsoft Team, a Microsoft 365 group is created to manage the team membership like Owners, members, guests. I would rather say the Microsoft 365 group is a backbone of a Team. Through the group you also get an email address for the MS team. Find the other Microsoft 365 services which gets created per this documentation whenever there is a Team provisioned
On this blogpost let us see how to enable a team which can also act as an email distribution list so that you can send an email to all the team members, by default this option is disabled. You will have to be an Owner of the team to set this up. There are couple of ways to do this
Graph Explorer
Outlook
Exchange Online Powershell
Exchange Online Administrator
Graph Explorer:
Graph explorer is a utility that will let you make requests and get responses against the different graph endpoints as a signed in user (Delegated User). To enable the email distribution functionality, we will have to get the group id of the team for setting a value to True for the property autoSubscribeNewMembers. To get the Group Id information go to the Team and click the Get link to team as shown below
Copy the content from the popup which should be in the below format
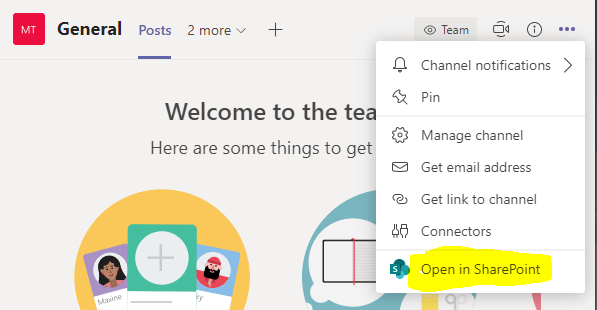
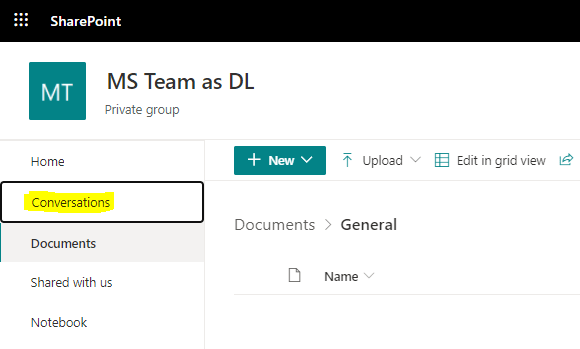
The Microsoft 365 group inbox for a Team is not available in Outlook but it can be accessed through the SharePoint site associated to the group. Open the SharePoint site from any of the Teams channel as shown below
On the Group Settings popup, enable the Subscription as shown below and then Save it. By default this setting is disabled for the Microsoft 365 group.
Exchange Online PowerShell:
The same setting can also be enabled from Exchange online PowerShell if you have Exchange online Administrator access on the tenant. Make sure the Exchange online PowerShell module is installed. Follow the steps below to turn on AutoSubscribeNewMembers which distributes emails to all users
Load the module by the running the command Import-Module ExchangeOnlineManagement
To disable the setting: Set-UnifiedGroup -Identity ” Team Display Name ” -AutoSubscribeNewMembers:$false
Refer to the documentation from Microsoft for more Exchange online commands related to the Microsoft 365 group.
Exchange Online Administrator
Login into the Exchange Online Admin center and click on Groups from the dashboard section. Execute the below steps
Find the group associated to the team (Team Display Name) from the list and then select
Click on Edit (Pencil Icon) from the ribbon
On the General tab, Enable the property Subscribe new members and then Save
Summary: The same setting can also be applied to a Team created through a Microsoft 365 group. Hope you have found this informational. There were already lot of blogs talking about groups
On this blogpost let us see how to add a custom domain and configure exchange email address for the added domain in a Microsoft 365 tenant. This will allow you to create M365 identities for the users in the Microsoft 365 tenant like user@domain.com instead of user@domain.onmicrosoft.com. This setup is also required if you have a Hybrid setup with users from Onpremise Active directory. Azure AD connect tool helps you synchronize your AD identity from Onpremise to Azure AD or Microsoft 365 tenant directory only if there is a custom domain added to the directory. The custom domain can be added from Microsoft 365 tenant admin center or Azure Active directory portal associated to the M365 tenant.
Pre-Requisites:
Own a Domain from any domain providers
Global administrator of Microsoft 365 tenant
If you don’t add a domain, user account in your organization will use the default onmicrosoft.com domain for their email address and UPN. To setup and configure a custom domain, you will have to
Add a TXT or MX record
Add DNS records to connect Microsoft 365 services
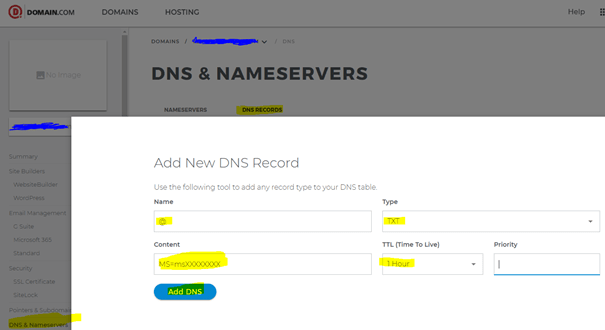
For this blog post I have used Domain.com provider to add the DNS records for the custom domain
Add a TXT or MX record:
The first step is to prove you are Owner of the domain and also make the domain is not associated to different tenant. To generate the DNS record values and to add the custom domain login to the Microsoft 365 Admin Center
Select Show all > Settings > Domains
Click Add domain
Enter the custom domain name you own
Click on the button Use this domain
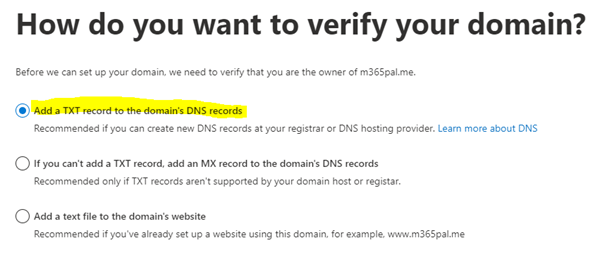
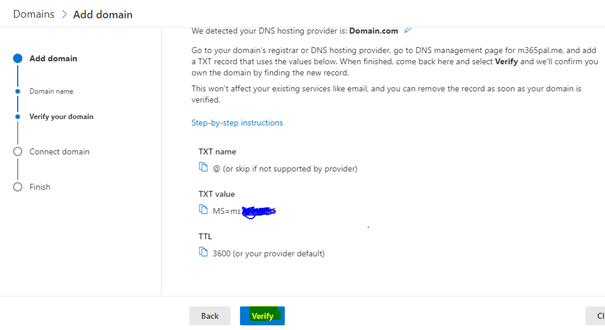
Select Add a TXT record to the domain’s DNS records but you can also add a MX record or add a text file to the domain’s website. Find the different options
The DNS record values for the TXT record will be generated as shown below. TTL 3600 seconds is 1 hour
Add the DNS record for TXT from the domain provider interface for managing the records
Go back to the Admin center and then click Verify. It takes around 15 mins to an hour for the DNS records to propagate, sometimes it may even take more time. Keep trying till the domain in verified. Once the domain is verified you will be able to proceed to the next step for configuring the Microsoft 365 services like exchange etc. You can also Skip and do the configuration later but with this setup you can create user accounts by using the custom domain as its UPN e.x user@domain.com without email address. Find instructions on this link to add a custom domain from Azure Active directory portal.
Add DNS records to connect Microsoft 365 services:
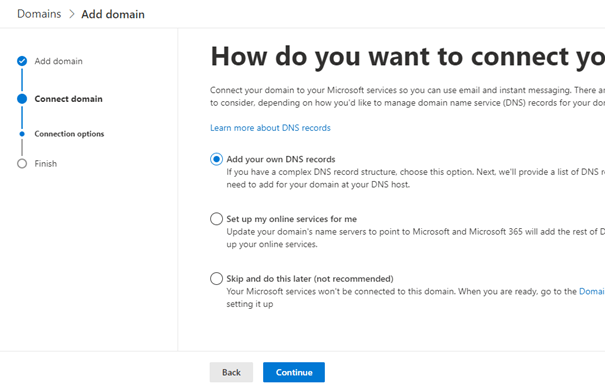
The domain is added & verified, now its time to connect the Microsoft services like Email (Exchange Online, Outlook), Mobile device Management aka MDM with the custom domain. On this post will be connecting only to Exchange online to receive email through Microsoft 365. After this setup is done Exchange online will be your new email host for the domain. After the domain is verified from the step above, select Add your own DNS records and click Continue button as shown below
The following DNS records will be generated as shown below
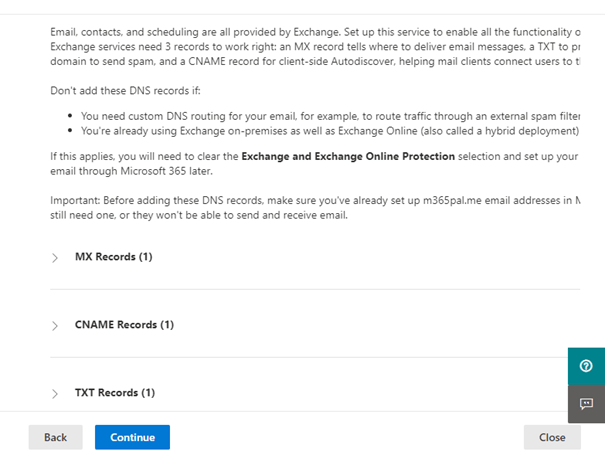
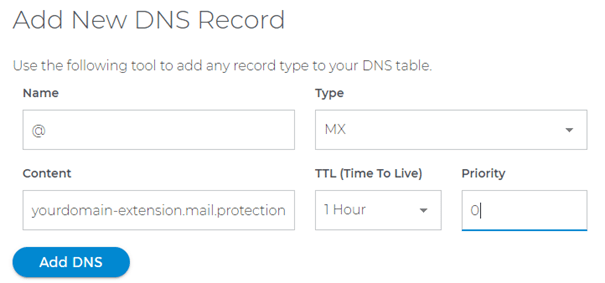
MX Records (Mandatory)
Sends incoming mail for your domain to the Exchange Online service in Office 365. Mails are delivered to the mail exchange server with the lowest preference number for this record, typically.
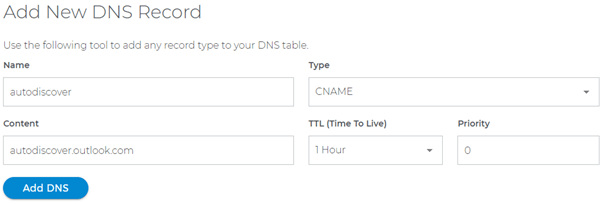
CNAME Records (Optional: For Outlook client to work)
Helps Outlook clients to easily connect to the Exchange Online service by using the Autodiscover service. Autodiscover automatically finds the correct Exchange Server host and configures Outlook for users
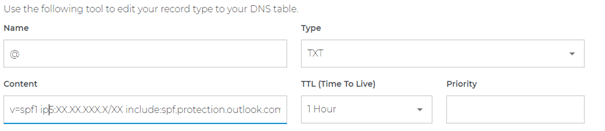
TXT Records (Optional: SPF record for prevention of spamming)
Helps to prevent other people from using your domain to send spam or other malicious email. Sender policy framework (SPF) records work by identifying the servers that are authorized to send email from your domain
Go back to the domain hosting provider interface to add the above DNS records, to get the values for each record expand each record shown on the above interface.
MX Record:
Set the priority to the Highest or to the number 0 and then add the DNS record. If the domain is xyz.com
There can be only one SPF record on the DNS records so if there are another record already (default), refer this link for more information. I already had the default one so the valye for the TXT record looked like v=spf1 ip5:XX.XX.XXX.X/XX include:spf.protection.outlook.com -all
ipX:XX.XX.XXX.X/XX is the default one
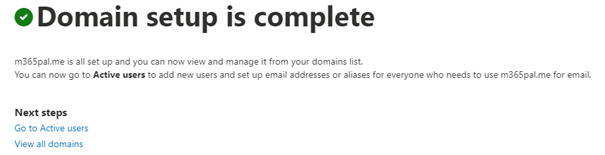
Now after all the DNS records are added, choose Continue. This will take you to the last page of the wizard with the message Domain setup is complete
Now the setup is completed, you can create users using the new custom domain or change an existing users UPN and email address on Admin center with the following steps
Select the new alias and if required change it to the primary email.
Summary: On this post we have seen how to configure a custom domain with email. There can also be multiple domains in one tenant. Hope you have found this informational. Let me know any feedback or comments on the comment section below
This blogpost will help you to explore and interact with MS graph API endpoint’s using the following tools
Postman client
Signed in as a user/On-behalf-of API call (Delegated permission)
Application/daemon API call (Application permissions)
Graph Explorer
I have used MS graph extensively on different MS cloud services like SharePoint, PowerAutomate, PowerApps, Azure services like Azure functions and on devices like Raspberry Pi. It is a very powerful service in Microsoft 365 platform. Let start with some basics
Introduction:
MS Graph API is a RESTful web API which enables you to access different Microsoft 365 cloud service resources through its unified programmability model.
Microsoft Graph exposes REST APIs and client libraries to access data on the following Microsoft cloud services:
Microsoft 365 services: Delve, Excel, Microsoft Bookings, Microsoft Teams, OneDrive, OneNote, Outlook/Exchange, Planner, SharePoint, Workplace Analytics.
Enterprise Mobility and Security services: Advanced Threat Analytics, Advanced Threat Protection, Azure Active Directory, Identity Manager, and Intune.
Windows 10 services: activities, devices, notifications, Universal Print (preview).
Dynamics 365 Business Central.
Permission Types:
MS Graph exposes granular permissions that controls the access of the apps that has to the different resources like sites, users, groups etc. There are two types of permission
Delegated permissions are used by apps that have a signed-in user present. For these apps, either the user or an administrator consents to the permissions that the app requests and the app can act as the signed-in user when making calls to Microsoft Graph.
Application permissions are used by apps that run without a signed-in user present. For e.g Apps that run as background services or daemons. Application permissions can only be consented by an administrator.
Access token:
To call a MS Graph API all you need is an access token in the authorization header of an HTTP request.
The access tokens are issued by the Microsoft identity platform which contains information to validate if the requestor has appropriate permissions to perform the operation they are requesting. An active directory app is a pre-requisite to generate an access token to call a Graph API endpoint.
There are also Microsoft identity platform authentication libraries for .NET, JS Android, Objective-C, Python, Java, Angular facilitating validation, cookie handling, token caching and on maintaining a secure connection. Let’s now go ahead and see the tools
MS Graph Explorer:
Graph explorer is a web-based tool which can be used to build and test requests using Microsoft Graph API. The explorer can be accessed from the following URL:
There will be a default Active directory application on the Organizational Active directory of the M365 tenant by the name Graph Explorer with application id de8bc8b5-d9f9-48b1-a8ad-b748da725064. This app can be accessed from the Enterprise applications blade of the Active directory as shown below
Delegated permissions are used by Graph Explorer. Based on your access role & admin consent’s you would be able to call different Microsoft Graph API from this tool. After you have signed into the Graph Explorer tool, the access token will be generated automatically
To view the token information, copy the token and paste it on the utility https://jwt.ms/
If your token has a scp (Scope) claim, then it’s a user based token (Delegated permissions). It is a JSON string containing a space separated list of scope the use has access to call different graph endpoints. You can also find other information related to the issued token, token issued at (iat), expirty not before (nbf), expiry time (exp). The data is in UNIX time stamp but you can convert this information to standard time using the online URL
Postman is a tool that can be used to build and test requests using the Microsoft graph API’s. To use this tool for testing the Graph API endpoint’s, register an app in Azure Active directory as per the instructions from this blog post. Provide the permission (Delegated & Application) as per your need to test it using Postman.
Copy the client id, client secret & tenant ID of the registered app. To access the various endpoints like authorization and token, click on the Endpoints from the Overview section of the Active directory app.
Setting up the environment using Postman collections:
There are Postman collections with many MS graph API requests created by Microsoft for us to explore. Import the collections and setup the environment (Client ID, Client secret, tenant id) for Application API calls and on-behalf-of API calls as per the instruction from the following article
To generate an application token, make a POST request to Get App-Only Access Token from the collection Microsoft Graph. The grant_type is client_credentials since it is Application permissions.
Token Validity:
The token is valid for 3599 seconds which is 1 hour. Post that the token will expire, you will have to regenerate the token by making another call.
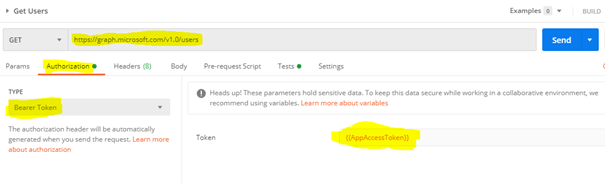
The AccessToken (Application API call) will be generated and automatically stored on the Environment (Microsoft Graph environment) AppAccessToken with the help of a script on the Tests tab in Postman. Copy the access token value & paste it on the utility https://jwt.ms/. Find the decoded token below which has information like the Application ID/client id of the AD app, display name and roles to which the app has access to poll the graph endpoint.
Graph API call:
The call to the Graph should have the bearer token
Signed-in user/on-behalf-of API Token:
To generate a Signed-in user token, make a POST request to Get user Access Token from the collection Microsoft Graph. The grant_type is password since it is delegated permissions.
The AccessToken (Signed-in user API call) will be generated and automatically stored on the Environment (Microsoft Graph environment) UserAccessToken with the help of a script on the Tests tab in Postman.
Copy the access token value & paste it on the utility https://jwt.ms/. Find the decoded token below which has information like the Application ID/client id of the AD app, display name and scopes (scp) to which the app has access to poll the graph endpoint. If you remember the Application API token had roles & not scopes, so this is how you can identify the token type.
Storing the production User ID and password is not recommended on the Environmental variables since the information is stored in Postman but this can be handled by generating an access token from the request Authorization tab, set the type as OAuth 2.0 and click Get New Access Token button
Fill in all the information gathered from the App in Azure AD like Appid, Secret, Endpoints (Authorization and Token), state can be any random value
Click Request token, this will prompt the user to enter the Username and password. After authentication, it will generate the token which could be used further to make API calls.
Graph API call:
The call to the Graph should have the bearer token on the Authorization tab or on the Headers tab
Summary: On this post we have seen how to use tools like Graph explorer & Postman to test different MS graph API endpoints. You can make requests like GET, POST, PUT, PATCH, DELETE based on its availability. Refer to the Microsoft documentation for v1.0 and beta endpoints. Once you have explored & tested the API, you are ready to use on applications using the available SDK’s for different programming languages. Let me know any feedback or comments on the comment section below
If your organization is using a hybrid cloud environment, this post will shed some light to integrate on-premise resources with Microsoft 365 & Azure services. Hybrid integration platforms allows enterprises to better integrate services and applications in hybrid environments (on-premise and cloud). In this blog post, I will write about the different services & tools available with in Microsoft Cloud which allows you to connect or expose your On-premises data or application in Office 365. There are still many enterprise organizations on Hybrid mode due to various factors. It can be a challenging task to integrate your on-premises network but with right tools & services in Office 365 & Azure it can be easier. Find below the high-level overview & some references on how to
Access your on-premise data in Power Platform & Azure Apps (Logic Apps, Analysis Services & Azure Data factory)
Programmatically access your on-premise resources in your Azure Function app
Access on-premise resources in Azure automation account
Expose your on-premise Application or an existing WEB API in Office 365 cloud
Access on-premise data in Power Platform & Azure Apps (Logic Apps, Analysis Services & Azure Data factory):
The on-premises data gateway allows you to connect to your on-premises data (data that isn’t in the cloud) with several Microsoft cloud services like Power BI, Power Apps, Power Automate, Azure Analysis Services, and Azure Logic Apps. A single gateway can be used to connect multiple on premise applications with different Office 365 applications at the same time.
At the time of writing, with a gateway you can connect to the following on-premises data over these connections:
SharePoint
SQL Server
Oracle
Informix
Filesystem
DB2
To install a gateway, follow the steps outlined in MS documentation Install an on-premises data gateway. Install the gateway in standard mode because the on-premises data gateway (personal mode) is available only for Power BI.
Once the data gateway is installed & configured its ready to be used in the Power platform applications.
The other catch the gateway is not available for the users with Power Automate/Apps use rights within Office 365 licenses as per the Licensing overview documentation for the Power Platform. Data gateways can be managed from the Power Platform Admin center.
You can use data gateway clusters (multiple gateway installations) using the standard mode of installation to setup a high availability environment, to avoid single points of failure and to load balance traffic across gateways in the group.
No need to worry about the security of the date since all the data which travels through the gateway is encrypted.
As per the definition from Microsoft an integration service environment is a fully isolated and dedicated environment for all enterprise-scale integration needs. When you create a new integration service environment, it’s injected into your Azure Virtual Network allowing you to deploy Logic Apps as a service in your VNET. The private instance uses dedicated resources such as storage and runs separately from the public global Logic Apps service. Once this logic apps instance is deployed on to your Azure VNET, you can access your On-premise data resources in the private instance of your Logic Apps using
Programmatically access your on-premise resources in your Azure Function app
As you all know Azure Functions helps in building functions in the cloud using serverless architecture with the consumption-based plan. This model lets the developer focus on the functionality rather than on infrastructure provisioning and maintenance. Okay let’s not more talk about what a Function app can do but let us see on how to connect to your on-premise resources (SQL, Biztalk etc) within your function.
During the creation of a Function app in Azure, you can choose the hosting plan type to be
Consumption (Serverless)
Premium
App Service plan
Consumption based plan is not supported for the on-premise integration so while creating the app the hosting plan has to either premium or app service based plan & the Operating system has to to be Windows. On-premise resources can be accessed using
Hybrid Connections
VNet Integration
Hybrid Connections:
Hybrid Connections can be used to access application resources in private networks which can be on-premise. Once the Function app resource is created in Azure, go to Networking section of the App service to setup & configure. Go through the documentation from Microsoft for the detailed instructions to set this up.
How it works:
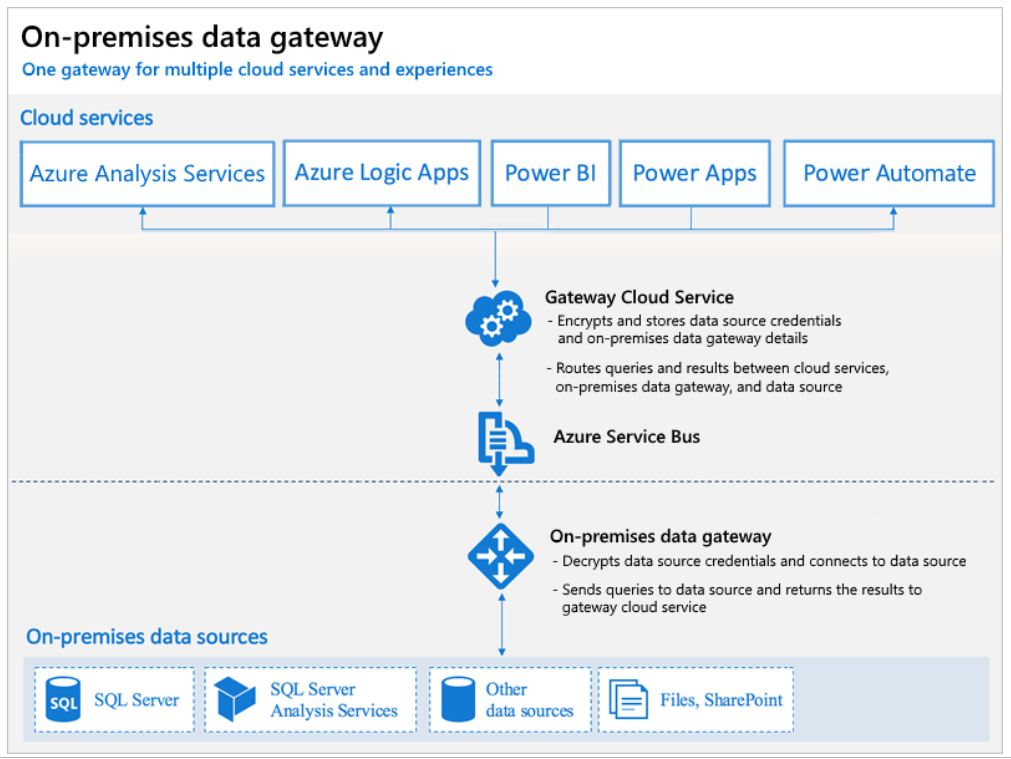
The Azure Hybrid Connection represents a connection between Azure App Service and TCP endpoint (host and port) of an on-premise system. On the diagram below Azure Service Bus Relay receives two encrypted outbound connections. One from the side of Azure App Service (Web App in our case) and another from the Hybrid Connection Manager (HCM). HCM is a program that must be installed on your on-premise system. It takes care of the integrations between the on-premise service (SQL in this case) with Azure Service Bus Relay.
Once the setup is done, you can create a connection string in Appsettings.json file or from Azure function app interface of your function app. After this you can access the data in your function app code.
I’ve found a couple of interesting blogs about this setup.
In the Networking features of the App service, you can add an existing VNET. An Azure Virtual Network (VNet) is a representation of your own network (private) in the cloud. It is a logical isolation of the Azure cloud dedicated to your subscription.
In Azure Vnet you can connect an on-premise network to a Microsoft VNet, this has been documented from Microsoft here. Once there is integration between your Azure Vnet & on-premise network and the VNet is setup on your function app you are set to access on-premise resources in your function app.
Access on-premise resources in Azure automation account:
Azure Automation is a service in Azure that allows you to automate your Azure management tasks and to orchestrate actions across external systems from right within Azure. Hybrid runbook worker feature allows you to access on-premise resources easily. The following diagram from Microsoft explains on how this feature works
I’ve written a blogpost recently about this feature for automating on-premise active directory.
Expose your on-premise Application or an existing WEB API in Office 365 cloud:
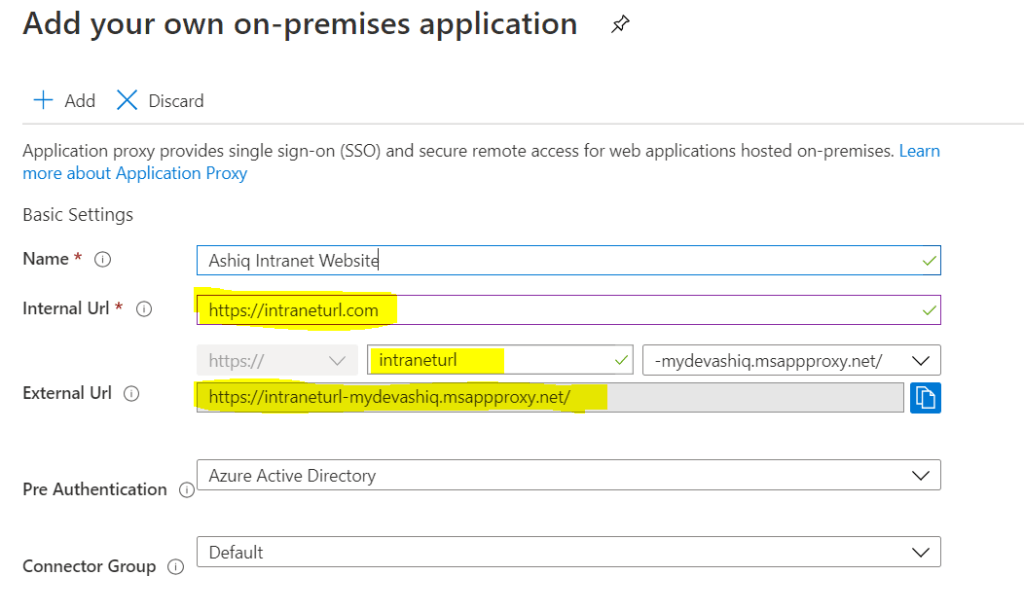
Azure Active Directory’s Application Proxy provides secure remote access to on-premises web applications (SharePoint, intranet website etc). Besides secure remote access, you have the option of configuring single sign-on. It allows the users to access on-premise applications the same way they access M365 applications like SharePoint Online, PowerApp, Outlook etc. To use Azure AD Application Proxy, you must have an Azure AD Premium P1 or P2 license.
Summary: I’ve given some overview about the different services & tools to connect & integrate on-premise resources with Microsoft cloud. Hope you like this post & find it useful. Let me know any feedback or comments on the comment section below
This post is in continuation to my previous post Automate the provision of Azure AD Account & License assignment – Part 1 for creating account in Azure active directory using Power Automate. On this post I will highlight the feature available in Azure Automation account which can be leveraged to create an On-premise AD account. Refer to this post for the usage of Azure automation account to interact with SharePoint online in Microsoft 365 using Power Automate.
Azure Automation is so easy to setup for automating tasks that interacts with
Azure (Azure AD, SQL etc)
M365 services (SharePoint etc).
Automation runbooks in Azure might not have access to resources in other clouds or in your on-premises environment because they run on the Azure cloud platform. To access local resources like On-premise Active Directory which lives behind the firewall, there is a feature within Azure Automation called as Hybrid runbook worker. Azure Automation Hybrid Workers extends Azure Automation into your private networks and allows running runbooks that interacts with resources such as on-premises Active Directory, SharePoint etc.
Hybrid Runbook Worker feature to run runbooks directly on the
Computer in On-premise network
Any secured network like a virtual machine in Azure behind the firewall
Cloud services like AWS etc
that’s hosting the role and against resources in the environment to manage local resources. Refer to this documentation about Hybrid runbook worker for more information.
The following image from Microsoft documentation illustrates this functionality:
Pre-requisite:
Azure Subscription to create
Automation Account
Log Analytics Workspace
Server (Windows or Linux based)
Internet access
Port: Only TCP 443 required for outbound internet access
I’ve found a really interesting video on Youtube from Travis Robert regarding this topic to set this up on Windows workstation.
Once the Hybrid runbook worker is setup, you can write PowerShell script to create account in On premise Active directory. Find the link to the script to add a user to Active directory in Onpremise. The parameters for the AD account (attributes like name, location, jobtitle, manager etc) to the runbook can be passed from a SharePoint List in Office 365 which could then be triggered using a Flow.
Summary: I was not able to give you a complete walkthrough but I hope had given some pointers to connect on-premise AD. Forgive my ignorance if I have made some mistakes since I don’t have much experience with IT infrastructure. Hope you find this post useful & informational. Let me know if there is any comments or feedback below.
In bigger active directory implementation, there will also be information stored on the Extension attributes, to get the information you will have to pass the name of the attribute “OnPremisesExtensionattributes” as a query string in the format as
The User profile service Rest API endpoint in SharePoint http://siteurl/_api/SP.UserProfiles.PeopleManager/GetMyProperties does not provide all the active directory information. For e.g Location, OnPremisesextensionAttributes etc information is not available. SharePoint UPS synchronizes the AD data of all users in schedule basis. So the other option is to use the Graph Endpoint if you need those information for your application customization.
A decade back I was part of a team to automate the On & Offboarding process of employees for a customer using .NET framework, it had a module to provision user accounts in an on-premise environment. I still remember having used couple of dll’s for Active directory 2003 & exchange 2007 to create AD & Email account. It was not easy but nowadays with the Office 365 in place its so easy to create account & enable different Office 365 services (Exchange, SharePoint, Yammer etc) for a user in Azure Active directory. This example will be applicable for the Organization which does not have On-premise Active directory. Organizations having On-premise active directory, the user account’s will be synchronized from On-premise AD to Azure AD. On this post I am going show you how to
Create Azure AD account & assign license using Power Automate
Assign License using Graph Endpoint
Create Azure AD account & assign license using Power Automate:
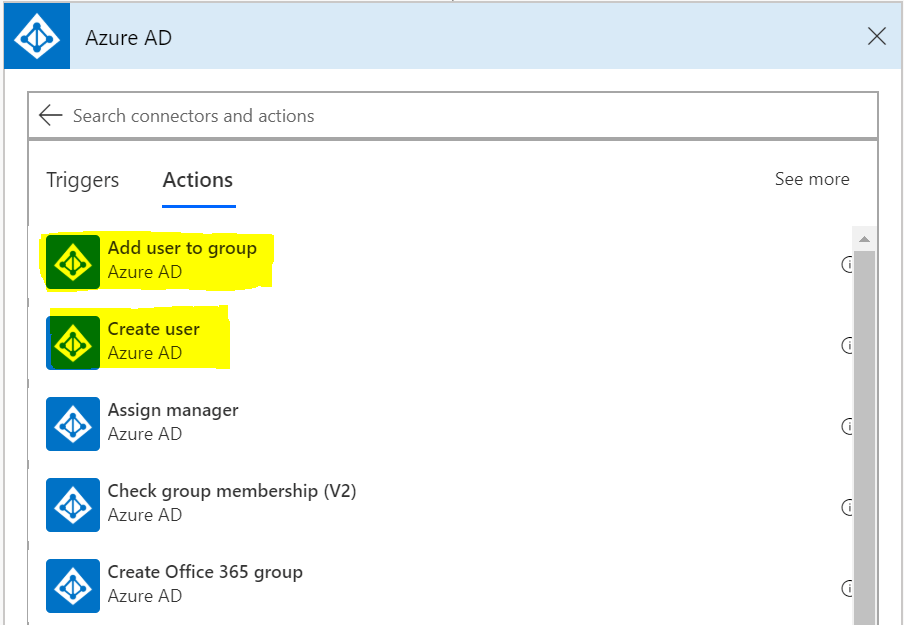
There is a Power Automate action Create user under the connector Azure AD which helps us to create account in Azure AD but there is no action as of now to assign individual license to a user but we can overcome this by adding the user to the AD security group which has a license assigned to it.
There is a flow action Add user to groupunder the same connector for adding the user to the security group, all the members of the group will get the license assigned on that group. The Azure AD connector does not return custom attributes of Azure AD. For e.g you can’t assign a value to a custom AD attribute with the Create user action, if you want to assign a custom attribute or an attribute which is not exposed in the Create User action then the account has to be created using PowerShell. There are ways to call a PowerShell script from Azure Automation Runbooks with the help of a flow action.
Other Azure AD actions apart from the above screenshot which could be of use are
Create group
Get group members
Get groups of a user
Get user
Remove Member from Group
Update user
There are templates available in Power automate template section which helps you create account based on the information from the SharePoint List, based on HTTP request etc
Prerequisite:
Permissions on Azure AD:
Group.ReadWrite.All
User.ReadWrite.All
Directory.ReadWrite.All
Security group with license assigned
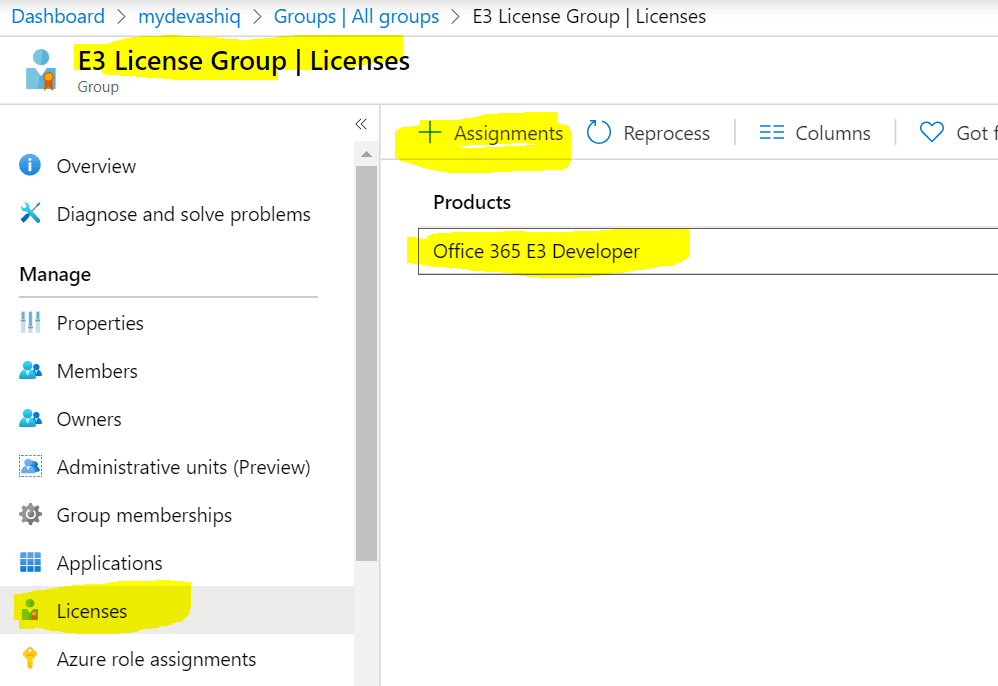
For assigning a license to Security group, go to Azure AD Admin center. Follow this documentation from Microsoft to assign license to a group.
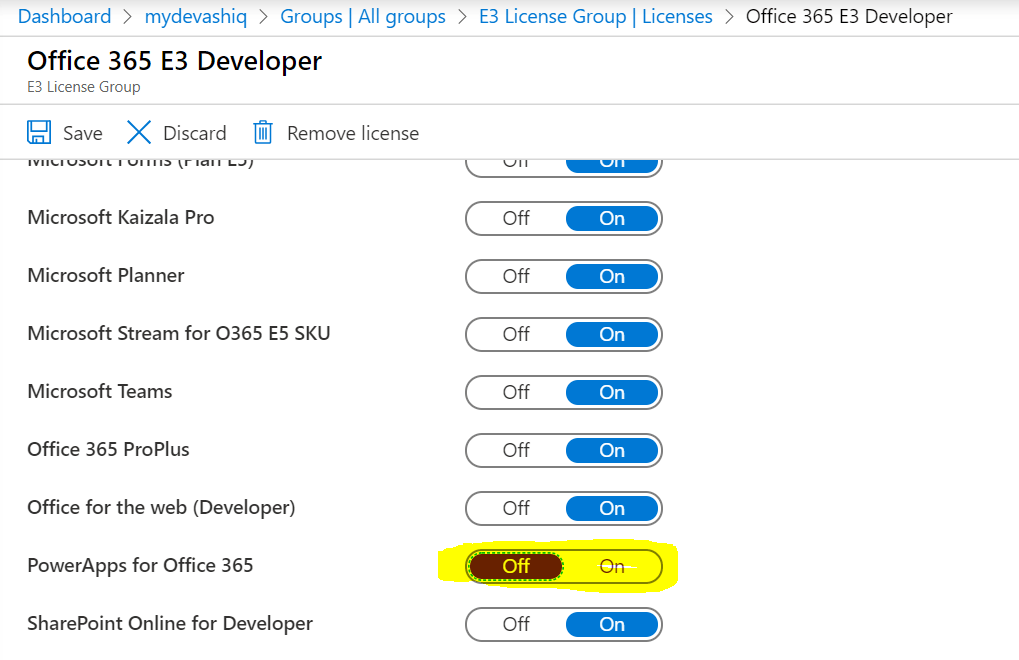
You can also turn off certain services from the license to the group, for e.g Turning off the Power App service for the user
You can also use dynamic groups for assigning license to a user, if you have dynamic group based license assignment to a user then you could ignore the step on the flow to add user to the security group. Dynamic groups works based on rules to determine group membership, for e.g if a user has an AD attribute set for Department. In this case the AD user created with certain department will get automatically added to the group which will in turn assign a license to the user.
Let’s now create the flow, I have used an Instant flow with trigger Manually Trigger a flow. Add the action Create user from the connector Azure AD
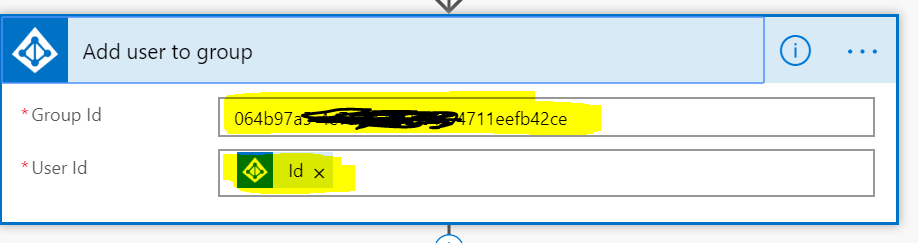
Now add the action Add user to group, the Group Id should be for the Security group which has a license assigned to it. The User Id field should be dynamic value Id from the previous action Create user.
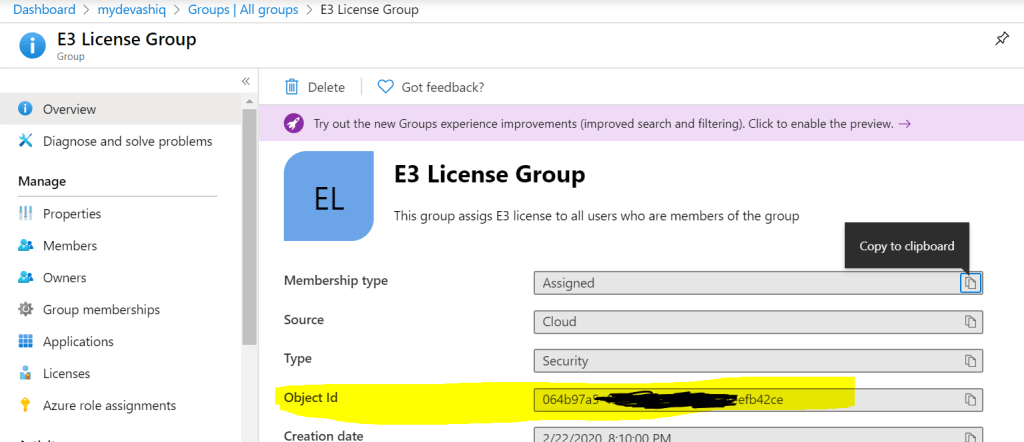
To get the group Id, go to Azure AD
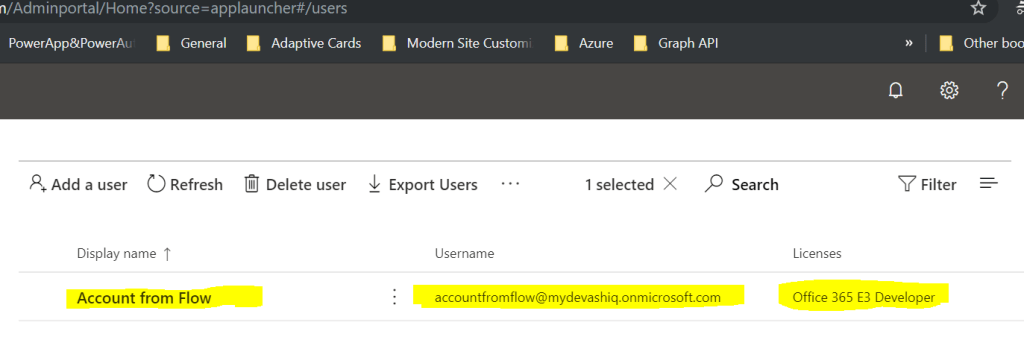
Run the flow. Once the flow runs successful the user account will be provisioned on Azure Ad with a license.
Assign License using Graph Endpoint:
There is a beta graph endpoint to assign license to a user. Find the Microsoft documentation for more information
All types of license (E5, E3, PowerApps, Power etc) has a Service Plan id also called as SKU id. Find the list of SKU id’s on this link if your tenant has procured the license for the service
The first SKU id is for Enterprise Mobility & Power BI (Free)
To remove the license for a user, use the collection removeLicenses. This graph endpoint to assign license can also be called from a Flow.
Summary: You can also use a HTTP request trigger in the Flow for integrating with other applications. On next post I will write about creating account in On-premise Active Directory. Hope you find this post useful & informational. Let me know if there is any comments or feedback below.