In a modern SharePoint site you can create custom themes using PowerShell, REST API & CSOM. In this blogpost I will show you how to create themes using PowerAutomate. The following REST endpoints are available
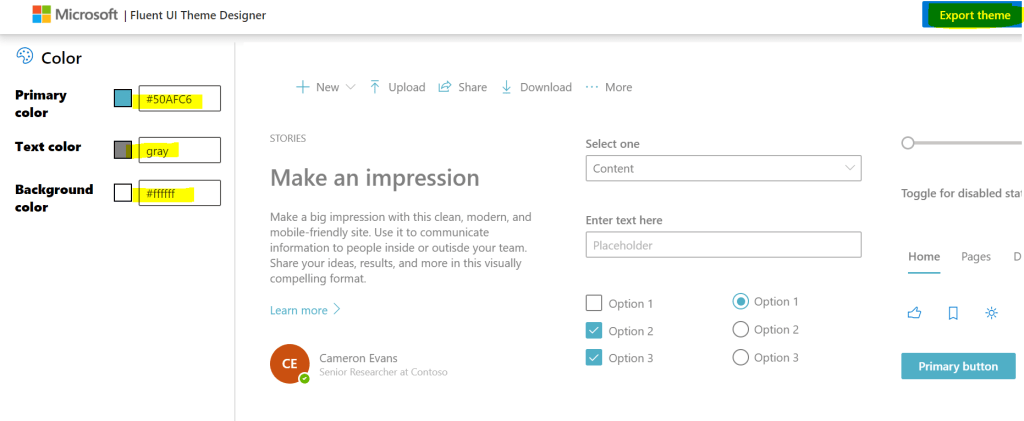
There is an online Theme Generator tool that you can use to define new custom themes. At the time of writing this post, the endpoints are open to everybody & not just to the SharePoint tenant admins which seems to be quite buggy. Laura Kokkarinen has written a very detailed blog post about this topic. I’ve got the inspiration to write about this topic from John Liu who has recently recorded a video about this. Find screenshot from the Theme generator tool:
Once you have defined the theme from the tool, click on the Export theme button on the Right top corner of the tool to export the theme as a code block in JS, JSON & PowerShell. In this case, click JSON & Copy the generated block
Flow for Creating or adding the Theme to the tenant:
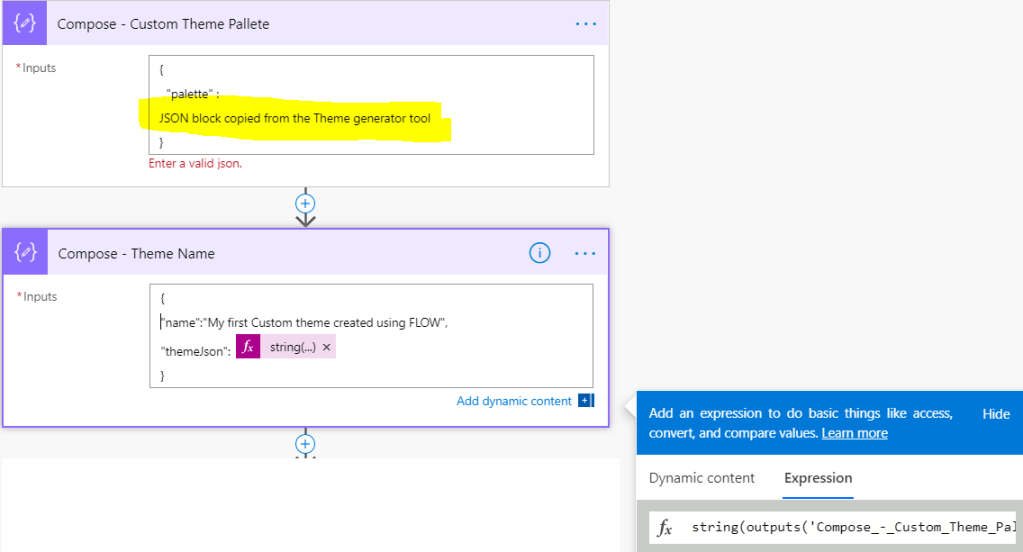
Let’s create an instant flow with trigger Manually trigger a flow to add a theme to the tenant. Add two Compose actions as shown below
The first compose action is the actual definition copied from the theme generator tool
{
  "palette" :
JSON block copied from the Theme generator tool
}
The second compose action has the name of the theme & its stringified JSON from the output of the previous compose action. To convert the JSON to string add a string expression on the dynamic content pane
{
"name":"My first Custom theme created using FLOW",
"themeJson": @{string(outputs('Compose_-_Custom_Theme_Pallete'))}
}
Now add the action Send an HTTP request to SharePoint with the following parameters
If your organization is using a hybrid cloud environment, this post will shed some light to integrate on-premise resources with Microsoft 365 & Azure services. Hybrid integration platforms allows enterprises to better integrate services and applications in hybrid environments (on-premise and cloud). In this blog post, I will write about the different services & tools available with in Microsoft Cloud which allows you to connect or expose your On-premises data or application in Office 365. There are still many enterprise organizations on Hybrid mode due to various factors. It can be a challenging task to integrate your on-premises network but with right tools & services in Office 365 & Azure it can be easier. Find below the high-level overview & some references on how to
Access your on-premise data in Power Platform & Azure Apps (Logic Apps, Analysis Services & Azure Data factory)
Programmatically access your on-premise resources in your Azure Function app
Access on-premise resources in Azure automation account
Expose your on-premise Application or an existing WEB API in Office 365 cloud
Access on-premise data in Power Platform & Azure Apps (Logic Apps, Analysis Services & Azure Data factory):
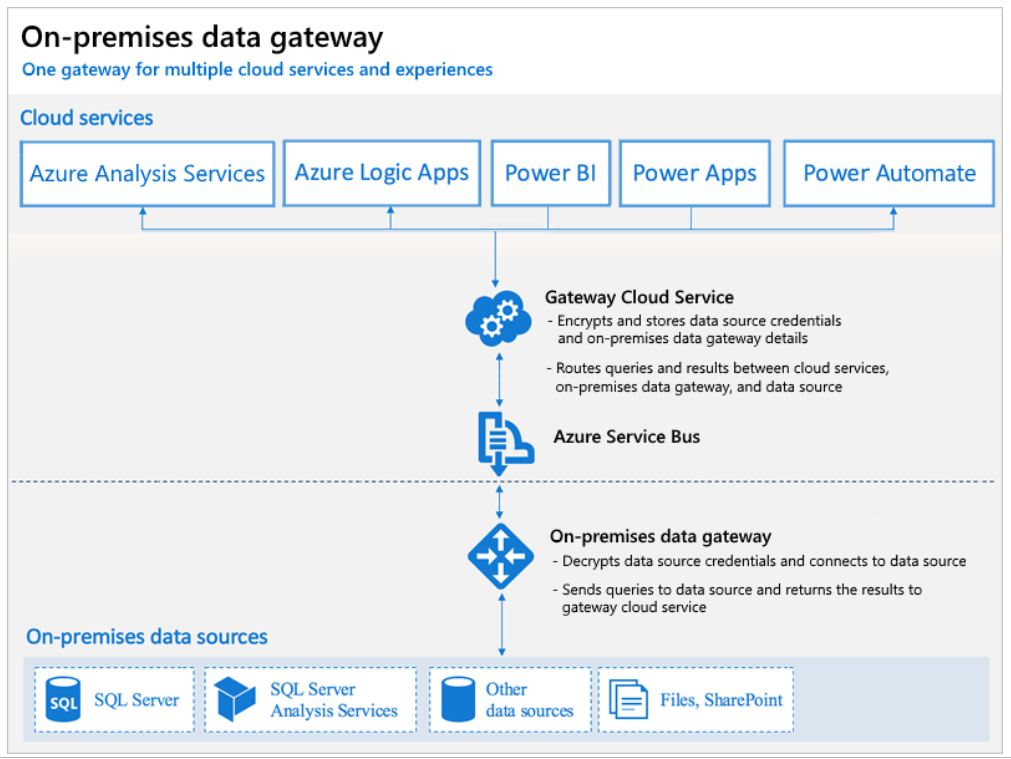
The on-premises data gateway allows you to connect to your on-premises data (data that isn’t in the cloud) with several Microsoft cloud services like Power BI, Power Apps, Power Automate, Azure Analysis Services, and Azure Logic Apps. A single gateway can be used to connect multiple on premise applications with different Office 365 applications at the same time.
At the time of writing, with a gateway you can connect to the following on-premises data over these connections:
SharePoint
SQL Server
Oracle
Informix
Filesystem
DB2
To install a gateway, follow the steps outlined in MS documentation Install an on-premises data gateway. Install the gateway in standard mode because the on-premises data gateway (personal mode) is available only for Power BI.
Once the data gateway is installed & configured its ready to be used in the Power platform applications.
The other catch the gateway is not available for the users with Power Automate/Apps use rights within Office 365 licenses as per the Licensing overview documentation for the Power Platform. Data gateways can be managed from the Power Platform Admin center.
You can use data gateway clusters (multiple gateway installations) using the standard mode of installation to setup a high availability environment, to avoid single points of failure and to load balance traffic across gateways in the group.
No need to worry about the security of the date since all the data which travels through the gateway is encrypted.
As per the definition from Microsoft an integration service environment is a fully isolated and dedicated environment for all enterprise-scale integration needs. When you create a new integration service environment, it’s injected into your Azure Virtual Network allowing you to deploy Logic Apps as a service in your VNET. The private instance uses dedicated resources such as storage and runs separately from the public global Logic Apps service. Once this logic apps instance is deployed on to your Azure VNET, you can access your On-premise data resources in the private instance of your Logic Apps using
Programmatically access your on-premise resources in your Azure Function app
As you all know Azure Functions helps in building functions in the cloud using serverless architecture with the consumption-based plan. This model lets the developer focus on the functionality rather than on infrastructure provisioning and maintenance. Okay let’s not more talk about what a Function app can do but let us see on how to connect to your on-premise resources (SQL, Biztalk etc) within your function.
During the creation of a Function app in Azure, you can choose the hosting plan type to be
Consumption (Serverless)
Premium
App Service plan
Consumption based plan is not supported for the on-premise integration so while creating the app the hosting plan has to either premium or app service based plan & the Operating system has to to be Windows. On-premise resources can be accessed using
Hybrid Connections
VNet Integration
Hybrid Connections:
Hybrid Connections can be used to access application resources in private networks which can be on-premise. Once the Function app resource is created in Azure, go to Networking section of the App service to setup & configure. Go through the documentation from Microsoft for the detailed instructions to set this up.
How it works:
The Azure Hybrid Connection represents a connection between Azure App Service and TCP endpoint (host and port) of an on-premise system. On the diagram below Azure Service Bus Relay receives two encrypted outbound connections. One from the side of Azure App Service (Web App in our case) and another from the Hybrid Connection Manager (HCM). HCM is a program that must be installed on your on-premise system. It takes care of the integrations between the on-premise service (SQL in this case) with Azure Service Bus Relay.
Once the setup is done, you can create a connection string in Appsettings.json file or from Azure function app interface of your function app. After this you can access the data in your function app code.
I’ve found a couple of interesting blogs about this setup.
In the Networking features of the App service, you can add an existing VNET. An Azure Virtual Network (VNet) is a representation of your own network (private) in the cloud. It is a logical isolation of the Azure cloud dedicated to your subscription.
In Azure Vnet you can connect an on-premise network to a Microsoft VNet, this has been documented from Microsoft here. Once there is integration between your Azure Vnet & on-premise network and the VNet is setup on your function app you are set to access on-premise resources in your function app.
Access on-premise resources in Azure automation account:
Azure Automation is a service in Azure that allows you to automate your Azure management tasks and to orchestrate actions across external systems from right within Azure. Hybrid runbook worker feature allows you to access on-premise resources easily. The following diagram from Microsoft explains on how this feature works
I’ve written a blogpost recently about this feature for automating on-premise active directory.
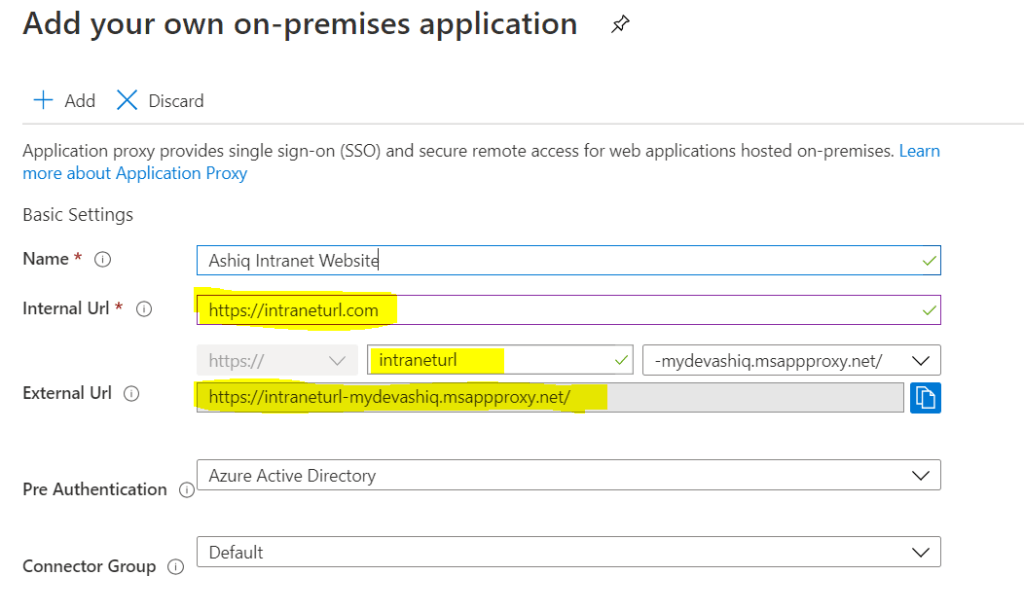
Expose your on-premise Application or an existing WEB API in Office 365 cloud:
Azure Active Directory’s Application Proxy provides secure remote access to on-premises web applications (SharePoint, intranet website etc). Besides secure remote access, you have the option of configuring single sign-on. It allows the users to access on-premise applications the same way they access M365 applications like SharePoint Online, PowerApp, Outlook etc. To use Azure AD Application Proxy, you must have an Azure AD Premium P1 or P2 license.
Summary: I’ve given some overview about the different services & tools to connect & integrate on-premise resources with Microsoft cloud. Hope you like this post & find it useful. Let me know any feedback or comments on the comment section below
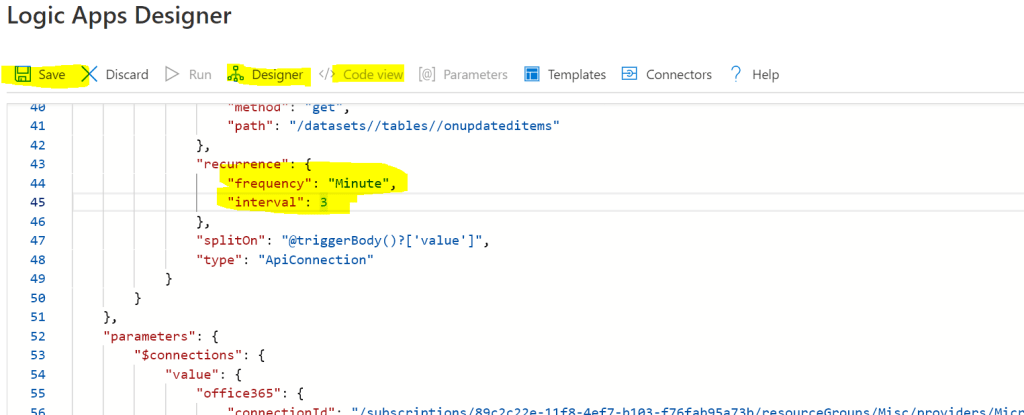
Have you ever noticed on your Automated flow with trigger for e.g Item created or modified on a SharePoint list will not run immediately as & when there was an item either created or modified in the list? The reason is all the automated triggers has a recurrent frequency schedule which is set to 3 mins, it means it looks for the changes in the SharePoint list every 3 mins. To check this, go to Peek Code on the trigger to check the interval frequency
For the When an Item is created trigger
This setting cannot be changed in Power Automate but with Azure Logic Apps you can adjust this setting. For more details on the pricing, refer to this link
If there is further delay in the trigger to get fired, check your flow plan since it has a dependency. As per information gathered from the Flow community forum
The maximum flow frequency for User based or App based plans is 1 minute, however if you are using Free plan it will be 15 minutes. And if it is Flow for Office 365 (Plan from your Enterprise license E3, E5 etc) and Flow for Dynamics 365 it will be 5 minutes.
From the FAQ page in the Microsoft site for Flow, it says
Your plan determines how often your flows run. For example, your flows may run every 15 minutes if you’re on the free plan. If a flow is triggered less than 15 minutes after its last run, it’s queued until 15 minutes have elapsed.
The same trigger with Logic apps which has options to update the recurrent frequency interval
If you are new to Logic Apps, follow this article from Microsoft to get started. The other advantage with Logic apps is there is a code view to update & Save which is not the case with Power Automate. In Power Automate, you can only view the code & not update
Hope this information was useful in some way. If you have any comments, let me know on the comments section.
Most of us would have used PowerShell for SharePoint to manage SharePoint settings at the organization level and site collection level. SharePoint Online PowerShell commands are very efficient for batch operations for e.g creating multiple sites, list items etc. To use the SharePoint Online PowerShell commands
You must have the SharePoint Admin role or Global Administrator role in Office 365
Install the SharePoint Online Management Shell module
As you know you must be administrator to install a PowerShell module on your workstation which not everyone will have in corporate environments.
I often use a PowerShell script to enable App Catalog at a site collection level to test the PnP webparts & extensions before deploying at the tenant level app catalog based on requirement. If you are not an SPO admin then the dependency is with the SPO admin. In this blogpost I am going to show you how to automate this process by executing PowerShell script to enable App catlog in Azure using Power Automate.
Pre-requisite & permissions:
SPO Admin
Azure Subscription to create Automation account
Access to Premium connector (Azure Automation) in Power Automate
SharePoint List to collect details about the site which needs to have App catalog enabled
To complete this automation process, create the following two components
Automation account in Azure with a Run Book to execute PowerShell script for enabling App Catalog in SP site
Power automate flow to call the Run Book
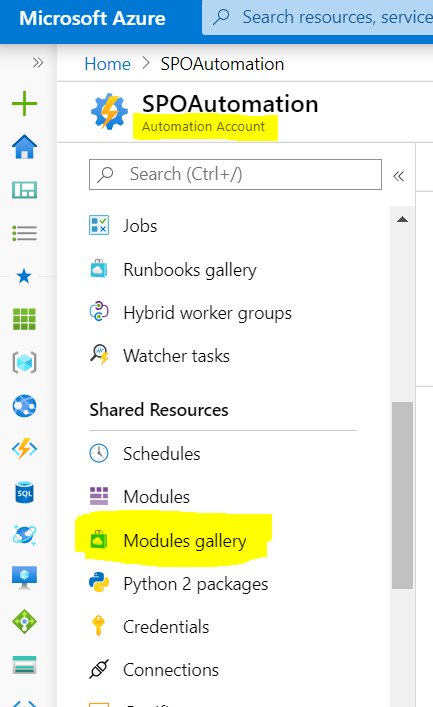
Automation account in Azure with a Run Book to execute PowerShell script for enabling App Catalog in SP siteAutomation service in Azure is a cloud-based automation and configuration service that supports consistent management across your Azure and non-Azure environments. Go through the documentation from Microsoft to know about this powerfull service in Azure. Let’s use the service in Azure to create a simple Runbook with PowerShell code to enable App catalog in SPO site, you can do much more than this using this service. Refer to this link for the pricing details for the automation service in Azure.
Step 1: Go the Azure portal & create a resource Automation
Enter the name of the automation account, select the Subscription & resource group & click Create
Step 2: After the resource is created, go to the resource & click Modules Gallery under the section Shared Resources as shown below to add the PS SPO module
Search with the keyword “SharePoint” & click “Microsoft.Onlie.SharePoint.PowerShell” and then click Import. This step will the add the SharePoint online PowerShell module for us to use the available PS SPO cmdlets in Runbook.
Now click modules & verify if the SPO PowerShell is added & available.
Step 3: The next step is to add the user credentials (Username & Password) of the SPO admin which is safe & secure by not hardcoding the password on the Runbook. You can also use certificates or AppID AppSecret in PnP online Powershell for creating connection to SPO.
Step 4: Now we are good to create the Runbook, to create it click Runbooks under the section Process Automation and then click Create a runbook. Enter the Name of the Runbook, select the Runbook type to PowerShell and click Create.
Now let’s add the code by editing the runbook to enable app catalog. The section Dynamic Parameters on the code will be passed from flow. To connect to SharePoint Online we are using the SPO admin credentials created in the previous step. Find the code below
# Dynamic Parameters
param(
  [parameter(Mandatory=$true)]
  [string]$SiteURL = "https://domain.sharepoint.com/sites/contosoportal",
  [parameter(Mandatory=$false)]
  [boolean]$enableAppCatalog = 1
)
# Credentials
$myCred = Get-AutomationPSCredential -Name "SPOAdminCred"
# Parameters
$AdminSiteURL = "https://domain-admin.sharepoint.com"
# Connect to SharePoint Online
Connect-SPOService -Url $AdminSiteURL -Credential $myCred
# Get the Site Collection
$Site = Get-SPOSite -Identity $SiteURL
# Enable App catalog
if($enableAppCatalog)
{Add-SPOSiteCollectionAppCatalog -Site $Site}
# Disable App catalog if false
else{Remove-SPOSiteCollectionAppCatalog -Site $Site}
# Get Site Collection Title
Write-Output $Site.Title
The runbook is now created, you can test the script by clicking on Test Pane & pass parameters (Site URL etc) to test it. Click Publish button as shown below to publish so that it can be called from Power Automate. It’s now time to create the flow
Power automate flow to call the Run Book
You can now create a flow with automated trigger from a SharePoint list to get the site url & Boolean value either to enable or disable the app catalog on the site. Here I will be using an Instant flow with trigger “Manually trigger a Flow”
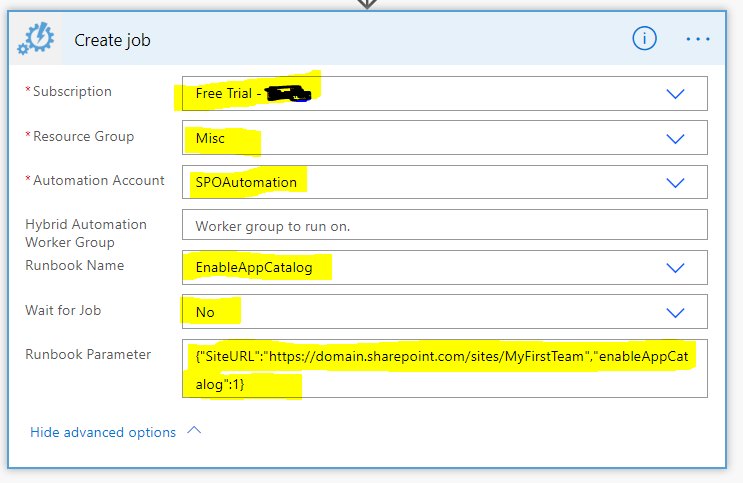
Once the flow is created, add the action “Create Job” under the connector “Azure Automation” which is a premium connector.
Select the Azure Subscription which has the Automation account resource with runbook>Select Resource Group>Select Automation Account>Select the Runbook name which has PS script to enable app catalog. If there is a need to wait until the automation job completes then select Yes on the field “Wait for Job”. For the dynamic parameter, write a JSON to pass the mandatory & optional parameters to the runbook script. On this example I will be passing the Site URL & Boolean value to either enable or disable app catalog using JSON as below
If using a SharePoint list, construct the above JSON dynamically with the URL
For the runbook parameters, you might also get an interface as shown below to pass the values (Site Url & enableAppcatalogbooleanvalue).
The flow is ready, run it to test now with parameters.
Summary: The use case I’ve chosen is a simple one but azure automation can be a more powerful service to perform various automation tasks. Find few below
Write Python script in the Runbook
Many samples are available within the Runbook gallery (Create AD user, Display All provisioned site collections etc) under the section Process automation.
With the PowerShell type Runbook all the PS modules (Azure AD for automating AD account creation, PNP SP Online etc) are readily available for us to import easily.
There is a feature by name “Hybrid Runbook Worker Feature” available within Azure Automation account for us to connect Onpremise resources in Azure (e.g SharePoint Onpremise, Onpremise AD etc).
Create a Webhook to call the runbook from an External application by making a POST call
Call a custom built dll by importing them in to the Modules section
Create graphical Runbook with GUI to add cmdlets & to configure the steps
This is in continuation to my earlier post using Adaptive card for collecting information in Outlook also known as Outlook actionable message. On this post I am going to show you how to collect information from a user in Teams and storing the values back in a SharePoint list. The following Power Automate actions under Microsoft Teams connector are now available in preview mode which helps us to capture data back from a Teams adaptive card meaning you would be able to make POST calls back to the flow by click of a button (Action.Submit) on the Adaptive card
Post an adaptive card as the Flow bot to a Teams user, and wait for a response
Post an adaptive card as the Flow bot to a Teams channel, and wait for a response
Once an Adaptive card is posted in Teams using the above actions, the flow run will not continue until the recipient or someone in the channel (if sent to channel) responds to inputs that are required within the card till then the flow is put on wait for maximum period (Async calls) of 30 days as per the documentation. Post that period the flow will time out if no one responds to the card. There can be use case to collect responses from users in Teams & post it to Azure services like SQL etc, this avoids the users to have access to premium services or license since the card is sent using Power automate. The use case I’ve chosen for this post is to collect Name & Email address of a teams user by sending them an input form which stores the responses in a SharePoint list after the user responds. Find the resources I’ve used for this example
Let’s start by designing the card using the Adaptive card designer. Click on Open Sample, select Input Form as shown below
Then change the host app from the default Bot Framework Webchat to Microsoft Teams – Light (Optional Step). Remove the Phone number Text Block [Element] & the corresponding Text.Input [Inputs] field to keep it simple & I’ve also changed the Adaptive card image URL on the right column to the following URL since the image default image on the sample has got some issues rendering on teams. Find some information on image size & resolutions limits here.
Click Copy Card JSON from ribbon for this card to be used on the flow. We now have the adaptive cards JSON ready with us, let’s go ahead and the create the flow using Power Automate. Find the generated JSON below
{
    "$schema": "http://adaptivecards.io/schemas/adaptive-card.json",
    "type": "AdaptiveCard",
    "version": "1.0",
    "body": [
        {
            "type": "ColumnSet",
            "columns": [
                {
                    "type": "Column",
                    "width": 2,
                    "items": [
                        {
                            "type": "TextBlock",
                            "text": "Tell us about yourself",
                            "weight": "Bolder",
                            "size": "Medium"
                        },
                        {
                            "type": "TextBlock",
                            "text": "We just need a few more details to get you booked for the trip of a lifetime!",
                            "isSubtle": true,
                            "wrap": true
                        },
                        {
                            "type": "TextBlock",
                            "text": "Don't worry, we'll never share or sell your information.",
                            "isSubtle": true,
                            "wrap": true,
                            "size": "Small"
                        },
                        {
                            "type": "TextBlock",
                            "text": "Your name",
                            "wrap": true
                        },
                        {
                            "type": "Input.Text",
                            "id": "myName",
                            "placeholder": "Last, First"
                        },
                        {
                            "type": "TextBlock",
                            "text": "Your email",
                            "wrap": true
                        },
                        {
                            "type": "Input.Text",
                            "id": "myEmail",
                            "placeholder": "youremail@example.com",
                            "style": "Email"
                        }
                    ]
                },
                {
                    "type": "Column",
                    "width": 1,
                    "items": [
                        {
                            "type": "Image",
                            "url": "https://download-ssl.msgamestudios.com/content/mgs/ce/production/SolitaireWin10/dev/adapative_card_assets/v1/tile_spider.png",
                            "size": "auto"
                        }
                    ]
                }
            ]
        }
    ],
    "actions": [
        {
            "type": "Action.Submit",
            "title": "Submit"
        }
    ]
}
Flow Creation:
Create an Instant flow with trigger “Manually trigger a Flow”, this will post an Adaptive card to a Teams user with the Input form which collects response to a SharePoint list. Create a SharePoint list with two columns for us to store the Name and Email submitted from the adaptive card on Teams.
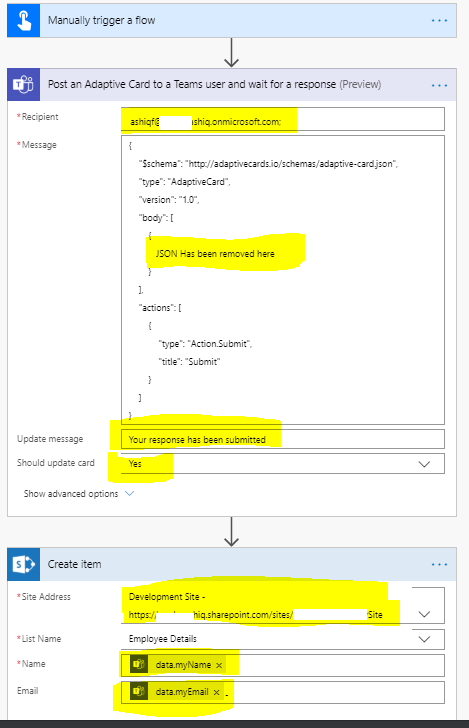
Add the flow action “Post an adaptive card as the Flow bot to a Teams user, and wait for a response”, on the action
Enter the email address of the user in the Recipient field
Paste the JSON copied from the card designer in the Message field
Enter information to be shown to the user on the field Update message after the Submit button is clicked
Field Should update card to be set as Yes
Now add the action “Create item” to store the form response in the SharePoint list created above with the request body information mapped to Name (myName) & Email (myEmail) using the dynamic content. The dynamic content has also information about the user (Email, Display Name, Response time etc) responded in Teams
The flow is ready, Run the flow to test it. The recipient would have received the card in Teams as below
After the user keys in the Name & Email address on Teams and clicking Submit button will complete the flow till then the flow will be in wait state for a period of 30 days maximum. The data will be submitted to the SharePoint list and the card will be updated with the update message as below
There is an Adaptive card designer in Power Automate which is an experimental feature currently with which you would able to design/update Adaptive card in the Power Automate action. To enable it, click the cog wheel on your flow environment and click “View All Power Automate settings”. On the popup toggle the Experimental Features to On and click Save button.
Go back to the flow in Edit mode, the Teams action will now have an Adaptive card designer as shown below
Senior Program Manager for Power Automate Audrie Gordon has a great video on Adaptive cards for Power Automate which has lot of information.
If you run in to an error while submitting the form or triggering the flow, look at the Troubleshooting tips for Adaptive cards. There are few known issues documented here with regards to using this action on Power Automate.
Summary: You now have created an input form for collecting information from a user in teams. To know the future road map for Adaptive cards, click here to know. There are couple of amazing templates available in the Flow environment, just search for Adaptive card in templates where you get template for different use cases. Hope you have enjoyed reading this post and find it useful. If you have any comments or feedback, please provide it on the comments section below.
In a SharePoint modern page, you as an author would be able to turn on or turn off comments while creating a page. Everyone with minimum Read access on a SharePoint site would be able to Post, Like, reply to a comment at a single level, @mention a person while commenting in a SharePoint page.
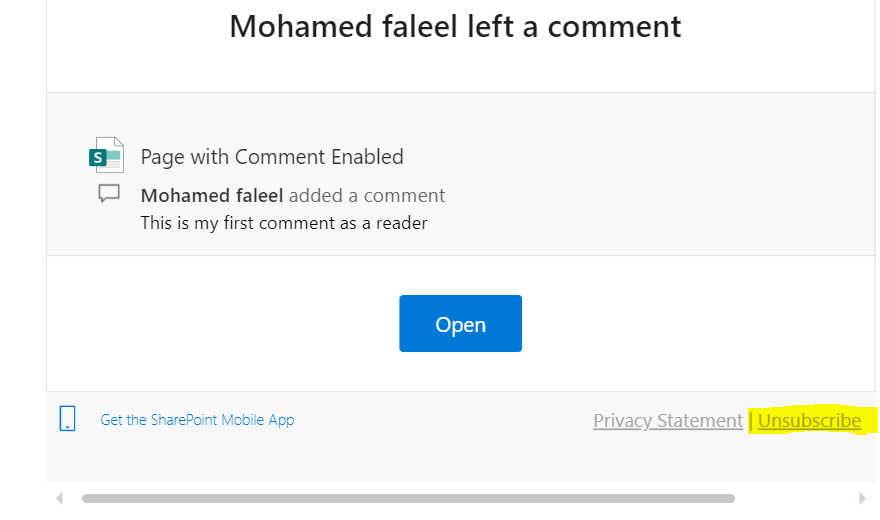
When someone comments on a page or news post, SharePoint notifies the author or the person mentioned in the header of the page via an email. The SharePoint mobile app also alerts the author whenever a comment is made. If there are multiple comments, it will be batched so that the authors receive a single email when several comments have been made within a short period of time. Additionally, author gets email notices when users reply to comments or leave a “like”. Author or a user can unsubscribe from notifications by clicking the “Unsubscribe” link in the footer of the email.
UnSubscribe
User with contribute access on a site would be able to delete any comments posted on the page which is quite an issue & not yet addressed by Microsoft. User with Read access to the site would be able to delete only the comments they have posted. Do you know where the comments are stored when ever you make a comment, they are stored in a separate data store with references to the Site Pages library guid & the item id of the page. The comments & likes are accessible via Rest API of the site. Find the different endpoints available for executing below actions
Getting comments & likes of a page item
Posting a comment on a page
Deleting a existing comment
There are couple of nice blog posts covering this topic with the API details. Find the links below:
On this blog post I am going to show you how to access the comments details of a SharePoint page using Power Automate.
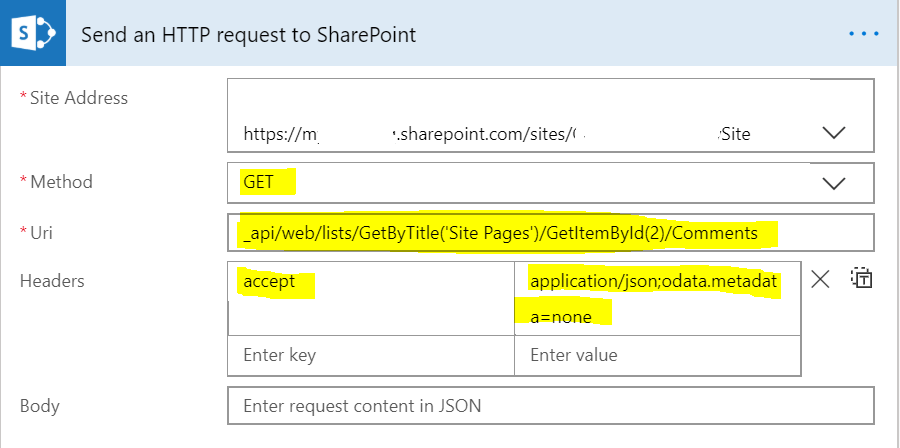
Let’s create an automated flow with trigger “Manually Trigger a Flow”, add an action “Send an Http request to SharePoint” since the API to retrieve the comments is an SharePoint rest API.
The API for getting the comments of a SharePoint page is
The odata.metadata=none option reduces the size of the payload significantly, and for many scenarios this is all that you need when working with list items
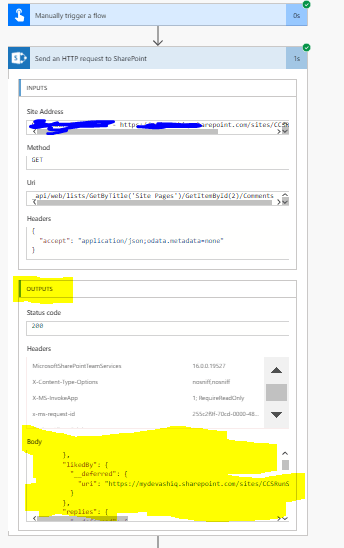
Run the flow, the output of this action would have all the data related to the comments posted by users on the page in a JSON format. To get the required information we will have to parse the JSON with the help of the Parse JSON action. Add the Parse to JSON action as below with content to the Body from Outputs of the action “Send an Http request to SharePoint”
Click on the button “Generate from sample” which loads a popup “Insert a Sample JSON payload” paste the run data of the flow for generating the schema automatically. To get the run data, go to the run history and click the run and go to outputs of the action “Send an Http request to SharePoint” copy everything inside the Body
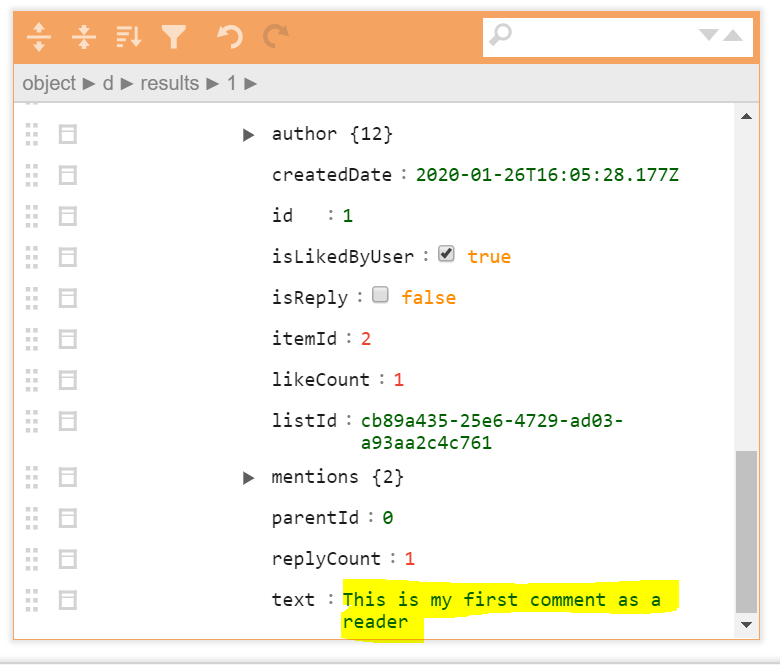
Find the information of the body in the JSON online viewer to decide what information you need & what is available on JSON output
Add the compose action to see all the information available from the Output of the parse action, I’ve added only text which has the comment text & email has the email address of the user posted the comment
Summary: There are different Rest API endpoints available for comments & likes in Modern SharePoint page, you can select the any of them based on the requirement. The api’s can also be used on SPFx solutions for customizing Comments feature. Hope you find this post useful. Let me know if there is any comments or feedback by posting a comment below.


