In this blog article, let us see how to call a Microsoft Graph API as an application in a Power Automate HTTP connector using a certificate credentials instead of a secret from the Azure Active directory application. Microsoft recommends using a certificate (instead of a client secret) as a credential for a higher level of assurance. Find below the list of actions to enable calling the Graph API using certificate credentials
Creation of Self-Signed certificate
Application Registration in Azure AD Portal
Creation of Power Automate cloud flow with the HTTP Connector
Method 1: Without using Azure Key Vault
Method 2: Azure Key Vault to store Certificate
Pre-Requisites:
Access to HTTP Premium Connector in Power Automate
The first step is to create a certificate. A self-signed certificate can be created by using the Windows PowerShell command New-SelfSignedCertificate or PnP PowerShell command New-PnPAzureCertificate. The self-signed certificate will be used in the Azure AD application. Find below PnP PowerShell command to create the certificate with the default validity of 10 years and secured with a password.
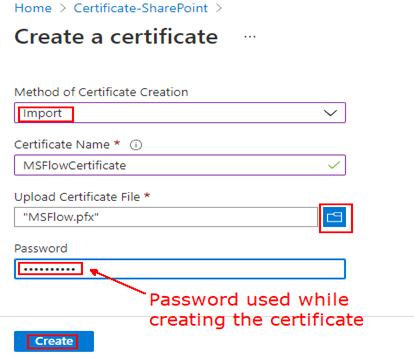
From the above screenshot, the certificate files MSFlow.pfx and MSFlow.cer will be available on C:\Users\ashiq\Desktop\Projects\PowerAutomate. Copy the PfxBase64 and the password which will be used in the HTTP connector while calling the Graph API. To get the details of an existing certificate, the PnP command
Register an application in Azure AD and obtain the client id & tenant id for the registered application. In this example I have added the Application permission with Admin Consent to access all the recent events of a user from Outlook.
To add the above created self-signed certificate, click Certificates & secrets under the Manage blade. Click Upload certificate > Select the certificate file MSFlow.cer > Add
Once the certificate is added successfully, you would be able to see the certificate Thumbprint with the Start date & Expiry date
Creation of Power Automate cloud flow with the HTTP Connector:
Let us see below how to access a Microsoft Graph API with & without using the Azure Key Vault.
Method 1: Without using Azure Key Vault
Method 2: Azure Key Vault to store Certificate
Method 1: Without using Azure Key Vault
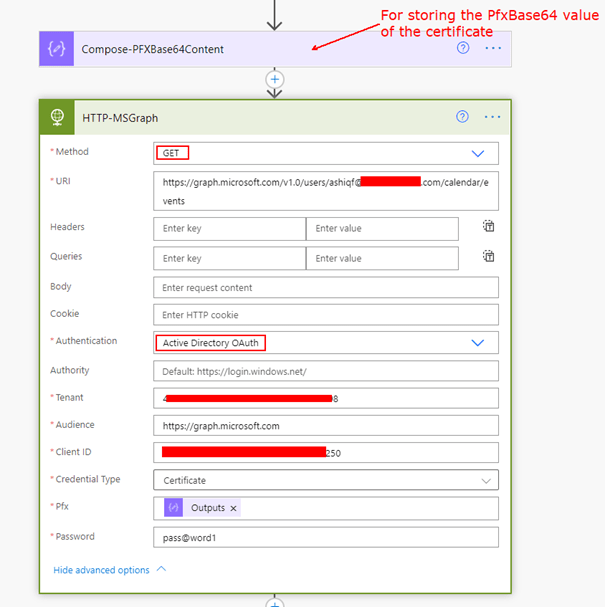
In the cloud flow, add a Compose action to store the PfxBase64 value copied during the creation of the certificate. Now add the HTTP action to get the users events from the default calendar
Password: Certificate password during the creation Find below screenshot for your reference
Find below screenshot for your reference
Run the flow, it should be able to get the outlook events as an application for the given user.
Method 2: Azure Key Vault to store Certificate
Azure Key Vault is a cloud service for storing and accessing secrets enabling your applications accessing it in a secure manner. Follow this article to upload the above generated certificate to the Azure key vault.
After the certificate is uploaded to the Azure Key Vault, with the help of the premium Azure Key Vault connector you would be able to access & use the secret in your cloud flow or logic app.
Step 1: Add the action Get secret in the flow. After entering the name of the Key Vault and the sign button is clicked, the connection would be established.
There are different authorization flows available in Microsoft Graph which could be leveraged based on needs. If you are visiting my blog for the first time, please do look at my other blogposts.
Do you like this article?
Subscribe to my blog with your email address using the widget on the right side or on the bottom of this page to have new articles sent directly to your inbox the moment I post them.
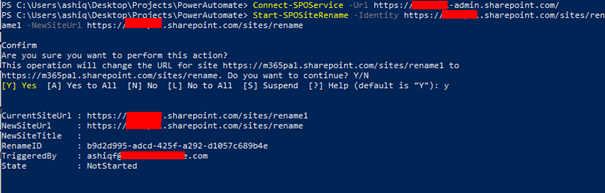
There is a possibility to change the SharePoint online site address of an existing site by a SharePoint admin or Global admin. There are different options to change the site URL from
Couldn’t create the site, please go back and try again.
SharePoint Online PowerShell to the rescue, run the following command as an Administrator after creating a site with some address from the start page or admin center to rename the URL
Philips Hue is a smart lighting solution provider with range of smart lights that can be controlled with your smart devices like your mobile phone, Google Home, Alexa etc through the applications developed by Philips. On top of applications from Philips, the Hue system also enables OAuth 2.0 to allow third party integrations to connect to Hue system resources. In this blog post, let us see how to use the Philips Hue OAuth 2.0 remote API to integrate with the Power Platform for controlling the lights.
Pre-Requisites:
Lights connected to the Hue Bridge. Hue bridge is a device which is the brain of the Philips hue smart lighting system that links the lights to the internet.
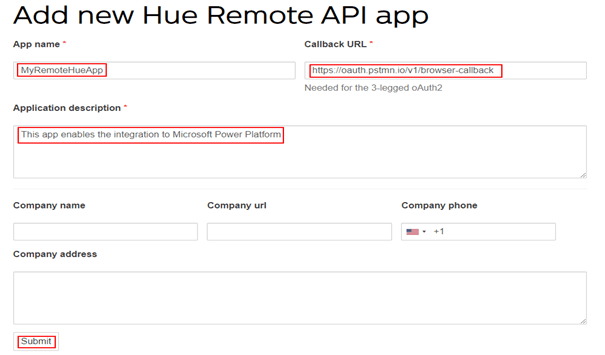
After entering the App name, Callback URL and the description, click the Submit button. For the callback URL I have provided the Postman browser call back url https://oauth.pstmn.io/v1/browser-callback facilitating OAuth 2.0 token generation from Postman. You can also enter http://localhost/ as the callback url. Find below screenshot of the newly registered Remote Hue API app
Copy the ClientId & ClientSecret which will be required to generate access token for controlling the Hue lights. The next step is to generate the access token.
Access Token Generation:
To access a Philips Hue API endpoint to turn on/off or change colours of light, an access token is required. To generate an access token, the first step is to generate an authorization code. Construct the following URL
GET https://api.meethue.com/oauth2/auth?clientid=<clientid>&appid=<appid>&deviceid=<deviceid>&devicename=<devicename>&state=<state>&response_type=code
ClientId: From the app registration.
ClientSecret: From the app registration.
AppId: From the app registration, the name of the app. Per the above screenshot, it is myremotehueapp
DeviceId: The device identifier must be a unique identifier in a string format for the app or device accessing the Hue Remote API.
DeviceName: The name of the app accessing the remote api.
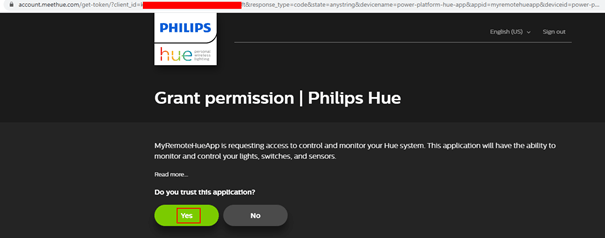
Access the URL in a browser, you will be prompted to accept or decline the permission grant to the created app.
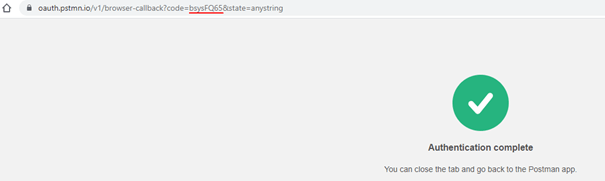
Once the app is trusted, there will be an authorization code automatically generated on the browser address bar as shown below
Make a note of the code which will be used to generate access token. To Deactivate an existing App or see all the list of existing apps, login to https://account.meethue.com/apps.
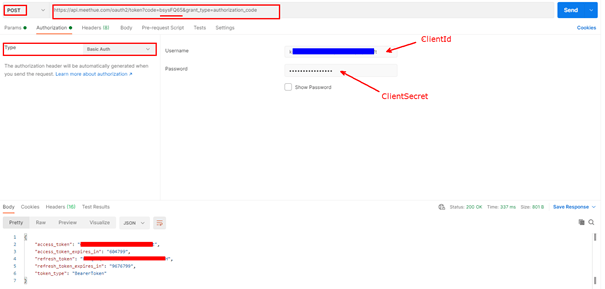
To generate an access token using Basic Authentication, make the following HTTP request using Postman or any other tool
Replace the code value with yours generated from the authorization grant request.
Authorization Type: Basic Auth. Username should be ClientId of the App and Password should be ClientSecret
Find below screenshot from Postman with the above HTTP POST request, make a note of the access token and refresh token from the response section of the request.
The Access token is approximately valid for 7 days and the refresh token for 100 days. Let us now see, how to refresh the access token.
Refresh Access token:
The access token is valid only for 7 days, to use it beyond 7 days there must be a new access token generated using the Refresh token. Find below the request details using Basic Authentication
Control the Hue Lights using the generated Access token:
Till now we have seen how to register a remote API app, generate access token and to refresh it before it expires. Let us now see how to use the access token to turn on/off, change colours etc with the remote API endpoints. To enable this experience, there must be a username created first.
User Name Creation:
Find the HTTP request details to enable the Link button
The devicetype is the appid or the name of the remote app
Headers:
Content-Type: application/json
Authorization: Bearer access_token
Copy the username from the above request response.
Turn On/Off Hue Lights:
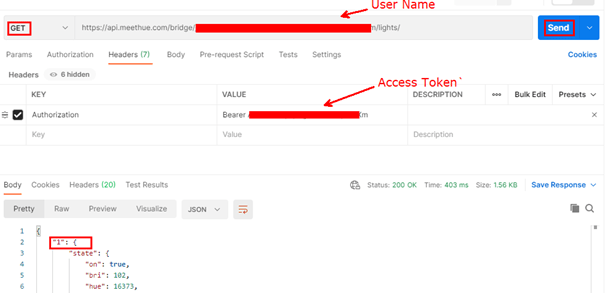
To turn On/Off the light, the first step is to get the Light no you are trying to control. To get the list of lights, make the following request with the user name generated above
The Philips Hue system uses Chromaticity to set the colour of the light. Chromaticity consists of two independent parameters, often specified as hue (h) and colourfulness, where the latter is alternatively called saturation, chroma. Find below diagram which will help you to set the colour of the light
Find below HTTP request details for setting the colour to RED
Change the XY values for different colours. To increase/decrease brightness update the bri attribute. With the help of the above diagram, for colour GREEN the XY value is 0.350000, 0.550000
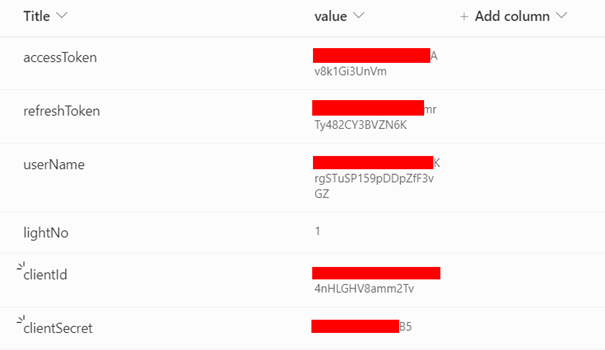
As you have seen above, to control the lights an access token and username is required. Store the information in a SharePoint list which will make it easier to get the Client Id, Client Secret, light no, refresh token etc. Find below the list schema I have created to manage the Light configuration.
Refresh the Access Token:
As the token is valid only for 7 days, create a scheduled Power Automate cloud flow which can run once in 6 days to create a new token using the Refresh token. Refer to the earlier section for the API endpoint details to refresh the token.
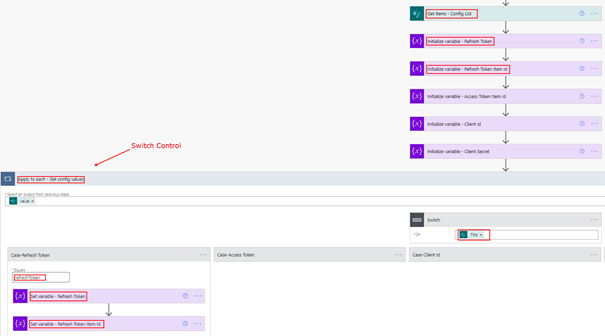
After the trigger is added, add the SharePoint connector to get values of the Refresh Token, Client Id, Client Sercret etc
Initialize variables to store the values retrieved from the SharePoint list
Add a Switch control to store the values on the variable.
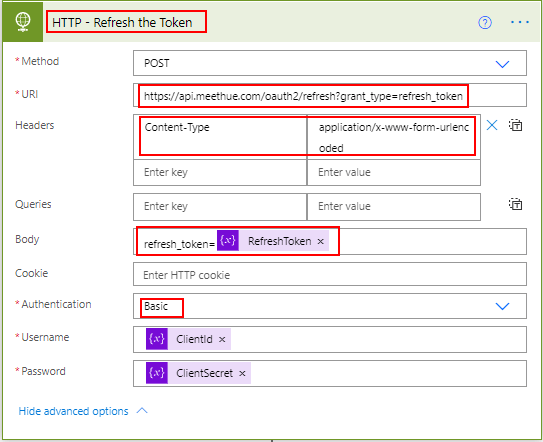
Add a HTTP action to refresh the token as shown below
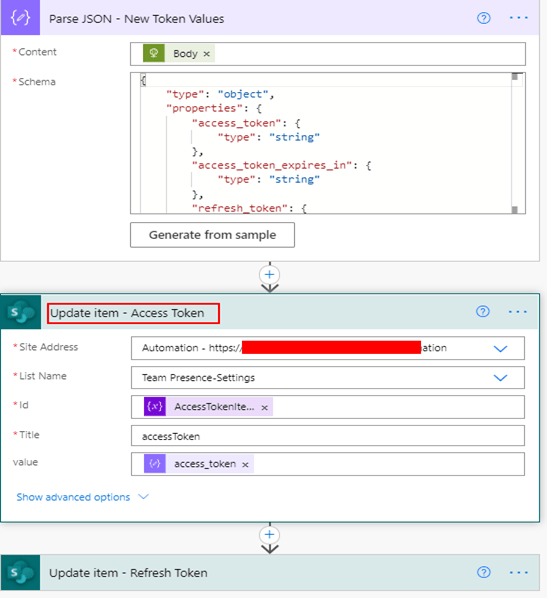
Add the JSON parse action to get the new token values including the new Refresh Token. Once the refresh token is used, it cannot be used again.
After getting the new values, update the access token & Refresh token in the SharePoint list.
To turn on/off or set different colours of the light from Power Automate or Power Apps, create a Flow with HTTP action & call the API given in the above section. To call the flow in Power Apps, use the Power Apps trigger or use a custom connector.
Control Lights from a .Net application:
Find code below to turn on/off light from a .NET application
private static async Task<string> TurnOnPhilipsHue(string accessTokenPhilipsHue, string userNamePhilipsHue, string lightNoPhilipsHue)
{
	string requestUrl = "https://api.meethue.com/bridge/" + userNamePhilipsHue + "/lights/"+ lightNoPhilipsHue + "/state";
	using var client = new HttpClient();

	var payload = "{\"on\": true,\"bri\": 102}";
	client.DefaultRequestHeaders.Authorization = new AuthenticationHeaderValue("Bearer", accessTokenPhilipsHue);
	var requestData = new StringContent(payload, Encoding.UTF8, "application/json");
	var response = await client.PutAsync(String.Format(requestUrl), requestData);
	var result = await response.Content.ReadAsStringAsync();
	return result;
}
I have used this light to build a Microsoft Teams status light, will post the link as soon as it is available. Hope you have found this informational & thanks for reading. If you are visiting my blog for the first time, please do look at my other blogposts.
If the HTTP request you make in Power Automate cloud flow gets a 200 OK response, all is good but if the HTTP response has the status codes like 408 – Request Timeout, 429 – Too many requests, 522 – Connection Timeout, 404 – Not found, 400 – Bad request etc there is a problem which needs attention. This post will show you how to handle HTTP request failures using
Retry Policy
Custom Retry for requests which cannot be handled by Retry Policy
Take actions based on HTTP status code
Retry Policy:
A Retry Policy specifies how the action or trigger retries a request when the original request times out or fails. The retry policy handles the following HTTP status codes
408 – Request Timeout
429 – Too many requests
5xx – xx refers to any number like 500 – Internal server error, 503 – Service Unavailable, 522 – Connection timed out etc
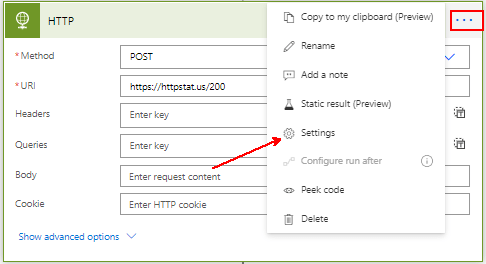
HTTP Action supports retry policy and by default the action retries 4 times at exponentially increasing intervals if there is a request failure. To view or update the Retry Policy configuration settings for the HTTP action, navigate to settings as shown on below screenshot
If you have to retry the request for more than 4 times or set some custom interval between retries, you can do so by changing the retry policy from Default to Fixed interval or Exponential interval as shown below
The policy waits for a specified interval before sending the next request.
There will not be any retry if the policy is set to None. For more details on the retry policies, go through this documentation from Microsoft. Find below screenshot of a Fixed Interval Retry Policy which attempts to make a HTTP request 5 more times after the first failed request with a 10-minute delay between each attempt.
The retry interval accepts value in ISO 8601 format. In the above screenshot for the interval field with value PT10M
P is the duration designator and T is the time designator, where M is the minute designator. PT5S translates to 5 seconds. For testing the policy with the HTTP action you can get sample http request links with different status codes request url’s from https://httpstat.us/.
The retry information will be logged in the flow Run history as shown below
Custom Retry for requests which cannot be handled by Retry Policy:
The retry policy handles only HTTP status codes 408, 429 and 5xx. On this section let us see how to handle the other types of HTTP status codes or non-retry-able errors. Let us take an example with a requirement to retry HTTP request with status code 400 – Bad request till the request succeeds.
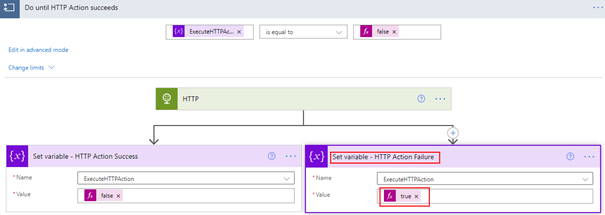
Step 1: Initialize a boolean variable ExecuteHTTPAction with the default value true. For the Boolean value use the expression true.
Step 2: Add a Do until control. The loop runs for a maximum of 60 times (Default setting) until the HTTP request succeeds or the condition is met. The Left side placeholder should have the ExecuteHTTPAction variable as a value and the right side should have Boolean variable False. Use Expression to enter the Boolean variable false.
Toggle between Edit in advance mode and Edit in basic mode if the right side placeholder to enter value is disabled.
Step 3: Add the HTTP request action and an action to Set variable ExecuteHTTPAction named as Set Variable – HTTP Action Success. Set the value of the variable to boolean false which means on HTTP action success (200 OK), there should not be any retry.
Step 4: Once the Set variable action is added, just above the action click + and Add a parallel branch as shown in the above picture. On the other side of the branch add an action Set variable named as Set variable – HTTP Action Failure to set the ExecuteHTTPAction variable to true which means there should be retry
Step 5: The last step is to configure Run after for the action Set variable – HTTP Action Failure. Find below screenshot for the Run after configuration
No change is required for Set variable – HTTP Action Success, just ensure the Set variable – HTTP Action Failure has the Run After has failed. You can add a Delay action after the parallel branch to make sure the HTTP request is made after certain interval based on scenario. You can also add scope controls for TRY, RETRY etc.
Alternative Method:
The other way to do this without adding the parallel branch is as shown below
Take actions based on HTTP status code:
If you have to take different actions based on the HTTP status code, for example call a different API when there is an HTTP 404 – Not found etc. The quick way to do this is get the HTTP status code of the HTTP request by adding the Compose action below the HTTP request action and select the Status code from the Dynamic content which is an Output of the action HTTP.
Now configure the run after for the compose action as shown below
The compose action would now be able to capture all type of HTTP status code. With the status code in hand, add a switch control to take different actions based on HTTP status code.
Summary:
On this post we have seen how to handle different HTTP request failures codes with options to Retry in your Power Automate flow. You can apply this technique to handle HTTP request made via custom connector, SharePoint Connector etc. Hope you have found this informational & thanks for reading. If you are visiting my blog for the first time, please do look at my other blogposts.
SharePoint and Microsoft teams services in Microsoft 365 makes it easier to share content or collaborate with external users who is outside your organization. A guest or external user is someone who do not have a school or work account with your organization, they can be your partner, vendor, customer etc. In this article let us see how to build a self-registration experience for external users with the help of Microsoft Forms & Power Automate to onboard them to a
SharePoint online site
Microsoft Team
Microsoft Form to collect details from External User:
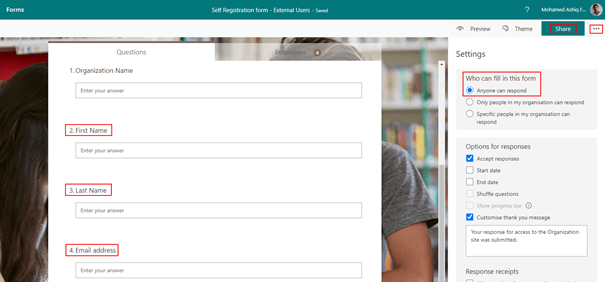
To start building this experience, create a Microsoft form with the setting Anyone can respond and with fields (Name, Email address etc) to collect information from the external user to send invitation.
Azure Active Directory Application registration:
The next step after creating the form is to register an application in Azure AD with Microsoft graph API permission to send invitation to external user. After the app is registered obtain the client id, client secret & tenant id to be used in the Power Automate flow further down this article to generate the JSON webtoken to access Microsoft Graph API for sending invitation. Find below screenshot with the permission User.Invite.All added to the app. Keep in mind the permission requires Admin consent.
There is also delegated permission available for User.Invite.All.
Onboard External users to a SharePoint online site:
Once the Microsoft form is ready, we can start building the Power Automate flow which can send the email invitation to the external user and for granting access to the SharePoint site. The external sharing features of SharePoint Online enables users in your organization share content with people outside the organization. There is no limit to the number of guests you can invite to SharePoint sites as per this SharePoint online limits documentation. Find below steps to create the Power Automate flow with a custom approval on a Microsoft Team
Power Automate Flow:
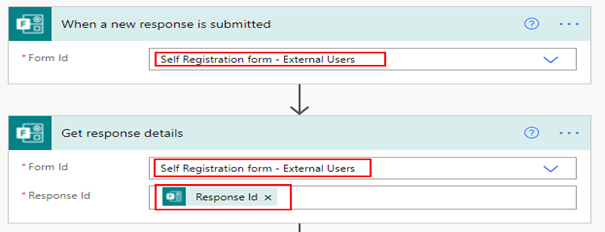
Create an Automated flow with the trigger When a new response is submitted with the above form name selected on the dropdown and then add the action Get response details with the Response Id selected from the dynamic content for the trigger to get the form details submitted in the Microsoft form by the external user. Find screenshot below
Adaptive card for Teams Approval:
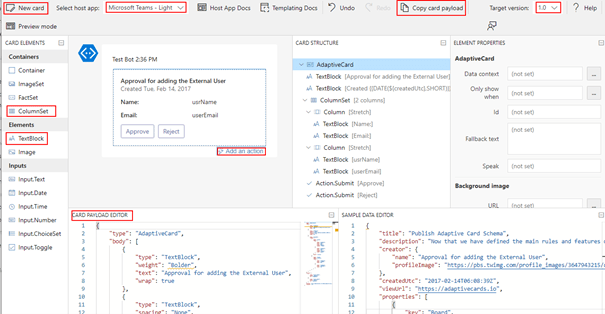
For the Approval in Microsoft Teams, I have used a custom card created from the Adaptive card designer with elements ColumnSet, TextBlock to display information submitted in the form & action button Approve and Reject to take further action by a Microsoft teams user to proceed with Invitation for the Guest account creation. Find screenshot below from the adaptive card designer
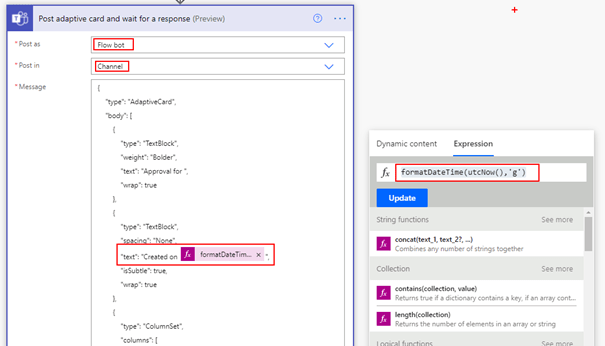
After the card is designed, copy the card payload from the designer and go to the flow and then add the action Post adaptive card and wait for a response and make appropriate selection on the available fields as shown below
Post as: Flow bot
Post in: Channel
Message: Payload copied from designer. Replace the fields for usrName & userEmail selected from the dynamic content from the outputs of the action Get response details. The created on textBlock element has the flow expression formatDateTime(utcNow(),’g’) to display the current datetime information on the card.
Update Message: Custom message which appear after an action taken in Microsoft Teams
Team: Select the Team where you would like to post the card
Channel: Select the channel from the Microsoft Team where you would like to have the approval adaptive card posted
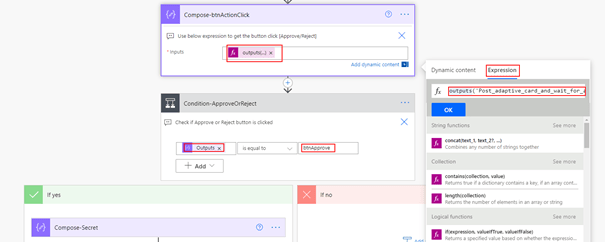
The above adaptive card is used to get approval from the Organization teams user based on the information submitted by the external user in the Microsoft form to proceed with the next steps for sending the guest account invite. Now we will have to identify if the user has clicked the button Approve or Reject. This information can be easily obtained from the Outputs of the action.
Note: Adaptive card can also be sent using a Microsoft Graph API with the card payload in Attachments field
Adaptive card for Teams – Dynamic content Missing:
As of the time I am writing this article there is an issue in getting the output as dynamic content for the Post adaptive card and wait for a response action if there is dynamic content added on the JSON Payload (Name, Email from Forms). The fix is to run the flow till the post adaptive card action and take an action on Microsoft teams by clicking either Approve or Reject and then go to the Flow run from the history as shown below
From the above screenshot, we can see if the user has clicked the Approve or Reject button from the field submitActionId. To get this value in Flow, use the expression
To get the submitActionId, enter the expression outputs(‘Post_adaptive_card_and_wait_for_a_response’).body.submitActionId in the compose action, then add a condition control to decide action based on users approval
I have observed this issue occurs in other team’s adaptive card actions as well, the above fix should work. Now we can implement the logic to send the Guest Invitation using Microsoft Graph API. To send the invite, we will use the Azure AD application registered above.
Generate JSON Web token to Access Graph API:
Be ready with the ClientId, Client Secret and Tenant Id collected from the AD app registration you have done initially. The only authentication flow to generate a access token for application permissions is Client credentials.
To generate a token
Store the Client Secret on a String variable or a compose action
Make a HTTP request using the HTTP connector with the following details. Make sure to replace the string for tenantId, azureAdAppclientId and azureAdAppclientSecret
Add a HTTP connector action to the flow for making a POST request per the following information
For the client secret make sure to URL encode using the expression encodeUriComponent(variables(‘clientSecret’)) else the request may fail due to the presence of special characters.
In the above screen, I have added a compose action to store the SharePoint site address to be used for granting the external user access to. To extract the token from the above request, add the parse JSON action with Content from the HTTP request body and the following schema
Include the access token when calling the Microsoft Graph API in the Headers section or raw as shown in the next section.
Send Invitation using Microsoft Graph API:
Before sending the invitation, validate if the user already exists in your organization AD tenant by using the email address of the external user with the help of the action Search for users as shown below
If there is null response for the action Search for users, then the user does not exist. This can be calculated using the expression length and by passing the value as a parameter, if it is equals zero then the external user does not exist. If the user already exists, we can directly proceed to granting the external user access to SharePoint.
Graph API to check if a guest user already exists:
{
  "invitedUserDisplayName": "External User Name",
  "invitedUserEmailAddress": "External User Email Address",
  "sendInvitationMessage": true,
  "inviteRedirectUrl": "SharePoint site URL or any URL",
  "invitedUserMessageInfo": {
    "messageLanguage": "en-US",
    "customizedMessageBody": "Welcome to the M365PAL SharePoint site! Click the link below and sign in."
  }
}
In HTTP request body, use the dynamic content of the form to populate the fields invitedUserDisplayName & Emailaddress. The invite redirectUri is the output of the compose action which has the SharePoint site url. I have added a delay of one minute before granting access to SharePoint site for the external user, this step is to make sure there is an entry in Azure AD for the external user/guest account.
Grant Access to SharePoint site for the external user:
As soon as the guest account invite is sent from the above Microsoft graph API request HTTP action, it is time to grant access to the SharePoint site for the external user. There is a SharePoint REST API endpoint to add a user to a SharePoint group (Owners, Member, Visitors), find below the request details
For the external user, the email address used to send the invite works.
Go back to the flow and add the action Send an HTTP request to SharePoint to call the above REST api. Find below the screenshot of the action
The above action uses delegated permission, the user of the connection should have access to the SharePoint site. As of now, there is no Graph API for adding the user to a SharePoint group but you can register an app in Active directory and add permission for SharePoint to call the above REST API. Refer to the documentation Granting access via Azure AD App-Only for calling the REST API using the registered AD app.
Testing the flow:
The whole flow can now be tested by submitting the form which sends the adaptive card on Teams first as shown below
After the card is approved, the invite is sent to the external user. After the external user accepts the invite, the user should be automatically redirected to the SharePoint site with the appropriate access. The access to the SharePoint site for the external user can be validated by the checking the membership of the SharePoint group in the site even before the user accepts the invitation. The site members can also be validated by accessing the URL for All users list:
This approach of granting access to SharePoint site for external user can be applied to internal users by turning off the access requests.
Limit External Sharing by domain:
The external sharing on SharePoint can be restricted based on domain of the external user. To enable the setting login into the SharePoint admin center > Policies > Sharing > Enable the checkbox Limit external sharing by domain > Add domain
Onboard External users to a Microsoft Team:
To onboard the external user to a Microsoft Team, the only change to the above flow is, instead of adding the user to the SharePoint group the user must be added as a Member to the Microsoft 365 group connected to the Microsoft Teams. The graph API to add a member to a Microsoft Team is
The expression to get the user object Id of the external user as per the below screenshot is
outputs(‘HTTP-SendGuestInvitation’).body.invitedUser.Id The expression can be used in a compose action to get the Object Id of the external user which can be used in the Graph API request to add the member to a Team. HTTP-SendGuestInvitation is the name of the HTTP Action.
Permission for the Azure AD App to add a member to a Microsoft Team:
The application permission Group.ReadWrite.All has to be added on the Azure AD app, if you are going to be using the same JSON webtoken generated above. There is delegated permission as well for adding members.
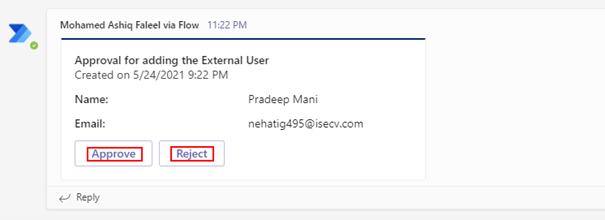
Summary: With this, the Power Automate flow should send the invitation as shown below to the external user.
If it is for a Microsoft Team, the external user should be licensed for teams service to open it on their teams client. The same flow can be also configured for Microsoft 365 group. If you are visiting my blog for the first time, please do look at my other blogposts.
Microsoft 365 CLI helps you manage configuration settings of Microsoft 365 tenant and its various services like SharePoint, Power Automate, Power Apps, Microsoft Graph etc and to build automation scripts on any platform. Refer to this post Resubmit your failed Power Automate flow runs automatically using M365 CLI and REST API for the steps to execute & to get started with M365 CLI commands. Find below the cmdlet to cancel a flow run
You can run the M365 CLI commands stored in a file like PowerShell cmdlets. Find below the M365 CLI cmdlets stored in a PowerShell file (.ps1) to cancel the running flow runs automatically.
$flowEnvironment=$args[0]
$flowGUID=$args[1]
$flowRuns = m365 flow run list --environment $flowEnvironment --flow $flowGUID --output json | ConvertFrom-Json
foreach ($run in $flowRuns)
{
    if($run.status -eq "Running")
	{
		Write-Output "Run details: " $run
		# Cancel all the running flow runs
		m365 flow run cancel --environment $flowEnvironment --flow $flowGUID --name $run.name --confirm
		Write-Output "Run Cancelled successfully"
	}
}
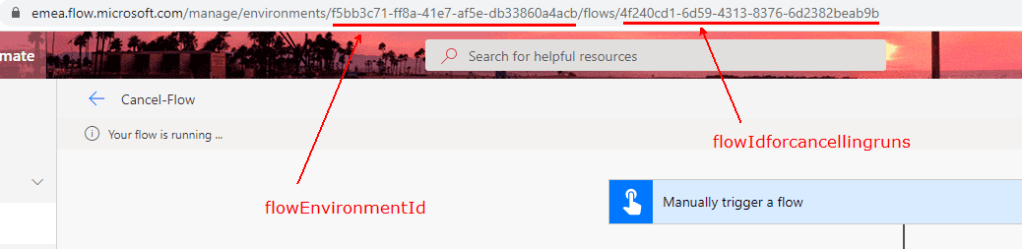
The above script stored in file with .ps1 extension can be executed as shown below on the Power Shell command line by passing the Flow Environment ID and the Flow ID in the command line
To get the Flow Environment Id and Flow Id, refer to the below screenshot
The script to cancel all ongoing flow runs can be downloaded from my GitHub here. Find below screenshot after running the script.
Power Automate REST API:
There are Power Automate REST API endpoints to list the Flow Runs and to cancel a run. Go through the following blog post for more information on how access the Power Automate REST API endpoints
The above-mentioned blogpost will help you to call the following Power Automate REST APIs from a custom connector and programmatically from other applications.
Summary: I would recommend getting familiar with Microsoft 365 CLI which has various cmdlets to make your job easier. The syntax of all commands is well documented with examples. Hope you have found this informational & thanks for reading. If you are visiting my blog for the first time, please do look at my other blogposts.
Have you ever been forced to resubmit lot of failed Power Automate flow runs manually, if so this blog post will help you to automatically resubmit the flow runs using
CLI for Microsoft 365
Power Automate REST API
Power Automate Management connector
CLI for Microsoft 365:
Microsoft 365 CLI helps you manage configuration settings of Microsoft 365 tenant and its various services like SharePoint, Power Automate, Power Apps, Microsoft Graph etc and to build automation scripts on any platform.
Getting started: The CLI for Microsoft 365 is available and distributed as an NPM package. To use it, install it globally using:
npm i -g @pnp/cli-microsoft365
To install the beta version
npm i -g @pnp/cli-microsoft365@next
To update to the latest stable version
@pnp/cli-microsoft365@latest
Next, login to Microsoft 365 CLI using the following command.
m365 login
You will be presented with a code and a login URL https://microsoft.com/devicelogin, navigate to the URL and enter the code > Sign-in using the Microsoft 365 work account. The above command uses device code flow to authenticate and authorize the user through an Azure Active directory app PnP Management Shell. If you are accessing M365 CLI for the first time, you may have to consent for permissions. After the sign-in process is completed, you can enter various commands available within Microsoft 365 CLI.
Let us start with a basic command to list all Power Automate environments in your Tenant
m365 flow environment list
You can try the various cmdlets available as shown in the below screenshot with in Microsoft 365 CLI from the following url
There are cmdlets which accepts JMESPath to query. You can run the M365 CLI commands stored in a file like PowerShell cmdlets. Find below the M365 CLI cmdlets stored in a PowerShell file (.ps1) to resubmit the failed flows automatically.
$flowEnvironment=$args[0]
$flowGUID=$args[1]
$flowRuns = m365 flow run list --environment $flowEnvironment --flow $flowGUID --output json | ConvertFrom-Json
foreach ($run in $flowRuns)
{
    if($run.status -eq "Failed")
	{
		Write-Output "Run details: " $run
		#Resubmit all the failed flows
		m365 flow run resubmit --environment $flowEnvironment --flow $flowGUID --name $run.name --confirm
		Write-Output "Run resubmitted successfully"
	}
}
The above script stored in a file can be executed as shown below by passing the Flow Environment ID and the Flow ID in the command line
You can modify the script to Resubmit flow run according to your requirement, for e.g. within a certain date range since there is information on the run start date. There are sample scripts available in the github repo for M365 CLI submitted by community members
There are Power Automate REST API endpoints to list the Flow Runs and to re-submit a run. Go through the following blog post for more information on how access the Power Automate REST API endpoints
The above-mentioned blogpost helps you to call the following Power Automate REST APIs from a custom connector and programmatically from other applications.
There is also an action to Resubmit flow run from the Power Automate management connector. Find the action below to resubmit a flow run with the details filled in. The environment and the flow value has to be selected from the dropdown.
For the trigger name, you can get the exact name from the flow definition file or using the expression trigger() added to the flow on a compose action.
To get the flow definition file go to the flow and export it as a Package.zip
Open the Zip package, go to the path Microsoft.Flow\flows\{flowGUID} and then open the file definition.json. Search for the keyword triggers, you can find the name of the trigger
In a Power Automate flow, you can get the flow run details using the following expression.
workflow()
Find below test result of a flow run using the expression workflow() on the compose action which has the runid and other details of the flow run.
With these possibilities you can automatically resubmit a failed flow run (time out, failure due to config change etc) if the details of the failed flows are logged somewhere.
There is also PowerShell support for Power Platform, do look at the following documentation to get to know the list of available cmdlets:
Cmdlet Get-FlowRun, gets all the flow runs of a particular flow.
Summary: I would recommend getting familiar with Microsoft 365 CLI which has various cmdlets to make your job easier. The syntax of all commands is well documented with examples. Hope you have found this informational & thanks for reading. If you are visiting my blog for the first time, please do look at my other blogposts.
Power Automate Management connector enables interaction with Power Automate management service to manage your flows with different actions to create, edit and update flows. If you want to do more but you were not able to find an action with this connector for e.g. get details on the Runs the flow has made, as of now there is no action which gets the run details of a flow with the Power Automate Management connector. So how to get the Runs the flow has made and even more actions like turning on/off/disable a flow etc? There are REST APIs with different endpoints for Power Automate, as of now there is no documentation from Microsoft on these API’s but there is documentation for Azure Logic Apps REST API. It is quite easy to convert the Logic Apps REST API for Power Automate operations. The APIs are secured with Azure AD OAuth 2.0, in this blog post let’s see how to call these API’s using
Custom Connector
Authorization code flow
Implicit flow
Let’s start this post with the API endpoint to list the flow runs for Azure Logic Apps & Power Automate. Find below the API endpoint for Azure Logic apps as per this documentation to list the Workflow Runs
The API version for Power Automate can be different in Microsoft 365 when compared against Azure Logic Apps. This information can be identified using fiddler or any browser-based developer tool (Network) by analyzing the http request traffic the portal makes to API endpoints for different operations after logging in to the Power Automate Portal. Find below screenshot regarding the API version on the home screen of the portal
As a first step towards accessing the API endpoint for Power Automate, there must be an Azure Active directory app registered in the AD tenant of the Microsoft 365 environment which has the Power Automate environment.
Azure Active Directory App Registration:
Register an application in Azure AD and obtain the client id, client secret & tenant id for the registered application. After the app is registered, follow the below steps to grant permission for the app to call the Power Automate Flow APIs:
In the App, click the API permission under the Manage blade and then click + Add a permission. Under the Microsoft APIs tab, click Flow Service as shown below
The flow API as of now supports only delegated permission (User Context). Now select the Permission based on the requirement. For this post, I have selected the permission Flows.Manage.All for listing the runs of the flow
The app is registered with the necessary configurations, let us now see how to call the Power Automate API using a custom connector. The custom connector takes care of generating the authorization token required to access the API using the authorization code flow.
Custom Connector to call the Power Automate APIs:
A custom connector is a wrapper around a REST API (Logic Apps also supports SOAP APIs) that allows Logic Apps, Power Automate or Power Apps to communicate with that REST or SOAP API. In the Power Automate portal expand Data on the left panel > Custom connectors > + New custom connector > Create from blank
After entering the connector name, in the General information enter the description and Host name to api.flow.microsoft.com
Now click Security on the right bottom corner to enter the Azure AD application information for the OAuth 2.0 authentication type. Under the section OAuth 2.0
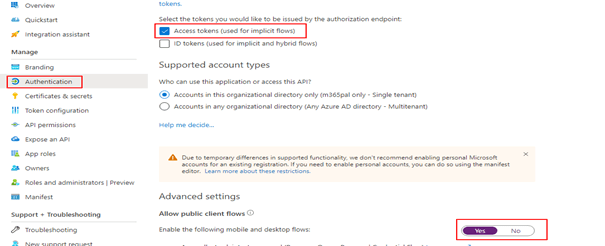
Change the Identity provider to Azure Active Directory
Enter the Client id & Client secret of the Azure AD application
After the above information is filled in, click Create connector which autogenerates the Redirect URL https://global.consent.azure-apim.net/redirect. This is the URL we have added as a Redirect Web URI in the Azure AD application. The connector is now ready for the actions to list the flow Runs with the help of Power Automate REST API endpoint.
Action to List Flow Runs:
The Power Automate REST API endpoint to list the flow runs is
After the custom connector is created in the above step, now click the Definition tab of the Custom Connector > click + New action to enter Summary, Description & Operation ID of the action > Click + Import from sample to enter the above API endpoint to list the flow runs in URL box and Verb as GET > Click Import
Click Update connector. To the test the action, click Test at the bottom right corner. In the following screen, create a connection and then pass the parameters for Power Automate Environment, Flow GUID & API Version of the Power Automate REST API. Flow GUID & Environment ID can be obtained from any of your existing flow in the environment. To get these information navigate to the My Flows section in the Power Automate portal and click any flow, the information will be on the URL as shown on the below sample
After entering the details, click Test operation to get the list of run details the flow had till now. You can get details like the status of the flow, flow start time & endtime, flow run id etc on the response
Copy the Response body from the above screen to add it to the default response for the action. Click the + Add default response on the action definition screen > Click + Import from sample > Paste the copied value to the Body section > Click Import.
The above step is recommended to parse the information of the response either in Power Automate or Power Apps. The sample Custom connector used for this blogpost can be downloaded from here.
Find below some REST API endpoints for different operations:
The above operations are just some samples, if you would to get the REST API endpoint details for different operations, go through the Logic Apps rest API documentation. You can also use Fiddler tool or browser developer tools to help you in finding the corresponding API endpoints after logging in to the Power Automate portal and then performing various operations within the portal interface.
Custom connector takes care of generating the token automatically to call the Power Automate REST APIs secured with OAuth but if you have to call these API programmatically in an application, you can use any one of the below authentication flows to generate the token.
Authorization code flow for token generation:
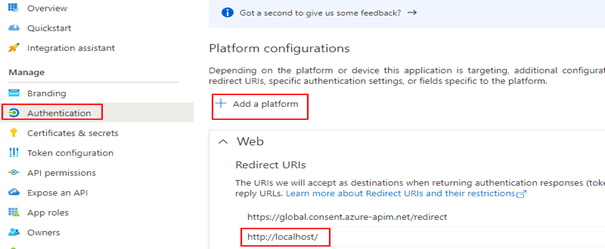
As the first step to generate the token using Authorization code flow, add the Redirect URI in the Azure Active directory app for your application. For this example, I have added http://localhost/ as a Redirect URI for the Web platform as shown below
Make the above change on the Azure AD application which was registered initially in this post to access Power Automate REST API. Construct the following URL after replacing the tenantId and azureAppId to generate the code in any browser for generating a token
After the above URL is accessed in the browser, you will be prompted to sign-in. Once the sign-in is complete, a code will be generated in the below format on the browser address bar as a response to the sign-in
The code can be used to redeem for an access token. Make the following HTTP request to generate the access token after replacing the tenantId on the request URL
Replace the AzureAppId, code value copied from the above request and the appClientSecret.
Headers:
Key: Content-Type
Value: application/x-www-form-urlencoded
Find screenshot below for the Postman request
The generated token can be used to access different Power Automate REST API endpoints based on the permissions you have consented to the Azure AD application by passing the token on the Authorization header as Bearer.
After any of the above URL is accessed in the browser, you will be prompted to sign-in. Once the sign-in is complete, access token will be generated in the below format on the browser address bar as a response to the sign-in
Also go through this documentation from Microsoft which has information of the different types of connectors to automate tasks with Power Automate.
Summary: On this post we have seen how to use Power Automate REST API to manage your cloud flows. These APIs works for both individual flows (My Flows) and flows which is part of the solutions. Power Automate REST APIs are very powerful to manage your cloud flows. I can think of scenario where in you can resubmit all your failed flows programmatically leveraging these API endpoints. Microsoft has documented WEB API for Power Automate flows included in solutions. If you are visiting my blog for the first time, please do look at my other blogposts.
I had a recent requirement to call a GraphQL based API secured with OAuth2 in Power Automate, this blog post is to share my learnings on GraphQL & how to call them in Power Automate. Let us quickly see some introduction to GraphQL
GraphQL is an open-source query language for your APIs with a service-side runtime for executing the queries based on pre-defined schema. It is not tied to any specific database but rather backed by your existing code and data.
A GraphQL API is different from a REST API in that it allows the client application to query for certain fields of resources. Send a GraphQL query to your API and get exactly what you need, like the name of a user and only receive that data.
GraphQL APIs get’s all the data a client needs in a single request.
It replaces multiple REST requests with a single call to fetch the data you specify.
Provides an abstraction layer to the client, which means that clients do not need to query multiple URLs to access different data.
Find some comparisons against REST
REST
GraphQL
HTTP Verbs (GET, POST, PATCH, PUT, DELETE) determines the operation to be performed
You will provide a JSON body aka GraphQL query whether you have to read or fetch values (GET) or a mutation (POST, PATCH, PUT, DELETE) to write values
When a HTTP GraphQL request is made with a query, the GraphQL server parses the query and respond back with data usually in a specific JSON format. There can also be variables in a query which makes it more powerful and dynamic. In GraphQL, the HTTP verb is predominantly POST but there can be implementations where Query & Variables are sent in URL encoded query parameters in the URL. I have used GitHub to learn & test GraphQL queries against my GitHub account.
GitHub GraphQL Explorer:
Github has GraphQL API that allows you to query and perform operations against repositories, users, issues, etc. To follow along this blogpost, sign in with your GitHub account on the GitHub GraphQL explorer URL https://docs.github.com/en/graphql/overview/explorer for testing some GraphQL queries
Create a Repository in your GitHub account
Get all your existing repositories
Let’s make first query on the explorer to get your GitHub Id for creating a new repo, the query is
{
  viewer {
    login
    id
  }
}
In Explorer
Type your queries on the left side panel and hit play to see the JSON response on the right side. Click the Docs link on the right top corner to go through the documentation. The GitHub graphql explorer can be a great starting point to learn and to write queries
Tip: Hitting Ctrl+Space on the explorer will show you all the available fields that you can query against the API.
Create a Repository in your GitHub account:
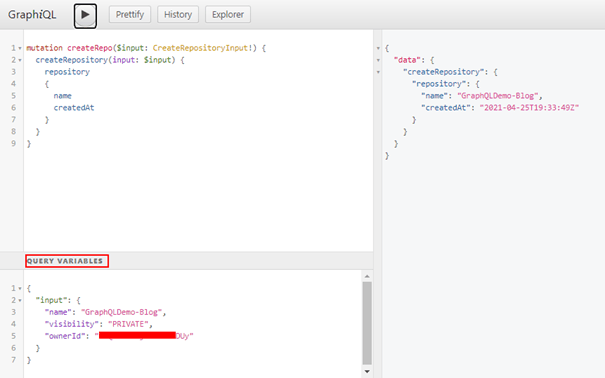
Find below the query & variables to create a Repo in your GitHub account. The ownerId on the query variables should be value copied from the previous query. The other observation on the query is we are using mutation since we are creating a repository
Query to create a Repo with out passing a query variable:
Find below the query to get all your existing repositories
{
  viewer {
    name
    repositories(first: 100) {
      totalCount
      nodes {
        name
      }
    }
  }
}
Till now we have seen couple of example queries in GitHub explorer, let us now see how to consume them in Power Automate
Call a GraphQL query in Power Automate:
HTTP connector in Power Automate can be used to call a GraphQL query based API but you will have to first convert the GraphQL query (Query+Variables) to a HTTP request with raw body. You can use the Postman utility to help you with the conversion. To call the above mentioned GraphQL query to create a Repo in Postman, the first step is create a Personal Access token. Create the token as per the instructions given in the following documentation with the scope repo selected
Token value should be the Personal Access token you have generated above. Find below screenshot for your reference in order to set the authorization token
In the request Body tab, enter the Query and GraphQL variables for creating the repo after selecting the Body type to GraphQL from none
On the query tab, CTRL+Space also works in Postman which autoprompts with some suggestions for fields.
Execute the request by clicking Send button which will create a New repo by the Name GraphQLDemo-blog in your github account. To call this GraphQL query in Power Automate, click the Code button as shown above on the right panel of the postman request and then select HTTP to auto generate a code snippet for making a HTTP request with raw body
Copy the request body as shown above. On the Power Automate HTTP connector, enter the following details to create the Repo
Summary: On this post we have seen how to call a GraphQL query based API from Github in Power Automate using a HTTP connector to create a Repo, this can be replicated to consume any other GraphQL based APIs. You can also construct dynamic request body on the HTTP connector for various operations. Hope you have found this informational & thanks for reading. If you are visiting my blog for the first time, please do look at my other blogposts.
With the assumption that you already know about Microsoft Graph and its capabilities I will directly jump in with the steps and instructions to call Microsoft graph Endpoints as a daemon app using Application permissions with the help of HTTP connector. Calling graph from a flow opens a wide range of possibilities which are not available with the prebuilt connectors. As of now you will not be able to call Microsoft graph with application permissions using a custom connector.
Pre-Requisites:
Access to HTTP Premium Connector in Power Automate
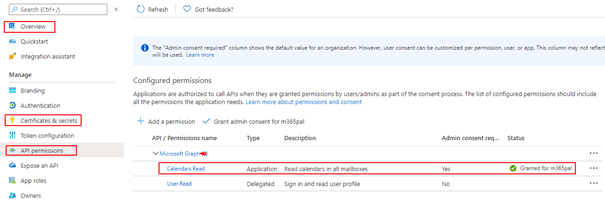
Register an application in Azure AD and obtain the client id, client secret & tenant id for the registered application. In this example I have added the Application permission Calendars.Read to access all the recent events of a user from Outlook.
It is not required in the Azure AD application to have a redirect URI.
Power Automate Flow:
It is now time to generate the graph token using the HTTP connector in flow which is a pre-requisite to call the Graph API endpoint. The only authentication flow to generate a access token for application permissions is Client credentials.
To generate a token
Store the Client Secret on a String variable
Make a HTTP request using the HTTP connector with the following details. Make sure to replace the string for tenantId, azureAdAppclientId and azureAdAppclientSecret
Method 1:
Add a HTTP connector action to the flow for making a POST request per the following information
For the client secret make sure to URL encode using the expression encodeUriComponent(variables(‘clientSecret’)) else the request will fail due to the presence of special characters.
To extract the token from the above request, add the parse JSON action with Content from the HTTP request body and the following schema
Summary: I have written a blog to get the attendee details of a meeting using this approach to Microsoft graph event endpoint API. Hope you have found this informational & thanks for reading. If you are visiting my blog for the first time, please do take a look at my other Microsoft graph in Power Automate blogposts.