
Power Automate Management connector enables interaction with Power Automate management service to manage your flows with different actions to create, edit and update flows. If you want to do more but you were not able to find an action with this connector for e.g. get details on the Runs the flow has made, as of now there is no action which gets the run details of a flow with the Power Automate Management connector. So how to get the Runs the flow has made and even more actions like turning on/off/disable a flow etc? There are REST APIs with different endpoints for Power Automate, as of now there is no documentation from Microsoft on these API’s but there is documentation for Azure Logic Apps REST API. It is quite easy to convert the Logic Apps REST API for Power Automate operations. The APIs are secured with Azure AD OAuth 2.0, in this blog post let’s see how to call these API’s using
- Custom Connector
- Authorization code flow
- Implicit flow

Let’s start this post with the API endpoint to list the flow runs for Azure Logic Apps & Power Automate. Find below the API endpoint for Azure Logic apps as per this documentation to list the Workflow Runs
Azure Logic Apps – List Workflow Runs:
GET
Find below the API endpoint for Power Automate to list the flow runs, the URL was formed based on the above Azure Logic apps URL.
Power Automate – List flow Runs:
GET
You can easily notice the differences in the table below:
| Azure Logic Apps | Power Automate |
| https://management.azure.com/subscriptions/{subscriptionId}/resourceGroups/{resourceGroupName}/ | https://api.flow.microsoft.com/ |
| providers/Microsoft.Logic | providers/Microsoft.ProcessSimple/environments/xxx-flow-env-guid-xxx |
| workflows/{workflowName} | flows/xxx-flow-guid-xxx |
| runs | runs |
| api-version=2016-06-01 | api-version=2016-11-01 |
The API version for Power Automate can be different in Microsoft 365 when compared against Azure Logic Apps. This information can be identified using fiddler or any browser-based developer tool (Network) by analyzing the http request traffic the portal makes to API endpoints for different operations after logging in to the Power Automate Portal. Find below screenshot regarding the API version on the home screen of the portal

As a first step towards accessing the API endpoint for Power Automate, there must be an Azure Active directory app registered in the AD tenant of the Microsoft 365 environment which has the Power Automate environment.
Azure Active Directory App Registration:
Register an application in Azure AD and obtain the client id, client secret & tenant id for the registered application. After the app is registered, follow the below steps to grant permission for the app to call the Power Automate Flow APIs:
- In the App, click the API permission under the Manage blade and then click + Add a permission. Under the Microsoft APIs tab, click Flow Service as shown below

- The flow API as of now supports only delegated permission (User Context). Now select the Permission based on the requirement. For this post, I have selected the permission Flows.Manage.All for listing the runs of the flow

- Add a Web Redirect URI https://global.consent.azure-apim.net/redirect as shown below to use the app in a custom connector

The app is registered with the necessary configurations, let us now see how to call the Power Automate API using a custom connector. The custom connector takes care of generating the authorization token required to access the API using the authorization code flow.
Custom Connector to call the Power Automate APIs:
A custom connector is a wrapper around a REST API (Logic Apps also supports SOAP APIs) that allows Logic Apps, Power Automate or Power Apps to communicate with that REST or SOAP API. In the Power Automate portal expand Data on the left panel > Custom connectors > + New custom connector > Create from blank

After entering the connector name, in the General information enter the description and Host name to api.flow.microsoft.com

Now click Security on the right bottom corner to enter the Azure AD application information for the OAuth 2.0 authentication type. Under the section OAuth 2.0
- Change the Identity provider to Azure Active Directory
- Enter the Client id & Client secret of the Azure AD application
- Leave the Login URL as https://login.windows.net & Tenant ID as common
- Enter the Resource URL as https://service.flow.microsoft.com/

After the above information is filled in, click Create connector which autogenerates the Redirect URL https://global.consent.azure-apim.net/redirect. This is the URL we have added as a Redirect Web URI in the Azure AD application. The connector is now ready for the actions to list the flow Runs with the help of Power Automate REST API endpoint.
Action to List Flow Runs:
The Power Automate REST API endpoint to list the flow runs is
Http Request Mode: GET
After the custom connector is created in the above step, now click the Definition tab of the Custom Connector > click + New action to enter Summary, Description & Operation ID of the action > Click + Import from sample to enter the above API endpoint to list the flow runs in URL box and Verb as GET > Click Import

Click Update connector. To the test the action, click Test at the bottom right corner. In the following screen, create a connection and then pass the parameters for Power Automate Environment, Flow GUID & API Version of the Power Automate REST API. Flow GUID & Environment ID can be obtained from any of your existing flow in the environment. To get these information navigate to the My Flows section in the Power Automate portal and click any flow, the information will be on the URL as shown on the below sample
Flow Details URL: https://emea.flow.microsoft.com/manage/environments/xxxx-flow-env-guid acb/flows/flow-guid-xxxx-xxxx-xxxxxxxxxxx/details
After entering the details, click Test operation to get the list of run details the flow had till now. You can get details like the status of the flow, flow start time & endtime, flow run id etc on the response

Copy the Response body from the above screen to add it to the default response for the action. Click the + Add default response on the action definition screen > Click + Import from sample > Paste the copied value to the Body section > Click Import.

The above step is recommended to parse the information of the response either in Power Automate or Power Apps. The sample Custom connector used for this blogpost can be downloaded from here.
Find below some REST API endpoints for different operations:
Get Flow Details:
HTTP Request Type: GET
Resubmit a flow run:
HTTP Request Type: POST
Cancel a flow run:
HTTP Request Type: POST
Turn On or Turn Off a Flow:
HTTP Request Type: POST
Add a Owner:
HTTP Request Type: POST
URL: https://api.flow.microsoft.com/providers/Microsoft.ProcessSimple/environments/ {FlowEnvironment}/flows/{FlowGUID}?api-version=2016-11-01
Body:
{“put”:[{“name”:”userGUIDhere”,”properties”:{“principal”:{“id”:”userGUIDhere”,”displayName”:”userDisplayNamehere”,”email”:”userUPNhere”,”type”:”User”}}}]}
Delete a Flow:
HTTP Request Type: DELETE
The above operations are just some samples, if you would to get the REST API endpoint details for different operations, go through the Logic Apps rest API documentation. You can also use Fiddler tool or browser developer tools to help you in finding the corresponding API endpoints after logging in to the Power Automate portal and then performing various operations within the portal interface.
Custom connector takes care of generating the token automatically to call the Power Automate REST APIs secured with OAuth but if you have to call these API programmatically in an application, you can use any one of the below authentication flows to generate the token.
Authorization code flow for token generation:
As the first step to generate the token using Authorization code flow, add the Redirect URI in the Azure Active directory app for your application. For this example, I have added http://localhost/ as a Redirect URI for the Web platform as shown below
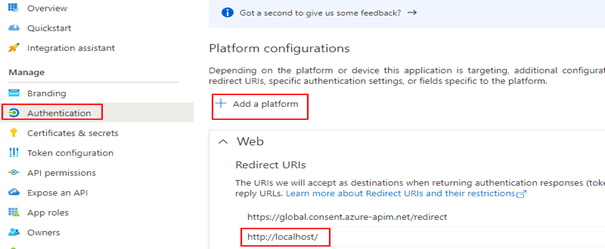
Make the above change on the Azure AD application which was registered initially in this post to access Power Automate REST API. Construct the following URL after replacing the tenantId and azureAppId to generate the code in any browser for generating a token
https://login.microsoftonline.com/tenantId/oauth2/authorize?
client_id=azureAppId
&response_type=code
&redirect_uri=http://localhost/
&scope=https://service.flow.microsoft.com//.default
After the above URL is accessed in the browser, you will be prompted to sign-in. Once the sign-in is complete, a code will be generated in the below format on the browser address bar as a response to the sign-in
http://localhost/?code=0.xxxxxxxxxxxxxxxxAA&session_state=88f349ba-63e3-4064-b9c9-992ba6c5606c#
The code can be used to redeem for an access token. Make the following HTTP request to generate the access token after replacing the tenantId on the request URL
Request Type: POST
Request URL: https://login.microsoftonline.com/{tenantId}/oauth2/v2.0/token
Body:
client_id= azureAppId
&scope=https://service.flow.microsoft.com//.default
&code=0.xxxxxxxxxxxxxxxxAA
&redirect_uri=http://localhost/
&grant_type=authorization_code
&client_secret=appClientSecret
Replace the AzureAppId, code value copied from the above request and the appClientSecret.
Headers:
Key: Content-Type
Value: application/x-www-form-urlencoded
Find screenshot below for the Postman request

The generated token can be used to access different Power Automate REST API endpoints based on the permissions you have consented to the Azure AD application by passing the token on the Authorization header as Bearer.
Reference for the error message I was receiving while working this flow “Access token has been obtained from wrong audience”: https://github.com/AzureAD/microsoft-authentication-library-for-js/issues/1735
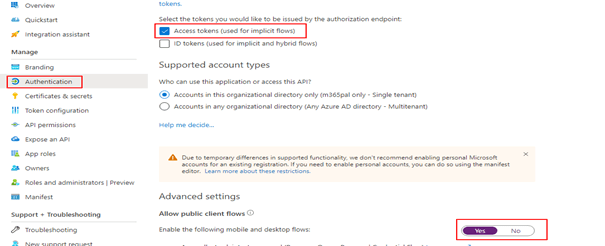
Implicit flow for token generation:
To generate a token using implicit flow, enable the following setting on the Azure Active directory app
Construct the following URL after replacing the tenantId and azureAppId to generate the access token directly in any browser
https://login.microsoftonline.com/tenantId/oauth2/v2.0/authorize?
client_id=azureAppId
&response_type=token
&redirect_uri=http://localhost/
&scope=https://service.flow.microsoft.com//.default
Or
https://login.microsoftonline.com/common/oauth2/authorize?resource=https://service.flow.microsoft.com/&response_type=token&client_id=azureAppId&redirect_uri=http://localhost/After any of the above URL is accessed in the browser, you will be prompted to sign-in. Once the sign-in is complete, access token will be generated in the below format on the browser address bar as a response to the sign-in
Microsoft recommends Authorization code flow than the implicit flow.
Refer to the following blog posts for more information on accessing an API with delegated permissions
- Call Microsoft Graph API in Power Apps and Power Automate using a Custom connector
- Call Microsoft Graph API as a signed in user with delegated permission in Power Automate
Also go through this documentation from Microsoft which has information of the different types of connectors to automate tasks with Power Automate.
Summary: On this post we have seen how to use Power Automate REST API to manage your cloud flows. These APIs works for both individual flows (My Flows) and flows which is part of the solutions. Power Automate REST APIs are very powerful to manage your cloud flows. I can think of scenario where in you can resubmit all your failed flows programmatically leveraging these API endpoints. Microsoft has documented WEB API for Power Automate flows included in solutions. If you are visiting my blog for the first time, please do look at my other blogposts.

Hi Mohamed,
I am looking for a way to set the “Run only users” connection of a cloud flow to a specific user via Rest-Api. The default setting is “Provided by run-only user”. Do you know if this is possible?
Regards,
Ingrid
LikeLike
I was trying this on a simple button flow with a SharePoint connector to get all list items in a specific site. Using fiddler I found the following
Request Type: PATCH
API URL: https://api.flow.microsoft.com/providers/Microsoft.ProcessSimple/environments/{envId}/flows/{flowId}?api-version=2016-11-01&$expand=swagger,properties.connectionreferences.apidefinition,properties.definitionSummary.operations.apiOperation,operationDefinition,plan,properties.throttleData
Request Body:
Such a long JSON which cannot be posted, I recommend you to use fiddler to find this information & analyze the request body. The body has information about the connection reference & user object id etc.
LikeLike
Thank you so much Mohamed for such a useful post. I am trying to get flow runs using a c# app instead of using custom connector in Power Automate. After so many searches came across your blog and it was to the point and precise. I was able to get the flow runs using authorization flow using your article. Thanks again
LikeLiked by 1 person
Hi Mohamed Ashiq Faleel
Is there a way to get a flow run or list of flow runs as admin?
Thank you!!
LikeLike
Hi Mohamed,
Can you please give me some samples to create a flow using this rest api
LikeLike
Hi Mohamed Ashiq Faleel,
Thanks for this article but I am getting “Admin Approval required” window while creating connection on custom connector window, got stuck here, can you please help?
Thanks
LikeLike
Hi, why not use the HTTP with Azure AD action in stead of the app registration and custom connection?
LikeLike
Hello, I am trying to do what is described in this blog but when I reach the test part I get a “EnvironmentAccessDenied” response.
Do you have any idea on how to solve this?
LikeLike
Hi Mohammed, Where can I retrieve the URL for a flow. In my case, I have a Http Request that I am using to call from a webhook and I as I promote the webhook through other environments I need to update the webhook with the new uri.
LikeLike
Hello,
I am trying to create this connector but I get the error AADSTS900561: The endpoint only accepts POST requests. Received a GET request.
Is it true that :
“You must have a license for Dataverse or Dynamics 365 Customer Engagement and a valid security role granting create access for connectors.”
And only then I could be able to add the connector.
If anyone knows how to work around it please let me know.
LikeLike
Were you able to test this with non-solutions flows? it works for me but as long as the flow is in a solution, otherwise, it fails me.
LikeLike
Hi I have Generated Token With Client credentials and That token is not working for this api.so how can i access the flow api without user.
LikeLike
Thank yyou for this
LikeLike
One question, does this work the same for base GCC environments for power automate?
I ran it for my flows, and I got this error: “”Request for GCC tenant is not applicable in the current unitedstates cloud.”
LikeLike