In my previous post, we explored how to secure an MCP Server using Microsoft Entra ID delegated permissions, where the user’s identity is passed through to the API.
But what if your scenario does not require user context?
What if you want:
A centralized connection
No per-user sign-in prompts
A backend service-to-service integration
In this post, we’ll walk through how to secure an MCP Server using application permissions (service principal authentication) and integrate it with Copilot Studio.
Introduction
MCP Servers exposed to Copilot Studio can be secured using different OAuth patterns:
Delegated permissions → user context
Application permissions → app-only context
This post focuses on the application permission model, where:
Copilot Studio uses a service principal (client credentials flow)
MCP Server validates app tokens instead of user tokens
No user interaction is required at runtime
Why Use Application Permissions?
Delegated access is great when you need user context. But in many enterprise scenarios:
Background operations don’t need user identity
Shared tools should behave consistently
Managing per-user connections becomes overhead
With application permissions:
Authentication is centralized
No per-user connection creation
Better suited for automation and shared agents
Prerequisites
Before starting:
Access to Microsoft Entra ID
Access to Copilot Studio and Power Platform
MCP Server implementation (you can reuse the same repo)
Permissions to create app registrations and custom connectors
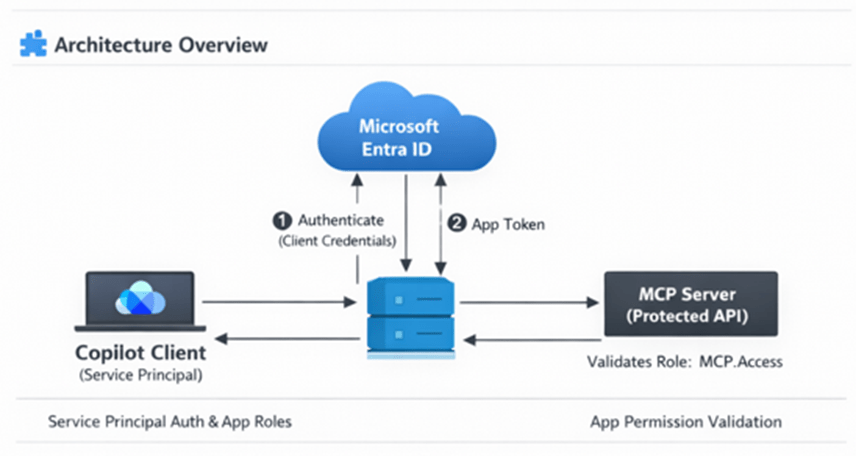
Architecture Overview
In this setup:
MCP Server → Protected API (App roles enabled)
Copilot Client → Service principal (client credentials flow)
Entra ID → Issues app-only tokens
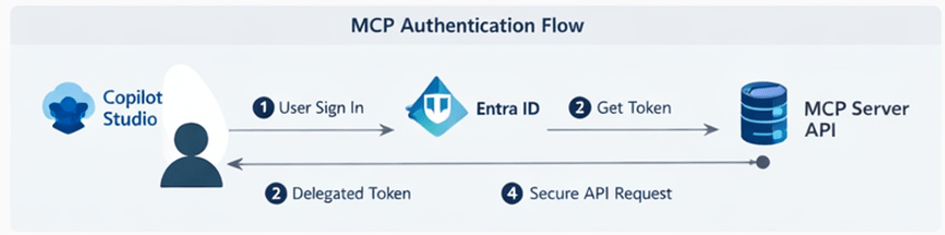
Flow:
Copilot (via connector) authenticates using service principal
Entra ID issues app-only token
Token is sent to MCP Server
MCP Server validates role-based access
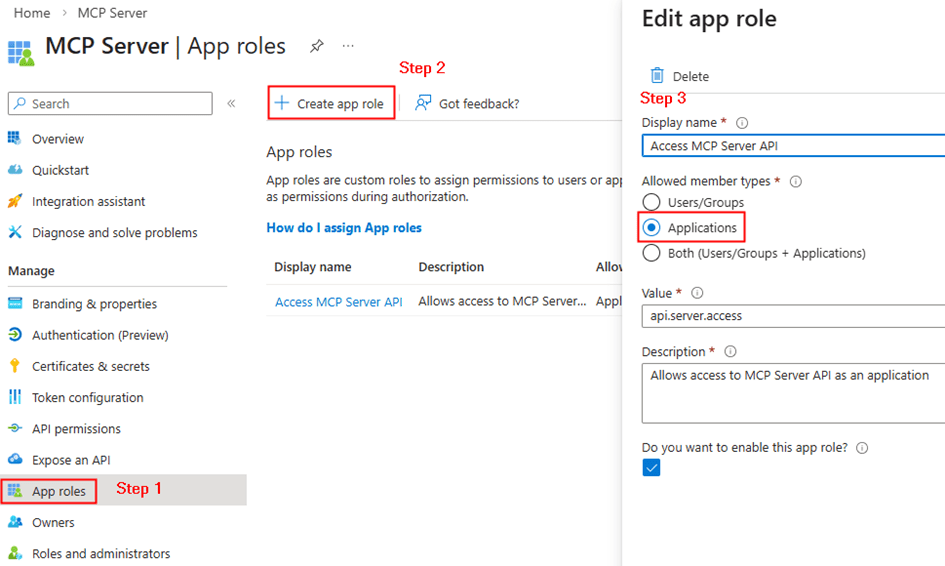
Step 1: Update MCP Server App Registration (Resource API)
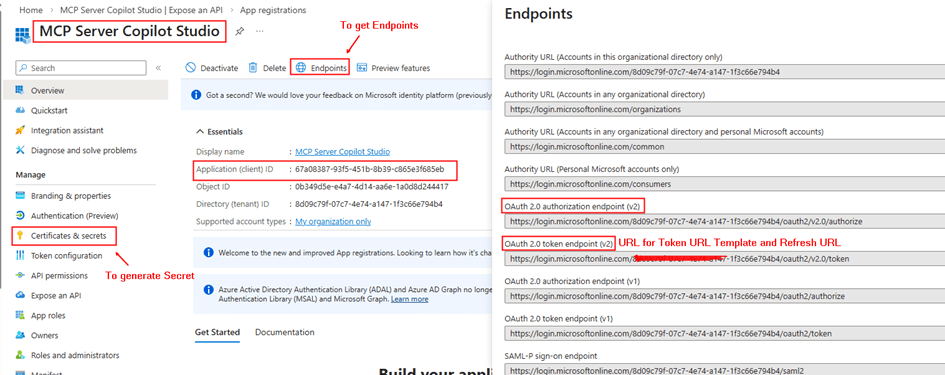
Go to your existing MCP Server app registration created from the instructions in my other post.
Create App Roles
Navigate to App roles → Add new role:
Display name: Access MCP Server API
Allowed member types: Applications
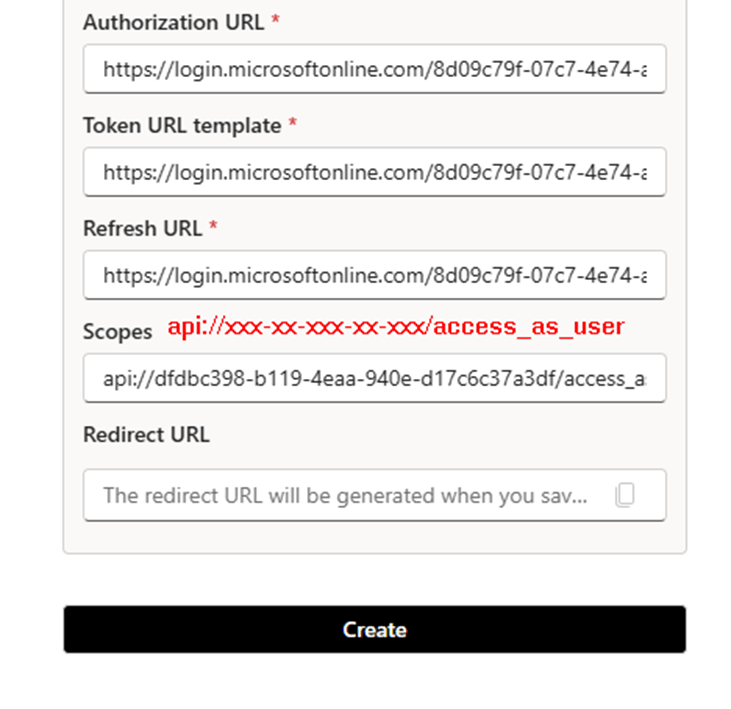
Value: api.server.access
Description: Allows access to MCP Server as an application
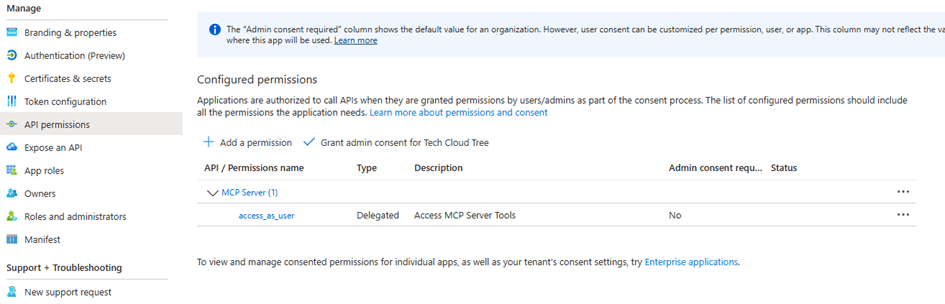
This is the key difference from delegated setup.
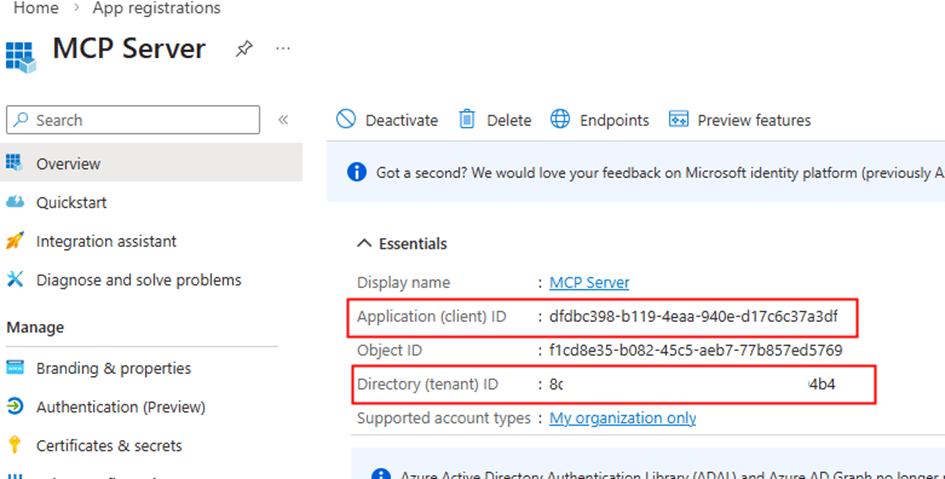
Instead of scopes, we have defined app roles for applications. Copy the resource url from the api permissions. E.g: api//xxxxx-xxxx-xxxx-xxx
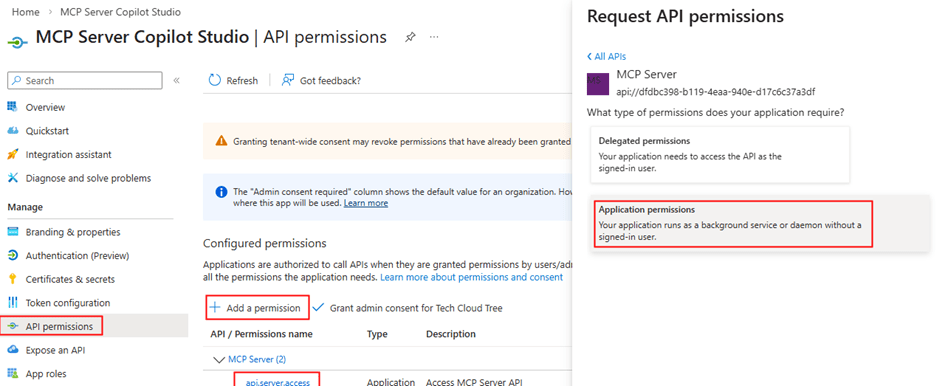
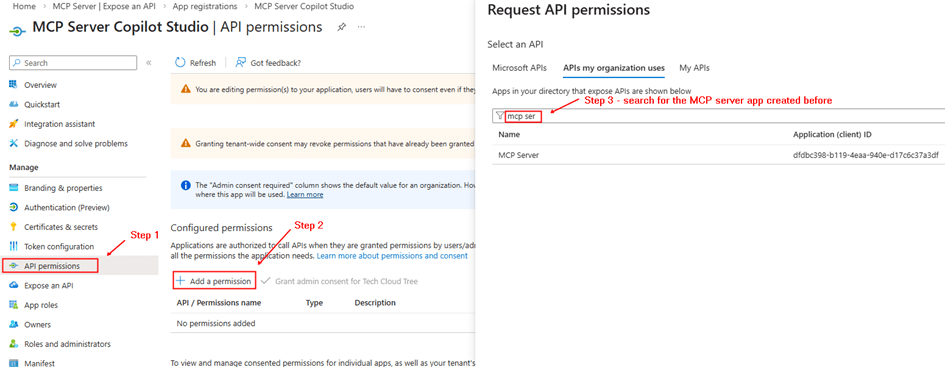
Go to your second app registration (Copilot client).
Add Application Permission
API permissions → Add permission
My APIs → Select MCP Server app
Choose Application permission → api.server.access
Grant Admin Consent
This allows the client app to call MCP Server without a user
Copy the client id, client secret for entering in the security tab while creating the custom connector.
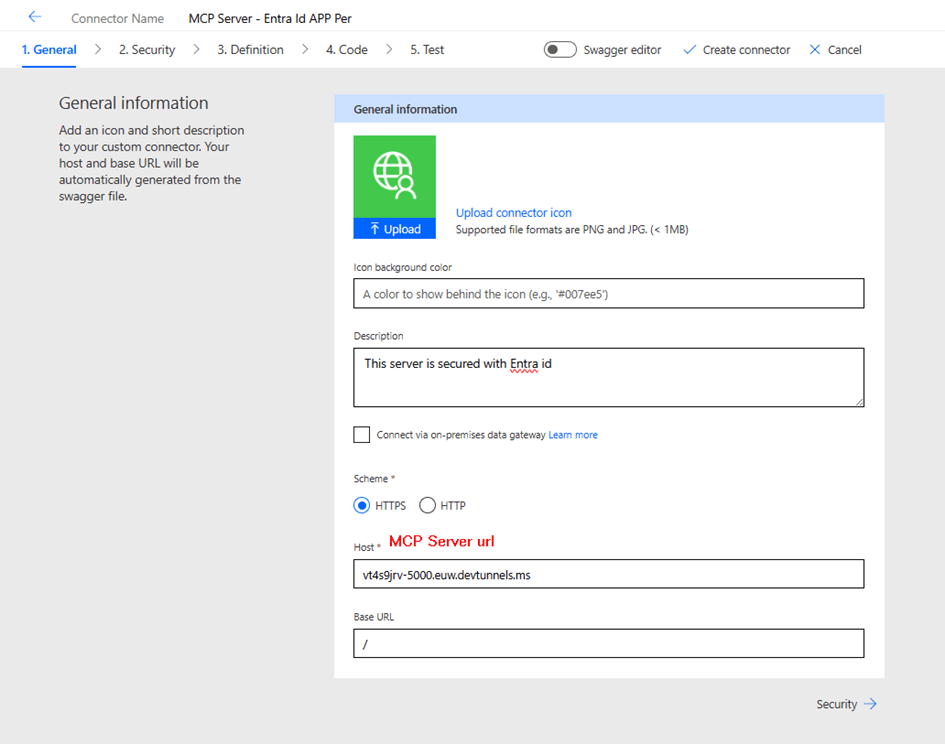
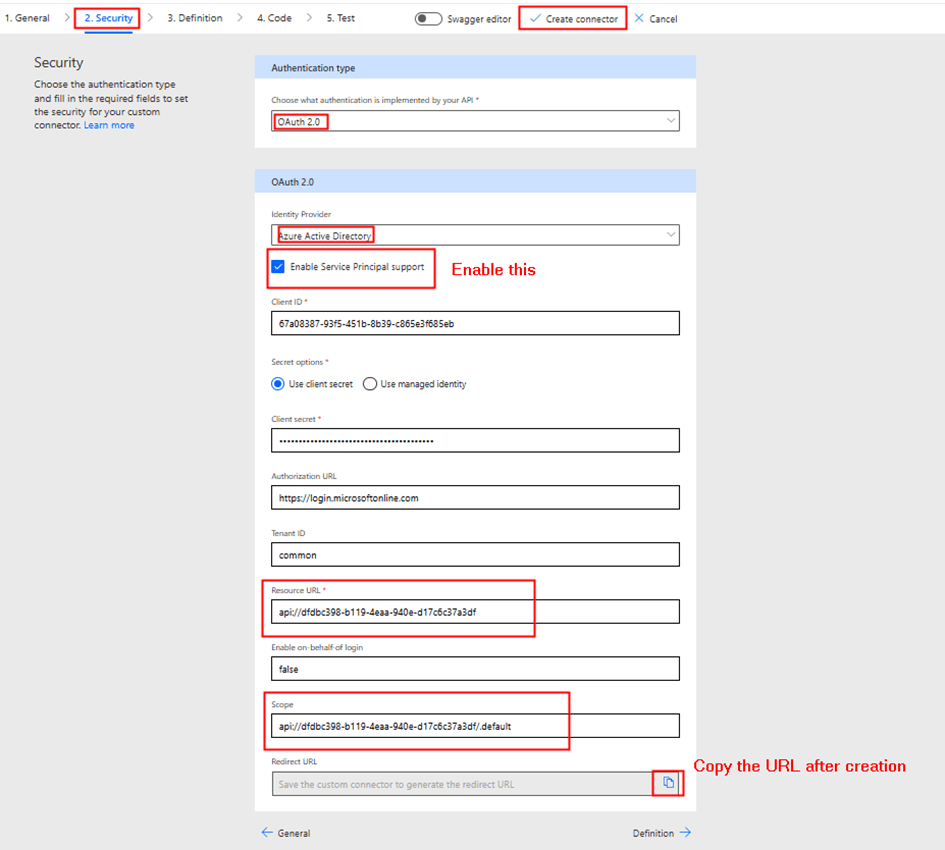
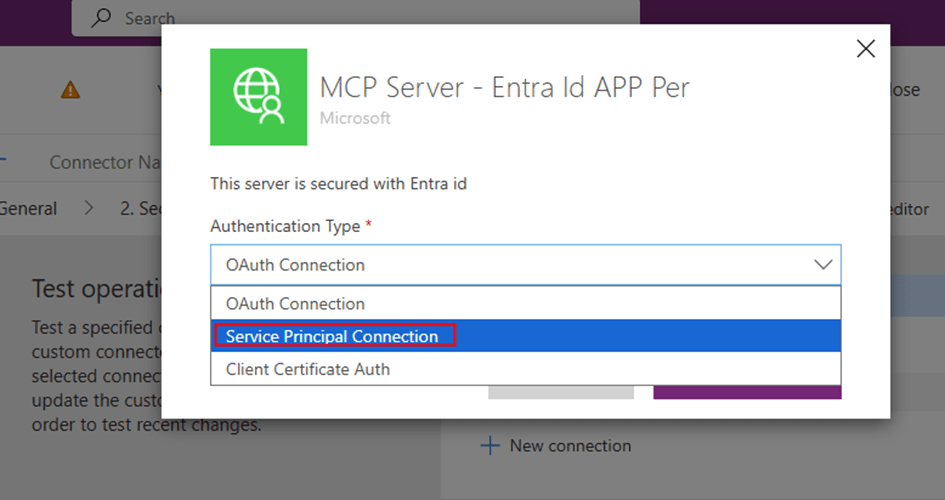
Step 3: Create Custom Connector in Power Platform
Unlike the delegated setup, this time we do not add MCP Server directly from Copilot Studio.
Instead:
Go to make.powerapps.com
Create a Custom Connector
Configure:
Security → OAuth 2.0
Enable Service Principal support
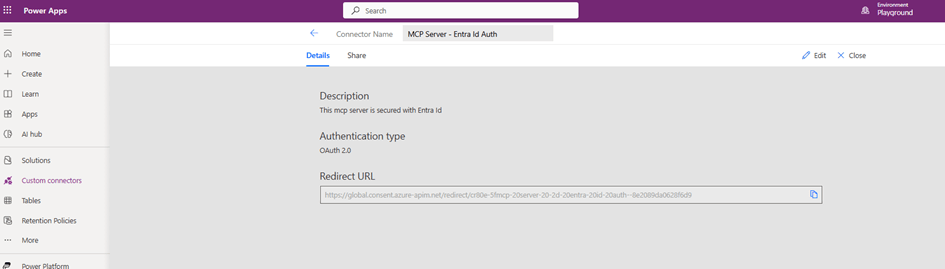
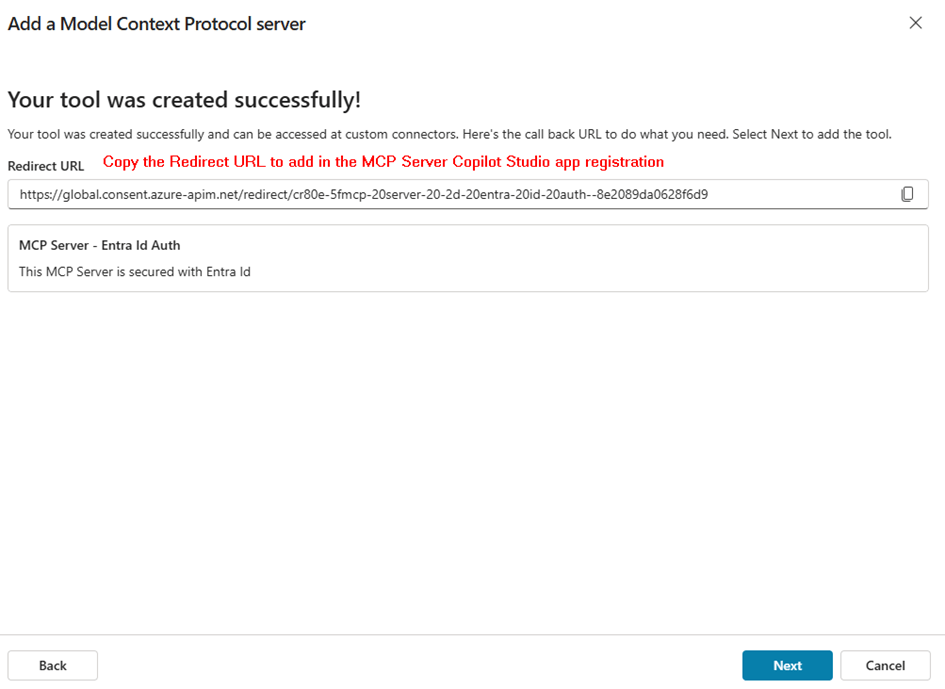
This connector uses the service principal credentials. After the entering the above details, click create connector. After the connector is created, copy the redirect URL to enter it in the Copilot studio client app registration
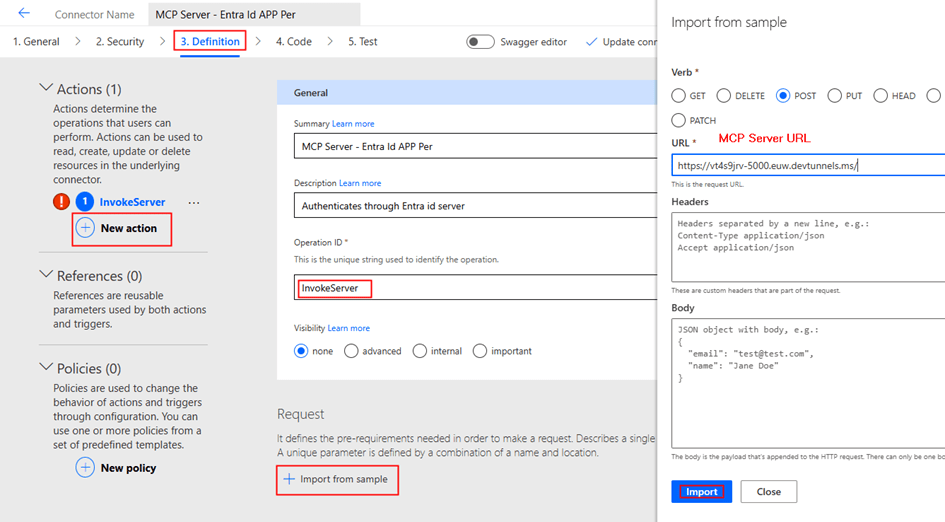
Now we can add the action Invoke server as below
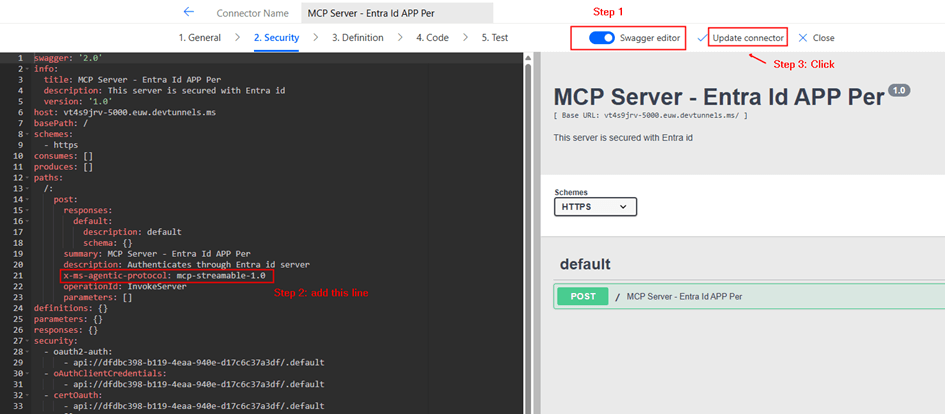
Update the connector. Now Toggle Swagger editor to add x-ms-agentic-protocol: mcp-streamable-1.0 as shown below
What It Does
Declares MCP Server Compatibility with Power Platform Agents
This extension tells Power Platform (and AI agents like Copilot) that your connector:
Component
Meaning
x-ms-
Microsoft-specific extension (not standard OpenAPI)
agentic-protocol
Indicates the API supports agentic/AI agent operations
mcp-streamable-1.0
Uses Model Context Protocol v1.0 with streaming support
What This Enables
Agentic Discovery – Agents can discover available tools/operations
Streaming Responses – Support for long-running async operations with streaming results
Native MCP Integration – Direct compatibility with MCP clients and servers
Agent Invocation – AI agents can invoke your MCP server endpoints intelligently
Step 4: Create Connection Using Service Principal
After updating the connector:
Create a new connection from the Test Tab in custom connector creation interface
Provide the below from your Copilot studio client app registration:
Client ID
Client Secret
Tenant ID
This creates a shared connection
Key difference:
No user login prompt
Connection is tied to service principal, not individuals
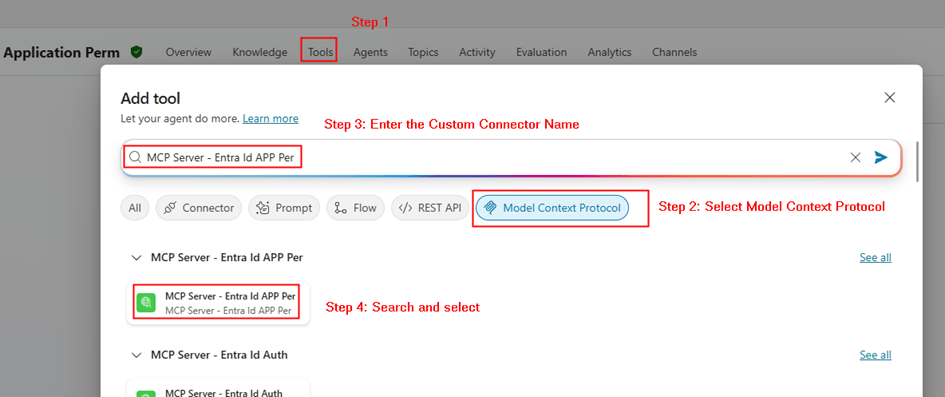
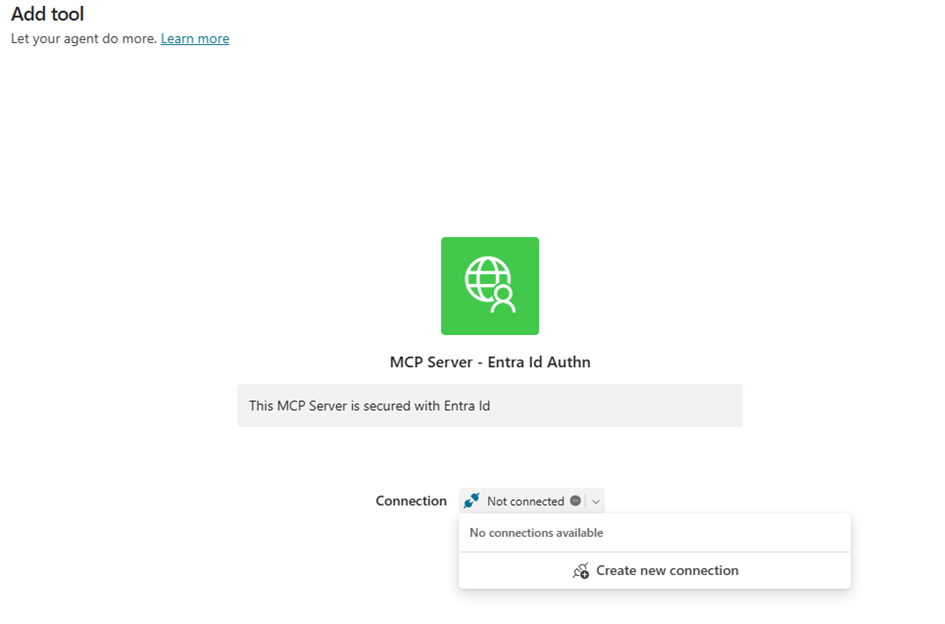
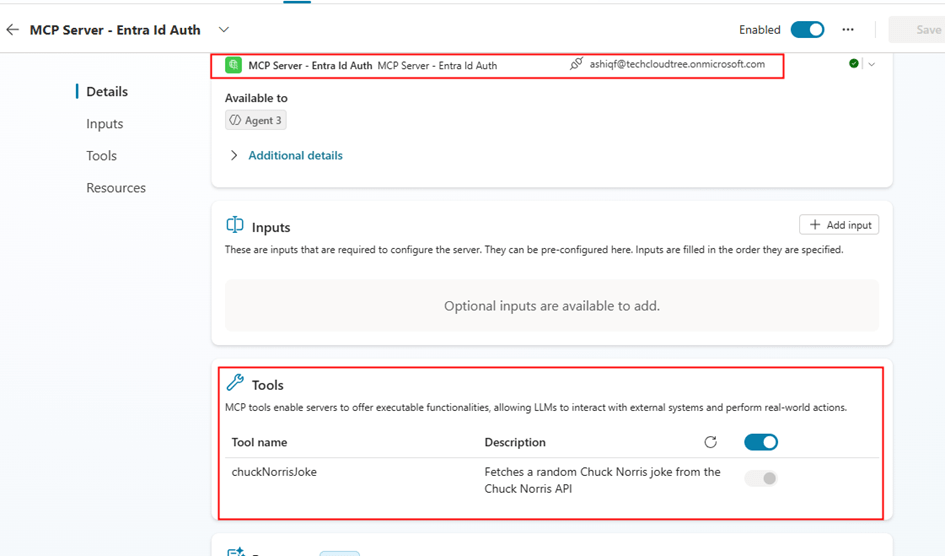
Step 5: Add MCP Server to Copilot Studio
Now go to Copilot Studio:
Open your agent
Add Tool → Browse existing MCP Servers
Select your MCP connector and the connection as below
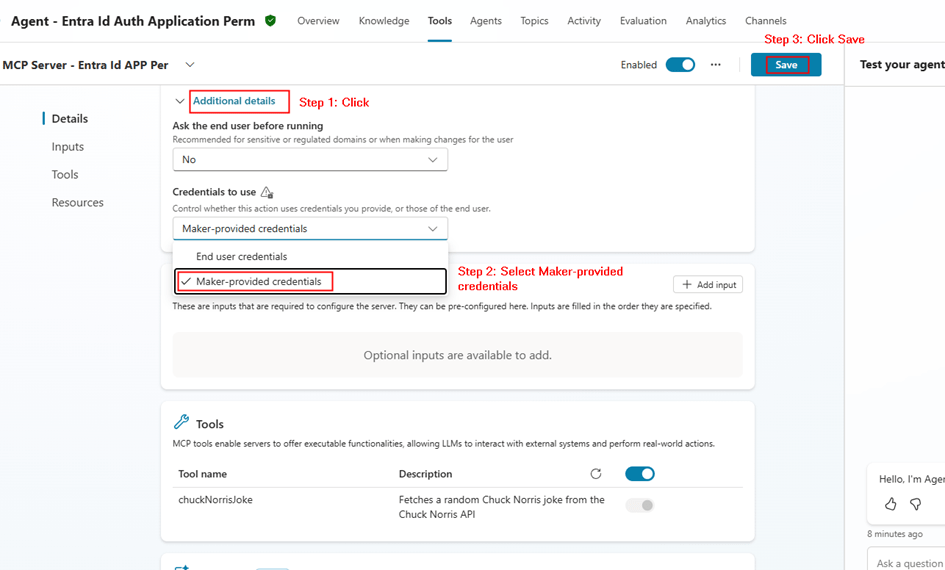
Important configuration in Copilot studio after the tool/MCP server is added:
Credentials to use: Maker provided
Save
This ensures:
The agent always uses the same connection
No per-user authentication required
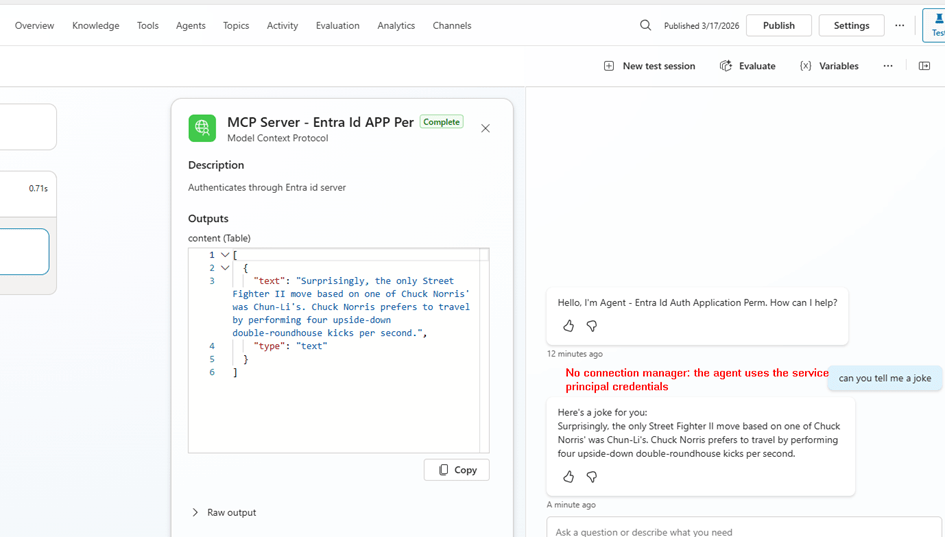
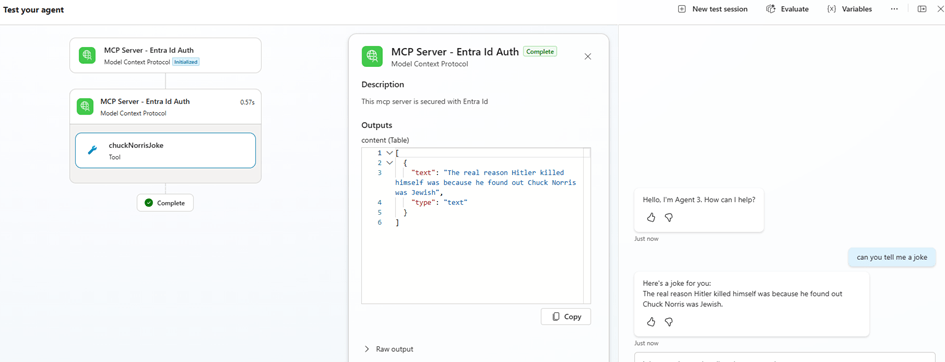
Step 6: Test the MCP Agent
Now test your agent:
Invoke MCP tool
Verify response
You should see:
No login prompts
Consistent responses
Backend authentication working
Delegated vs Application Permissions
Feature
Delegated
Application
Identity
User
App
Token Type
User token
App token
Consent
User/Admin
Admin only
Connection
Per user
Shared
Use Case
User-specific data
Background/shared APIs
Summary
In this post, we covered:
Securing MCP Server using application permissions
Creating app roles for application access
Assigning application permissions to client app
Creating custom connector in Power Platform
Using service principal connection
Adding MCP server to Copilot Studio via existing connector
Configuring maker-provided authentication
Why This Matters
Using application permissions is critical when:
You want centralized authentication
Your MCP tools don’t require user context
You want to avoid connection sprawl
You need consistent behavior across all users
This model is especially useful for:
Enterprise APIs
Shared automation tools
Backend integrations
Final Thoughts
Both delegated and application permission models have their place.
Use delegated when user identity matters
Use application permissions when it doesn’t
By implementing service principal authentication for your MCP Server, you enable:
Scalable architecture
Simplified connection management
Secure, app-driven integrations with Copilot Studio
With the rise of AI agents and extensibility through MCP (Model Context Protocol), exposing your APIs and tools to agents like Copilot Studio is becoming increasingly common. But the catch – without proper authentication, you’re opening the doors to your enterprise data.
In this post, we’ll walk through how to secure an MCP Server using Microsoft Entra ID and consume it from Copilot Studio using delegated permissions.
MCP servers allow AI agents to invoke tools and APIs in a standardized way. When integrated with platforms like Microsoft Copilot Studio, they unlock powerful automation scenarios.
However, MCP servers are essentially OAuth 2.0 resource servers, and every MCP client (like Copilot Studio) acts as an OAuth client.
Why Securing Your MCP Server is Important
Without proper authentication:
Anyone with access to the endpoint could invoke your tools
Sensitive operations such as internal APIs may be exposed
No identity context → no auditing or governance
Modern MCP implementations rely on OAuth-based authentication, ensuring:
Identity-aware requests
Scoped access tokens
Secure communication between client and server
In enterprise scenarios, Entra IDbecomes the natural choice.
Prerequisites
Before we begin, make sure you have:
Access to a Microsoft Entra ID tenant
Access to Microsoft Copilot Studio
Basic understanding of:
OAuth 2.0 / Delegated permissions
App registrations
MCP server up and running (use the repo above)
Architecture Overview
We will configure:
MCP Server → Protected resource (API)
Copilot Studio → Client application
Entra ID → Identity provider
Flow:
User signs in via Copilot Studio
Copilot gets delegated token
Token is sent to MCP Server
MCP Server validates and processes request
Step 1: Create App Registration for MCP Server (Resource API)
Go to Entra ID → App registrations → New registration
Configure:
Name: MCP-Server-App
Supported account types: Single Tenant
After creation:
Copy the Client Id, Tenant Id from the Overview section.
Expose an API
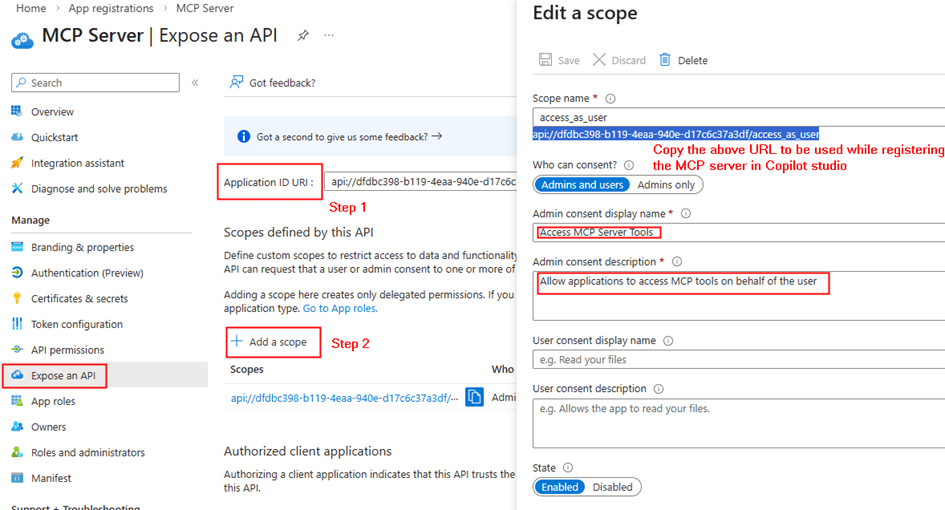
Go to Expose an API
Set Application ID URI (e.g., api://xxx-xxxx)
Add a scope:
Name: access_as_user
Who can consent: Admins + users
Configure Permissions
Add required Microsoft Graph delegated permissions (if needed) or remove it.
This app represents your secured MCP Server
Step 2: Configure MCP Server with Entra ID
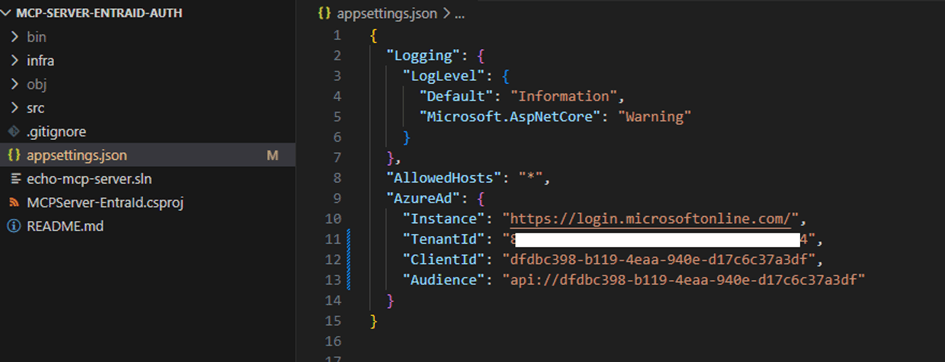
In your MCP server, appsettings.json (from repo):
Configure:
Tenant ID
Client ID (MCP Server app)
Scopes
This allows the server to:
Validate incoming tokens
Optionally call APIs like Microsoft Graph
Many MCP implementations use OAuth flows such as on-behalf-of (OBO)/delegates permissions to call APIs using the user’s identity.
Step 3: Create App Registration for Copilot Studio (Client)
Create another app:
Name: Copilot-MCP-Client
Supported Account Types: Single tenant only
Configure:
API Permissions
Add permission:
My APIs → MCP-Server-App
Select: access_as_user (delegated)
Copy the Client Id, secret and the OAuth endpoints for adding the MCP server in Copilot studio interface.
Grant Admin Consent
This step is not Mandatory, if not provided an admin consent the user will asked for a consent with the permissions for the app while creating the connection to the MCP Server.
Step 4: Add MCP Server in Copilot Studio
Now comes the interesting part.
In Copilot Studio:
Go to Tools
Click + Add a tool > Model Context Protocol
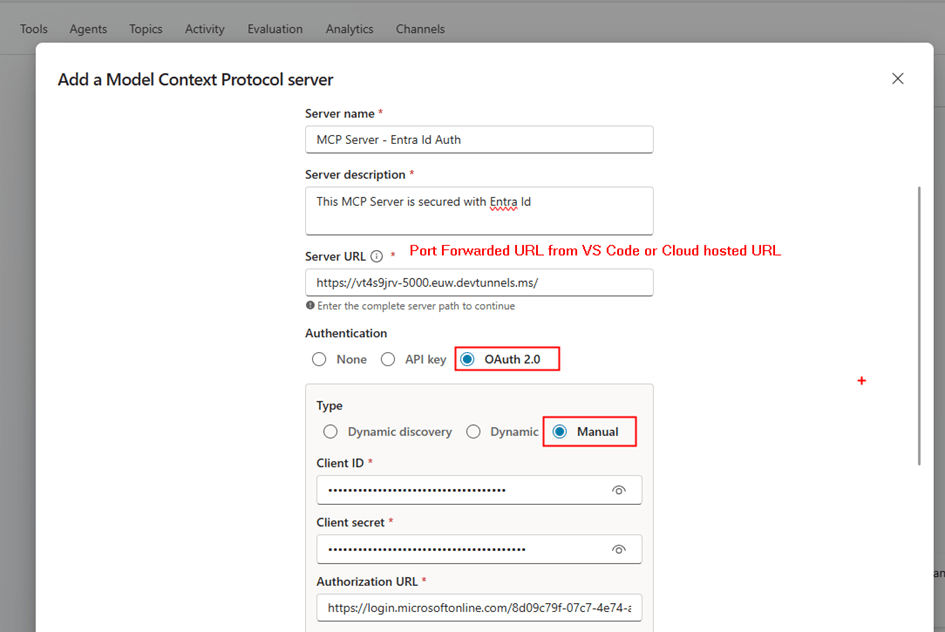
Provide the details from the Copilot Studio Client app registration and MCP endpoint (e.g., /mcp or /)
Copilot Studio will:
Create a custom connector behind the scenes
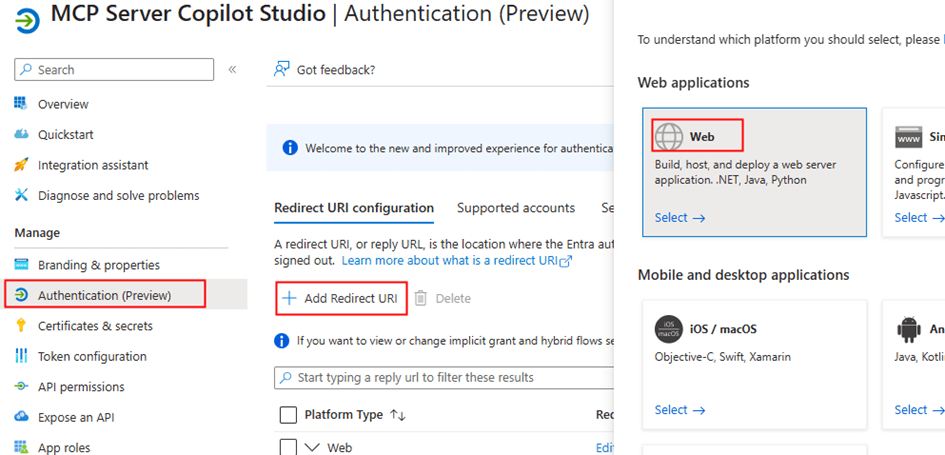
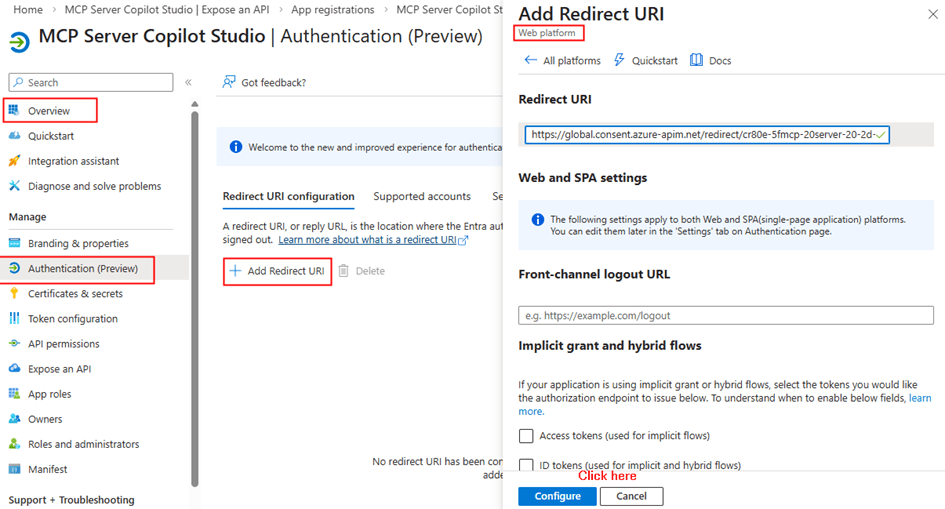
On the next screen, you will get the link to the redirect url
Now go to the Copilot studio client app registration Authentication section under Manage blade
Add Redirect URI (important for Copilot Studio custom connector)
With this capability, custom connectors can access APIs without storing client secrets, significantly improving security and simplifying management.
In this article, we will explore how to configure Managed Identity authentication for a Power Platform custom connector. The approach works for any API secured with Microsoft Entra ID, and we will use Microsoft Graph as an example API.
Why Managed Identity?
Traditionally, Microsoft Entra Id protected APIs are accessed using:
Delegated user authentication
Service Principal or application user authentication
Both require secret management.
Managed Identity removes this requirement.
Key advantages include:
No client secrets to manage
Reduced security risks
Native trust with Microsoft Entra ID
This approach aligns with modern secretless authentication patterns widely used in Azure services.
Authentication Architecture
When using managed identity authentication with custom connectors, the authentication flow looks like this:
Power Apps / Power è Custom Connector (Managed Identity Authentication) è Microsoft Entra ID (Federated Credential Trust) è Target API (e.g., Microsoft Graph)
Instead of storing credentials, the connector uses federated identity trust to obtain access tokens from Microsoft Entra ID.
Step 1: Register an Application in Microsoft Entra ID
First, create an App Registration in Microsoft Entra ID.
Navigate to:
Azure Portal → Microsoft Entra ID → App registrations → New registration
Supported account types: Single tenant
After creating the app, note the following values:
Application (Client) ID
Tenant ID
Managed identity authentication currently supports single-tenant applications.
Step 2: Configure API Permissions
Add the required permissions depending on the API you are accessing.
Since we are using Microsoft Graph as an example, we have left it with the default delegated permission:
User.Read
Grant Admin Consent if required depending on the permissions you have added.
Step 3: Create a Custom Connector
Navigate to the Power Apps or Power Automate Maker Portal.
Create a new connector:
Custom Connectors → New Custom Connector → Create from Blank
Provide a connector name such as:
Managed Identity API Connector
In the General tab configure the API host.
Example for Microsoft Graph:
Host: graph.microsoft.com
Base URL: /
If you are connecting to another API, replace these values with that API’s endpoint.
Step 4: Configure Managed Identity Authentication
In the Security tab.
Authentication Type: OAuth 2.0
Identity Provider: Azure Active Directory
Provide:
Client ID → Application ID of your App Registration
You can define additional actions depending on the API endpoints you want to expose.
For other APIs, configure the corresponding endpoints.
Step 7: Create the Connection
Navigate to the Test tab and create a new connection.
Unlike service principal authentication, you do not need to provide client secrets.
Power Platform will automatically authenticate using the managed identity configuration.
Step 8: Use the Connector
The connector can now be used from:
Power Apps
Power Automate
Benefits of Managed Identity for Custom Connectors
Using managed identity authentication provides several advantages:
Improved Security
No client secrets or certificates are stored in Power Platform.
Reduced Operational Overhead
No secret rotation or credential management.
Current Limitations
This capability is currently in preview
Summary:
Managed Identity authentication for Power Platform custom connectors enables secure, secretless access to APIs. Although we used Microsoft Graph as the example, the same pattern can be applied to any API secured with Microsoft Entra ID.
This approach simplifies security management and provides a cleaner architecture for enterprise Power Platform integrations.
In today’s data-driven world, businesses rely on integration between their data sources and analysis platforms to derive insights and make informed decisions. One such powerful combination is leveraging Snowflake, a leading cloud-based data warehousing platform, alongside Microsoft Power Platform. In this blog series, we’ll delve into the options of integrating Snowflake data sources into Power Platform, exploring both custom and out-of-the-box connector options. In Part 1, our focus will be on setting up and configuring Snowflake, followed by creating a custom connector that leverages Snowflake’s SQL REST API. This connector facilitates the connection between Snowflake and the Power Platform services such Power Apps and Power Automate.
Pre-requisites:
Snowflake account with Account Admin access: Snowflake offers a 30-day trial, granting full access to explore its capabilities. You can select either Azure/AWS/GCP
Entra ID access (Global Admin or Privileged Administrator Role) to create App registration and grant Admin consent: Ensure you have Entra ID access to enable the creation of App registrations and to grant Admin consent for necessary permissions.
Power Platform Administrator Role: To make adjustments to allow custom connector endpoints for Snowflake identifier URL, especially in cases where endpoints are blocked by the tenant scoped DLP policy.
Maker or System Administrator access in a Power Platform Environment: Access privileges should include Maker or System Administrator rights within your Power Platform environment to register custom connector.
Power Apps premium license: A Power Apps premium license is required to use a custom connectors in a Power Apps or a Cloud flow.
This blog post is divided into the following sections:
Creation of Entra ID Apps.
Setup Snowflake Environment.
Creation of a custom connector & DLP Policy Update.
Creation of Entra ID Apps:
There are two app registrations required to facilitate the API access through Microsoft Entra ID, where one would represent the Snowflake OAuth resource and the other would represent the OAuth client application which would be in this case the custom connector
Section 1 – Registering an Application in Microsoft Entra ID for Snowflake OAuth resource:
In the Entra ID portal, navigate to App registrations and click + New registration. Enter a name, such as Snowflake OAuth resource, and proceed by clicking the Register button, leaving all settings as default.
Under the Manage section in the side menu, select Expose an API. Set the Application ID URI with the default value and remember to copy this value for future use. This will be known as external_oauth_audience_list in the section Setup and configuration in Snowflake
Click on the Add a scope button to access the panel. The Snowflake Role Public is added as an OAuth scope for OAuth flows where the Snowflake OAuth client acts on behalf of a user from the custom connector. If there is a custom Snowflake role, it should be added as a scope instead of ‘Public’:
Enter a new Scope name as session:scope:PUBLIC
Set Admin consent display name to Account Admin
Provide Admin consent description as “Can Administer the Snowflake account”
Ensure the Enabled scope state is selected.
Complete the process by selecting the Add scope button to create the scope.
Section 2 – Registering an Application in Microsoft Entra ID for Snowflake OAuth client:
In the Entra ID portal, navigate to App registrations and click + New registration. Enter a name, such as Snowflake OAuth client, and proceed by clicking the Register button, leaving all settings as default.
Retrieve the Client ID, Tenant Id from the Overview section of the Entra ID app and generate a secret through the Certificates & secrets under the Manage blade. Once the secret is successfully created, copy its value for use in configuring the custom connector OAuth Authentication.
In the API permissions section under the Manage blade, click + Add a permission and search for Snowflake OAuth resource, the application created previously.
Select the Delegated permission session:scope:PUBLIC defined in the previous section as shown below, and grant Admin consent.
Everything is configured in Entra ID. Now, let’s move on to Snowflake to set up the necessary components for this integration to function.
Let’s head in to the Snowflake instance as an Account Admin. Here, you’ll create a
Create Database with sample data & grant roles
Set up security integration
Create a user in Snowflake synchronized with the Entra ID user
Log in to the Snowflake instance to copy the Identifier URL as shown below. This URL will be used in the custom connector to access the Snowflake REST API.
Create a SQL Worksheet as shown below and execute the following script to set up the Snowflake environment by creating a warehouse, database, and table named ‘rockers_table’. Sample data is inserted into the table, and permissions are granted to the ‘public’ role for accessing and updating the table:
-- Switch to the 'accountadmin' role
use role accountadmin;
-- Create the HOL_WH warehouse with size 'X-SMALL'
CREATE OR REPLACE WAREHOUSE HOL_WH WITH WAREHOUSE_SIZE='X-SMALL';
-- Create the HOL_DB database
CREATE OR REPLACE DATABASE HOL_DB;
-- Grant usage on the warehouse HOL_WH to the role 'public'
GRANT USAGE ON WAREHOUSE hol_wh TO ROLE public;
-- Grant usage on the database HOL_DB to the role 'public'
grant usage on database hol_db to role public;
-- Grant usage on the schema HOL_DB.PUBLIC to the role 'public'
grant usage on schema hol_db.public to role public;
use role accountadmin;
-- Switch to the HOL_DB database
use database HOL_DB;
use warehouse HOL_WH;
-- Create the 'rockers_table' table
CREATE TABLE rockers_table (
  id INT,
  name VARCHAR(50),
  age INT
);
-- Insert data into the 'rockers_table' table
INSERT INTO rockers_table (id, name, age)
VALUES (1, 'Jimi Hendrix', 27),
       (2, 'Janis Joplin', 27),
       (3, 'Elvis Presley', 42),
       (4, 'Freddie Mercury', 45),
       (5, 'Whitney Houston', 48),
       (6, 'Michael Jackson', 50),
       (10, 'John Lennon', 40);
-- Grant select and update permissions on the 'rockers_table' table to the role 'public'
grant select, update on table hol_db.public.rockers_table to role public;
Set up security integration:
Let’s proceed to create the Security integration, which is a Snowflake object that establishes an interface between Snowflake and Entra ID. This integration is a prerequisite for enabling Entra OAuth authentication in the custom connector. Execute the following script:
Replace the tenantid in ‘external_oauth_issuer’ and ‘external_oauth_jws_keys_url’, and the Application ID URI in ‘external_oauth_audience_list’. These values should be copied from sections 1 and 2 of the Entra ID app creation process written above.
Create a user in Snowflake synchronized with the Entra ID user:
We’ll create a user in Snowflake that mirrors the Entra ID user upn as created in the security integration. In the User & Roles section under Admin, click + User. The login name should be the UPN (User Principal Name) from Entra ID/AD. Once the required details are entered, proceed to click on Create User.
Creation of a custom connector & DLP Policy Update:
The custom connector serves as a wrapper around the Snowflake REST API, facilitating communication between Power Apps or Power Automate and the API. To create this connector, navigate to Custom connectors in the Power Apps/Power Automate maker portal, then click on + New custom connector and select Create from blank. Enter the connector name, and on the subsequent screen, enter the Snowflake Identifier URL in the Host field and some description about the connector.
Now click Security on the right bottom corner or from the Tab to enter the Entra ID application information copied from the App registration Snowflake OAuth Client for the OAuth 2.0 authentication type. Under the section OAuth 2.0
Change the Identity provider to Azure Active Directory
Enter the Client id & Client secret copied from the Section 2 of the Entra ID app registration Snowflake OAuth Client
Enter the Resource URL as api://applicationIDURI copied from the Section 1 of the Entra ID app registration Snowflake OAuth Resource
Enter the Scope as session:scope:PUBLIC based on the permissions you have added. Leave a space between each permission if there are multiple permissions
The connector is now prepared to add actions based on the Snowflake REST API endpoints. Snowflake’s REST API offers functionalities such as submitting SQL statements, checking execution statuses, cancelling executions, and fetching query results concurrently. This blog post will primarily concentrate on integrating with the API to submit SQL statements. For more guidelines, it’s recommended to look at the Snowflake REST API documentation for best practices.
Let’s proceed to add an action for submitting a SQL statement. Navigate to Definitions and select + New action. Once you’ve filled in the Summary, Description, and Operation ID (e.g., GETSFData), click on + Import from sample under the Request section, and input the following details:
{
"statement": "select name, age from rockers_table;",
"timeout": 60,
"database": "HOL_DB",
"schema": "PUBLIC",
"warehouse": "HOL_WH",
"role": "PUBLIC"
}
Click Import & Update connector then proceed to click the Test tab and create a New connection. In the event of encountering DLP error message indicating that connection creation has been blocked by Data Loss Prevention (DLP) policy. Add the Snowflake Identifier URL as a connector pattern allowed in the Business/Non Business category of the DLP policy.
VOILA, everything is set up. You can now test the action to execute a SQL statement to retrieve data from the rockers_table as shown below:
The request body for updating an existing item is
{
"statement": "UPDATE rockers_table SET Name = 'Mohamed Ashiq' WHERE ID = '1';",
"timeout": 60,
"database": "HOL_DB",
"schema": "PUBLIC",
"warehouse": "HOL_WH",
"role": "PUBLIC"
}
Summary:
In the next part of the blog series, we’ll explore how to manipulate the response from the connector action. This involves adding C# code in the custom connector to facilitate the display in Power Apps gallery control without using a Power Automate flow. Hope you have found this informational & thanks for reading. If you are visiting my blog for the first time, please do look at my other blogposts.
Do you like this article?
Subscribe to my blog with your email address using the widget on the right side or on the bottom of this page to have new articles sent directly to your inbox the moment I publish them.
In both Part 1 and Part 2 of the blog series, I’ve covered the utilization of Managed Identities in Power Apps and Power Automate for secure access to Microsoft Graph API. This included a deep dive into setting up and configuring the Azure API Management service with the Microsoft Graph permissions for the managed identity. In Part 2, I’ve explored the process of exporting the API as a connector in Power Platform, securing it with API key authentication.
To enhance the security of the custom connector published from Azure API Management for Microsoft Graph APIs using Entra ID OAuth authentication instead of Subscription key, it is essential to create two Entra ID applications. One application should represent the API from API Management, while the other should represent the client application to be utilized in the Entra ID OAuth authentication for the custom connector.
Registering an Application in Microsoft Entra ID for API Representation:
In the Entra ID portal, navigate to App registrations and click + New registration. Enter a name, such as APIM PP Resource, and proceed by clicking the Register button, leaving all settings as default. This app represents the APIs added in the Azure API management instance.
Under the Manage section in the side menu, select Expose an API. Set the Application ID URI with the default value and remember to copy this value for future use.
Click on theAdd a scope button to access the Add a scope panel:
Enter a new Scope name as APIM.MSGraphAPI
Set Admin consent display name to APIM MSGraph API
Provide Admin consent description as “Grants access to the API in APIM.”
Ensure the Enabled scope state is selected.
Complete the process by selecting the Add scope button to create the scope.
Registering an Application in Microsoft Entra ID for Client Representation:
Create another Entra ID app to be used in the custom connector for securing with Entra ID OAuth Authentication. In the Entra ID portal, navigate to App registrations and click + New registration. Enter a name, such as APIM PP Client, and proceed by clicking the Register button, leaving all settings as default.
Retrieve the Client ID, Tenant Id from the Overview section of the Entra ID app and generate a secret through the Certificates & secrets under the Manage blade. Once the secret is successfully created, copy its value for use in configuring the custom connector OAuth Authentication.
Go to the Entra ID app APIM PP Resource created earlier. In the Manage section, click on Expose an API and then Add a client application by selecting + Add a client application in the popout panel. Enter the Client ID of the APIM PP Client app registered now. Select the authorized scope created in the previous section, then proceed by clicking Add Application. This ensures the application APIM PP Resource trusts the client application APIM PP Client and users should not be asked to consent when the client calls the APIs published API Management instance.
Note: If you prefer users/admins to provide consent for the permission while creating a connection for the custom connector, add the APIM.MSGraphAPI Scope to the APIM PP Client app, as shown below. In this scenario, the step mentioned in bullet no 2 becomes unnecessary.
Configuring Custom Connector Authentication to Entra ID OAuth:
Following the export of the API from the Azure API Management as a custom connector in Power Platform in Part 2 of this blog series, proceed to the Power Apps or Power Automate maker portal to edit the connector.
Access the custom connectors, locate the exported connector in the Power Platform Environment where the connector was exported from API Management
Within the Authentication type settings, originally set to API Key, click Edit, and modify it to OAuth 2.0.
Choose the Identity provider as Azure Active Directory. Enter the Client ID and Client secret obtained from the APIM PP Client app copied earlier. Set the resource URL to the Application ID URI generated from the APIM PP Resource app.
Click Update connector to generate a Redirect URL on the same screen—ensure to copy this URL.
Navigate to the APIM PP Client app in the Entra ID portal and add a Web Redirect URI, paste the copied Redirect URL.
Azure API Management: Configure JWT validation policy to Authorize requests from Custom connector:
The JWT validation policy pre-authorizes requests from the Power Platform Custom connector as it adds the layer of security to ensure that incoming access tokens are valid and meet specific criteria before the APIM starts processing requests to the added MS Graph API endpoints. The policy checks the value of the audience claim in an access token obtained from Microsoft Entra ID with in the custom connector. The audience claim typically specifies the intended recipient of the token, ensuring that the token is meant for the intended API.
By configuring the following JWT validation policy in the <inbound> policy section below the node <base />, you enforce the validation of the access token, and if the token is invalid, an error message is returned. Don’t forget to replace the TenantId and the required claims value to the client id of the app APIM PP Resource.
Note: If you attempt to establish the connection from the Test Tab and subsequently execute the action, you will encounter the following error “Access denied due to missing subscription key. Make sure to include subscription key when making requests to an API.
Creating a Product:
To enable the custom connector to generate tokens for API access from API Management, it’s necessary to associate the APIs with a Product that doesn’t require a subscription key. Follow these steps:
In the left navigation pane, go to Products and click on + Add.
Provide the Product Name, Description, uncheck the box Require subscription option, select the relevant API, and proceed to create the Product.
Testing the Custom connector:
Navigate to the Power Platform Maker portal and access the custom connector interface. Edit the connector to initiate the creation of a connection within the Test tab. Click on + New connection and click Create. Notably, you’ll observe that it doesn’t prompt for the API Subscription key, as discussed in the Part 2 of the article.
Once the connection is created, return to the edit mode of the custom connector to initiate testing of the actions. Navigate to the Test tab, where you can select the specific connection and choose the operation you wish to test. Test the operation and validate the results of the custom connector action.
Summary:
This concludes the blog series, where we delved into the secure access of Microsoft Graph APIs in Power Platform with the help of Azure API management, employing both Subscription keys and Entra ID OAuth authentication. Demonstrated the usage of managed identities in Power Platform, the methods explored here, particularly for securing Microsoft Graph API with application permissions, are adaptable for various services. Addressing the significant security risk of Broken Access Control, I have highlighted the importance of correctly implementing authentication mechanisms to prevent potential exploitation by attackers.
For those with existing Entra ID app registrations seeking to enhance security with API Management, the credential manager feature offers a solution. Utilizing the Grant Type Authorization code for Delegated Permission and Client Credentials for Application Permission ensures a comprehensive approach to safeguarding your applications and APIs. Hope you have found this informational & thanks for reading. If you are visiting my blog for the first time, please do look at my other blogposts.
Do you like this article?
Subscribe to my blog with your email address using the widget on the right side or on the bottom of this page to have new articles sent directly to your inbox the moment I publish them.
In Part 1 of the blog series on using Managed identities in Power Apps and Power Automate to access Microsoft Graph API securely, I have delved into the setup and configuration of the Azure API management service with the necessary Microsoft Graph permissions for the managed identity. Building upon that foundation, Part 2 aims to take it further your integration journey in making the API’s available as a connector in Power Apps and Power Automate secured with API key Authentication.
Azure API Management Instance: Managing API Subscription Keys
APIs published through the Azure API Management instance are by default secured by Subscription keys. These keys play a crucial role in establishing connections in Power Apps or Power Automate after exporting APIs as custom connectors.
To manage these keys, navigate to the left navigation menu under the “Subscriptions” blade in the Azure portal within your API Management (APIM) instance. Here, you have the option to generate a new key or utilize an existing one. Copy the key from the portal to create the connection in the later section.
You can test the API by using the Subscription key from Postman as shown below:
Exporting API as a Connector in Power Platform:
To harness the capabilities of the APIs within your API Management instance secured with the Managed identities, exporting them as connectors in Power Platform is a major step in order to be used in Power Apps and Power Automate. Follow these simple steps for a seamless integration:
In the left navigation menu, navigate to Power Platform under the APIs blade.
Click on Create a connector to initiate the connector creation process.
Choose the specific API (e.g., msgraph) that you wish to export as a connector.
Select the Power Platform environment where you have Maker/Admin role access.
Under API Display Name, enter a name for the connector. This will be the identifier for your connector within Power Platform.
Click on the “Create” button to complete the process.
Once the connector is created, navigate to your Power Apps or Power Automate portal. You’ll see the API listed under Custom Connectors on the left navigation bar in Environment where the connector has been created from the API Management instance.
Click on the Edit icon to initiate the analysis and testing of connector actions.
Explore the Definition tab to view the view the API operations within the APIM instance now listed as Actions.
Verify the Authentication type of the connector by navigating to the Security tab, where the setting is configured to API key for streamlined validation.
Begin by creating a connection in the Test tab. Click on + New connection to start testing.
Enter the Subscription key, which you previously copied from the Azure portal for the API Management (APIM) instance. This key establishes the secure link between your connector and the APIM services. If there is no error, the connection will be created.
In the event of encountering below error message indicating that connection creation has been blocked by Data Loss Prevention (DLP) policy
Add the Gateway URL copied from the API management instance under the Overview section on the portal as a connector pattern allowed in the Business/Non Business category of the DLP policy.
Note: Please be aware that in the API Management instance, within the APIs Policies section, if you haven’t included the wildcard (*) as I did for CORS, and have instead specified particular URLs like https://make.powerapps.com, an additional policy in the Custom connector is required to be added under the Definitions tab. Specifically, you need to add a policy to set the request Origin header.
Testing the Custom Connector:
Once the connection is created, return to the edit mode of the custom connector to initiate testing of the actions. Navigate to the Test tab, where you can select the specific connection and choose the operation you wish to test. Test the operation and validate the results of the custom connector action.
Summary:
This completes the Part 2 of the blog series where we have explored the process of accessing Microsoft Graph APIs securely within the API management with Subscription key authentication using managed identities (System and User) as a connector in Power Platform. In our next article, we will delve into the enhancing security further by implementing OAuth authentication within the custom connector for API management APIs. Stay tuned. Hope you have found this informational & thanks for reading. If you are visiting my blog for the first time, please do look at my other blogposts.
Do you like this article?
Subscribe to my blog with your email address using the widget on the right side or on the bottom of this page to have new articles sent directly to your inbox the moment I publish them.
Using Microsoft Graph in Power Apps and Power Automate offers several advantages for streamlining integration with various Microsoft 365 services and applications. Additionally, securing these integrations with Azure Managed Identities significantly enhances the overall security of the solution. Azure Managed Identities enable applications and services to authenticate with Azure services seamlessly and securely. When it comes to using Microsoft Graph API, you don’t need a client secret anymore. This makes it simpler to manage and keeps everything more secure. This blog series, divided into multiple articles, is dedicated to utilizing managed identities either System Assigned or User Assigned in Power Platform to access MS Graph API endpoints. It leverages Azure API Management service with the support of a custom connector. The focus of this particular article is on configuring the Azure API management service with the necessary Microsoft Graph permissions for the managed identity.
Pre-requisites & permissions:
Here are the resources and permissions required to follow along this blogpost:
Azure Subscription/Entra ID:
You need an Azure subscription to create and manage Azure API Management instances.
Azure Managed Identity – User or System Assigned:
Create or use an existing Azure Managed Identity. This can be either a user-assigned identity or a system-assigned identity of the APIM resource, depending on your requirements.
Global Admin or Privileged Administrator Role:
The user should have Global Administrator or Privileged Administrator role in the Microsoft Entra ID to grant Admin consent for the MS graph permissions on the Managed Identity using Microsoft Graph PowerShell SDK.
Power Platform Environment:
Set up a Power Platform Environment where you plan to create and use custom connectors.
Role:
Ensure that the user/maker has the System Administrator/Customizer/Maker role on the Power Platform Environment. This role is required to create custom connectors.
DLP Policy:
Make adjustments to allow custom connector endpoints, especially in cases where endpoints are blocked by the tenant scoped DLP policy.
License:
A Power Apps or Power Automate Premium license is necessary for creating and using custom connectors. Ensure that the user has the required premium license assigned.
Azure API Management Setup with Microsoft Graph Permissions:
Create a Azure API Management resource and turn on System assigned managed identity and if available, add a User Assigned Managed Identity in the Security section of the API Management instance. Execute the following PowerShell script which user Microsoft Graph SDK to add the permission User.Read.All to either the System or User assigned managed identity. Adjust the permissions as needed for your specific requirements. Before executing the script, replace the permission and the display name of the Managed identity depending on the managed identity you have used. If you have used a System Assigned managed identity, ensure that it corresponds to the display name of the API Management instance.
# Install Microsoft Graph PowerShell module if not already installed
# Connect to Microsoft Graph Connect-MgGraph -Scopes "Directory.ReadWrite.All","AppRoleAssignment.ReadWrite.All"
# Get Managed Identity Service Principal
$MSI = (Get-MgServicePrincipal -Filter "displayName eq '$DisplayNameOfMSI'") # Sleep for a while to allow time for service principal creation if needed
Start-Sleep -Seconds 10 # Get Microsoft Graph Service Principal $GraphServicePrincipal = Get-MgServicePrincipal -Filter "AppId eq '$GraphAppId'"
# Retrieve the App Role from the Microsoft Graph Service Principal based on the specified Permission Name $Role = $GraphServicePrincipal.AppRoles | Where-Object {$_.Value -eq $PermissionName}
# Create an App Role Assignment HashTable for assigning the role to the Managed Identity $AppRoleAssignment = @{
principalId = $MSI.Id
resourceId = $GraphServicePrincipal.Id
appRoleId = $Role.Id }
# Assign the Graph permission New-MgServicePrincipalAppRoleAssignment -ServicePrincipalId $MSI.Id -BodyParameter $AppRoleAssignment
You can download the above script from this link. If you prefer using the Azure AD PowerShell module, keep in mind that it is planned for deprecation. In such a case, you can get the script from this link.
Note: You’ll discover equivalent commands for Microsoft Graph PowerShell as opposed to the Azure AD PowerShell cmdlets on the following link
In the API Management instance, on the left menu select APIs > + Add API. Select HTTP and enter the following settings. Then select Create.
System Assigned Managed Identity:
Navigate to the newly created API and select Add Operation. Enter the following settings for accessing the API through System Assigned Managed Identity (SAMI) and select Save.
Setting
Value
Display name
getUsrProfileSAMI
URL for GET
/users/{User (UPN)}
Select the Operation getUserProfile. In the Inbound processing section, select the (</>) (code editor) icon to use the authentication-managed-identity policy to authenticate with the Microsoft Graph API endpoint using the Managed Identity. This policy uses the managed identity to obtain an access token from Microsoft Entra ID for accessing the specified graph resource.
Replace with the following code in the inbound node:
If you prefer to utilize a user-assigned managed identity, click on Add Operation, input the specified settings for accessing the API via User Assigned Managed Identity (SAMI), and then click Save
Setting
Value
Display name
getUsrManagerUAMI
URL for GET
/users/{User (UPN)}/manager
The Inbound processing section should have the following code
You would now be able to test the Graph API endpoint for both the identities from the Test tab.
Add CORS Policy to API in API Management:
CORS settings allow or restrict web applications or services hosted on different domains from making requests to your API. If you want to enable cross-origin requests to the configured Graph API’s from Power Platform Custom connector, you need to configure CORS settings in the API Management service. In the left menu, select APIs and select the API that you will export as a custom connector. If you want to, select only an API operation to apply the policy to.
In the Policies section, in the Inbound processing section, select + Add policy. Select Allow cross-origin resource sharing (CORS).
Up to this point, we have set up the API Management instance with Graph API endpoints for both System Assigned and User Assigned identities. In the upcoming article, we will delve into exporting the API to the Power Platform as a custom connector, implementing security through API key authentication. Hope you have found this informational & thanks for reading. If you are visiting my blog for the first time, please do look at my other blogposts.
Do you like this article?
Subscribe to my blog with your email address using the widget on the right side or on the bottom of this page to have new articles sent directly to your inbox the moment I publish them.
SharePoint and Microsoft teams services in Microsoft 365 makes it easier to share content or collaborate with external users who is outside your organization. A guest or external user is someone who do not have a school or work account with your organization, they can be your partner, vendor, customer etc. In this article let us see how to build a self-registration experience for external users with the help of Microsoft Forms & Power Automate to onboard them to a
SharePoint online site
Microsoft Team
Microsoft Form to collect details from External User:
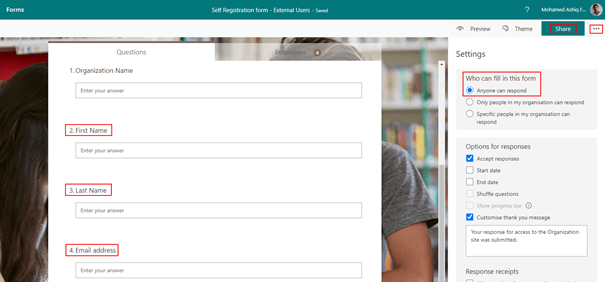
To start building this experience, create a Microsoft form with the setting Anyone can respond and with fields (Name, Email address etc) to collect information from the external user to send invitation.
Azure Active Directory Application registration:
The next step after creating the form is to register an application in Azure AD with Microsoft graph API permission to send invitation to external user. After the app is registered obtain the client id, client secret & tenant id to be used in the Power Automate flow further down this article to generate the JSON webtoken to access Microsoft Graph API for sending invitation. Find below screenshot with the permission User.Invite.All added to the app. Keep in mind the permission requires Admin consent.
There is also delegated permission available for User.Invite.All.
Onboard External users to a SharePoint online site:
Once the Microsoft form is ready, we can start building the Power Automate flow which can send the email invitation to the external user and for granting access to the SharePoint site. The external sharing features of SharePoint Online enables users in your organization share content with people outside the organization. There is no limit to the number of guests you can invite to SharePoint sites as per this SharePoint online limits documentation. Find below steps to create the Power Automate flow with a custom approval on a Microsoft Team
Power Automate Flow:
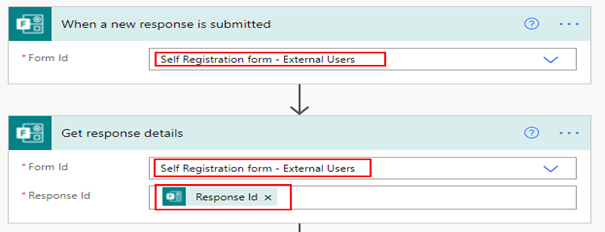
Create an Automated flow with the trigger When a new response is submitted with the above form name selected on the dropdown and then add the action Get response details with the Response Id selected from the dynamic content for the trigger to get the form details submitted in the Microsoft form by the external user. Find screenshot below
Adaptive card for Teams Approval:
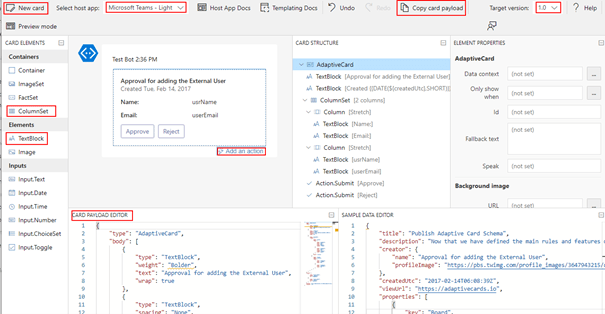
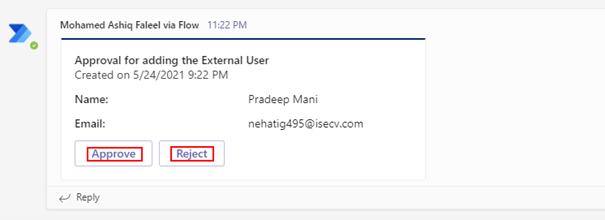
For the Approval in Microsoft Teams, I have used a custom card created from the Adaptive card designer with elements ColumnSet, TextBlock to display information submitted in the form & action button Approve and Reject to take further action by a Microsoft teams user to proceed with Invitation for the Guest account creation. Find screenshot below from the adaptive card designer
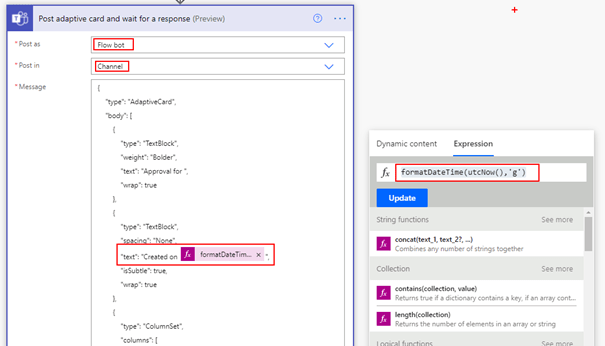
After the card is designed, copy the card payload from the designer and go to the flow and then add the action Post adaptive card and wait for a response and make appropriate selection on the available fields as shown below
Post as: Flow bot
Post in: Channel
Message: Payload copied from designer. Replace the fields for usrName & userEmail selected from the dynamic content from the outputs of the action Get response details. The created on textBlock element has the flow expression formatDateTime(utcNow(),’g’) to display the current datetime information on the card.
Update Message: Custom message which appear after an action taken in Microsoft Teams
Team: Select the Team where you would like to post the card
Channel: Select the channel from the Microsoft Team where you would like to have the approval adaptive card posted
The above adaptive card is used to get approval from the Organization teams user based on the information submitted by the external user in the Microsoft form to proceed with the next steps for sending the guest account invite. Now we will have to identify if the user has clicked the button Approve or Reject. This information can be easily obtained from the Outputs of the action.
Note: Adaptive card can also be sent using a Microsoft Graph API with the card payload in Attachments field
Adaptive card for Teams – Dynamic content Missing:
As of the time I am writing this article there is an issue in getting the output as dynamic content for the Post adaptive card and wait for a response action if there is dynamic content added on the JSON Payload (Name, Email from Forms). The fix is to run the flow till the post adaptive card action and take an action on Microsoft teams by clicking either Approve or Reject and then go to the Flow run from the history as shown below
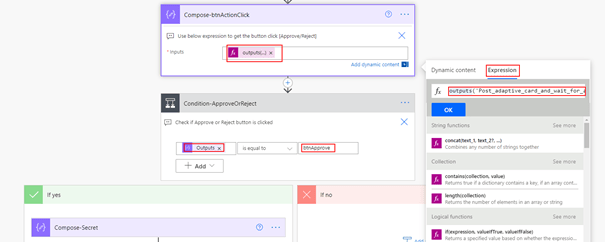
From the above screenshot, we can see if the user has clicked the Approve or Reject button from the field submitActionId. To get this value in Flow, use the expression
To get the submitActionId, enter the expression outputs(‘Post_adaptive_card_and_wait_for_a_response’).body.submitActionId in the compose action, then add a condition control to decide action based on users approval
I have observed this issue occurs in other team’s adaptive card actions as well, the above fix should work. Now we can implement the logic to send the Guest Invitation using Microsoft Graph API. To send the invite, we will use the Azure AD application registered above.
Generate JSON Web token to Access Graph API:
Be ready with the ClientId, Client Secret and Tenant Id collected from the AD app registration you have done initially. The only authentication flow to generate a access token for application permissions is Client credentials.
To generate a token
Store the Client Secret on a String variable or a compose action
Make a HTTP request using the HTTP connector with the following details. Make sure to replace the string for tenantId, azureAdAppclientId and azureAdAppclientSecret
Add a HTTP connector action to the flow for making a POST request per the following information
For the client secret make sure to URL encode using the expression encodeUriComponent(variables(‘clientSecret’)) else the request may fail due to the presence of special characters.
In the above screen, I have added a compose action to store the SharePoint site address to be used for granting the external user access to. To extract the token from the above request, add the parse JSON action with Content from the HTTP request body and the following schema
Include the access token when calling the Microsoft Graph API in the Headers section or raw as shown in the next section.
Send Invitation using Microsoft Graph API:
Before sending the invitation, validate if the user already exists in your organization AD tenant by using the email address of the external user with the help of the action Search for users as shown below
If there is null response for the action Search for users, then the user does not exist. This can be calculated using the expression length and by passing the value as a parameter, if it is equals zero then the external user does not exist. If the user already exists, we can directly proceed to granting the external user access to SharePoint.
Graph API to check if a guest user already exists:
{
  "invitedUserDisplayName": "External User Name",
  "invitedUserEmailAddress": "External User Email Address",
  "sendInvitationMessage": true,
  "inviteRedirectUrl": "SharePoint site URL or any URL",
  "invitedUserMessageInfo": {
    "messageLanguage": "en-US",
    "customizedMessageBody": "Welcome to the M365PAL SharePoint site! Click the link below and sign in."
  }
}
In HTTP request body, use the dynamic content of the form to populate the fields invitedUserDisplayName & Emailaddress. The invite redirectUri is the output of the compose action which has the SharePoint site url. I have added a delay of one minute before granting access to SharePoint site for the external user, this step is to make sure there is an entry in Azure AD for the external user/guest account.
Grant Access to SharePoint site for the external user:
As soon as the guest account invite is sent from the above Microsoft graph API request HTTP action, it is time to grant access to the SharePoint site for the external user. There is a SharePoint REST API endpoint to add a user to a SharePoint group (Owners, Member, Visitors), find below the request details
For the external user, the email address used to send the invite works.
Go back to the flow and add the action Send an HTTP request to SharePoint to call the above REST api. Find below the screenshot of the action
The above action uses delegated permission, the user of the connection should have access to the SharePoint site. As of now, there is no Graph API for adding the user to a SharePoint group but you can register an app in Active directory and add permission for SharePoint to call the above REST API. Refer to the documentation Granting access via Azure AD App-Only for calling the REST API using the registered AD app.
Testing the flow:
The whole flow can now be tested by submitting the form which sends the adaptive card on Teams first as shown below
After the card is approved, the invite is sent to the external user. After the external user accepts the invite, the user should be automatically redirected to the SharePoint site with the appropriate access. The access to the SharePoint site for the external user can be validated by the checking the membership of the SharePoint group in the site even before the user accepts the invitation. The site members can also be validated by accessing the URL for All users list:
This approach of granting access to SharePoint site for external user can be applied to internal users by turning off the access requests.
Limit External Sharing by domain:
The external sharing on SharePoint can be restricted based on domain of the external user. To enable the setting login into the SharePoint admin center > Policies > Sharing > Enable the checkbox Limit external sharing by domain > Add domain
Onboard External users to a Microsoft Team:
To onboard the external user to a Microsoft Team, the only change to the above flow is, instead of adding the user to the SharePoint group the user must be added as a Member to the Microsoft 365 group connected to the Microsoft Teams. The graph API to add a member to a Microsoft Team is
The expression to get the user object Id of the external user as per the below screenshot is
outputs(‘HTTP-SendGuestInvitation’).body.invitedUser.Id The expression can be used in a compose action to get the Object Id of the external user which can be used in the Graph API request to add the member to a Team. HTTP-SendGuestInvitation is the name of the HTTP Action.
Permission for the Azure AD App to add a member to a Microsoft Team:
The application permission Group.ReadWrite.All has to be added on the Azure AD app, if you are going to be using the same JSON webtoken generated above. There is delegated permission as well for adding members.
Summary: With this, the Power Automate flow should send the invitation as shown below to the external user.
If it is for a Microsoft Team, the external user should be licensed for teams service to open it on their teams client. The same flow can be also configured for Microsoft 365 group. If you are visiting my blog for the first time, please do look at my other blogposts.
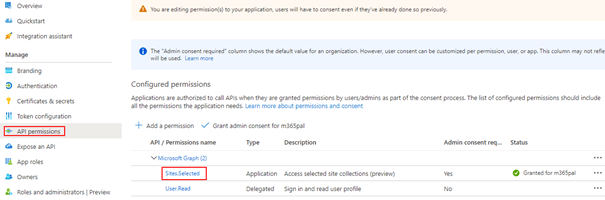
As per this announcement made on Feb 2021, Microsoft graph now provides option to have granular permissions level using Sites.Selected application permission for the AD application instead of granting permission for all the sites in the tenant. The permission Sites.Selected does not provide access to any SharePoint site collections for the application unless the AD application has been assigned with permission roles read or write by an Admin. On this post let us see how to grant a site permission (Read or Write) to an AD Application with Sites.Selected permission by using postman client. As of the time I am writing this post there is no user interface to assign permissions to specific site collections for the application.
Pre-Requisite:
Register Azure AD Application (APP 1) in Azure AD Portal with the following permissions
Sites.Selected (Admin Consented)
Another AD Application (APP 2) with following permission only for the admins to assign selected roles to the above App
Sites.FullControl.All (Admin Consented)
App Registration:
Start with registering the above said two Azure AD applications
Another app for admins for granting roles to APP 1
Grant permission role to the SharePoint site for the Azure AD Application:
This step is grant permission for the Azure AD application with Sites.Selected application permission to a given site collection. Perform the following steps to grant the role (Read/Write or Read and Write) to the AD app (APP 1)
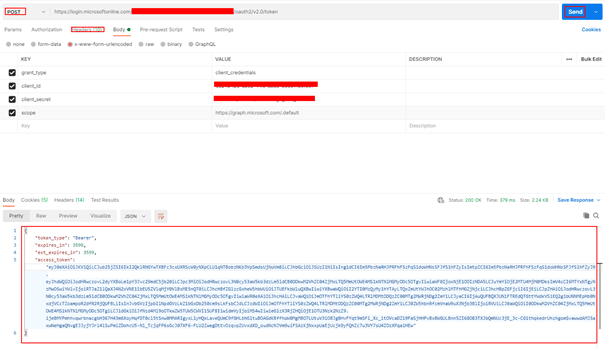
Gather the Client ID, Tenant ID and Client secret of the admin app
In PostMan, make a HTTP request to generate the access token for the admin app – APP 2
Copy the access_token to be used for granting roles.
Get the Client ID of the Azure AD Application – APP 1 with Sites.Selected permission
Decide on the Role (Read or Write) for the granting the Site specific role for the APP 1 with Sites.Selected permission.
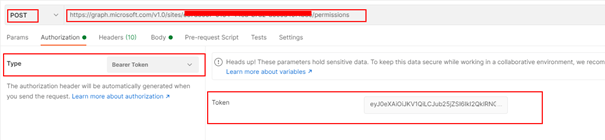
Get the SiteId of the SharePoint site to be assigned permissions for the application (App 1). An easy way to get the siteId is by viewing the page source from the browser with the site open.
In PostMan, make a HTTP request to grant the site role to the APP 1. Replace the siteId with the actual siteId which will be a guid
Paste the access token on the token box as shown below with Authorization type selected as Bearer Token
Send the request for granting the role for APP 1. After the request is made the APP 1 with the Sites.Selected permission has access to the site with write role we have granted to. The same way you can assign app access to multiple SharePoint sites.
Grant the Role using PnP PowerShell:
There is a PnP PowerShell cmdlet to grant access to SharePoint site for the registered AD application with Sites.Selected permission. The command to grant permission can be executed by the Site Collection administrator after creating a connection to the site
You will be prompted to enter credentials including the second factor. After the connection is created, enter the following command to grant Write permission to the AD App
To install PnP PowerShell module on the local workstation, enter the following command
Install-Module -Name PnP.PowerShell
There is also a PnP cmdlet to register an AD app in the Azure Active directory.
Grant the Role by an Admin using the Graph Explorer tool:
Role can also be assigned by an admin with out having the admin AD app (APP 2) using the graph explorer tool. This can be done only by an Admin
If there is any error related to permissions, make sure the admin consents to Sites.FullControl.All for the Graph tool. There is also an SPFx community webpart developed by a community member with User Interface for this operation
On this post we have seen how to grant access to Azure AD which has the Sites.Selected permission. You can also grant permission/role to an app with sites.selected permission programmatically. If you are using SharePoint API instead of Graph API in the Azure AD app registration, Sites.Selected is available on Application Permission as shown below
Hope you have found this informational & thanks for reading. If you are visiting my blog for the first time, please do look at my other blogposts.
Do you like this article?
Subscribe to my blog with your email address using the widget on the right side or on the bottom of this page to have new articles sent directly to your inbox the moment I publish them.
There are many organizations maintaining multiple domains on a single Microsoft 365 or Azure AD tenant, in those cases there might be a need to create dynamic Microsoft 365 groups, security groups & distributions list based on the user’s domain to manage the group’s membership. On this blogpost, let us see how to
Create Dynamic Microsoft 365 group based on the user’s domain for Teams & Yammer
Create a Dynamic distribution list based on user’s domain in Exchange online
To begin with let us see some basics of a Dynamic group. The membership of a dynamic group will automatically update as people join, leave, or move within the organization whenever the user’s Azure Active Directory attributes are changed. In simple terms, rules determines the group membership. The users will be added or removed automatically as and when the user attributes change or users join and leave the tenant which reduces the administrative effort of adding and removing users from a group. Dynamic group can be created based on variety of attributes including role, location, department etc.
Create Dynamic Microsoft 365 group based on the user’s domain for Teams & Yammer
Microsoft Teams and Yammer (Microsoft 365 Connected) supports dynamic membership. It enables the membership of Team or Yammer to be defined by one or more rules that check for certain attributes in Azure AD. Microsoft Teams & Yammer creates a Microsoft 365 group in Azure AD. For this post, the membership rule will be simple one which is based on the user’s domain and country. You can also have a complex rule involving multiple Azure AD attributes like Title, Geography, Department etc. Before we proceed further, there are some pre-requisite & facts to be considered before creating a dynamic group.
User Administrator or Global administrator role in Azure AD
Users you foresee to be part of a dynamic group membership rule should have an Azure AD premium License P1 or P2
Microsoft 365 E3, E5, Front line workers MF3 & MF1 has Azure AD premium 1 service which should suffice.
An Azure AD organization can have maximum of 5000 dynamic groups.
Any number of Azure AD resources can be members of a single group.
Dynamic Membership based on Domain for Teams:
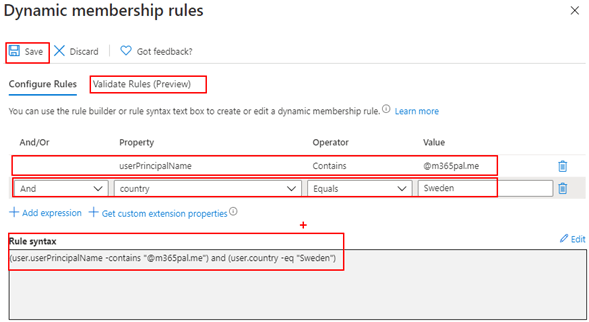
To create a Dynamic membership MS team, create a Microsoft 365 group first with Dynamic membership in Azure Active directory. You can create a dynamic group from PowerShell but here I will be using Azure Ad GUI to create the dynamic Microsoft 365 group with rule to add users based on their domain and country. I have added a domain m365pal.me to my Azure AD tenant which I will be using here for this example.
Sign in to Azure AD Admin center with administrator role in the Azure AD organization
Click Groups and then click + New Group
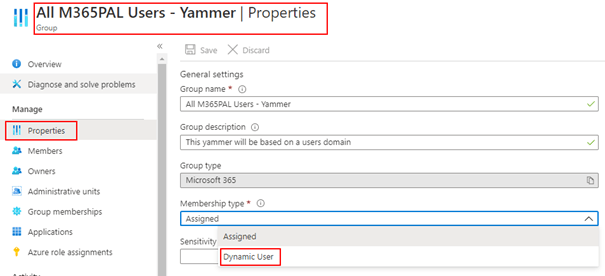
Select the Group type as Microsoft 365. Dynamic membership will also work with Security group but for team it should be Microsoft 365 group.
Enter the Group Name & Group email address
Select the Membership type as Dynamic User
Select the Owner and then
Under Dynamic user members section, click Add dynamic query
In Dynamic membership rules panel, add rule to define membership based on users domain & country
First rule for Domain: under Property column select userPrinicipalName, Operator should be Contains and the Value should be the domain name in format “@yourdomain.com”. This rule will add all users with the UPN user@yourdomain.com. Now click + Add expression to add the second rule
Second rule for country: under Property column select country, Operator should be Equals and the value should be the country name.
You can also validate the rules by clicking the link Validate Rules and then by adding users to check if the user satisfies the rule
Click Save. This is how it should look like
Click Create.
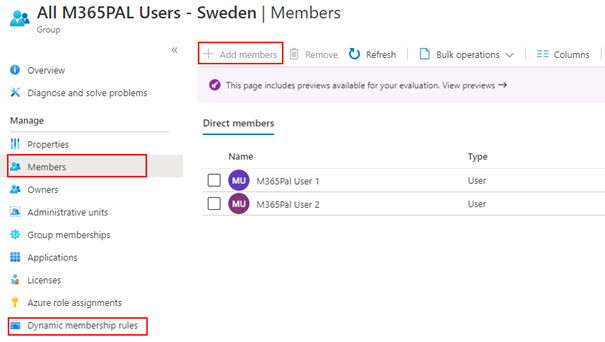
After waiting for couple of minutes, check the group membership. Please find below screenshot for the group which has two members satisfying the condition. You can also notice the + Add members link is disabled since the group is dynamic membership and not assigned. To modify the rules, click the link Dynamic membership rules link.
Now we are ready to create the MS Teams, go to https://teams.microsoft.com/ and then click Join or create a team at the left bottom corner and then Click Create a team
Click From a group or team and then click Microsoft 365 group
Now select the group you have created in Azure AD and then click Create.
The team is now created, you can find the team on the list. Check the membership of the team which will have the two users satisfying the rules and the owner of the group. One more thing to notice here is the message which says The membership settings prevents you from adding or removing members.
Voila! Dynamic Microsoft team is now created & setup.
If you have an existing team to be converted to a Dynamic team, find the Microsoft 365 group in Azure AD for the Team you wish to convert and then update the membership status from Assigned to Dynamic user with membership rules
Dynamic Membership based on Domain for Yammer:
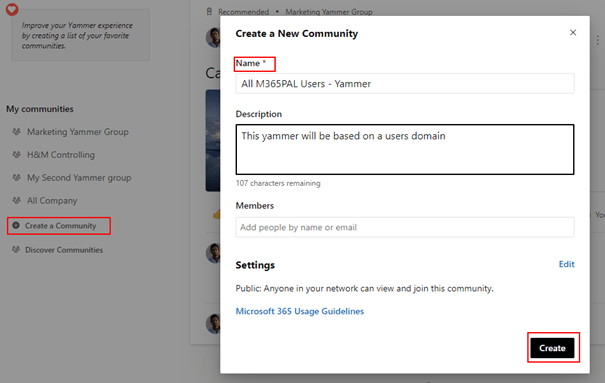
Yammer (Microsoft 365 Connected) also supports dynamic membership. Find the steps below to create a dynamic yammer group based on the user’s domain. Find the steps below
Click Create a Community and then Enter the name of the Community
Click the button Create
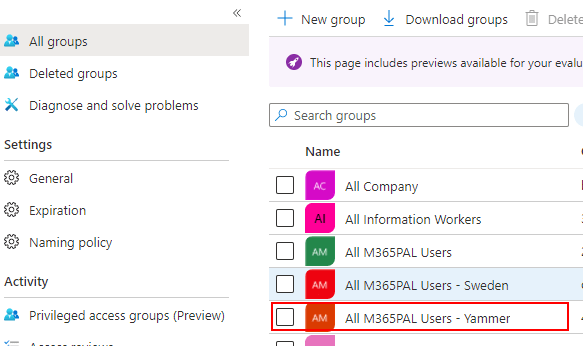
Now sign in to Azure AD Admin center to the update the membership settings of the Microsoft 365 group connected to the Yammer community. Find the yammer group and then click
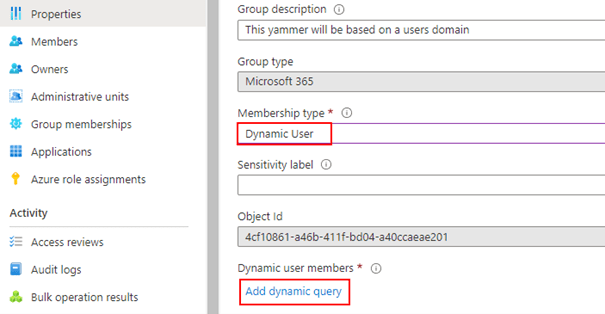
Click Properties under the Manage blade and then change the membership type from Assigned to Dynamic user
After updating the membership type to Dynamic user. You will now have option to enter the dynamic query. Click dynamic query
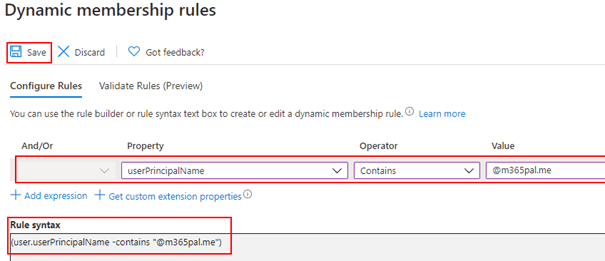
In Dynamic membership rules panel, add rule to define membership based on users domain
Rule for Domain: under Property column select userPrinicipalName, Operator should be Contains and the Value should be the domain name in format “@yourdomain.com”. This rule will add all users with the UPN user@yourdomain.com. Now click + Add expression to add rules based on need
Click Save
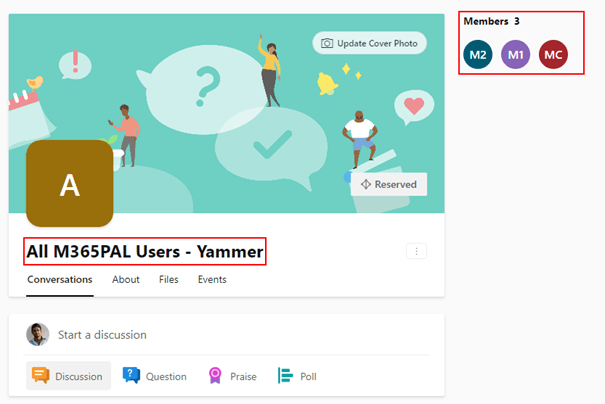
Click Save. Wait for couple of minutes for the membership to be updated.
Now check the Yammer group in Yammer.com for the membership status. Please find below screenshot for your reference which will not have the + icon on the highlighted members section for adding users since this is now a dynamic yammer group
Also, Microsoft 365 group/Security group can be used for different use cases. See some sample use cases below
You can use to target SharePoint page/news to specific audience with the help of Microsoft 365 group or Security group. Will it not be more powerful if you use dynamic groups within a SharePoint to target content certain group of audience!
Assign Microsoft Licenses to users based on Dynamic Group.
Grant access to an App (PowerApps etc) using the dynamic group targeting certain departments, geographies etc
Create a Dynamic distribution list based on user’s domain in Exchange online:
Dynamic distribution groups are mail-enabled Active Directory group to distribute email messages to all its members within a Microsoft Exchange organization. Unlike regular distribution lists that contain a defined set of members, the membership list for dynamic distribution groups is calculated each time a message is sent to the group, based on the filters and conditions that you define in the group. You can create a Dynamic Distribution list from Exchange Admin center as shown below but the options to write advanced filter conditions or rules are limited so PowerShell is preferred.
Dynamic Distribution list from PowerShell:
Make sure the Exchange online PowerShell module is installed. There are some limitations to create a recipient filter (Rules) that worked based on user’s domain with the operator like or contains but there is a workaround. The filter works based on the exchange property WindowsEmailAddress which is always the primary SMTP address, you can also consider using the property WindowsLiveID. Follow the steps below to create a Dynamic Distribution list based on user’s domain
Load the module by the running the command Import-Module ExchangeOnlineManagement
After authentication, enter the following command to create the Dynamic DL based on User’s domain. I have added the RecipientTypeDetails in the RecipientFilter to apply the filter rule only to user mailboxes which excludes the SharedMailboxes
Summary: On this post we have seen how to create dynamic groups based on user’s domain. Do some planning to start using the dynamic groups which will help reduce lot of administrative overhead. Hope you have found this informational & helpful. Let me know any feedback or comments on the comment section below