DLP policies are essential in ensuring that data is managed uniformly across an organization, thereby preventing critical business data from being accidentally published to social media or other connectors. These policies can be created at both the tenant and environment levels, with management handled through the Power Platform admin center. However, it is currently not possible to copy an existing DLP policy from the Admin center. This limitation can create difficulties when there is a need to create new policies based on an existing one.

In this blog post, we will explore various options for copying existing DLP policies to streamline the process. By using these options, you can save time and effort when creating new policies based on existing ones.
- Power Automate Flow
- DLP Editor Power Apps from CoE starter kit app
- Power Shell
Note: To create a DLP policy at the Tenant level, you must be a Power Platform or Global Administrator role in AD.
Power Automate Flow:
The Power Platform Connector for Admins, available in both Power Automate and Power Apps, offers a range of environment lifecycle management capabilities, including DLP policy management.
To copy an existing DLP Policy, we will be utilizing the action List DLP Policies and Create DLP Policy in a Button Flow
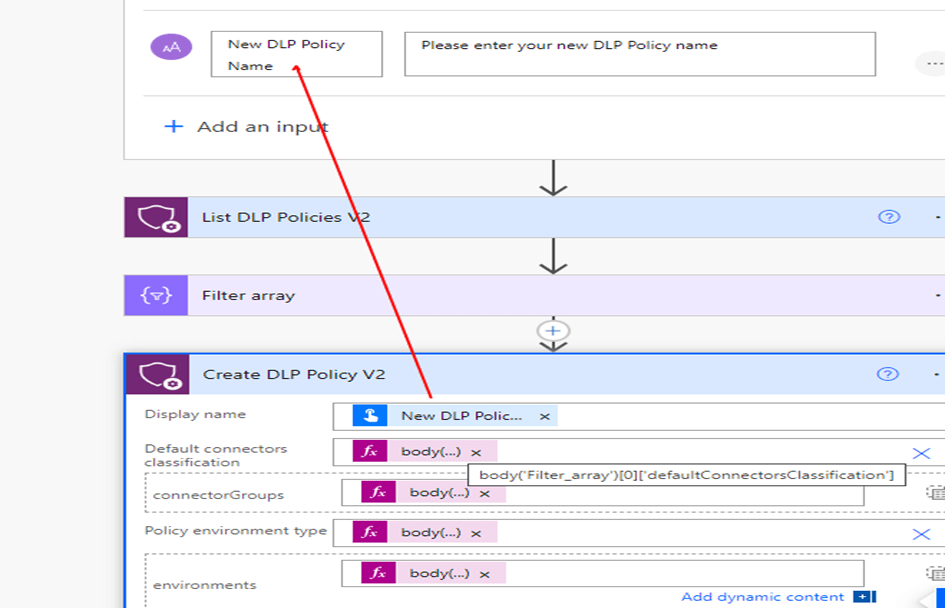
Step 1: In the trigger, create two parameters to get the input for the existing Policy Name and the New DLP Policy name followed with the action List DLP Policies from the connector Power Platform for Admins to list all the policies in the Organization

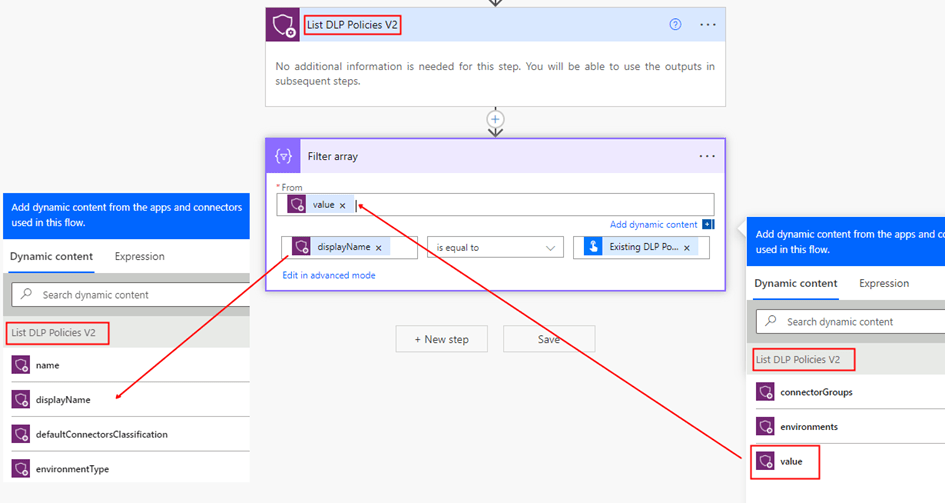
Step 2: To select the DLP policy that you want to copy in a Power Automate flow, add a Filter Array action. This action filters the DLP policies obtained from the List DLP Policies action based on a condition. Specifically, it checks whether the displayName of the DLP Policy from the DLP Policies list action matching with the trigger input Existing DLP Policy Name. Once the Filter Array action is executed, it returns a new array containing only the DLP policy that meets the condition. This filtered array can then be used as input for creating a New DLP policy
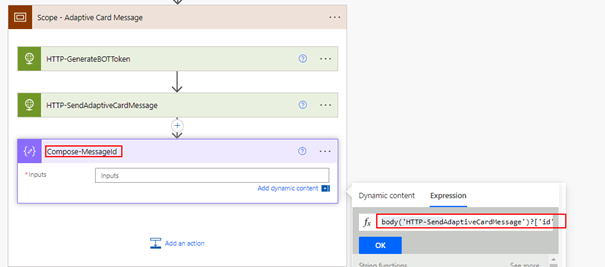
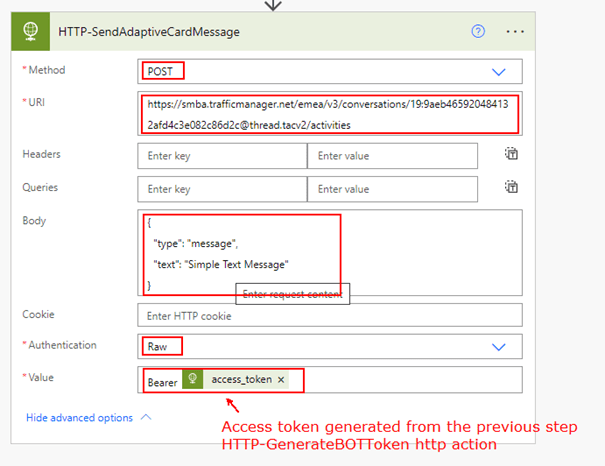
Step 3: Add the action Create DLP Policy from the Power Platform for Admins connector with the first property Display Name from the Trigger input. For the other input parameters for the action, use the expression from Output of the Filter Array action as shown below
body('Filter_array')[0]['defaultConnectorsClassification']
body('Filter_array')[0]['connectorGroups']
body('Filter_array')[0]['environmentType']
body('Filter_array')[0]['environments']
Save the changes to ensure that they are preserved. Once you have saved the flow, you can test it to make sure that it works as intended. I have the flow definition saved in my github if you wanted to take a copy of it.
CoE Starter Kit App:
The Center of Excellence (CoE) starter kit core components solution includes a Canvas app DLP Editor with a range of useful features to manage and administer DLP policies. One such feature is the ability to copy an existing Data Loss Prevention (DLP) policy, making it easy to replicate policies across multiple environments or tenants.

This app uses the Power Platform for Admins connector.
Power Shell:
Power Apps Administration PowerShell provides a convenient set of cmdlets that enable you to easily create and manage Data Loss Prevention (DLP) Policies. Microsoft has provided a helpful sample script that allows you to manage your tenant and environment policies. With this script, you can perform a wide range of tasks related to DLP policies, including creating new policies, reading existing policies, updating policies, and removing policies. The sample can be found here. By breaking down the sample script into manageable sections, you can gain a deeper understanding of how DLP policies work and how you can modify them to suit your organization’s needs with PowerShell.
Summary:
This blog post provides a overview of different methods that can be used to copy existing Data Loss Prevention (DLP) policies, which is currently not available from the Power Platform admin center. These techniques can help automate the DLP policy creation process, saving time and effort.
Do you like this article?
Subscribe to my blog with your email address using the widget on the right side or on the bottom of this page to have new articles sent directly to your inbox the moment I publish them.