
The Attachment control in Power Apps is a useful feature that allows users to upload and delete files, but it can only be used with data sources such as SharePoint List or Dataverse table. However, if you need to upload and delete files without using these data sources, you can create a custom component using the Attachment control or you can directly use this control in the app. I have followed the tip from Shane Young in this YouTube video to add the Attachment control to a component library.
By creating a custom component Library for the attachment control, you can upload and delete files similar to a Picture control but with the ability to handle any file type across any apps within an environment. This blog post is not a tutorial on how to create the component, but rather
- How to use it
- To Save the file in SharePoint Document Library using Power Automate Flow
- How to customize the component to fit your needs.
How to use it – Add the Component to the Power Apps:
To incorporate this component into your app, you need to first import it into your environment. Please find below the steps to follow
Step 1: Download the component library from my github repo.
Step 2: Create a Blank Canvas App with a temporary name, on the studio command bar, click on the ellipsis > Click ‘Open’, browse to select the downloaded .msapp package. Save the App and then publish it. You would now be able to see the component from the Component Libraries.

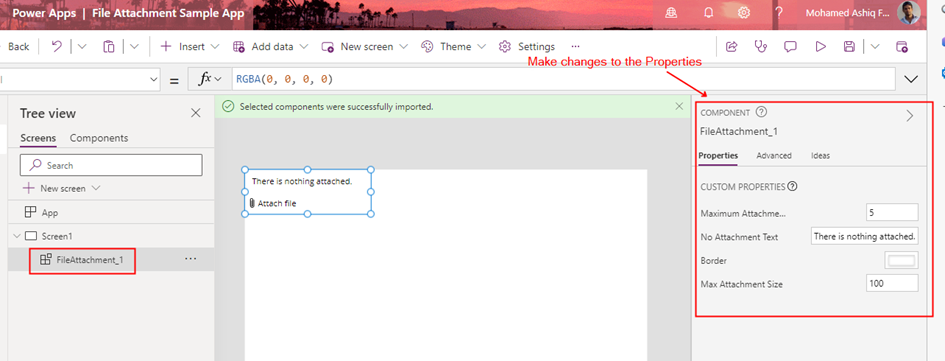
Step 3: After following the instructions outlined in this documentation to import the Published component into your app, the component will be available for use in any app within the environment as shown below.

Step 4: Modify the input parameters of the component to adjust settings such as maximum number of attachments, border colour, attachment size, and other defined parameters of the component.
Step 5: To display the uploaded file content within the app or to send the file to a Power Automate flow, you can incorporate any of the following controls based on the file type:
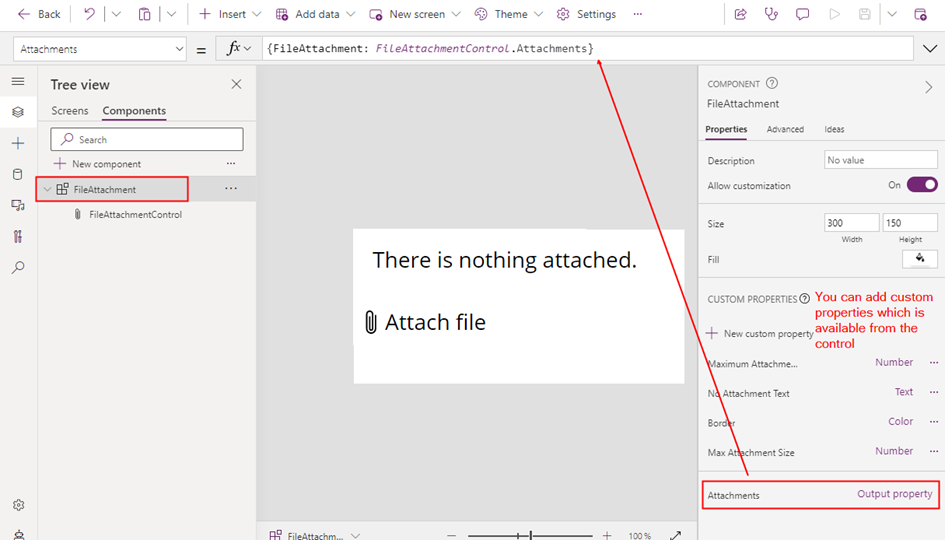
In the Media Property of the control, the formula to display the file content is
First(FileAttachment_1.Attachments.FileAttachment).ValueThe file content will be uploaded to the app as binary data with the URL appres://blobmanager/ for each file uploaded from the attachment control. To get the file Name:
First(FileAttachment_1.Attachments.FileAttachment).Name
Note: In the above screenshot, I have set the Max Attachments Component property to 1 in the Step 4
Send the File to Power Automate:
In order to send or store a file using a Power Automate flow, I needed to convert the file content to Base64 format. To accomplish this, I used a image control to capture the file content in binary format. Here is how I configured the image control:

This control works with any types of files to get the binary content.
After obtaining the binary content of the file using the JSON function, I performed some string manipulations to extract the binary content while excluding the Content-Type. Specifically, I used a combination of Split(), Left() and Last() functions to separate the content into an variable varExtractedFileContent.
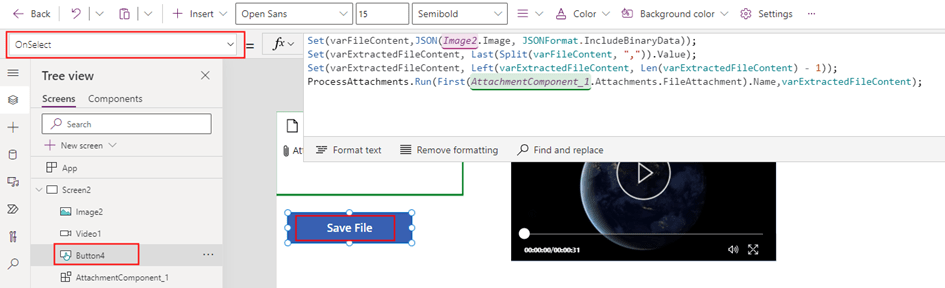
Set(varFileContent,JSON(Image2.Image, JSONFormat.IncludeBinaryData));
Set(varExtractedFileContent, Last(Split(varFileContent, ",")).Value);
Set(varExtractedFileContent, Left(varExtractedFileContent, Len(varExtractedFileContent) - 1));
By performing these manipulations, I was able to extract the binary content of the file in a format that could be easily passed to a Power Automate flow or other API or action.
This allowed me to send the file to a Power Automate flow, which could then save the file in a SharePoint library or call some other API or action that required the data to be in Base64 format.
The Power Automate flow used to save the file to a SharePoint Document Library is simple. The flow consists of a Power Apps trigger and a SharePoint action Create File, which takes two input parameters: File Name and File Content.

I have used the base64toBinary() expression to convert the base64-encoded string to binary data. This expression is a prerequisite for the SharePoint create file action and ensures that the file is saved correctly to the SharePoint Document Library.
PowerFx to call the flow from Power Apps:
ProcessAttachments.Run(First(AttachmentComponent_1.Attachments.FileAttachment).Name,varExtractedFileContent);If you need to upload multiple files to a library using the Attachment control, you can use Gallery control with the Image control, Collections, ForAll function, and the OnAddFile property from the Attachment control. First, create a collection to store the files that are uploaded using the Attachment control using the OnAddFile property. Then, use the Gallery control to load the binary of the uploaded files in the Image control. Next, use the ForAll function to iterate through each file in the gallery and call the Power Automate flow on a button click.
Customizing the Component:
The component I’ve created is a simple one for handling file attachments, but it does not have all the properties from the Attachment control. If you need more customization, you can easily modify it to suit your specific needs by adding additional input or output properties.
To add a new property, you can simply edit the component code and include the new property as an input or output parameter.
By customizing the component in this way, you can tailor it to your specific requirements and ensure that it meets all of your file attachment needs
Summary:
In summary, the Attachment control in Power Apps is a useful feature for uploading and deleting files, but it is limited to certain data sources. To work around this limitation, you can create a custom component using the Attachment control, which allows you to handle any file type and bypass the use of data sources like SharePoint or Dataverse tables. Hope you have found this informational & thanks for reading. If you are visiting my blog for the first time, please do look at my other blogposts.
Do you like this article?
Subscribe to my blog with your email address using the widget on the right side or on the bottom of this page to have new articles sent directly to your inbox the moment I publish them.
