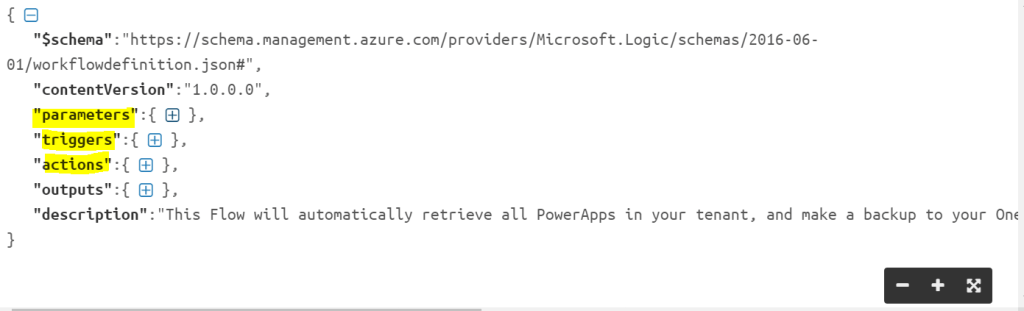
Adaptive Cards a new way for developers to display & exchange content in a common and consistent way across different applications. It can be hosted on
- Bot Framework Webchat
- Cortona Skills
- Outlook Actionable Messages
- Windows Timeline
- Microsoft Teams
- Windows Notifications
SDKs (.NET, JavaScript, Android, React, iOS etc) are available for authoring & rendering cards inside your own apps. Microsoft has got a very great documentation on this. The schema explorer has got information about all the list of available Card elements, containers & actions sets to use. Adaptive card templating features which is now available in preview mode to help create, reuse & share the cards you develop & enable you to separate the data from the layout in an Adaptive card. There is also a plugin available called as Adaptive Card Viewer in Visual studio code for visualizing the card & a Team app called as App Studio.
Develop a card using the Adaptive Card Designer from the scratch or you can start with some available samples. Card Authors describe their content as a simple JSON object with the help of the designer which could then be rendered natively inside a Host Application as shown above, automatically adapting to the look and feel of the Host.
On this blog post, I am going to show you how to create an Outlook actionable message using a sample (Input Form) available in Adaptive card designer, this collects information (Name, Email) from the user & storing it in a SharePoint list using two flows. On submission of the form, a simple response message will be shown using a response Adaptive card. For the outlook version requirements for actionable message, click on this link. Find the flows to be created below
- Instant flow with the manual trigger for sending the adaptive card in an email
- Instant Flow using trigger When a Request is received for sending information to SharePoint list
Actionable messages can be via Email which I am focusing on this blog post or using connectors. Check here the supported scenarios via an Email.
Steps Involved to create actionable message via an Email:
- Creating the Adaptive card for the host application (Outlook)
- Creating the Flows
Let’s start with creating the card using the Adaptive Card designer
Adaptive Card Creation:
There is going to be two adaptive cards
- First one is the initial form to be sent on email using the sample Input form
- Second one is a response card which will be shown after the input form is submitted
First Adaptive Card:
Go the designer & click on Open Sample, select Input Form as shown below

Then change the host app from the default Bot Framework Webchat to Outlook Actionable Messages. Remove the Phone number Text Block [Element] & the corresponding Text.Input [Inputs] field to keep it simple. Remove the Submit action set, add the action set of type Action.Http for us call the flow with method POST for us to interact with SharePoint

Update the following attributes of the just added element action set
- Rename the Title of the element to Submit from Action.Http
- Add the Id submit
- Change the Style to Positive from Default
- Select the Method to POST
- Url to be set to our second FLOW (When a Http request is received) HTTP POST url later once we have it ready with us
- Add the following to the Body
{
"inputName":"{{myName.value}}",
"inputEmail":"{{myEmail.value}}"
}- Set the HTTP Headers
- Click the Add New header, enter “Authorization” to Name and leave the Value blank. If this is not done, you will receive an HTTP 401 unauthorized message while clicking the button on the email. The HTTP request is received flow does not have any authentication its anonymous so be careful with the URL and have some steps to validate on the flow so check if its triggered from valid source
- Add one more header, enter “Content-type” to Name and Value should be “application/json”. This is required to make the POST request from the email
The first card is ready, lets us go ahead and create the second one which is the response card. This will be shown once the response is submitted
Second Adaptive Card:
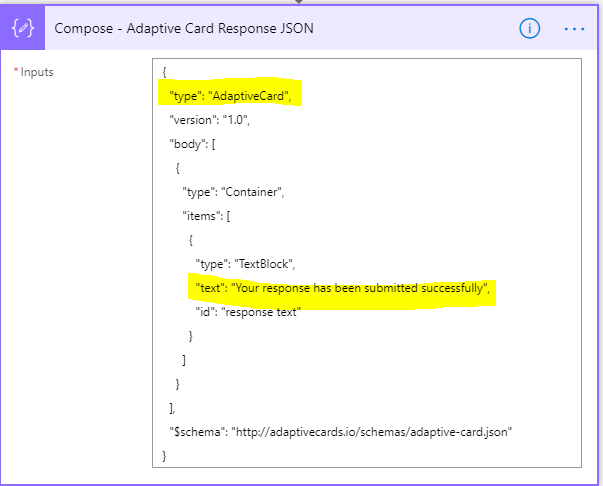
This is going to be a very simple card, lets start from the scratch. Go to the designer and select New Card
- Add a Container
- Add a TextBlock with text “Your Response has been submitted successfully” on the container
Click Copy Card JSON from ribbon for this card to be used on the flow. We now have the adaptive cards ready with us, let’s go ahead and the create the flows using Power Automate. Find the generated JSON below
{
  "type": "AdaptiveCard",
  "version": "1.0",
  "body": [
    {
      "type": "Container",
      "items": [
        {
          "type": "TextBlock",
          "text": "Your response has been submitted successfully",
          "id": "response text"
        }
      ]
    }
  ],
  "$schema": "http://adaptivecards.io/schemas/adaptive-card.json"
}
Instant Flow using trigger When a Request is received:
This flow is an Instant flow with trigger “When a HTTP request is received”, this is going to be called from email for submitting the Input form to a SharePoint list. Create a SharePoint list with two columns for us to store the Name and Email submitted from the adaptive card on email.Create the flow with the trigger as said above. The POST url will be generated after the flow is saved with an action. Click Generate from sample on the trigger and copy and paste below information which would automatically generate the schema for you. If you have more advanced JSON schema with, try using this tool.
{
	"inputName": "",
	"inputEmail": ""
}
Click Advanced options to select the method POST. Add the action create item to store the user form response to SharePoint list created above with the request body information mapped to Title (Name – inputName) & Email (inputEmail) using the dynamic content

Add the Compose action, paste the JSON of the second adaptive card to the Inputs.
Add the Response action, a premium one with the header key CARD-UPDATE-IN-BODY and the value as true. The body parameter should be the outputs of the compose action JSON

Save the flow, the POST url will now be generated copy it and go to the first adaptive card and paste it on the url attribute for the Submit action set. After this copy the JSON from ribbon, we are now ready for creating the next flow
Instant flow with the manual trigger for sending the Adaptive Card
This flow is an instant flow with trigger Manually Trigger a flow for sending the adaptive card an outlook actionable message in an Email. You can have a different type of trigger based on the requirement. Add the compose & send an email (v2) action, paste the JSON for the first adaptive card to the inputs field of compose action. Make sure JSON also has the POST Url of the first flow on the Action set. On the compose action, also include the script tags as given below
<script type=”application/adaptivecard+json”>
— JSON of First Adaptive Card—
</script>
<script type="application/adaptivecard+json">
{
    "$schema": "http://adaptivecards.io/schemas/adaptive-card.json",
    "type": "AdaptiveCard",
     "version": "1.0",
    "body": [
        {
            "type": "ColumnSet",
            "columns": [
                {
                    "type": "Column",
                    "width": 2,
                    "items": [
                        {
                            "type": "TextBlock",
                            "text": "Tell us about yourself",
                            "weight": "Bolder",
                            "size": "Medium"
                        },
                        {
                            "type": "TextBlock",
                            "text": "We just need a few more details to get you booked for the trip of a lifetime!",
                            "isSubtle": true,
                            "wrap": true
                        },
                        {
                            "type": "TextBlock",
                            "text": "Don't worry, we'll never share or sell your information.",
                            "isSubtle": true,
                            "wrap": true,
                            "size": "Small"
                        },
                        {
                            "type": "TextBlock",
                            "text": "Your name",
                            "wrap": true
                        },
                        {
                            "type": "Input.Text",
                            "id": "myName",
                            "placeholder": "Last, First"
                        },
                        {
                            "type": "TextBlock",
                            "text": "Your email",
                            "wrap": true
                        },
                        {
                            "type": "Input.Text",
                            "id": "myEmail",
                            "placeholder": "youremail@example.com",
                            "style": "Email"
                        }
                    ]
                },
                {
                    "type": "Column",
                    "width": 1,
                    "items": [
                        {
                            "type": "Image",
                            "url": "https://upload.wikimedia.org/wikipedia/commons/b/b2/Diver_Silhouette%2C_Great_Barrier_Reef.jpg",
                            "size": "auto"
                        }
                    ]
                }
            ]
        }
    ],
    "actions": [
        {
            "type": "Action.Http",
            "title": "Submit",
            "url": "HTTP POST FLOW URL",
            "id": "submit",
            "style": "positive",
            "method": "POST",
            "body": "{\"inputName\":\"{{myName.value}}\",\"inputEmail\":\"{{myEmail.value}}\"}",
            "headers": [
                {
                    "name": "Authorization",
                    "value": ""
                },
                {
                    "name": "Content-type",
                    "value": "application/json"
                }
            ]
        }
    ]
}
</script>
On the Send an email (V2) action, click the html view and select the outputs of the compose JSON which has the first adaptive card JSON. The flow is ready, click the Test link on the right corner of your flow to trigger it. The email will be received to the sender as below
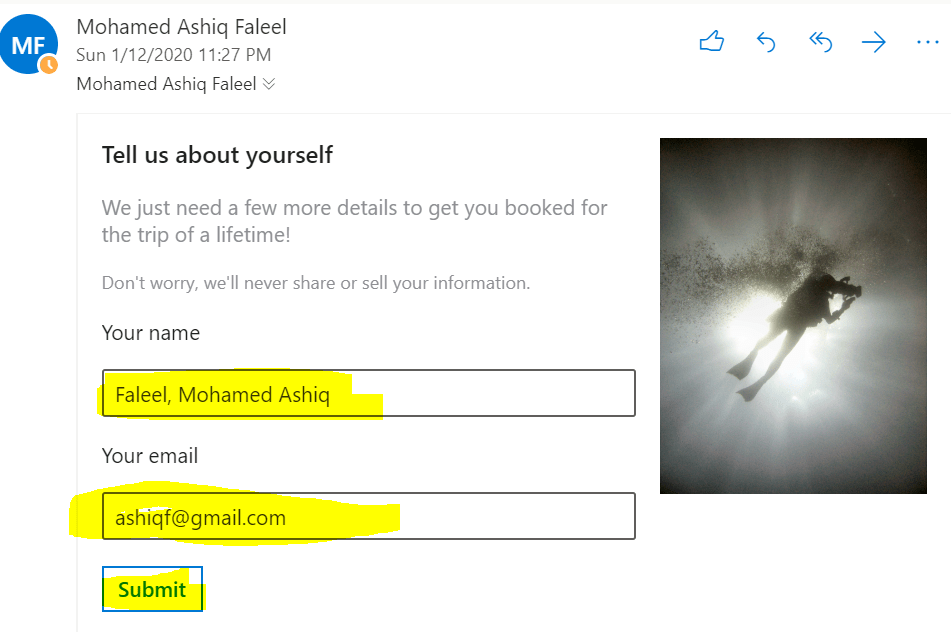
Once the information is Submitted, you would see the response as below

If you would like to test with the tenant or global users, then register your adaptive card actionable message on the Actionable Email Developer Dashboard to enable this service. Enter the Flow URL (HTTP Request response), scope & sender email address. For more information on the developer dashboard refer here. Regarding security of the actionable message, refer here.

Once your provider is approved. Add the Provider Id (originator) field to the originator attribute in your JSON of the adaptive cards next to the type key, as follows:
“originator”: “ProviderId”,
Summary: You now have an actionable message adaptive card on outlook for collecting information from users on email. It provides you more functionality than the available Out of the box actions Approvals or Emails with options. To know the future road map, click here to know. Hope you have enjoyed reading this post and find it useful. If you have any comments or feedback, please provide it on the comments section below.