In this section of the blog series, we’ll walk through the steps to create a Microsoft Graph subscription for Teams presence updates based on the Custom connector created on the previous post and configure a Power Automate flow to receive and process these updates through Azure Event Hub.
Step 1: Creating a Microsoft Graph Subscription for Teams Presence
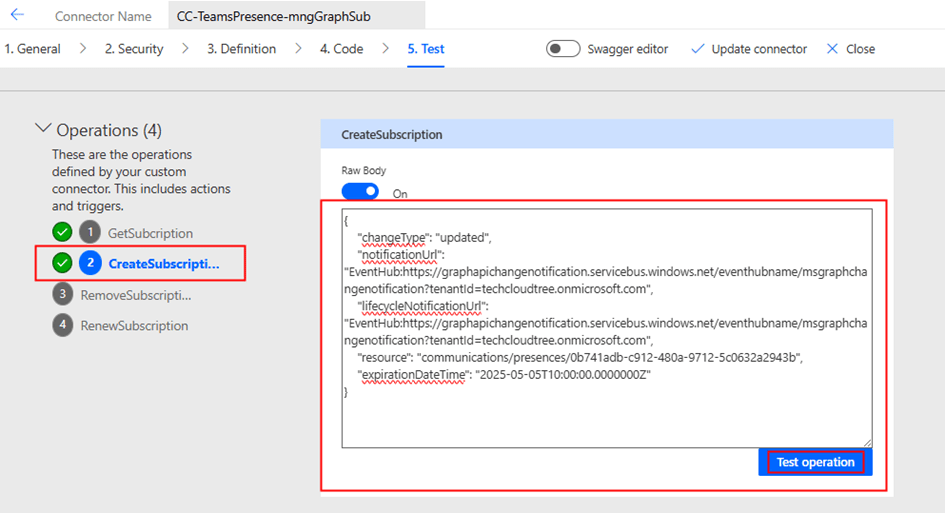
Using the custom connector built in Part 1 of this blog series, initiate the Microsoft Graph subscription by calling the Create Subscription action
When creating a Microsoft Graph subscription for Teams presence updates, make sure to update the following fields in your request payload:
notificationUrl URL where Microsoft Graph will send presence update notifications. This should point to your Azure Event Hub endpoint configured to receive events.
lifecycleNotificationUrl URL to handle lifecycle events such as validation and subscription expiration. This should point to an endpoint capable of processing these system-level callbacks (optional but recommended).
resource This defines the target of the subscription. Format: /communications/presences/{userId}
Replace {userId} with the Object ID (GUID) of the Azure AD user whose presence updates you want to track.
expirationDateTime Timestamp defining when the subscription expires.
For presence, the maximum allowed duration is 1 hour.
Use ISO 8601 format: YYYY-MM-DDTHH:MM:SSZ
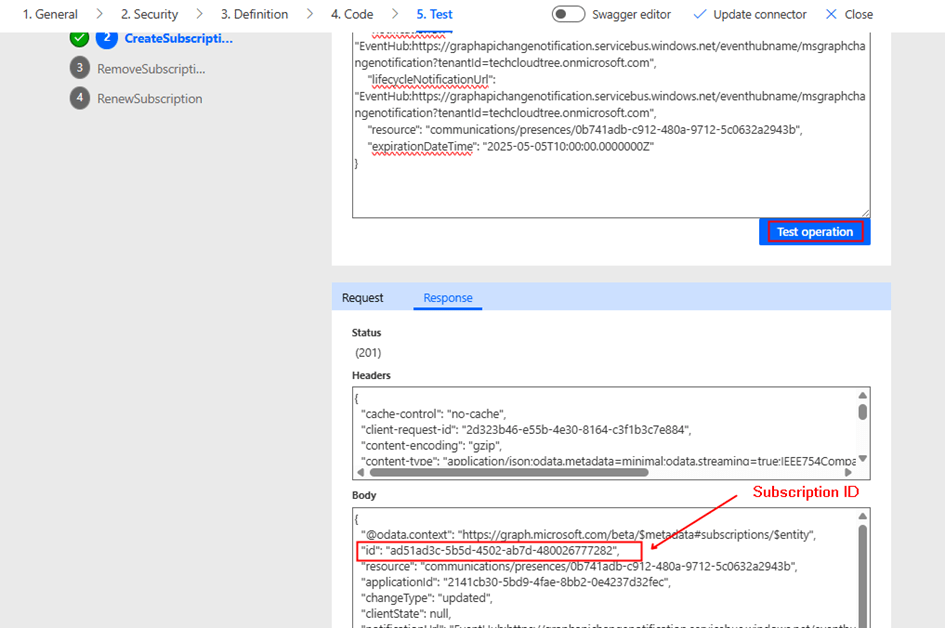
Tip: After the subscription is successfully created, make sure to note down the Subscription ID, as it is required to renew the presence subscription— which must be refreshed every hour. This renewal process can be automated using a scheduled Power Automate flow.
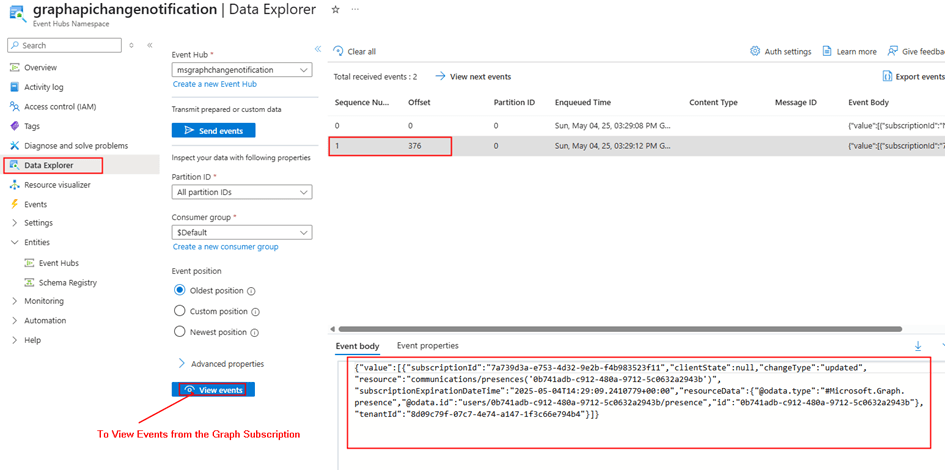
Step 2: Receiving Notifications via Azure Event Hub
Azure Event Hub serves as a high-throughput ingestion pipeline for Microsoft Graph notifications. After the subscription is created, presence change events are pushed into the specified Event Hub.
Each event includes metadata such as the subscription ID, resource details containing user information, and a timestamp—enabling you to respond effectively to presence status changes in real time.
As seen in the payload above, user availability or activity changes in Microsoft Teams are not directly visible—this data is encrypted. To access it, you’ll need to configure certificate-based encryption and decrypt the payload accordingly. We’ll cover this process in detail in the next blog post.
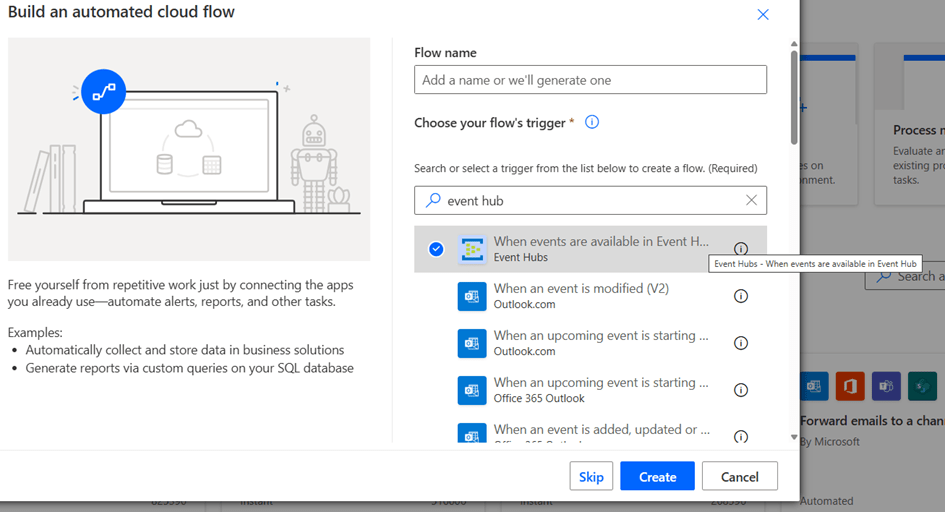
Step 3: Creating a Power Automate Flow to Process Presence Updates
Now that presence updates are routed into Azure Event Hub, we’ll use Power Automate to process these updates.
Steps to Configure:
Trigger:
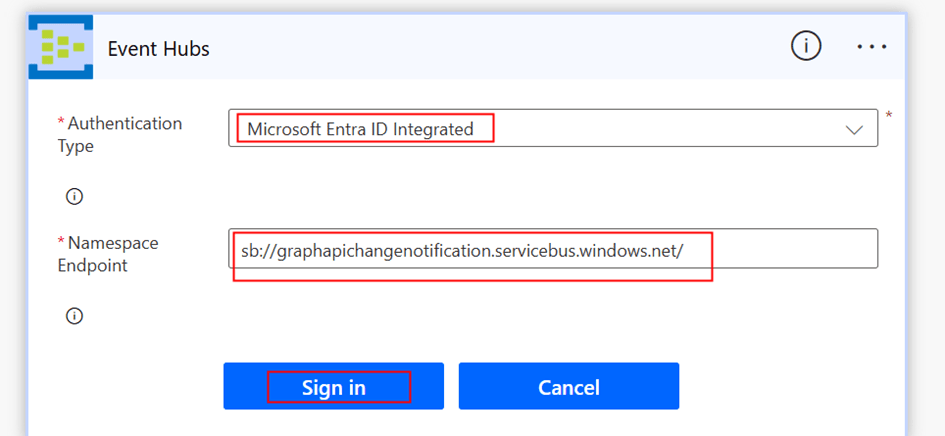
Use the “When events are available in Event Hub” trigger (premium connector).
Create a New connection using the Authentication type Microsoft Entra ID Integrated
After the Connection is created, you would be able to select the Event hub from the dropdown to complete the trigger configuration.
Parse Event Data:
Use a Parse JSON action to extract userId, subscriptionId, and changeType from the incoming event schema.
You can get the payload which is in Base64 format by using the expression base64ToString(triggerOutputs()?[‘body/ContentData’])
Act on Status Change:
Act of the notification by making a another query to the presence endpoint or subscription to rich notications by using certificate which we will discuss in our next blog post
Note: Once the Power Automate flow is configured to receive events from the Event Hub, the Data Explorer in the Azure Portal will no longer display events, as the Event Hub allows only one active consumer per consumer group. There would be an Error message like: At least one receiver for the endpoint is created with epoch of ‘638819602939505217’, and so non-epoch receiver is not allowed.
What’s Next?
In the next part, we will explore how to receive rich presence notifications from Microsoft Teams users, including availability and activity details. Specifically, we will cover:
How to configure certificate-based encryption to enable rich notifications
How to retrieve availability information from the encrypted payload
Do you like this article?
Subscribe to my blog with your email address using the widget on the right side or on the bottom of this page to have new articles sent directly to your inbox the moment I publish them.
Do you like this article?
Subscribe to my blog with your email address using the widget on the right side or on the bottom of this page to have new articles sent directly to your inbox the moment I publish them.
Real-time notifications on system changes are crucial for proactive monitoring and automation. Microsoft Graph allows us to receive change notifications across multiple Microsoft 365 resources. In this blog series, we will explore how to set up Microsoft Graph change notifications for Teams presence status changes, with alerts delivered to Azure Event Hub. As part of this process, we will create a custom connector to manage the lifecycle of a change notification subscription and a Power Automate flow to receive alerts from Azure Event Hub. Other delivery channels, such as Webhooks, are supported for Microsoft Graph change notifications. However, they are not ideal for high-throughput scenarios and they require a publicly available notification URL. This approach offers flexibility compared to standard connectors for triggers, enabling alert handling across various Microsoft resources.
Solution Architecture
Microsoft Graph Subscription – Creates a subscription for Teams presence updates.
Azure Event Hub – Receives change notifications from Microsoft Graph.
Custom Connector in Power Platform – Handle Lifecycle [Create, Update/Renew] of the Microsoft Graph Subscription.
Power Automate Flow – Processes event [Teams Presence Update] data.
Set Up Permissions in Entra ID for creating Microsoft Graph Subscription:
To create a Microsoft Graph subscription for Teams presence change notifications, you must first register an Entra ID app with the appropriate Microsoft Graph permissions based on the resources you want to get alerts. In this case, the resource will be Microsoft Teams presence. This app is then used in a custom connector to manage the subscription lifecycle including creation, renewal, and may be deletion. Since Microsoft Graph subscriptions are not permanent, they must be renewed periodically. Specifically, a Teams presence subscription is valid for a maximum of 1 hour before requiring renewal.
Entra ID App registration for Signed In user (Delegated Access) – Custom Connector:
Create a new App Registration and note the Application (Client) ID, Tenant ID & Client Secret.
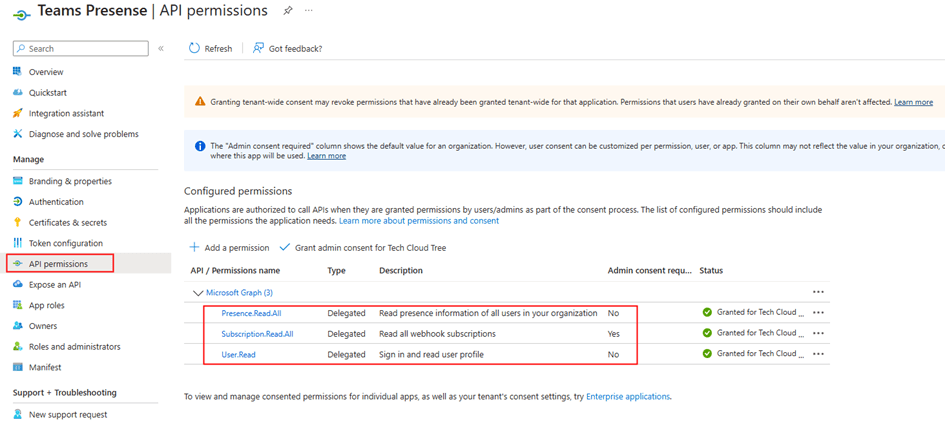
Under API Permissions, add the following Delegated permissions:
Presence.Read.All
Subscription.Read.All – Admin Consent
User.Read
Generate a Client Secret under Certificates & Secrets.
Copy Client ID and Client Secret for authentication.
Setting Up Azure Event Hub
Azure Event Hub acts as a high-throughput messaging service that enables the real-time processing of Microsoft Graph notifications.
Create an Azure Event Hub
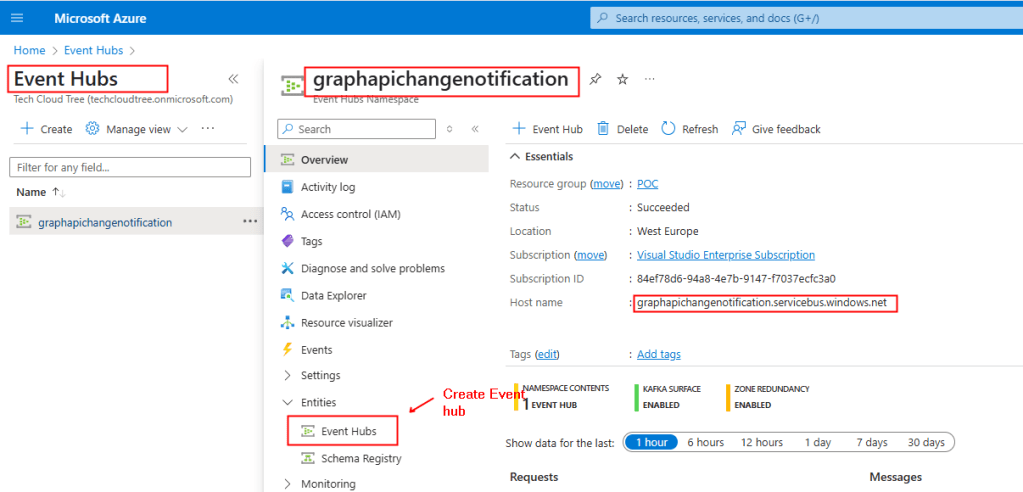
Create the Azure Event hub according to the instructions given in this MS Learn documentation.
The recommendation is to use Microsoft Entra ID RBAC instead of SAS. The Notification URL, which will be used when creating the Microsoft Graph subscription, would look like the example below:
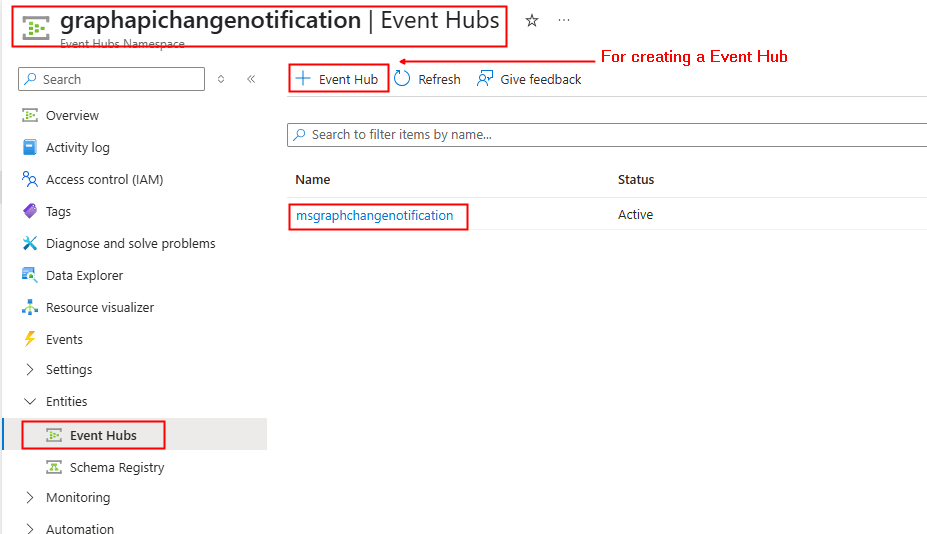
To construct the above URL, In the Overview section of the Event Hubs Namespace copy the Host Name as shown below from the screenshot and the name of your event hub as shown in the screenshot 2.
Screenshot 2:
Creating a Custom Connector in Power Platform
A custom connector is used to manage the lifecycle of the Microsoft Graph subscription, including creating the subscription and updating/renewing it before it expires, as the duration of a subscription is not infinite.
3.1 Create a Custom Connector
The Entra ID app is registered with required permissions, the next step is to create the custom connector. To create the connector, go to Power Automate or Power Apps portal → Custom Connectors → New Custom Connector – Create from blank.
In the General Tab, Provide graph.microsoft.com under Host.
In the Security tab, set Authentication type:
Select OAuth 2.0
Enter the Client ID, Client Secret from the Entra Id app registration
Click Create connector. After this, the Redirect URL will be generated – Copy it. Next in the Entra ID App registration create earlier, navigate to the Authentication section under the Manage, add the copied Redirect URL by clicking + Add a platform and selecting Web.
You can download the Swagger definition of the custom connector from here. After importing the file into your environment, replace the client ID and client secret in the security settings.
The Microsoft Graph API endpoints for creating, renewing / updating subscriptions for change notifications, utilized in connector definitions are thoroughly documented in this Microsoft Learn link. The action in the custom connector for renewing the subscription can be used in a scheduled Power Automate flow.
Summary:
So far, we have set up the foundational components required for enabling real-time notifications. This includes configuring an App Registration with the necessary permissions to create and manage subscriptions via a custom connector. We have also set up Azure Event Hub to receive alerts from Microsoft Graph.
In the next part, we will focus on creating the subscription and configuring a Power Automate flow to process and act on presence updates received from Azure Event Hub. Stay tuned! Hope you have found this informational & thanks for reading. If you are visiting my blog for the first time, please do look at my other blogposts.
Do you like this article?
Subscribe to my blog with your email address using the widget on the right side or on the bottom of this page to have new articles sent directly to your inbox the moment I publish them.
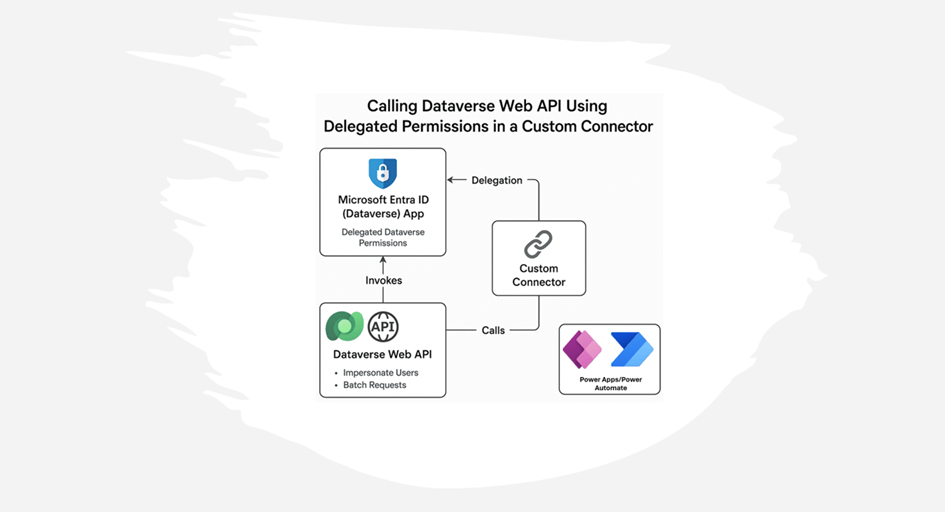
When integrating with Microsoft Dataverse, developers may need to interact with the Web API to perform advanced operations such as impersonating users, batching etc. While Power Automate provides the “Invoke an HTTP request” action to call Dataverse API, this approach has limitations, such as lack of reusability and maintainability. A better alternative is using a custom connector allowing secure and scalable Dataverse Web API interactions. This blog explores how to set up a custom connector that calls the Dataverse Web API as the signed in user.
Using the Dataverse Web API with a custom connector has advantages over the built-in Invoke an HTTP request connector, such as reusability and ensuring controlled access without exposing application user credentials, which is another way to call a Web API. Please see the picture below, which illustrates how to use the Web API with the connector
Use Cases of Dataverse Web API
The Dataverse Web API is powerful and enables many scenarios, such as:
User Impersonation: Perform operations as another user (e.g. approvals, data updates).
Batch Processing: Combine multiple operations in a single request to improve performance & to overcome API Request limits.
Advanced Querying: Use OData queries for complex filtering and joins.
Custom Business Logic: Extend functionality with plugin-like behavior through API calls.
Registering an App in Microsoft Entra ID (Azure AD) for Delegated Dataverse Web API Access
To access Dataverse Web API endpoints with a custom connector in Power Automate or Power Apps, there has to be Entra ID App registrations created for Delegated (Signed-In user) access.
Entra ID App registration for Signed In user (Delegated Access):
Create a new App Registration and note the Application (Client) ID, Tenant ID & Client Secret.
Under API Permissions, click + Add a permission and search dataverse under APIs my organization uses as shown below
Click user_impersonation under Delegated permissions
Create a secret key under the Certificates & Secrets section and make a note of it. This key will be used when creating the custom connector
Creating the Custom Connector:
With the Entra ID app registered, the next step is to create the custom connector. This connector can be used in either a Power Automate flow or Power Apps to call the Dataverse Web API. To create the connector, go to Power Automate or Power Apps portal → Custom Connectors → New Custom Connector – Create from blank.
In the General Tab, Provide the Organization URL (Dataverse Environment URL) of your Dataverse environment under Host. It typically follows the format: orgxxxxxx.crm4.dynamics.com.
In the Security tab, set Authentication type:
Select OAuth 2.0
Enter the Client ID, Client Secret from the Entra Id app registration
Click Create connector. After this, the Redirect URL will be generated – Copy it. Next in the Entra ID App registration, navigate to the Authentication section under the Manage, add the copied Redirect URL by clicking + Add a platform and selecting Web, as shown below
Let’s add a simple Dataverse Web API endpoint /api/data/v9.2/WhoAmI, which provides information on the signed-in user’s Dataverse user ID. In the Definition tab, click + New action and provide an Operation id of your choice. Then click + Import from sample to enter the Verb as GET and the URL as /api/data/v9.2/WhoAmI and then click Import.
All set now – it’s time to test the connector. In the Test tab, create a new connection and then select the action (WhoAmI-Operation Id) to test. As shown below, it provides my signed-in Dataverse user ID for the Dataverse environment
Summary:
Using a custom connector provides a scalable and secure way to interact with Dataverse Web API. This approach improves maintainability compared to using Invoke an HTTP request directly. It also unlocks powerful capabilities like impersonation, batch processing etc. These are just a few examples of what can be achieved through the Dataverse Web API. If you are visiting my blog for the first time, please do look at my other blogposts.
Do you like this article?
Subscribe to my blog with your email address using the widget on the right side or on the bottom of this page to have new articles sent directly to your inbox the moment I publish them.
In Part 1 of this blog series, we explored how to set up Entra ID apps for both custom connectors (signed-in users) and daemon apps (sign-in on behalf of users). We also explored various Microsoft Graph API endpoints required to retrieve meeting transcription content.
In this post, we’ll explore how to retrieve transcription content using Microsoft Graph API endpoints. We’ll cover two approaches: a Custom Connector in Power Apps or Power Automate for signed-in users and an HTTP Connector in Power Automate to fetch data on behalf of a signed-in user.
Setting Up a Custom Connector:
The custom connector acts as a bridge between Power Apps or Power Automate and the Microsoft Graph API, enabling communication. I have already built the custom connector with all necessary actions to generate meeting transcripts using the Microsoft Graph API. You can download it from the link provided. After importing the solution into your environment, navigate to the Security tab in the custom connector and copy the Redirect URL.
Next, navigate to the Authentication section under the Manage blade of the Entra ID app registration and add the copied Redirect URL, as shown below
Configuring Authentication:
In the Security tab of the custom connector, enter the details from the Entra ID app registration, as configured in Part 1 of this blog series. Refer to the section Entra ID App registration for Signed In user (Delegated Access) – Custom Connector for retrieving these details:
Make sure OAuth 2.0 is selected as the authentication type.
To retrieve a user’s upcoming or past Teams meetings within a specified date range, use the following API request:
Endpoint:
GET https://graph.microsoft.com/v1.0/me/events?$select=id,subject,organizer,attendees,start,end,location,onlineMeeting&$orderby=start/dateTime desc&$top=3&$filter=start/dateTime ge '2025-02-03' and end/dateTime le '2025-03-07'
This request fetches the latest three events, including their ID, subject, organizer, attendees, start and end times, location, and online meeting details, filtered by a specific date range. This could changed based on your requirement
2. Retrieving a Meeting ID Using Join URL
If you have a meeting join URL from the above request and need to find its corresponding Meeting ID, use this API call:
Endpoint:
GET https://graph.microsoft.com/v1.0/me/onlineMeetings?$filter=JoinWebUrl eq {OnlineJoinURL}
This allows you to extract the unique identifier (meetingId) for a Teams meeting, which is required for fetching transcripts.
3. Retrieving Available Meeting Transcripts
Once you have the meetingId, you can list all available transcripts for that meeting using:
Endpoint:
GET https://graph.microsoft.com/v1.0/me/onlineMeetings/{meetingId}/transcripts
This response will include transcript details such as their unique transcriptId.
4. Fetching Meeting Transcript Content
To retrieve the actual transcript content in text/VTT (Web Video Text Tracks) format, use:
Endpoint:
GET https://graph.microsoft.com/v1.0/me/onlineMeetings/{meetingId}/transcripts/{transcriptId}/content?$format=text/vtt
This will return the full meeting transcript, which can be further processed for AI-driven summarization or note generation.
Testing the Custom Connector:
Authenticate and run a test request from the custom connector test interface after creating the connection. Verify that the transcription content is retrieved by testing all the different actions.
Using an HTTP Connector in Power Automate to get the Meeting transcriptions:
To obtain the transcription using Application permissions or on behalf of the user, use the details from the Entra ID app registration as configured in Part 1 of this blog series on the HTTP connector. This section covers from Part 1 Entra ID App registration for on-behalf-of signed-in users (Application Access) has the Client Id, Secret, Tenant Id for retrieving meeting transcriptions via the different Microsoft Graph API endpoints. Find below screenshot for getting the meeting transcriptions directly using the transcript URL
Enhancing Meeting Transcriptions with Azure OpenAI LLM
Azure Open AI models converts raw transcripts into structured, easy-to-read meeting notes, highlighting key discussion points, decisions, and action items. I have deployed gpt-4o-mini model in Azure OpenAI. API endpoint and Key for the model can be obtained from the Azure AI Foundary portal once after the model is deployed. Find the below the screenshot for calling the OpenAI LLM model using the HTTP Connector
You can also build a custom connector
Request Body:
{
  "model": "gpt-4o-mini",
  "messages": [
    {
      "role": "user",
      "content": "Create a short meeting summary and action items in bullet points from the following transcript:@{body('GETMeetingTranscript')}"
    }
  ]
}
This solution utilizes a Power Automate flow with Graph API to retrieve Teams meeting transcripts and Azure AI LLM to generate meeting notes based on delegated and application permission. While this is a basic implementation, it can be expanded into a comprehensive solution by integrating with Power Apps for a user-friendly interface, enabling access to meeting summaries and insights with minimal investment. By combining Power Automate, Graph API, and Azure OpenAI organizations can automate meeting documentation, enhancing productivity.
Do you like this article?
Subscribe to my blog with your email address using the widget on the right side or on the bottom of this page to have new articles sent directly to your inbox the moment I publish them.
Microsoft 365 Copilot offers Teams meeting note generation, but its licensing costs can be a significant investment for organizations. For those looking for a more cost effective alternative, using Power Automate or Power Apps with Microsoft Graph API and Azure OpenAI provides a scalable and budget friendly solution.
In this series, we will explore how to automate the process of generating meeting notes by leveraging the Microsoft Graph API to retrieve meeting transcriptions and summarizing them using Azure OpenAI’s language models. We will cover both delegated permissions (retrieving transcriptions as the signed-in user) and application permissions (retrieving transcriptions on behalf of a user).
In Part 1, we will explore the Microsoft Graph API endpoints required to access Teams meeting transcriptions and the setup of Entra ID app registrations. In Part 2, we will look at how to integrate these APIs into Power Automate using a Custom Connector (for signed-in users) and the HTTP Connector (for application-level access) to fetch meeting transcriptions
Retrieving Meeting Transcriptions with Microsoft Graph API
To start, we need to extract meeting transcriptions from Microsoft Teams using Microsoft Graph API. Microsoft provides endpoints for accessing recorded meeting transcriptions, but there are specific permissions and configurations required.
Prerequisites
Before proceeding, ensure that you have:
Access to Register app registration in Entra ID Portal
Power Automate / Power Apps premium license. To test the custom connector you can also get a community plan if you do not have a premium plan.
An Azure OpenAI service instance for text processing.
Step 1: Set Up Permissions in Azure AD
To access Microsoft Graph API endpoints with a custom connector and HTTP connector in Power Automate, there has to be Entra ID App registrations created for Delegated and Application access.
Entra ID App registration for Signed In user (Delegated Access) – Custom Connector:
Create a new App Registration and note the Application (Client) ID, Tenant ID & Client Secret.
Under API Permissions, add the following Application permissions:
OnlineMeetings.Read.All
OnlineMeetingTranscript.Read.All
Calendars.Read
User.Read.All
Allow applications to access online meetings on behalf of a user:
To access Graph API endpoints for retrieving meeting transcriptions on behalf of the signed-in user, an Application Access Policy must be configured for the Entra ID app registration created earlier using the Client ID. Execute the Power Shell script as below
New-CsApplicationAccessPolicy -Identity AAP-policy -AppIds "ReplaceClientIdfromEntraIDAppRegforApplicationAccess" -Description "To grant the Application access to MS Graph API Endpoints for Transcription"
Grant-CsApplicationAccessPolicy -PolicyName AAP-policy -Global
There is also a Power Shell command which can be used to provide access to the application for a specific user.
Note: If the app registration is not granted access through the application access policy, attempting to access the Graph API endpoint for transcription content will result in the following error.
Application is not allowed to perform operations on the user ‘xxxx-xxxxx-xxx-xxx-xxxx’, neither is allowed access through RSC permission evaluation.
Step 2: Retrieve Transcriptions with Microsoft Graph API
Microsoft Graph API provides endpoints for accessing and managing Teams calendar events and transcripts. We’ll explore how to retrieve user events, extract meeting IDs, and obtain transcript content URLs.
In Part 2, we will create custom connector / HTTP connector and use them in Power Automate with Azure OpenAI’s GPT model to summarize the transcription and generate structured meeting notes. Stay tuned!
Do you like this article?
Subscribe to my blog with your email address using the widget on the right side or on the bottom of this page to have new articles sent directly to your inbox the moment I publish them.
In both Part 1 and Part 2 of this blog series, we explored integration techniques using the Snowflake REST API through a custom connector. There is a Snowflake connector in Preview for an extended period, featuring actions for submitting, monitoring status, and cancelling SQL statements. In this post, we’ll delve into how you can leverage this connector within a Power Automate flow to execute a SQL statement
There is a prerequisite to be done within the Snowflake environment by executing the following SQL script to make modifications to the security integration created in the Part 1 of the blog series.
ALTER SECURITY INTEGRATION connector
SET EXTERNAL_OAUTH_AUDIENCE_LIST = ('https://analysis.windows.net/powerbi/connector/snowflake', 'api://8a3865da-e301-46c6-801f-7417a75a8271');
The OOB Snowflake connector uses Power BI Analysis service API.
Enter the necessary details related to the Snowflake instance you intend to connect to and the SQL statement you aim to execute, you are prepared to test the connector.
The Select action is make the data transformation.
Hope you have found this informational & thanks for reading. If you are visiting my blog for the first time, please do look at my other blogposts.
Do you like this article?
Subscribe to my blog with your email address using the widget on the right side or on the bottom of this page to have new articles sent directly to your inbox the moment I publish them.
In today’s data-driven world, businesses rely on integration between their data sources and analysis platforms to derive insights and make informed decisions. One such powerful combination is leveraging Snowflake, a leading cloud-based data warehousing platform, alongside Microsoft Power Platform. In this blog series, we’ll delve into the options of integrating Snowflake data sources into Power Platform, exploring both custom and out-of-the-box connector options. In Part 1, our focus will be on setting up and configuring Snowflake, followed by creating a custom connector that leverages Snowflake’s SQL REST API. This connector facilitates the connection between Snowflake and the Power Platform services such Power Apps and Power Automate.
Pre-requisites:
Snowflake account with Account Admin access: Snowflake offers a 30-day trial, granting full access to explore its capabilities. You can select either Azure/AWS/GCP
Entra ID access (Global Admin or Privileged Administrator Role) to create App registration and grant Admin consent: Ensure you have Entra ID access to enable the creation of App registrations and to grant Admin consent for necessary permissions.
Power Platform Administrator Role: To make adjustments to allow custom connector endpoints for Snowflake identifier URL, especially in cases where endpoints are blocked by the tenant scoped DLP policy.
Maker or System Administrator access in a Power Platform Environment: Access privileges should include Maker or System Administrator rights within your Power Platform environment to register custom connector.
Power Apps premium license: A Power Apps premium license is required to use a custom connectors in a Power Apps or a Cloud flow.
This blog post is divided into the following sections:
Creation of Entra ID Apps.
Setup Snowflake Environment.
Creation of a custom connector & DLP Policy Update.
Creation of Entra ID Apps:
There are two app registrations required to facilitate the API access through Microsoft Entra ID, where one would represent the Snowflake OAuth resource and the other would represent the OAuth client application which would be in this case the custom connector
Section 1 – Registering an Application in Microsoft Entra ID for Snowflake OAuth resource:
In the Entra ID portal, navigate to App registrations and click + New registration. Enter a name, such as Snowflake OAuth resource, and proceed by clicking the Register button, leaving all settings as default.
Under the Manage section in the side menu, select Expose an API. Set the Application ID URI with the default value and remember to copy this value for future use. This will be known as external_oauth_audience_list in the section Setup and configuration in Snowflake
Click on the Add a scope button to access the panel. The Snowflake Role Public is added as an OAuth scope for OAuth flows where the Snowflake OAuth client acts on behalf of a user from the custom connector. If there is a custom Snowflake role, it should be added as a scope instead of ‘Public’:
Enter a new Scope name as session:scope:PUBLIC
Set Admin consent display name to Account Admin
Provide Admin consent description as “Can Administer the Snowflake account”
Ensure the Enabled scope state is selected.
Complete the process by selecting the Add scope button to create the scope.
Section 2 – Registering an Application in Microsoft Entra ID for Snowflake OAuth client:
In the Entra ID portal, navigate to App registrations and click + New registration. Enter a name, such as Snowflake OAuth client, and proceed by clicking the Register button, leaving all settings as default.
Retrieve the Client ID, Tenant Id from the Overview section of the Entra ID app and generate a secret through the Certificates & secrets under the Manage blade. Once the secret is successfully created, copy its value for use in configuring the custom connector OAuth Authentication.
In the API permissions section under the Manage blade, click + Add a permission and search for Snowflake OAuth resource, the application created previously.
Select the Delegated permission session:scope:PUBLIC defined in the previous section as shown below, and grant Admin consent.
Everything is configured in Entra ID. Now, let’s move on to Snowflake to set up the necessary components for this integration to function.
Let’s head in to the Snowflake instance as an Account Admin. Here, you’ll create a
Create Database with sample data & grant roles
Set up security integration
Create a user in Snowflake synchronized with the Entra ID user
Log in to the Snowflake instance to copy the Identifier URL as shown below. This URL will be used in the custom connector to access the Snowflake REST API.
Create a SQL Worksheet as shown below and execute the following script to set up the Snowflake environment by creating a warehouse, database, and table named ‘rockers_table’. Sample data is inserted into the table, and permissions are granted to the ‘public’ role for accessing and updating the table:
-- Switch to the 'accountadmin' role
use role accountadmin;
-- Create the HOL_WH warehouse with size 'X-SMALL'
CREATE OR REPLACE WAREHOUSE HOL_WH WITH WAREHOUSE_SIZE='X-SMALL';
-- Create the HOL_DB database
CREATE OR REPLACE DATABASE HOL_DB;
-- Grant usage on the warehouse HOL_WH to the role 'public'
GRANT USAGE ON WAREHOUSE hol_wh TO ROLE public;
-- Grant usage on the database HOL_DB to the role 'public'
grant usage on database hol_db to role public;
-- Grant usage on the schema HOL_DB.PUBLIC to the role 'public'
grant usage on schema hol_db.public to role public;
use role accountadmin;
-- Switch to the HOL_DB database
use database HOL_DB;
use warehouse HOL_WH;
-- Create the 'rockers_table' table
CREATE TABLE rockers_table (
  id INT,
  name VARCHAR(50),
  age INT
);
-- Insert data into the 'rockers_table' table
INSERT INTO rockers_table (id, name, age)
VALUES (1, 'Jimi Hendrix', 27),
       (2, 'Janis Joplin', 27),
       (3, 'Elvis Presley', 42),
       (4, 'Freddie Mercury', 45),
       (5, 'Whitney Houston', 48),
       (6, 'Michael Jackson', 50),
       (10, 'John Lennon', 40);
-- Grant select and update permissions on the 'rockers_table' table to the role 'public'
grant select, update on table hol_db.public.rockers_table to role public;
Set up security integration:
Let’s proceed to create the Security integration, which is a Snowflake object that establishes an interface between Snowflake and Entra ID. This integration is a prerequisite for enabling Entra OAuth authentication in the custom connector. Execute the following script:
Replace the tenantid in ‘external_oauth_issuer’ and ‘external_oauth_jws_keys_url’, and the Application ID URI in ‘external_oauth_audience_list’. These values should be copied from sections 1 and 2 of the Entra ID app creation process written above.
Create a user in Snowflake synchronized with the Entra ID user:
We’ll create a user in Snowflake that mirrors the Entra ID user upn as created in the security integration. In the User & Roles section under Admin, click + User. The login name should be the UPN (User Principal Name) from Entra ID/AD. Once the required details are entered, proceed to click on Create User.
Creation of a custom connector & DLP Policy Update:
The custom connector serves as a wrapper around the Snowflake REST API, facilitating communication between Power Apps or Power Automate and the API. To create this connector, navigate to Custom connectors in the Power Apps/Power Automate maker portal, then click on + New custom connector and select Create from blank. Enter the connector name, and on the subsequent screen, enter the Snowflake Identifier URL in the Host field and some description about the connector.
Now click Security on the right bottom corner or from the Tab to enter the Entra ID application information copied from the App registration Snowflake OAuth Client for the OAuth 2.0 authentication type. Under the section OAuth 2.0
Change the Identity provider to Azure Active Directory
Enter the Client id & Client secret copied from the Section 2 of the Entra ID app registration Snowflake OAuth Client
Enter the Resource URL as api://applicationIDURI copied from the Section 1 of the Entra ID app registration Snowflake OAuth Resource
Enter the Scope as session:scope:PUBLIC based on the permissions you have added. Leave a space between each permission if there are multiple permissions
The connector is now prepared to add actions based on the Snowflake REST API endpoints. Snowflake’s REST API offers functionalities such as submitting SQL statements, checking execution statuses, cancelling executions, and fetching query results concurrently. This blog post will primarily concentrate on integrating with the API to submit SQL statements. For more guidelines, it’s recommended to look at the Snowflake REST API documentation for best practices.
Let’s proceed to add an action for submitting a SQL statement. Navigate to Definitions and select + New action. Once you’ve filled in the Summary, Description, and Operation ID (e.g., GETSFData), click on + Import from sample under the Request section, and input the following details:
{
"statement": "select name, age from rockers_table;",
"timeout": 60,
"database": "HOL_DB",
"schema": "PUBLIC",
"warehouse": "HOL_WH",
"role": "PUBLIC"
}
Click Import & Update connector then proceed to click the Test tab and create a New connection. In the event of encountering DLP error message indicating that connection creation has been blocked by Data Loss Prevention (DLP) policy. Add the Snowflake Identifier URL as a connector pattern allowed in the Business/Non Business category of the DLP policy.
VOILA, everything is set up. You can now test the action to execute a SQL statement to retrieve data from the rockers_table as shown below:
The request body for updating an existing item is
{
"statement": "UPDATE rockers_table SET Name = 'Mohamed Ashiq' WHERE ID = '1';",
"timeout": 60,
"database": "HOL_DB",
"schema": "PUBLIC",
"warehouse": "HOL_WH",
"role": "PUBLIC"
}
Summary:
In the next part of the blog series, we’ll explore how to manipulate the response from the connector action. This involves adding C# code in the custom connector to facilitate the display in Power Apps gallery control without using a Power Automate flow. Hope you have found this informational & thanks for reading. If you are visiting my blog for the first time, please do look at my other blogposts.
Do you like this article?
Subscribe to my blog with your email address using the widget on the right side or on the bottom of this page to have new articles sent directly to your inbox the moment I publish them.
Capabilities like text-to-speech (TTS) and audio playback can take your applications to new heights of user engagement and accessibility. In this blog post, we’ll look at integrating text-to-speech and audio playback functionalities into Power Apps using Power Automate and Azure Speech Services. Whether you’re looking to provide dynamic narration, streamline communication, or enhance accessibility, this post will walk you through the steps to integrate TTS capabilities into your Power Apps projects.
Prerequisites:
Before you begin, ensure that you have the following prerequisites in place:
Maker role in Power Platform environment
Premium License – HTTP Connector
Azure Subscription Access
Azure Speech services – Text to speech
Creating Speech Services in Azure for Text to Speech:
Azure provides Speech Services that enable developers to integrate advanced speech capabilities into their applications, including Text to Speech (TTS). With Azure Speech Services, you can convert text into speech in various languages and voices.
Step 1: Create the resource Speech services in the Azure Portal
Step 2: Copy the Key from the Keys and Endpoint section within the Resource Management blade. This Key is used for authentication when making requests to the Speech service APIs, enabling text-to-speech conversion in the Power Automate flow through the HTTP connector.
Step 3: Go to the Speech Studio to choose a voice from the gallery provided in Text to Speech section. Alternatively, you can create a custom voice using your own audio recordings. The Speech Studio can also be accessed from the Overview section of the Speech service in the Azure portal.
Power Automate Flow to convert the text to speech:
The Power Automate serves as a tool in orchestrating the integration between Power Apps and Azure Speech Services, enabling communication between the components. Create an Instant Power Automate flow with the trigger “PowerApps (V2)” either from the Power Automate portal or directly from the Power Apps maker interface. Add a text input varTextInput as shown below to send the text from the Power Apps
The next step involves converting the text to speech/audio utilizing the Text to Speech REST API through the HTTP connector action. Add the HTTP action with request details as below
Method: POST
URI: Depending on the region where you’ve created the Azure Speech resource, select the corresponding Rest API endpoint from the list in the Microsoft documentation. For instance, if the Speech Service resource is created in West Europe, the URL will be:
In the request body, add the varTextInput included to the Power Apps trigger. I have added the voice en-US-JennyNeural, you can select it from the voice gallery as discussed above.
Next, add a Compose action to convert the audio generated from the HTTP action into base64 format. This will serve as the text output passed in the Respond to a PowerApp or flow action, as shown below:
Let’s develop the app for the text narration feature, where users can input text to be converted into audio using the Power Automate flow created earlier. On the Canvas, add a Text Input control for entering the desired text, an Audio control to play the audio generated from the Azure text-to-speech service, and a button to trigger the Power Automate flow. Make sure the flow is added to the Power Apps. Add the following code to the OnSelect property of the button
// Reset the Audio1 control to its default state, clearing any previous audio.
Reset(Audio1);

// Run the TexttoSpeechFlow Power Automate flow, passing the text from TextInput1 as input.
// Store the result (converted audio) in the varconvertedAudio variable.
Set(varconvertedAudio, TexttoSpeechFlow.Run(TextInput1.Text));

// Set the playAudioContent variable to false, ensuring that any previous audio playback is stopped.
Set(playAudioContent, false);

// Set the playAudioContent variable to true, triggering playback of the newly converted audio.
Set(playAudioContent, true);
The variable playAudioContent will be used in Audio control Star property to play the audio automatically
The Media property of the Audio control should have the following formula, depending on the output variable added in the ‘Respond to PowerApps or flow’ action of the Power Automate flow
The x-wav is the format of the generated audio from the Text to Speech REST API in the Power Automate flow which can be validated from the output of the HTTP action HTTP-TexttoSpeech
You are now ready to test your app.
Summary:
By combining the power of Power Automate and Azure Speech Services developers can quickly integrate text-to-speech and audio playback functionalities into their Power Apps. Hope you have found this informational & thanks for reading. If you are visiting my blog for the first time, please do look at my other blogposts.
Do you like this article?
Subscribe to my blog with your email address using the widget on the right side or on the bottom of this page to have new articles sent directly to your inbox the moment I publish them.
In Power Platform, capacity add-ons such as AI Builder Credits, Per-App plan, Power Pages Capacity, Power Automate Per Flow, Power Automate Process, Copilot Studio messages are allocated at an environment level and are not tied to individual users, unlike the Power Apps/Power Automate Premium plan. These add-ons are assigned to an environment through the Power Platform Admin Center. However, there may be cases where the allocation of add-ons needs to be automated as part of the license assignment process, leveraging IT service management tools such as ServiceNow, BMC Remedy or any custom tools.
This blog post will explore how to automate the capacity assignment using the Power Platform API, which is currently in preview at the time of writing.
Pre-Requisites:
Power Platform Administrator
Access to create Entra ID App registration
Power Automate Premium – License
Authentication of Power Platform API:
To access the resources available via Power Platform API, the API must be authenticated with a token generated using an Entra ID application. This token is sent as a header along with each API request. Client credentials authentication flow is used with the Service Principal.
Active Directory App registration:
To generate a bearer token, the first step is to register an Active Directory app with the Power Platform API permission to call the API endpoints responsible for assigning capacity to an environment. Once the registration is complete, add the permission Licensing.Allocations.ReadWrite as detailed in the documentation, to assign Capacity Add-ons as shown below
Select the permission as shown below
Admin consent is not required.
Make sure to note the Client ID/Application ID, Client Secret, and Tenant ID associated with the registered application, as these details will be essential for the Power Automate flow.
Registering the Entra ID app as an Admin management Application:
Access for the registered Entra application needs to be granted by a user with the Power Platform Administrator role to be utilized as a Service Principal for calling the capacity allocation API. Use the following PowerShell command to grant the necessary permissions for the App Reg/service principal to invoke the Capacity Addon allocation API.
Replace the EntraIDAppRegistrationClientId with the registered Entra ID App reg.
Note: The Service Principal flow doesn’t use application permissions and is instead treated as a Power Platform Administrator for all API calls that they make.
Power Automate Flow:
For testing purposes, I’ve created an Instant Flow. However, select a trigger type that aligns with your specific needs. Add a HTTP connector to generate an access token for calling the API. Find the HTTP request details as below
The provided http request body pertains to AI Builder credit allocation. For other capacity types like Per App plan, Copilot Studio, and Power Pages follow the currency type information outlined in the following documentation:
This capability opens doors to enhanced license assignment processes for Power Platform, offering an approach for managing and optimizing Power Platform addons through automation. Hope you have found this informational & thanks for reading. If you are visiting my blog for the first time, please do look at my other blogposts.
Do you like this article?
Subscribe to my blog with your email address using the widget on the right side or on the bottom of this page to have new articles sent directly to your inbox the moment I publish them.
In both Part 1 and Part 2 of the blog series, I’ve covered the utilization of Managed Identities in Power Apps and Power Automate for secure access to Microsoft Graph API. This included a deep dive into setting up and configuring the Azure API Management service with the Microsoft Graph permissions for the managed identity. In Part 2, I’ve explored the process of exporting the API as a connector in Power Platform, securing it with API key authentication.
To enhance the security of the custom connector published from Azure API Management for Microsoft Graph APIs using Entra ID OAuth authentication instead of Subscription key, it is essential to create two Entra ID applications. One application should represent the API from API Management, while the other should represent the client application to be utilized in the Entra ID OAuth authentication for the custom connector.
Registering an Application in Microsoft Entra ID for API Representation:
In the Entra ID portal, navigate to App registrations and click + New registration. Enter a name, such as APIM PP Resource, and proceed by clicking the Register button, leaving all settings as default. This app represents the APIs added in the Azure API management instance.
Under the Manage section in the side menu, select Expose an API. Set the Application ID URI with the default value and remember to copy this value for future use.
Click on theAdd a scope button to access the Add a scope panel:
Enter a new Scope name as APIM.MSGraphAPI
Set Admin consent display name to APIM MSGraph API
Provide Admin consent description as “Grants access to the API in APIM.”
Ensure the Enabled scope state is selected.
Complete the process by selecting the Add scope button to create the scope.
Registering an Application in Microsoft Entra ID for Client Representation:
Create another Entra ID app to be used in the custom connector for securing with Entra ID OAuth Authentication. In the Entra ID portal, navigate to App registrations and click + New registration. Enter a name, such as APIM PP Client, and proceed by clicking the Register button, leaving all settings as default.
Retrieve the Client ID, Tenant Id from the Overview section of the Entra ID app and generate a secret through the Certificates & secrets under the Manage blade. Once the secret is successfully created, copy its value for use in configuring the custom connector OAuth Authentication.
Go to the Entra ID app APIM PP Resource created earlier. In the Manage section, click on Expose an API and then Add a client application by selecting + Add a client application in the popout panel. Enter the Client ID of the APIM PP Client app registered now. Select the authorized scope created in the previous section, then proceed by clicking Add Application. This ensures the application APIM PP Resource trusts the client application APIM PP Client and users should not be asked to consent when the client calls the APIs published API Management instance.
Note: If you prefer users/admins to provide consent for the permission while creating a connection for the custom connector, add the APIM.MSGraphAPI Scope to the APIM PP Client app, as shown below. In this scenario, the step mentioned in bullet no 2 becomes unnecessary.
Configuring Custom Connector Authentication to Entra ID OAuth:
Following the export of the API from the Azure API Management as a custom connector in Power Platform in Part 2 of this blog series, proceed to the Power Apps or Power Automate maker portal to edit the connector.
Access the custom connectors, locate the exported connector in the Power Platform Environment where the connector was exported from API Management
Within the Authentication type settings, originally set to API Key, click Edit, and modify it to OAuth 2.0.
Choose the Identity provider as Azure Active Directory. Enter the Client ID and Client secret obtained from the APIM PP Client app copied earlier. Set the resource URL to the Application ID URI generated from the APIM PP Resource app.
Click Update connector to generate a Redirect URL on the same screen—ensure to copy this URL.
Navigate to the APIM PP Client app in the Entra ID portal and add a Web Redirect URI, paste the copied Redirect URL.
Azure API Management: Configure JWT validation policy to Authorize requests from Custom connector:
The JWT validation policy pre-authorizes requests from the Power Platform Custom connector as it adds the layer of security to ensure that incoming access tokens are valid and meet specific criteria before the APIM starts processing requests to the added MS Graph API endpoints. The policy checks the value of the audience claim in an access token obtained from Microsoft Entra ID with in the custom connector. The audience claim typically specifies the intended recipient of the token, ensuring that the token is meant for the intended API.
By configuring the following JWT validation policy in the <inbound> policy section below the node <base />, you enforce the validation of the access token, and if the token is invalid, an error message is returned. Don’t forget to replace the TenantId and the required claims value to the client id of the app APIM PP Resource.
Note: If you attempt to establish the connection from the Test Tab and subsequently execute the action, you will encounter the following error “Access denied due to missing subscription key. Make sure to include subscription key when making requests to an API.
Creating a Product:
To enable the custom connector to generate tokens for API access from API Management, it’s necessary to associate the APIs with a Product that doesn’t require a subscription key. Follow these steps:
In the left navigation pane, go to Products and click on + Add.
Provide the Product Name, Description, uncheck the box Require subscription option, select the relevant API, and proceed to create the Product.
Testing the Custom connector:
Navigate to the Power Platform Maker portal and access the custom connector interface. Edit the connector to initiate the creation of a connection within the Test tab. Click on + New connection and click Create. Notably, you’ll observe that it doesn’t prompt for the API Subscription key, as discussed in the Part 2 of the article.
Once the connection is created, return to the edit mode of the custom connector to initiate testing of the actions. Navigate to the Test tab, where you can select the specific connection and choose the operation you wish to test. Test the operation and validate the results of the custom connector action.
Summary:
This concludes the blog series, where we delved into the secure access of Microsoft Graph APIs in Power Platform with the help of Azure API management, employing both Subscription keys and Entra ID OAuth authentication. Demonstrated the usage of managed identities in Power Platform, the methods explored here, particularly for securing Microsoft Graph API with application permissions, are adaptable for various services. Addressing the significant security risk of Broken Access Control, I have highlighted the importance of correctly implementing authentication mechanisms to prevent potential exploitation by attackers.
For those with existing Entra ID app registrations seeking to enhance security with API Management, the credential manager feature offers a solution. Utilizing the Grant Type Authorization code for Delegated Permission and Client Credentials for Application Permission ensures a comprehensive approach to safeguarding your applications and APIs. Hope you have found this informational & thanks for reading. If you are visiting my blog for the first time, please do look at my other blogposts.
Do you like this article?
Subscribe to my blog with your email address using the widget on the right side or on the bottom of this page to have new articles sent directly to your inbox the moment I publish them.