Its fairly easy to create an event using Power automate in Office 365 Outlook using the action Create Event but there is no action to get the attendees details on who has Accepted, tentatively accepted, Declined & No response if you are trying to automate.
MS Graph comes to the rescue to get the attendees details, there is an endpoint available to fetch the attendee’s details of an outlook event.
Let’s assume you are creating Outlook Event using flow action Create Event which has a connection using a different account (For e.g a service account with mailbox enabled). After the event is created the Event ID (Unique ID of an Event) is stored on a SharePoint Custom list or SQL etc to get the attendees information.
Before you start, you need to make sure you have the following:
- Access to an Office 365 tenant with administrative access to Azure AD
- Access to create flows in Microsoft Flow
Step 1 – Create an Application in Azure AD with API permissions to Calendar
You will need to register an application within Azure AD.
Navigate to Azure Active Directory from https://portal.azure.com and select App registrations. Select New registration. I am not going to list the steps required to create an Application in Azure AD, there are lot of blog posts & Microsoft articles which covers the steps. For this requirement, Redirect URI is not required to filled on the Azure app.
To get authorized to call Microsoft Graph in Power Automate/MS Flow, we’ll need the following information:
- Tenant ID
- Client ID
- Client secret
- API Permission to Read Calendar
- Token Endpoint
Once the application is created, go to the API Permissions. To configure application permissions for the AD app to get the event information, API permission to the Calendar is required. Find the steps below to grant read permission to the calendar
- Click on the API Permissions menu item in the navigation panel.
- Click on the Add a Permission button.
- Click Microsoft Graph under the tab Microsoft APIs.
- Click on the Application Permissions button.
- Expand the Calendars section.
- Select the Calendars.Read option. This step gives access to the app for reading all the calendars in the mailboxes across the tenant.
- Click on the Add Permissions button.
- Click on the Grant Admin Consent button.
- Click on the Yes button to confirm consent.

I use the Graph Explorer https://developer.microsoft.com/en-us/graph/graph-explorer# to test & explore different endpoints.

This explorer will not work for delegated permissions since it uses your permissions to access the API endpoint but you can use Postman to test the graph endpoint with the Oauth authentication.
Find the documentation for the different endpoints available for Calendar in the link
For this requirement we are interested in the following HTTP request/endpoint to the get details of a different user using the version 1.0
GET /users/{id | userPrincipalName}/calendar/events/{id}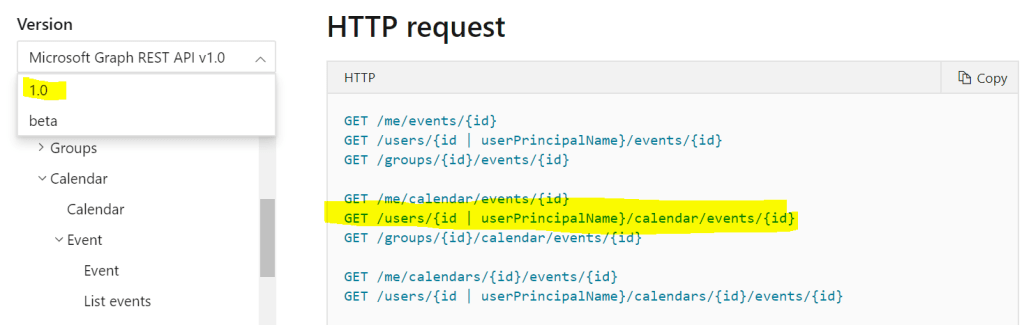
Step 2 – Create a Flow
With the Azure AD application created, you have to create a flow using it. You could even create a Azure logic Apps. Find the steps below to create a scheduled flow
First, go to https://flow.microsoft.com and go to My flows. Select New > Create Scheduled-from blank to create a new flowThis flow will be running on scheduled basis to get the attendees details.

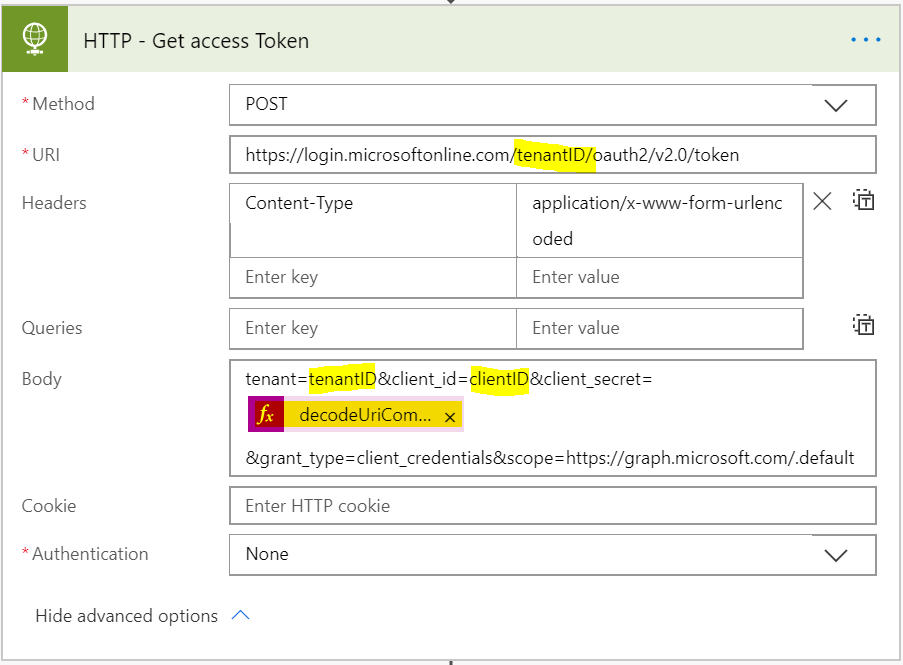
Call the token endpoint of the tenant’s Azure AD which will provide us an access token for Microsoft Graph in return for the information contained in the request body. Use the Flow action HTTP which is premium action to make a HTTP post request for getting a token.
Before we construct the HTTP request, we need encode the client secret to avoid having URL unsafe characters:
encodeUriComponent(variables('ClientSecret'))| The HTTP method | POST |
| The request URL | https://login.microsoftonline.com/your tenant id/oauth2/v2.0/token |
| The Content-Type header | application/x-www-form-urlencoded |
| The request body | tenant=tenantID&client_id=clientID&client_secret=@{decodeUriComponent(variables(‘ClientSecret’))}&grant_type=client_credentials&scope=https://graph.microsoft.com/.default |
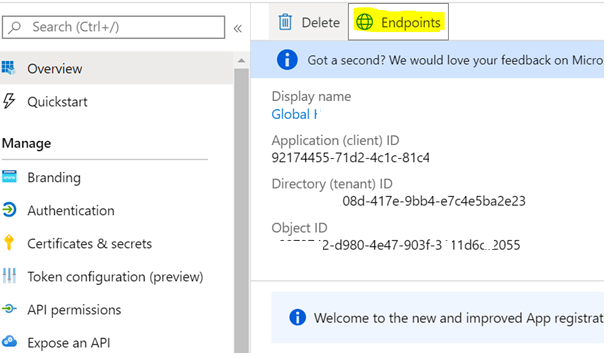
The token endpoint URL can be obtained from the AD App by clicking on the Endpoint link as shown below
When the above HTTP request is made, we get authenticated, and in the response, we’ll receive the access token for calling Microsoft Graph. Before we can use the access token, we need to parse the JSON in the response body to make the token available to us in the dynamic content panel
The next step is to the parse the JSON response of the HTTP – Get Access token action and get the token type and access token to make a call to the Graph endpoint. To do this Add the action Parse JSON
- The Content has to be the Body of the action HTTP – Get Access token and to build the schema.
- Run the flow, copy the outputs [Body] of the action HTTP – Get Access token
- Click the button Generate from Sample, paste the Body and click Done. These steps will generate the schema automatically

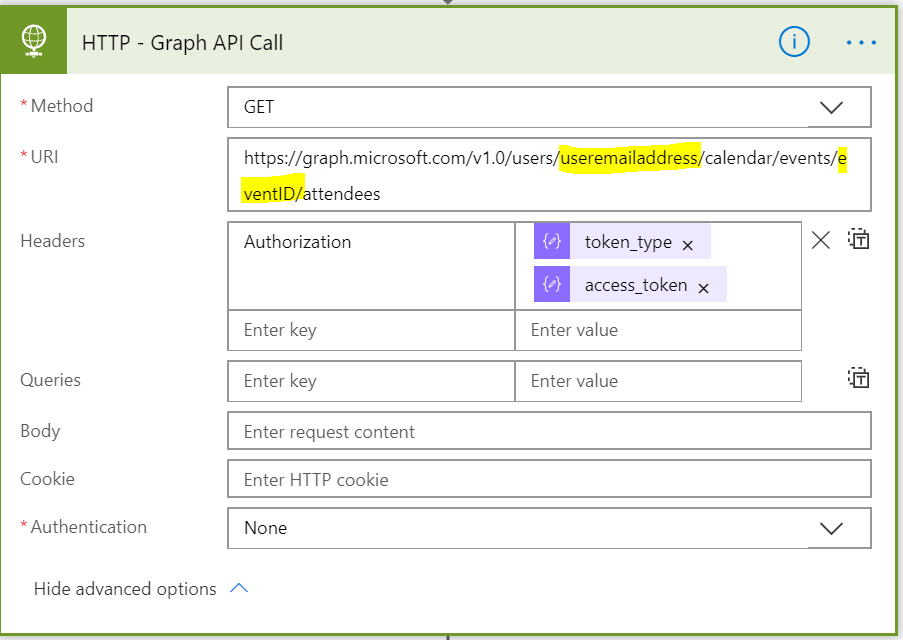
The next step is to call the Graph endpoint using the HTTP action with the token type & access token on the Headers obtained from the above method
GET URI: https://graph.microsoft.com/v1.0/users/useremailaddress/calendar/events/eventID/attendees
Event ID should be the ID of the event you would like to get the attendees information and Headers information is constructed from the Parse JSON – Access token.
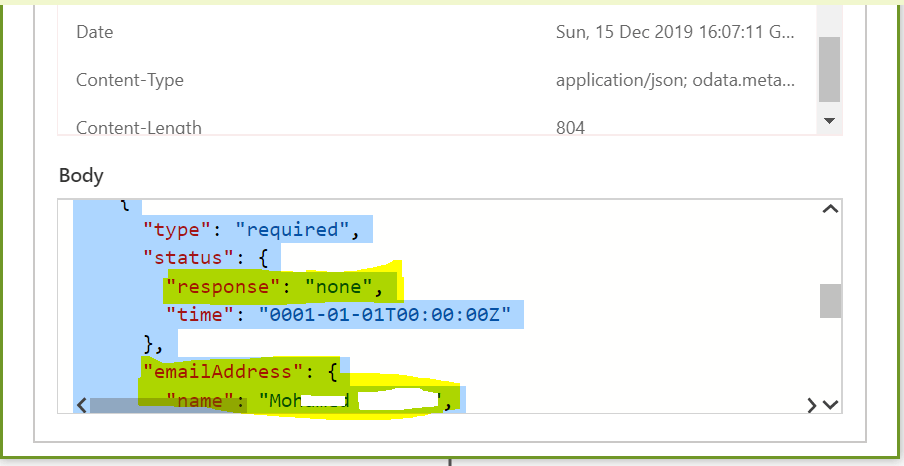
Run the Flow, you will now have the attendee’s information in the JSON format as shown below. The JSON will have information about the users details and the responses. JSON Parse action could be used to parse the JSON and get the information as per the requirement
Hopefully you enjoyed reading this article and find it useful.

Thx ashiqf, worked like a charme.
Actually I had to remove the toke type from the Graph Api Call – then it worked out for me.
LikeLike
I cannot get the last HTTP piece to work did something change?
LikeLike
can we retrieve who have attended the event instead of who has accepted ?
LikeLike