Enabling Real Time Alerts using Microsoft Graph in Power Platform – Part 1

Real-time notifications on system changes are crucial for proactive monitoring and automation. Microsoft Graph allows us to receive change notifications across multiple Microsoft 365 resources. In this blog series, we will explore how to set up Microsoft Graph change notifications for Teams presence status changes, with alerts delivered to Azure Event Hub. As part of this process, we will create a custom connector to manage the lifecycle of a change notification subscription and a Power Automate flow to receive alerts from Azure Event Hub. Other delivery channels, such as Webhooks, are supported for Microsoft Graph change notifications. However, they are not ideal for high-throughput scenarios and they require a publicly available notification URL. This approach offers flexibility compared to standard connectors for triggers, enabling alert handling across various Microsoft resources.

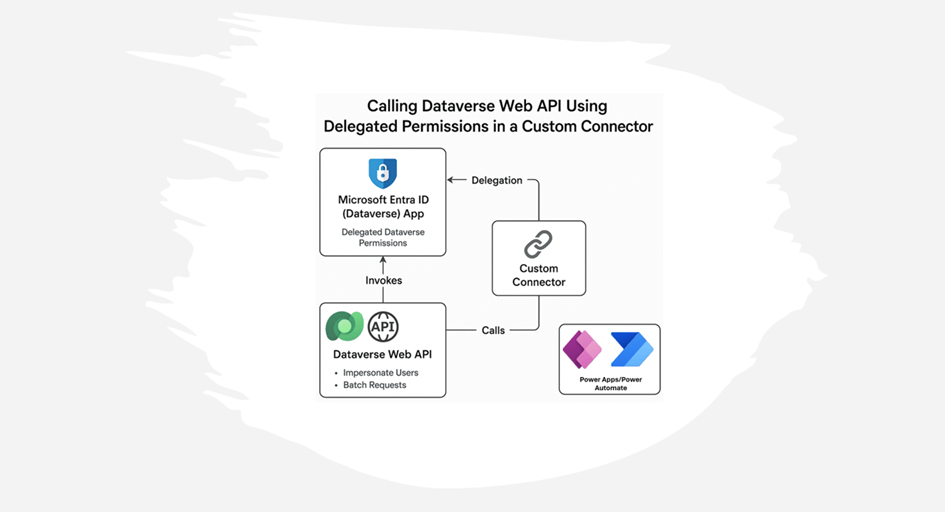
Solution Architecture

  1. Microsoft Graph Subscription – Creates a subscription for Teams presence updates.
  2. Azure Event Hub – Receives change notifications from Microsoft Graph.
  3. Custom Connector in Power Platform – Handle Lifecycle [Create, Update/Renew] of the Microsoft Graph Subscription.
  4. Power Automate Flow – Processes event [Teams Presence Update] data.

Set Up Permissions in Entra ID for creating Microsoft Graph Subscription:

To create a Microsoft Graph subscription for Teams presence change notifications, you must first register an Entra ID app with the appropriate Microsoft Graph permissions based on the resources you want to get alerts. In this case, the resource will be Microsoft Teams presence. This app is then used in a custom connector to manage the subscription lifecycle including creation, renewal, and may be deletion. Since Microsoft Graph subscriptions are not permanent, they must be renewed periodically. Specifically, a Teams presence subscription is valid for a maximum of 1 hour before requiring renewal.

Entra ID App registration for Signed In user (Delegated Access) – Custom Connector:

  1. Navigate to Microsoft Entra ID.
  2. Create a new App Registration and note the Application (Client) ID, Tenant ID & Client Secret.
  3. Under API Permissions, add the following Delegated permissions:
    • Presence.Read.All
    • Subscription.Read.All – Admin Consent
    • User.Read
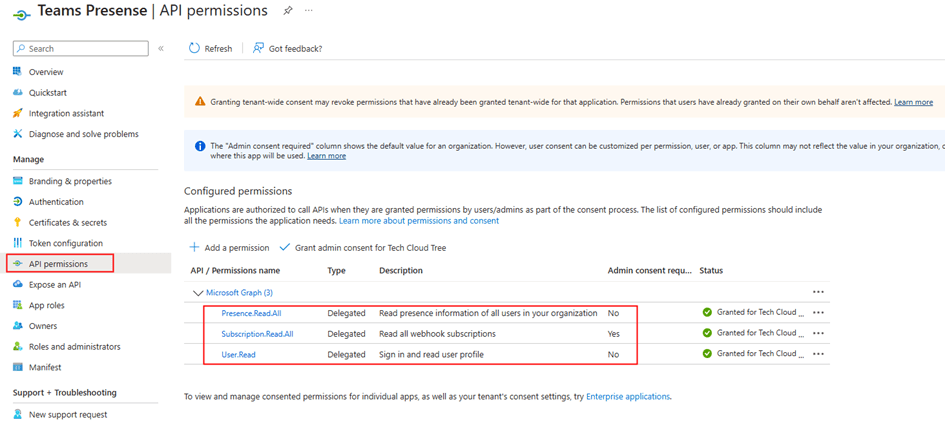
  1. Generate a Client Secret under Certificates & Secrets.
  2. Copy Client ID and Client Secret for authentication.

Setting Up Azure Event Hub

Azure Event Hub acts as a high-throughput messaging service that enables the real-time processing of Microsoft Graph notifications.

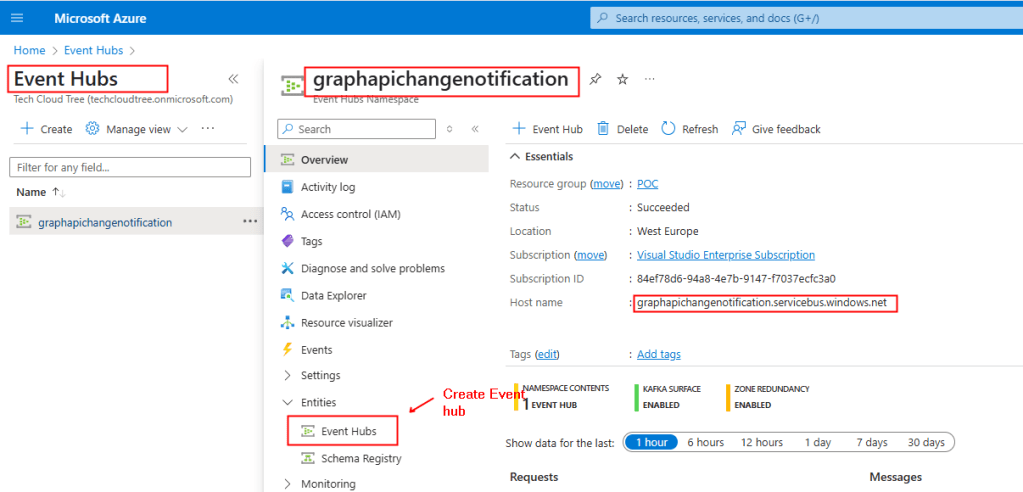
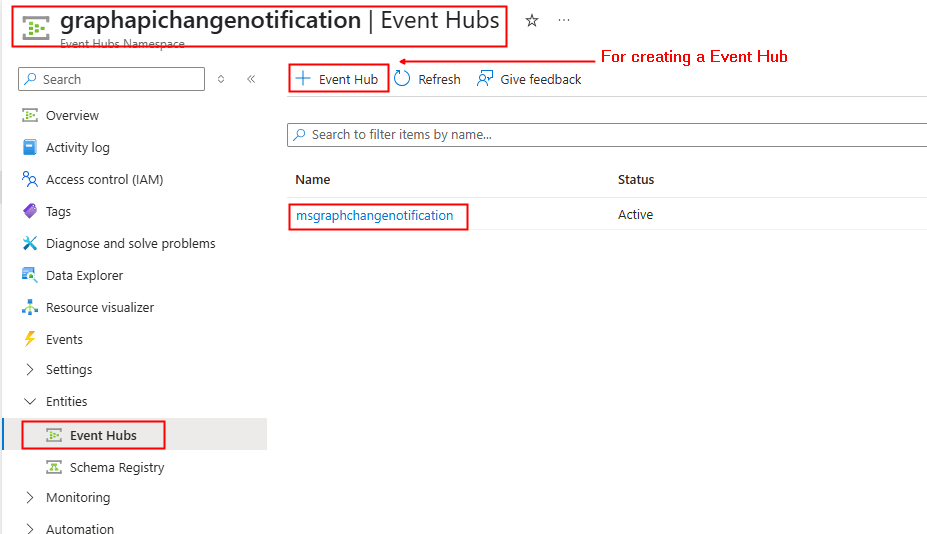
  1. Create an Azure Event Hub

Create the Azure Event hub according to the instructions given in this MS Learn documentation.

The recommendation is to use Microsoft Entra ID RBAC instead of SAS. The Notification URL, which will be used when creating the Microsoft Graph subscription, would look like the example below:

EventHub:https://yourazureeventhubinstancename.servicebus.windows.net/eventhubname/youreventhubname?tenantId=yourtenantdomainname.onmicrosoft.com

To construct the above URL, In the Overview section of the Event Hubs Namespace copy the Host Name as shown below from the screenshot and the name of your event hub as shown in the screenshot 2.

Screenshot 2:


Creating a Custom Connector in Power Platform

A custom connector is used to manage the lifecycle of the Microsoft Graph subscription, including creating the subscription and updating/renewing it before it expires, as the duration of a subscription is not infinite.

3.1 Create a Custom Connector

The Entra ID app is registered with required permissions, the next step is to create the custom connector. To create the connector, go to Power Automate or Power Apps portal → Custom Connectors → New Custom Connector – Create from blank.

In the General Tab, Provide graph.microsoft.com under Host.

  1. In the Security tab, set Authentication type:
  • Select OAuth 2.0
  • Enter the Client ID, Client Secret from the Entra Id app registration
  • Set the Resource URL to your Dataverse environment Url: https://graph.microsoft.com/
  1. Click Create connector. After this, the Redirect URL will be generated – Copy it. Next in the Entra ID App registration create earlier, navigate to the Authentication section under the Manage, add the copied Redirect URL by clicking + Add a platform and selecting Web.

You can download the Swagger definition of the custom connector from here.  After importing the file into your environment, replace the client ID and client secret in the security settings.

The Microsoft Graph API endpoints for creating, renewing / updating subscriptions for change notifications, utilized in connector definitions are thoroughly documented in this Microsoft Learn link. The action in the custom connector for renewing the subscription can be used in a scheduled Power Automate flow.

Summary:

So far, we have set up the foundational components required for enabling real-time notifications. This includes configuring an App Registration with the necessary permissions to create and manage subscriptions via a custom connector. We have also set up Azure Event Hub to receive alerts from Microsoft Graph.

In the next part, we will focus on creating the subscription and configuring a Power Automate flow to process and act on presence updates received from Azure Event Hub. Stay tuned! Hope you have found this informational & thanks for reading. If you are visiting my blog for the first time, please do look at my other blogposts.

Do you like this article?

Subscribe to my blog with your email address using the widget on the right side or on the bottom of this page to have new articles sent directly to your inbox the moment I publish them.

Calling Dataverse Web API using Delegated Permissions in a Custom Connector

When integrating with Microsoft Dataverse, developers may need to interact with the Web API to perform advanced operations such as impersonating users, batching etc. While Power Automate provides the “Invoke an HTTP request” action to call Dataverse API, this approach has limitations, such as lack of reusability and maintainability. A better alternative is using a custom connector allowing secure and scalable Dataverse Web API interactions. This blog explores how to set up a custom connector that calls the Dataverse Web API as the signed in user.

Using the Dataverse Web API with a custom connector has advantages over the built-in Invoke an HTTP request connector, such as reusability and ensuring controlled access without exposing application user credentials, which is another way to call a Web API. Please see the picture below, which illustrates how to use the Web API with the connector

Use Cases of Dataverse Web API

The Dataverse Web API is powerful and enables many scenarios, such as:

  • User Impersonation: Perform operations as another user (e.g. approvals, data updates).
  • Batch Processing: Combine multiple operations in a single request to improve performance & to overcome API Request limits.
  • Advanced Querying: Use OData queries for complex filtering and joins.
  • Custom Business Logic: Extend functionality with plugin-like behavior through API calls.

Registering an App in Microsoft Entra ID (Azure AD) for Delegated Dataverse Web API Access

To access Dataverse Web API endpoints with a custom connector in Power Automate or Power Apps, there has to be Entra ID App registrations created for Delegated (Signed-In user) access.

Entra ID App registration for Signed In user (Delegated Access):

  1. Navigate to Microsoft Entra ID.
  2. Create a new App Registration and note the Application (Client) ID, Tenant ID & Client Secret.
  3. Under API Permissions, click + Add a permission and search dataverse under APIs my organization uses as shown below
  1. Click user_impersonation under Delegated permissions
  1. Create a secret key under the Certificates & Secrets section and make a note of it. This key will be used when creating the custom connector

Creating the Custom Connector:

With the Entra ID app registered, the next step is to create the custom connector. This connector can be used in either a Power Automate flow or Power Apps to call the Dataverse Web API. To create the connector, go to Power Automate or Power Apps portal → Custom Connectors → New Custom Connector – Create from blank.

  1. In the General Tab, Provide the Organization URL (Dataverse Environment URL) of your Dataverse environment under Host. It typically follows the format: orgxxxxxx.crm4.dynamics.com.
  1. In the Security tab, set Authentication type:
    • Select OAuth 2.0
    • Enter the Client ID, Client Secret from the Entra Id app registration
    • Set the Resource URL to your Dataverse environment Url: https://orgxxxxx.crm4.dynamics.com/
  1. Click Create connector. After this, the Redirect URL will be generated – Copy it. Next in the Entra ID App registration, navigate to the Authentication section under the Manage, add the copied Redirect URL by clicking + Add a platform and selecting Web, as shown below
  1. Let’s add a simple Dataverse Web API endpoint /api/data/v9.2/WhoAmI, which provides information on the signed-in user’s Dataverse user ID. In the Definition tab, click + New action and provide an Operation id of your choice. Then click + Import from sample to enter the Verb as GET and the URL as /api/data/v9.2/WhoAmI and then click Import.
  1. All set now – it’s time to test the connector. In the Test tab, create a new connection and then select the action (WhoAmI-Operation Id) to test. As shown below, it provides my signed-in Dataverse user ID for the Dataverse environment

Summary:

Using a custom connector provides a scalable and secure way to interact with Dataverse Web API. This approach improves maintainability compared to using Invoke an HTTP request directly. It also unlocks powerful capabilities like impersonation, batch processing etc. These are just a few examples of what can be achieved through the Dataverse Web API. If you are visiting my blog for the first time, please do look at my other blogposts.

Do you like this article?

Subscribe to my blog with your email address using the widget on the right side or on the bottom of this page to have new articles sent directly to your inbox the moment I publish them.

Automating Meeting Notes with Microsoft Graph API and Azure OpenAI in Power Platform – Part 2

In Part 1 of this blog series, we explored how to set up Entra ID apps for both custom connectors (signed-in users) and daemon apps (sign-in on behalf of users). We also explored various Microsoft Graph API endpoints required to retrieve meeting transcription content.

In this post, we’ll explore how to retrieve transcription content using Microsoft Graph API endpoints. We’ll cover two approaches: a Custom Connector in Power Apps or Power Automate for signed-in users and an HTTP Connector in Power Automate to fetch data on behalf of a signed-in user.

Setting Up a Custom Connector:

The custom connector acts as a bridge between Power Apps or Power Automate and the Microsoft Graph API, enabling communication. I have already built the custom connector with all necessary actions to generate meeting transcripts using the Microsoft Graph API. You can download it from the link provided. After importing the solution into your environment, navigate to the Security tab in the custom connector and copy the Redirect URL.

Next, navigate to the Authentication section under the Manage blade of the Entra ID app registration and add the copied Redirect URL, as shown below

Configuring Authentication:

In the Security tab of the custom connector, enter the details from the Entra ID app registration, as configured in Part 1 of this blog series. Refer to the section Entra ID App registration for Signed In user (Delegated Access) – Custom Connector for retrieving these details:

  • Make sure OAuth 2.0 is selected as the authentication type.
  • Enter Entra ID (Azure AD) credentials:
  • Save and test authentication.

Defining the API Request:

1. Fetching User Events

To retrieve a user’s upcoming or past Teams meetings within a specified date range, use the following API request:

Endpoint:

GET https://graph.microsoft.com/v1.0/me/events?$select=id,subject,organizer,attendees,start,end,location,onlineMeeting&$orderby=start/dateTime desc&$top=3&$filter=start/dateTime ge '2025-02-03' and end/dateTime le '2025-03-07'

This request fetches the latest three events, including their ID, subject, organizer, attendees, start and end times, location, and online meeting details, filtered by a specific date range. This could changed based on your requirement

2. Retrieving a Meeting ID Using Join URL

If you have a meeting join URL from the above request and need to find its corresponding Meeting ID, use this API call:

Endpoint:

GET https://graph.microsoft.com/v1.0/me/onlineMeetings?$filter=JoinWebUrl eq {OnlineJoinURL}

This allows you to extract the unique identifier (meetingId) for a Teams meeting, which is required for fetching transcripts.

3. Retrieving Available Meeting Transcripts

Once you have the meetingId, you can list all available transcripts for that meeting using:

Endpoint:

GET https://graph.microsoft.com/v1.0/me/onlineMeetings/{meetingId}/transcripts

This response will include transcript details such as their unique transcriptId.

4. Fetching Meeting Transcript Content

To retrieve the actual transcript content in text/VTT (Web Video Text Tracks) format, use:

Endpoint:

GET https://graph.microsoft.com/v1.0/me/onlineMeetings/{meetingId}/transcripts/{transcriptId}/content?$format=text/vtt

This will return the full meeting transcript, which can be further processed for AI-driven summarization or note generation.

Testing the Custom Connector:

Authenticate and run a test request from the custom connector test interface after creating the connection. Verify that the transcription content is retrieved by testing all the different actions.

Using an HTTP Connector in Power Automate to get the Meeting transcriptions:

To obtain the transcription using Application permissions or on behalf of the user, use the details from the Entra ID app registration as configured in Part 1 of this blog series on the HTTP connector. This section covers from Part 1 Entra ID App registration for on-behalf-of signed-in users (Application Access) has the Client Id, Secret, Tenant Id for retrieving meeting transcriptions via the different Microsoft Graph API endpoints. Find below screenshot for getting the meeting transcriptions directly using the transcript URL

Enhancing Meeting Transcriptions with Azure OpenAI LLM

Azure Open AI models converts raw transcripts into structured, easy-to-read meeting notes, highlighting key discussion points, decisions, and action items. I have deployed gpt-4o-mini model in Azure OpenAI. API endpoint and Key for the model can be obtained from the Azure AI Foundary portal once after the model is deployed. Find the below the screenshot for calling the OpenAI LLM model using the HTTP Connector

You can also build a custom connector

Request Body:

{
  "model": "gpt-4o-mini",
  "messages": [
    {
      "role": "user",
      "content": "Create a short meeting summary and action items in bullet points from the following transcript:@{body('GETMeetingTranscript')}"
    }
  ]
}

Reference:

https://learn.microsoft.com/en-us/azure/ai-services/openai/how-to/create-resource?pivots=web-portal

Storing and Sharing the AI-Generated Notes

You can also save the AI-generated summary in for an end-end solution:

  • SharePoint List.
  • Dataverse

Workflow Summary

  1. Retrieve transcription using Graph API (via Custom Connector or HTTP Connector).
  2. Send transcription to Azure OpenAI for summarization.
  3. Store or share the AI-generated meeting notes.

The Power Automate flow solution which uses the different custom connector actions to generate the meeting notes can be downloaded from

https://ashiqf.com/wp-content/uploads/2025/03/meetingnotesgenerationpowerautomateflow_1_0_0_1.zip

Meeting Notes generated from OpenAI model

Summary:

This solution utilizes a Power Automate flow with Graph API to retrieve Teams meeting transcripts and Azure AI LLM to generate meeting notes based on delegated and application permission. While this is a basic implementation, it can be expanded into a comprehensive solution by integrating with Power Apps for a user-friendly interface, enabling access to meeting summaries and insights with minimal investment. By combining Power Automate, Graph API, and Azure OpenAI organizations can automate meeting documentation, enhancing productivity.

Do you like this article?

Subscribe to my blog with your email address using the widget on the right side or on the bottom of this page to have new articles sent directly to your inbox the moment I publish them.